
100A Solar Charge Controller Aicd AGMGel
100A Solar Charge Controller User Manual
Model: 100A Solar Charge Controller Aicd AGMGel
1. ആമുഖം
This manual provides detailed instructions for the installation, operation, and maintenance of your Generic 100A Solar Charge Controller. Designed to efficiently manage power from solar panels to charge 12V or 24V lead-acid, AGM, or Gel batteries, this controller utilizes PWM technology for optimal performance and battery longevity. It features dual USB ports for convenient device charging and comprehensive protection mechanisms to ensure safe and reliable operation of your solar system.

Image 1.1: The 100A Solar Charge Controller and its accompanying USB extension cable.
2. സുരക്ഷാ നിർദ്ദേശങ്ങൾ
Please read and understand all safety instructions before installing or operating the solar charge controller. Failure to follow these instructions may result in electric shock, fire, or severe injury.
- Always connect the battery to the charge controller first. This allows the controller to recognize the system voltage.
- Connect the solar panel to the charge controller next.
- Connect the DC load to the charge controller last.
- To disconnect, follow the reverse order: disconnect load, then solar panel, then battery.
- അമിതമായി ചൂടാകുന്നത് തടയാൻ കൺട്രോളറിന് ചുറ്റും ശരിയായ വായുസഞ്ചാരം ഉറപ്പാക്കുക.
- Use appropriate wire gauges for all connections to handle the expected current.
- Avoid short circuits at all times.
- Keep the controller away from water, moisture, and flammable materials.
- This device is not waterproof; install it in a dry, protected environment.
3. ഉൽപ്പന്ന സവിശേഷതകൾ
The 100A Solar Charge Controller offers a range of features designed for efficient and safe solar power management:
- Auto-Rated Current: Supports various capacities from 10A up to 100A.
- പരമാവധി പിവി ഇൻപുട്ട് പവർ: Handles up to 1200W for 12V battery systems (with 18V-23V solar panels) and up to 2400W for 24V battery systems (with 24V-42V solar panels).
- ഡ്യുവൽ വോളിയംtagഇ പിന്തുണ: Automatically detects and adapts to 12V or 24V battery systems.
- ബാറ്ററി അനുയോജ്യത: Designed for optimal charging and discharging of Lead-Acid, Gel, Flooded, and AGM batteries.
- PWM Technology: Utilizes Pulse Width Modulation for efficient charging, maximizing battery life and performance.
- മെച്ചപ്പെടുത്തിയ സംരക്ഷണം: Features dual MOSFET reverse current protection and low heat production.
- 3-എസ്tage Charging Management: Provides complete and optimized charging for your battery.
- ബിൽറ്റ്-ഇൻ പരിരക്ഷകൾ: Includes overcurrent, short circuit, open circuit, and reverse connection protection. All protections are self-recovery, preventing damage to the controller.
- ഡ്യുവൽ യുഎസ്ബി ഔട്ട്പുട്ട്: Two USB ports with a maximum current of 2.5A, supporting charging for various devices, including Apple phones. A USB Male to Female Extension Cable is included.

Image 3.1: Visual representation of the comprehensive security protection features of the solar charge controller.
4. ഘടകങ്ങൾ കഴിഞ്ഞുview
Familiarize yourself with the main components of your solar charge controller:
- LCD ഡിസ്പ്ലേ: Shows real-time data such as battery voltage, charging current, discharge current, and various settings.
- നിയന്ത്രണ ബട്ടണുകൾ: Three buttons (MENU, UP, DOWN/ON/OFF) for navigating the display and adjusting parameters.
- ഇരട്ട USB പോർട്ടുകൾ: Located on the front panel for charging external USB devices.
- ടെർമിനൽ ബ്ലോക്കുകൾ: Six screw terminals at the bottom for connecting the battery, solar panel, and DC load. These are clearly marked with symbols.

Image 4.1: Product dimensions of the solar charge controller.
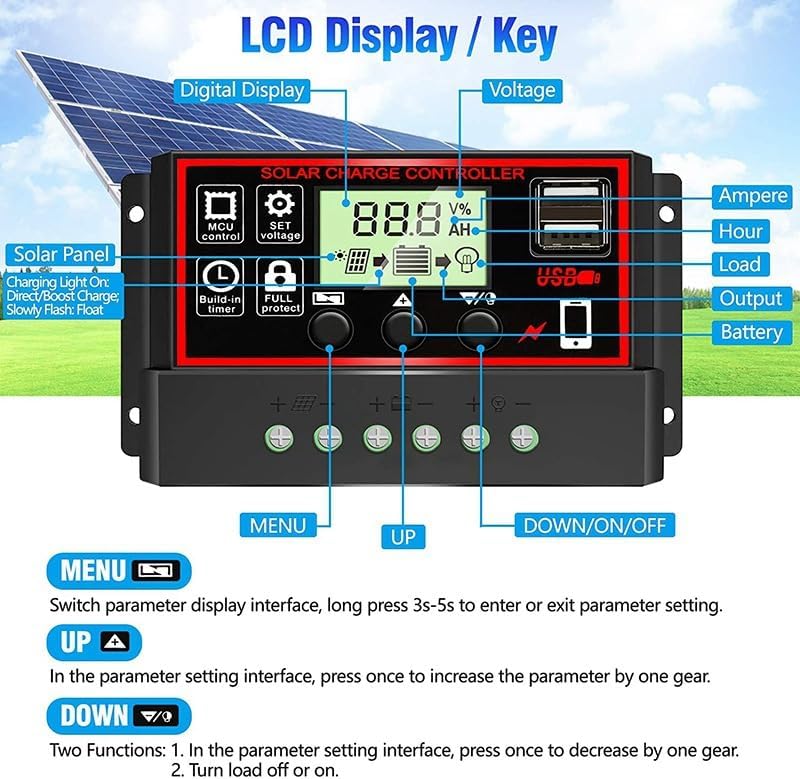
ചിത്രം 4.2: വിശദമായത് view of the LCD display and control buttons.
5. സജ്ജീകരണവും ഇൻസ്റ്റാളേഷനും
Follow these steps carefully to install your solar charge controller. Incorrect wiring can damage the device or your system components.
- വയറുകൾ തയ്യാറാക്കുക: Ensure you have appropriate wire gauges for your system's current. Strip about 8-10mm of insulation from the ends of all wires.
- ബാറ്ററി ബന്ധിപ്പിക്കുക: Connect the battery to the controller's battery terminals (marked with a battery symbol). Connect the positive (+) wire to the positive terminal and the negative (-) wire to the negative terminal. The LCD display should light up, indicating the controller has power.
- സോളാർ പാനൽ ബന്ധിപ്പിക്കുക: Connect the solar panel to the controller's solar panel terminals (marked with a sun symbol). Connect the positive (+) wire to the positive terminal and the negative (-) wire to the negative terminal.
- Connect DC Load: Connect your DC load (e.g., lights, fan) to the controller's load terminals (marked with a light bulb symbol). Connect the positive (+) wire to the positive terminal and the negative (-) wire to the negative terminal.
- സുരക്ഷിത കണക്ഷനുകൾ: Ensure all terminal screws are tightened securely to prevent loose connections and potential arcing.

Image 5.1: Wiring diagram for the solar charge controller.
ഇൻസ്റ്റലേഷൻ വീഡിയോ ഗൈഡ്
Video 5.1: A step-by-step guide demonstrating how to properly wire the solar charge controller to your solar panel and battery system.
6. പ്രവർത്തന നിർദ്ദേശങ്ങൾ
The LCD display provides real-time information and allows you to adjust various parameters.
നാവിഗേഷൻ പ്രദർശിപ്പിക്കുക
അമർത്തുക മെനു button to cycle through the different display interfaces:
- പ്രധാന ഡിസ്പ്ലേ: നിലവിലെ ബാറ്ററി വോളിയം കാണിക്കുന്നുtage.
- ഫ്ലോട്ട് വോളിയംtage: വോളിയംtage at which the battery is maintained after charging.
- ഡിസ്ചാർജ് വീണ്ടും ബന്ധിപ്പിക്കുക: വോളിയംtagബാറ്ററി കുറവായതിനാൽ വിച്ഛേദിക്കപ്പെട്ടതിന് ശേഷം ലോഡ് വീണ്ടും കണക്ട് ചെയ്യുന്ന e-യിൽ.
- ബാറ്ററിയുടെ തരം: Displays the selected battery type (B01 for Lead-Acid, B02 for AGM, B03 for Gel).
- വർക്ക് മോഡ്: Controls the load output (e.g., 24H for continuous output, 01-23H for timed output, 00H for dusk-to-dawn).
- ഡിസ്ചാർജ് നിർത്തുക: വോളിയംtage at which the load will be disconnected to protect the battery from over-discharge.
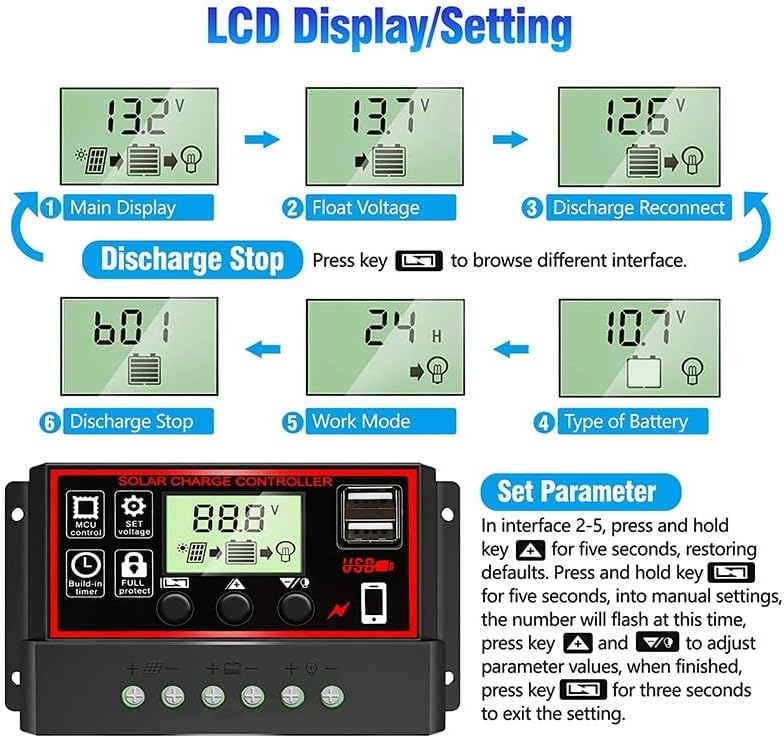
ചിത്രം 6.1: ഉദാamples of LCD display screens and settings.
പാരാമീറ്റർ ക്രമീകരണങ്ങൾ
To enter manual settings for parameters (interfaces 2-5):
- അമർത്തിപ്പിടിക്കുക മെനു button for 5 seconds. The number on the display will flash.
- ഉപയോഗിക്കുക UP ഒപ്പം താഴേക്ക് buttons to adjust the parameter values.
- Once finished, press and hold the മെനു button for 3 seconds to exit the setting mode.
To restore default settings, press and hold the UP button for 5 seconds while on interfaces 2-5.
7. പരിപാലനം
പതിവ് അറ്റകുറ്റപ്പണികൾ നിങ്ങളുടെ സോളാർ ചാർജ് കൺട്രോളറിന്റെ ദീർഘായുസ്സും ഒപ്റ്റിമൽ പ്രകടനവും ഉറപ്പാക്കുന്നു:
- ശുചിത്വം: കൺട്രോളർ വൃത്തിയായും പൊടിയും അവശിഷ്ടങ്ങളും ഇല്ലാതെയും സൂക്ഷിക്കുക. വൃത്തിയാക്കാൻ ഉണങ്ങിയ തുണി ഉപയോഗിക്കുക.
- കണക്ഷൻ പരിശോധന: Periodically inspect all wiring connections to ensure they are tight and free from corrosion. Loose connections can lead to power loss or overheating.
- വെൻ്റിലേഷൻ: Ensure that the controller's ventilation openings are not blocked to allow for proper heat dissipation.
- പരിസ്ഥിതി വ്യവസ്ഥകൾ: Verify that the controller is installed in a dry, well-ventilated area, protected from direct sunlight, rain, and extreme temperatures.
8. പ്രശ്നപരിഹാരം
നിങ്ങളുടെ സോളാർ ചാർജ് കൺട്രോളറിൽ പ്രശ്നങ്ങൾ നേരിടുകയാണെങ്കിൽ, ഇനിപ്പറയുന്ന പൊതുവായ പ്രശ്നങ്ങളും പരിഹാരങ്ങളും പരിശോധിക്കുക:
- LCD-യിൽ ഡിസ്പ്ലേ ഇല്ല:
- Check the battery connection. Ensure the positive and negative terminals are correctly connected and secure.
- Verify that the battery has sufficient charge (above 8V for 12V systems, 16V for 24V systems) to power the controller's display.
- No Charging from Solar Panel:
- Check the solar panel connections to the controller.
- Ensure there is sufficient sunlight reaching the solar panel.
- Verify the solar panel's open-circuit voltage (Voc) is within the controller's acceptable range (e.g., 18V-23V for 12V systems, 24V-42V for 24V systems).
- ലോഡ് പ്രവർത്തിക്കുന്നില്ല:
- Check the load connections to the controller.
- Ensure the battery has enough charge; the load will disconnect if the battery voltage drops below the discharge stop voltage.
- Check the 'Work Mode' setting on the controller to ensure the load output is enabled (e.g., 24H for continuous output).
- Verify the load current does not exceed the controller's rated load current.
- കൺട്രോളർ അമിത ചൂടാക്കൽ:
- Ensure adequate ventilation around the controller.
- Check if the load or charging current exceeds the controller's maximum rating.
9 സ്പെസിഫിക്കേഷനുകൾ
| സ്പെസിഫിക്കേഷൻ | മൂല്യം |
|---|---|
| ഇനത്തിൻ്റെ ഭാരം | 0.19 കിലോഗ്രാം (6.7 ഔൺസ്) |
| ഡിസ്പ്ലേ തരം | എൽസിഡി |
| പ്രവർത്തന താപനില | 60 Degrees Celsius (Max) |
| നിർമ്മാതാവ് | SHENZHEN HUAXINQIANG Co,.Ltd |
| ചാർജിംഗ് പോർട്ട് തരം | USB |
| ഉൽപ്പന്ന അളവുകൾ | 6 x 2 x 3 ഇഞ്ച് (6"L x 2"W x 3"H) |
| മാതൃരാജ്യം | ചൈന |
| ഇനം മോഡൽ നമ്പർ | 100A Solar Charge Controller Aicd AGMGel |
| ബാറ്ററികൾ ആവശ്യമാണ് | ഇല്ല |
| ഉൾപ്പെടുത്തിയ ഘടകങ്ങൾ | Solar charge controller, a USB Male Busbar |
| നിറം | കറുപ്പ് |
| വാല്യംtage | 12 വി / 24 വി ഓട്ടോ |
| മെറ്റീരിയൽ | പ്ലാസ്റ്റിക് |
10. വാറൻ്റിയും പിന്തുണയും
For warranty information and technical support, please refer to the seller's contact details on your purchase platform or the product packaging. Keep your proof of purchase for any warranty claims.
Ask a question about this manual
Ask about setup, troubleshooting, compatibility, parts, safety, or missing instructions. Manuals+ will review the question and use this page’s manual context to help answer it.