
1. ആമുഖം
The CMTOOL Digital HVAC Gauges Set is a professional tool designed for comprehensive HVAC system diagnostics and maintenance. It features a 92-refrigerant database, precise pressure and vacuum testing capabilities, and an intuitive digital display. This manual provides detailed instructions for setup, operation, and maintenance to ensure optimal performance and longevity of your device.

Figure 1: CMTOOL Digital HVAC Gauges Set and included accessories.
2. ഉൽപ്പന്ന സവിശേഷതകൾ
- 92 Refrigerants & 5 Pressure Units: Built-in database for various maintenance occasions with automatic unit conversion.
- Double Pressure Test: Simultaneously measures low-pressure and high-pressure pipelines (0-6000Kpa range, 10000Kpa overload limit).
- Temperature Calculation: Automatically calculates evaporation and condensation temperature.
- പ്രഷർ ലീക്ക് ടെസ്റ്റ്: Records initial and instantaneous pressure values, calculates pressure difference, and displays test time.
- Refrigerant Filling & Vacuum Operation: Facilitates refrigerant addition and vacuuming with clear indicators.
- HD Screen Display & Power Display: Backlit digital screen for clear data reading in low light, with battery power indicator.
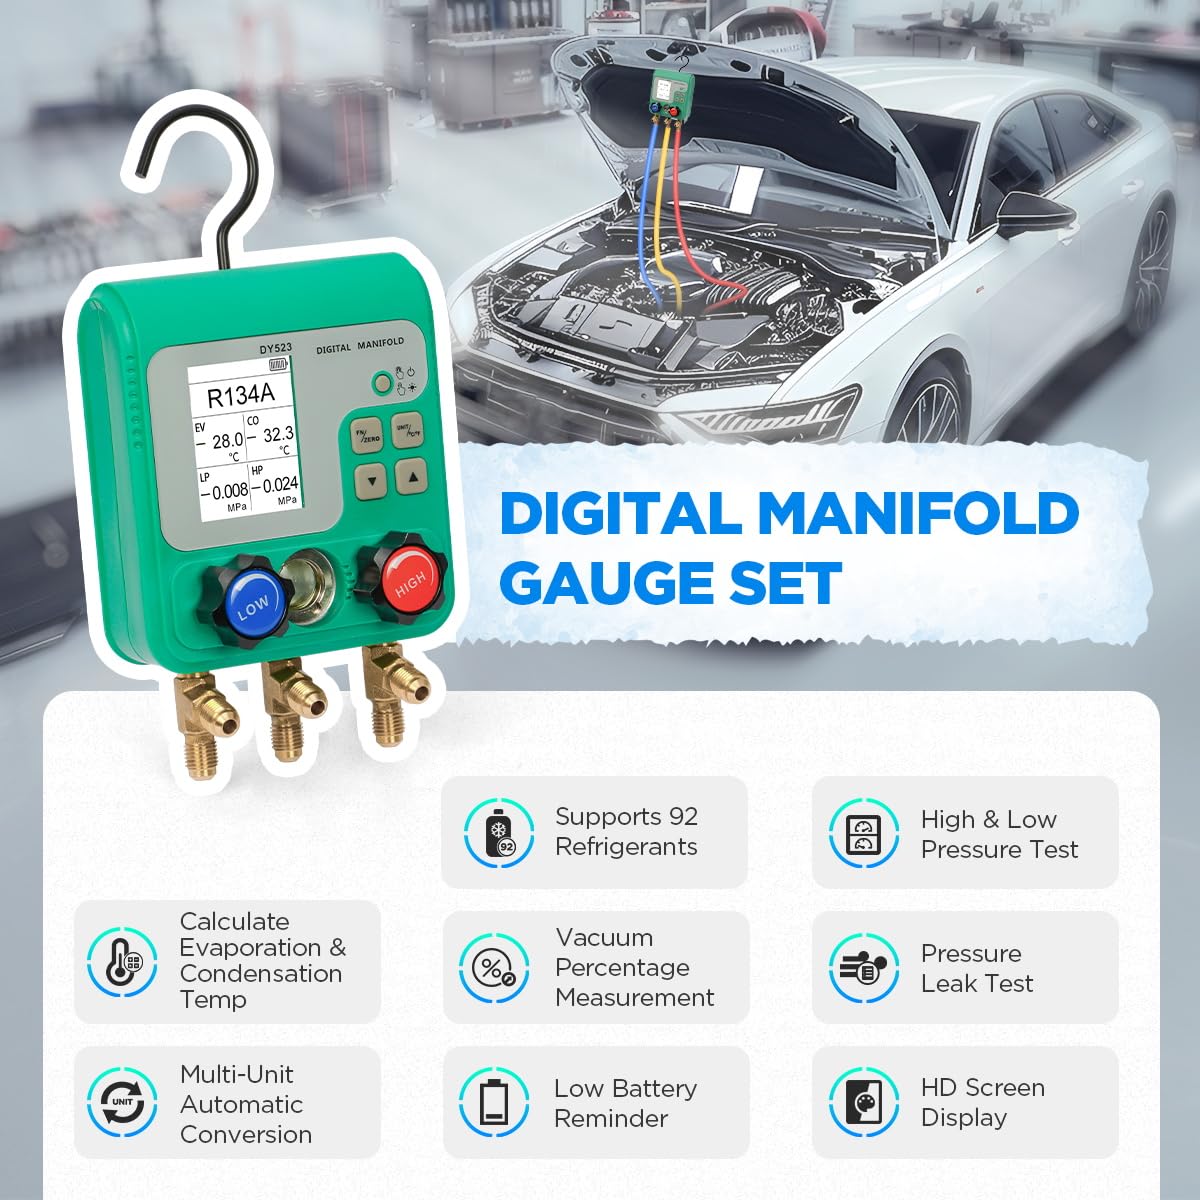
ചിത്രം 2: ഓവർview of the CMTOOL Digital Manifold Gauge Set's key features.
3. ബോക്സിൽ എന്താണുള്ളത്?
പാക്കേജ് തുറക്കുമ്പോൾ, ഇനിപ്പറയുന്ന എല്ലാ ഘടകങ്ങളും ഉണ്ടെന്ന് ദയവായി ഉറപ്പാക്കുക:
- CMTOOL Digital HVAC Gauge Set
- 3 Hoses (Red, Yellow, Blue)
- R134A Quick Connectors
- Valve Core Remover
- Universal Can Tap
- പോർട്ടബിൾ സ്യൂട്ട്കേസ്
- 3 x 1.5V AAA ബാറ്ററികൾ
- Refrigerant Hose Seal Accessories
- ഇംഗ്ലീഷ് ഉപയോക്തൃ മാനുവൽ

Figure 3: All components included in the CMTOOL Digital HVAC Gauges Set.
4. സജ്ജീകരണം
4.1 ബാറ്ററി ഇൻസ്റ്റാളേഷൻ
The digital manifold gauge is powered by 3 x 1.5V AAA batteries. Locate the battery compartment on the back of the unit, open it, insert the batteries according to the polarity markings, and close the compartment securely.

Figure 4: Battery compartment and installation process.
4.2 പ്രാരംഭ കണക്ഷൻ
Before operation, familiarize yourself with the gauge's interface and connection points:
- 2.4-inch Digital HD Screen: Displays all measurement data.
- ഓൺ/ഓഫ് ബട്ടൺ: Short press to power on, long press to power off. Short press to turn on/off the backlight.
- FN/ZERO Button: Long press to zero pressure reading. Short press to switch function mode.
- UNIT/°C/°F Button: Short press to switch pressure unit. Long press to switch temperature unit.
- മുകളിലേക്കും താഴേക്കുമുള്ള അമ്പടയാളങ്ങൾ: Short press to switch refrigerant type. Short press to run/stop air tightness test.
- Low Pressure Valve (Blue): Controls the low-pressure line.
- High Pressure Valve (Red): Controls the high-pressure line.
- Visual Filling Window: Allows observation of refrigerant flow.
- 1/4 inch Low Pressure Inlet (I): Connects to the blue hose.
- Refrigerant Inlet/Vacuum Pump Inlet (J): Connects to the yellow hose.
- 1/4 inch High Pressure Inlet (K): Connects to the red hose.
- Foldable Hook (L): For convenient hanging during use.
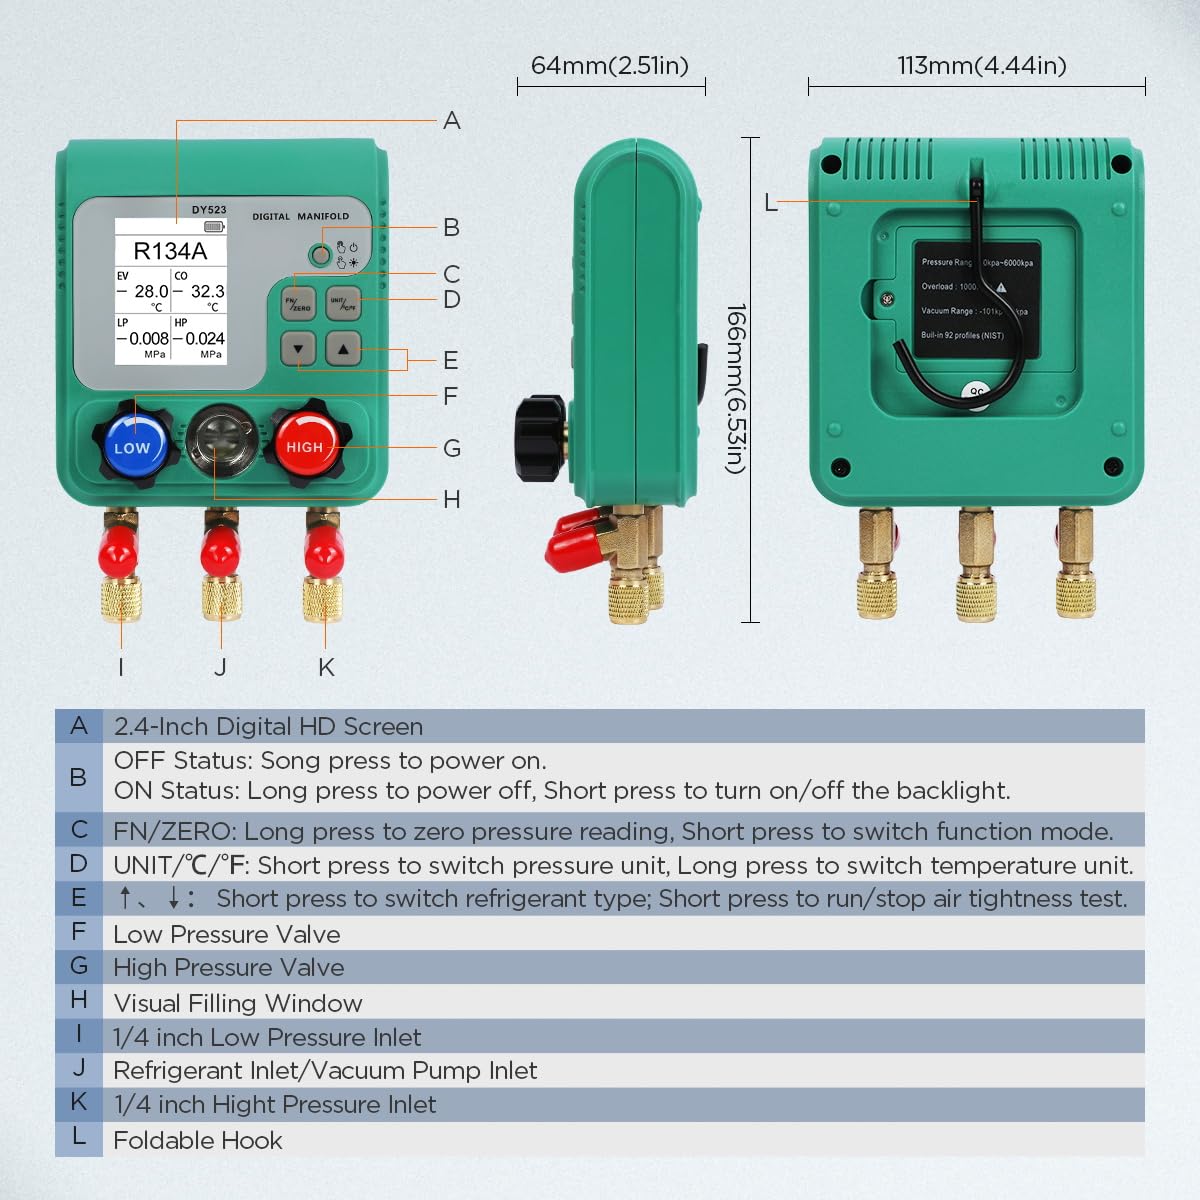
Figure 5: Product icon and description of components.
5. പ്രവർത്തന നിർദ്ദേശങ്ങൾ
The CMTOOL Digital HVAC Gauges Set supports three primary operating modes: Refrigerant Filling and Pressure Inspection, Vacuum Operation, and Pressure Leak Test. Ensure all connections are secure before beginning any operation.

Figure 6: Three main operating modes of the digital manifold gauge.
5.1 വാക്വം ഓപ്പറേഷൻ
This mode is used to evacuate air and moisture from the HVAC system before charging with refrigerant.
- Connect the yellow hose from the gauge to the vacuum pump.
- Connect the blue hose to the low-pressure service port of the HVAC system and the red hose to the high-pressure service port.
- Ensure both the blue (LOW) and red (HIGH) valves on the manifold gauge are closed.
- വാക്വം പമ്പ് ഓണാക്കുക.
- Open the blue (LOW) and red (HIGH) valves on the manifold gauge to begin evacuation.
- Monitor the "VAC" percentage and pressure reading on the digital display. Vacuuming is complete when the vacuum degree reaches approximately 80%-90% and remains stable without further changes.
- Once vacuuming is complete, close both the blue (LOW) and red (HIGH) valves on the manifold gauge before turning off the vacuum pump.
Video 1: Demonstration of the Vacuum Operation process using the CMTOOL Digital HVAC Gauges Set. This video also demonstrates Refrigerant Filling and Pressure Test, and Pressure Leak Test.
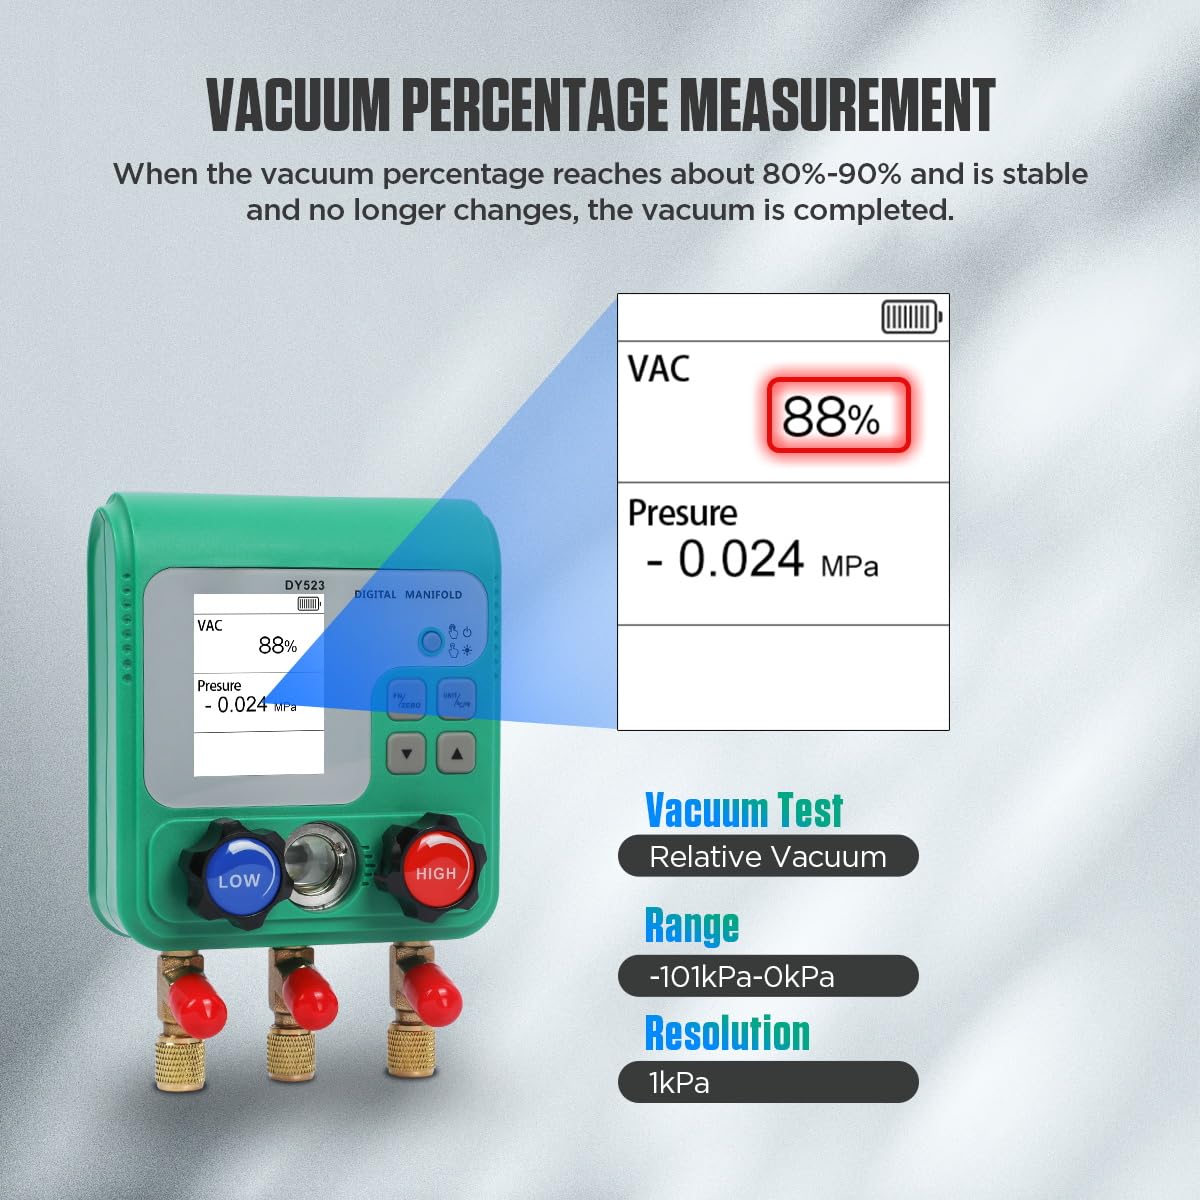
Figure 7: Digital display showing vacuum percentage and pressure during vacuum operation.
5.2 Refrigerant Filling and Pressure Test
This mode allows for adding refrigerant to the system and monitoring pressure levels.
- Ensure the blue (LOW) and red (HIGH) valves on the manifold gauge are closed.
- Connect the yellow hose to the refrigerant can via the universal can tap.
- Connect the blue hose to the low-pressure service port and the red hose to the high-pressure service port of the HVAC system.
- Open the valve on the refrigerant can.
- Slowly open the blue (LOW) valve on the manifold gauge to allow refrigerant to enter the system. Monitor the pressure readings on the display.
- Once the desired pressure is reached, close the blue (LOW) valve and the valve on the refrigerant can.
- Observe the LP (Low Pressure) and HP (High Pressure) readings, along with the calculated evaporation (EV) and condensation (CO) temperatures.

Figure 8: Display showing pressure and calculated temperature units.
5.3 പ്രഷർ ലീക്ക് ടെസ്റ്റ്
This test helps identify leaks in the HVAC system by monitoring pressure changes over time.
- Ensure the system is charged to the desired pressure.
- Close both the blue (LOW) and red (HIGH) valves on the manifold gauge.
- Press the "FN/ZERO" button to switch to the pressure leak test mode. The display will show "Time", "ΔP" (pressure difference), "Start Pressure", and "Current Pressure".
- Press the play button (usually indicated by an arrow on the screen or a specific button) to start the leak test timer.
- Monitor the "ΔP" value. A significant change indicates a leak. The test time is displayed in "HH:MM" format.
- Press the stop button to end the test.

Figure 9: Pressure Leak Test display showing initial pressure, current pressure, and pressure difference over time.
6 സ്പെസിഫിക്കേഷനുകൾ
| ഫീച്ചർ | വിശദാംശങ്ങൾ |
|---|---|
| ഉൽപ്പന്ന അളവുകൾ | 10.62 x 9.84 x 3.9 ഇഞ്ച്; 6.28 പൗണ്ട് |
| ഇനം മോഡൽ നമ്പർ | HVAC Digital Manifold Gauge Set |
| ബാറ്ററികൾ | 3 AAA ബാറ്ററികൾ ആവശ്യമാണ് (ഉൾപ്പെടുന്നു) |
| നിർമ്മാതാവ് | CMTOOL |
| സ്ക്രീൻ വലിപ്പം | 2.4 ഇഞ്ച് എച്ച്ഡി ഡിസ്പ്ലേ |
| പ്രഷർ ടെസ്റ്റ് ശ്രേണി | 0-6000 കെപിഎ |
| പ്രഷർ ഓവർലോഡ് പരിധി | 10000 Kpa |
| മർദ്ദ പരിശോധന കൃത്യത | +/- 0.5 %(FS)+ 5dgt |
| വാക്വം ടെസ്റ്റ് ശ്രേണി | -101 Kpa - 0 Kpa |
| Refrigerant Database | 92 types (e.g., R11, R12, R134A, R410A) |

Figure 10: List of 92 refrigerants supported by the device.
7. പരിപാലനം
Proper maintenance ensures the longevity and accuracy of your CMTOOL Digital HVAC Gauges Set.
- വൃത്തിയാക്കൽ: മൃദുവായതും ഉണങ്ങിയതുമായ തുണി ഉപയോഗിച്ച് യൂണിറ്റ് തുടയ്ക്കുക. അബ്രാസീവ് ക്ലീനറുകളോ ലായകങ്ങളോ ഉപയോഗിക്കരുത്.
- സംഭരണം: Store the gauge set in its portable suitcase in a cool, dry place away from direct sunlight and extreme temperatures.
- ബാറ്ററി മാറ്റിസ്ഥാപിക്കൽ: Replace batteries promptly when the low battery indicator appears on the screen to prevent data loss or malfunction.
- ഹോസ് പരിശോധന: Regularly inspect hoses for cracks, leaks, or damage. Replace if necessary to maintain system integrity.
- Valve Core Maintenance: Use the included valve core remover for any necessary maintenance on valve cores.
8. പ്രശ്നപരിഹാരം
If you encounter issues with your digital HVAC gauge set, refer to the following common troubleshooting steps:
| പ്രശ്നം | സാധ്യമായ കാരണം | പരിഹാരം |
|---|---|---|
| ഗേജ് പവർ ഓൺ ചെയ്യുന്നില്ല. | ഡെഡ് അല്ലെങ്കിൽ തെറ്റായി ഇൻസ്റ്റാൾ ചെയ്ത ബാറ്ററികൾ. | ബാറ്ററി പോളാരിറ്റി പരിശോധിക്കുക അല്ലെങ്കിൽ പുതിയ AAA ബാറ്ററികൾ ഉപയോഗിച്ച് മാറ്റിസ്ഥാപിക്കുക. |
| Inaccurate pressure readings. | Gauge needs zeroing; loose connections; damaged sensor. | Press and hold the "ZERO" button to re-zero. Check all hose connections for tightness. If problem persists, contact support. |
| Cannot achieve proper vacuum. | System leak; vacuum pump issue; improper valve operation. | Perform a pressure leak test to identify leaks. Check vacuum pump functionality. Ensure all valves are correctly opened/closed during vacuuming. |
| Display shows "10 digits" in pressure area. | Initial power-on state. | Press and hold the "ZERO" button to return to zero. |
9. വാറൻ്റിയും പിന്തുണയും
For warranty information and technical support, please refer to the warranty card included in your product packaging or visit the official CMTOOL website. You may also contact CMTOOL customer service directly for assistance with product operation, troubleshooting, or replacement parts.
CMTOOL Store: Visit the CMTOOL Store on Amazon