ആമുഖം
This manual provides essential information for the setup, operation, and maintenance of your new Tucus replacement remote control. This remote is designed to be compatible with various JVC Micro COMPACT COMPONENT Stereo Systems, including models RM-SUXQ30UW, RM-SUXQ30US, UX-Q30S, UX-Q30B, UX-Q30P, and UX-Q30W. While it is a replacement remote and not the original device's remote, common functions are expected to operate normally. Please review this guide thoroughly to ensure proper use and longevity of your remote control.
സജ്ജമാക്കുക
1. ബാറ്ററി ഇൻസ്റ്റാളേഷൻ
The remote control requires two (2) AA batteries (not included) for operation. Follow these steps to install them:
- റിമോട്ട് കൺട്രോളിന്റെ പിൻഭാഗത്ത് ബാറ്ററി കമ്പാർട്ട്മെന്റ് കണ്ടെത്തുക.
- ബാറ്ററി കമ്പാർട്ട്മെന്റ് കവർ തുറക്കാൻ താഴേക്ക് അല്ലെങ്കിൽ പുറത്തേക്ക് സ്ലൈഡ് ചെയ്യുക.
- കമ്പാർട്ടുമെന്റിനുള്ളിലെ അടയാളപ്പെടുത്തലുകളുമായി പോസിറ്റീവ് (+), നെഗറ്റീവ് (-) ടെർമിനലുകൾ ശരിയായി വിന്യസിക്കുന്നുണ്ടെന്ന് ഉറപ്പാക്കിക്കൊണ്ട് രണ്ട് AA ബാറ്ററികൾ ഇടുക.
- സുരക്ഷിതമായി ക്ലിക്ക് ചെയ്യുന്നതുവരെ ബാറ്ററി കമ്പാർട്ട്മെന്റ് കവർ തിരികെ സ്ഥലത്തേക്ക് സ്ലൈഡ് ചെയ്യുക.

Figure 1: Back of the remote control showing the battery compartment cover.
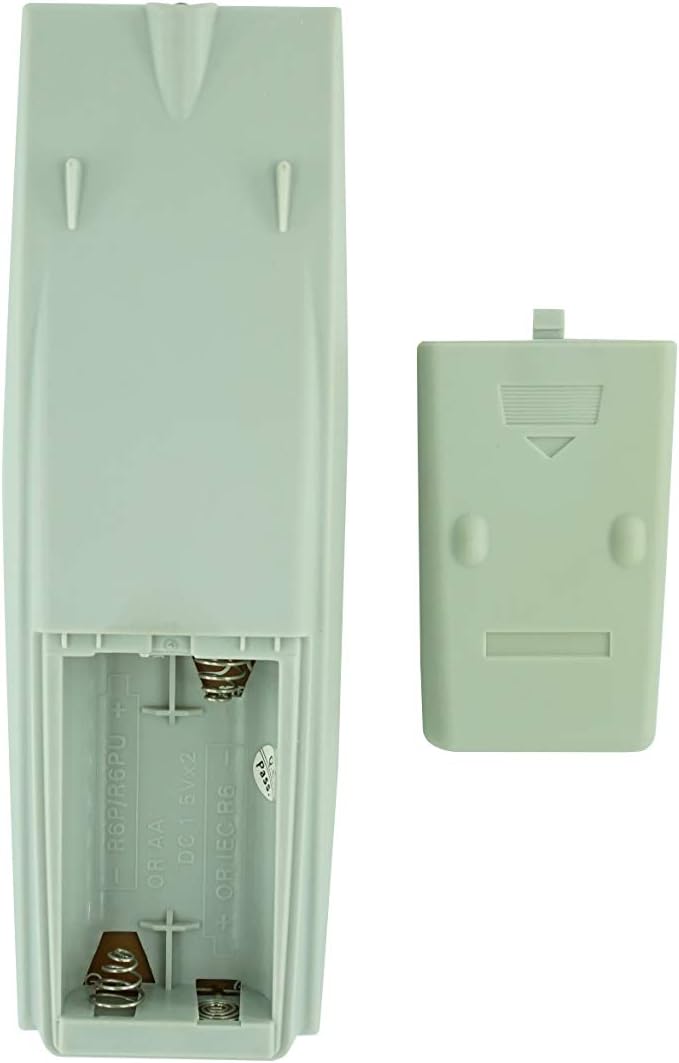
Figure 2: Battery compartment with cover removed, ready for battery insertion.
2. പ്രാരംഭ ഉപയോഗം
Once batteries are installed, the remote control is ready for use. Point the remote directly at your JVC Micro COMPACT COMPONENT Stereo System. No additional programming is typically required for this replacement remote for the listed compatible models.
പ്രവർത്തന നിർദ്ദേശങ്ങൾ
This remote control provides access to the primary functions of your JVC stereo system. Below is a general overview of common button functions. Please note that while the functionality is guaranteed, the exact button layout may differ slightly from your original remote.

ചിത്രം 3: മുൻഭാഗം view ബട്ടൺ ലേഔട്ടുള്ള റിമോട്ട് കൺട്രോളിന്റെ.
പ്രധാന പ്രവർത്തനങ്ങൾ:
- സ്റ്റാൻഡ്ബൈ/ഓൺ: Powers the stereo system on or off.
- പ്രദർശിപ്പിക്കുക: Changes or shows display information.
- ക്ലോക്ക്/ടൈമർ: Accesses clock and timer settings.
- ഉറക്കം: Sets a sleep timer for automatic power off.
- Number Buttons (0-9, +10): Direct input for track numbers, radio frequencies, etc.
- ബാസ് / ട്രെബിൾ: ബാസ്, ട്രെബിൾ ലെവലുകൾ ക്രമീകരിക്കുന്നു.
- Navigation (UP, DOWN, LEFT, RIGHT, SET): മെനു നാവിഗേഷനും തിരഞ്ഞെടുപ്പിനും ഉപയോഗിക്കുന്നു.
- Playback Controls (PLAY/PAUSE, STOP, FAST FORWARD, REWIND, SKIP): മീഡിയ പ്ലേബാക്ക് നിയന്ത്രിക്കുന്നു.
- Source Selection (CD, TAPE, FM/AM, AUX/MD): Selects the audio input source.
- FM MODE / REV.MODE: Toggles FM stereo/mono or tape reverse mode.
- AUTO PRESET: Automatically scans and saves radio stations.
- PRGM / RANDOM / REPEAT: Controls program, random, and repeat playback modes.
- PTY SEARCH / PTY SELECT: For Program Type search and selection on radio.
- DISPLAY / TA/News / Info: Provides additional display information or traffic/news announcements.
- AHB PRO: ആക്റ്റീവ് ഹൈപ്പർ-ബാസ് PRO സജീവമാക്കുന്നു അല്ലെങ്കിൽ നിർജ്ജീവമാക്കുന്നു.
- വോളിയം (+/-): മാസ്റ്റർ വോളിയം ലെവൽ ക്രമീകരിക്കുന്നു.
For specific advanced functions, please refer to the original instruction manual of your JVC Micro COMPACT COMPONENT Stereo System.
മെയിൻ്റനൻസ്
റിമോട്ട് കൺട്രോൾ വൃത്തിയാക്കുന്നു
റിമോട്ട് കൺട്രോളിന്റെ രൂപവും പ്രവർത്തനക്ഷമതയും നിലനിർത്താൻ, അത് പതിവായി വൃത്തിയാക്കുക:
- മൃദുവായതും ഉണങ്ങിയതുമായ തുണി ഉപയോഗിച്ച് ഉപരിതലം തുടയ്ക്കുക.
- കഠിനമായ അഴുക്കിന്, ചെറുതായി dampതുണിയിൽ വെള്ളം അല്ലെങ്കിൽ നേരിയതും ഉരച്ചിലുകൾ ഇല്ലാത്തതുമായ ഒരു ക്ലീനർ ഉപയോഗിക്കുക. ക്ലീനർ നേരിട്ട് റിമോട്ടിലേക്ക് സ്പ്രേ ചെയ്യരുത്.
- കഠിനമായ രാസവസ്തുക്കൾ, ലായകങ്ങൾ, അല്ലെങ്കിൽ അബ്രസീവ് ക്ലീനിംഗ് പാഡുകൾ എന്നിവ ഉപയോഗിക്കുന്നത് ഒഴിവാക്കുക, കാരണം ഇവ റിമോട്ടിന്റെ ഫിനിഷിനോ ആന്തരിക ഘടകങ്ങളോ കേടുവരുത്തും.
ബാറ്ററി മാറ്റിസ്ഥാപിക്കൽ
Replace batteries when the remote's response becomes sluggish or it stops functioning. Always replace both batteries at the same time with new ones of the same type (AA). Do not mix old and new batteries, or different types of batteries.
സംഭരണം
റിമോട്ട് കൺട്രോൾ ദീർഘനേരം ഉപയോഗിക്കുന്നില്ലെങ്കിൽ, ചോർച്ചയും റിമോട്ടിന് കേടുപാടുകൾ സംഭവിക്കാനുള്ള സാധ്യതയും തടയാൻ ബാറ്ററികൾ നീക്കം ചെയ്യുക.
ട്രബിൾഷൂട്ടിംഗ്
- റിമോട്ട് പ്രതികരിക്കുന്നില്ല:
- ബാറ്ററികൾ ശരിയായ പോളാരിറ്റിയിൽ (+/-) ശരിയായി ചേർത്തിട്ടുണ്ടോയെന്ന് പരിശോധിക്കുക.
- പഴയ ബാറ്ററികൾ പുതിയവ ഉപയോഗിച്ച് മാറ്റിസ്ഥാപിക്കുക.
- Ensure there are no obstructions between the remote control and the stereo system's infrared receiver.
- നിങ്ങൾ റിമോട്ട് കൺട്രോളിന്റെ ഫലപ്രദമായ പരിധിയിലാണെന്ന് ഉറപ്പാക്കുക.
- Some buttons not working or unexpected behavior:
- This remote is a replacement and while common functions are supported, the button layout or specific advanced functions might not perfectly match your original remote. Refer to the button layout image in the Operating Instructions section.
- Ensure the stereo system is powered on and set to the correct input source.
- Remote appears damaged:
- If the remote has been dropped or exposed to liquids, internal damage may have occurred. In such cases, replacement may be necessary.
സ്പെസിഫിക്കേഷനുകൾ
| ബ്രാൻഡ് | ജനറിക് |
| നിർമ്മാതാവ് | TUCUS |
| മോഡൽ നമ്പർ | DVT-C9F24992D65E215A7DD6011D34514A46 |
| അനുയോജ്യമായ മോഡലുകൾ | JVC RM-SUXQ30UW, RM-SUXQ30US, UX-Q30S, UX-Q30B, UX-Q30P, UX-Q30W Micro COMPACT COMPONENT Stereo SYSTEM |
| മെറ്റീരിയൽ തരം | മറ്റുള്ളവ |
| പവർ ഉറവിടം | 2 x AA ബാറ്ററികൾ (ഉൾപ്പെടുത്തിയിട്ടില്ല) |
| ASIN | B0D79958PW |
| ആദ്യ തീയതി ലഭ്യമാണ് | ജൂൺ 17 2024 |
വാറൻ്റി വിവരങ്ങൾ
This product comes with a 3-month warranty from the date of purchase. This warranty covers manufacturing defects and ensures the remote control functions as intended for compatible models. Please retain your proof of purchase for any warranty claims.
ഉപഭോക്തൃ പിന്തുണ
If you have any questions regarding the compatibility or functionality of this remote control, or if your specific device model is not listed, please contact the seller directly for assistance. The seller stocks a wide range of remote controls and parts and can confirm suitability for your needs.
For general inquiries or to provide feedback, please refer to the contact information provided by your retailer or the seller.


