
1. ആമുഖം
The ZOYI VC17B+ is a high-performance, True-RMS digital multimeter designed for accurate measurement of various electrical parameters. It features a large, backlit display for clear readings in diverse environments and a robust design suitable for electricians, students, and maintenance professionals. This manual provides essential information for the safe and effective operation of your device.
പ്രധാന കഴിവുകളിൽ ഇവ ഉൾപ്പെടുന്നു:
- എസി/ഡിസി വോളിയംtagഇ, നിലവിലെ അളവ്
- Resistance, Capacitance, and Frequency measurement
- Continuity and Diode testing
- താപനില അളക്കൽ
- ഡ്യൂട്ടി സൈക്കിൾ
- Additional functions: True-RMS, Data Hold, Backlight, Low Battery Alert, Auto Power Off, MAX/MIN, Relative Measurement (REL)
2 സുരക്ഷാ വിവരങ്ങൾ
ഏതെങ്കിലും ഇലക്ട്രിക്കൽ ടെസ്റ്റിംഗ് ഉപകരണങ്ങൾ ഉപയോഗിക്കുമ്പോൾ എല്ലായ്പ്പോഴും സുരക്ഷാ മുൻകരുതലുകൾ പാലിക്കുക. അങ്ങനെ ചെയ്യുന്നതിൽ പരാജയപ്പെടുന്നത് വൈദ്യുതാഘാതം, പരിക്ക് അല്ലെങ്കിൽ മീറ്ററിനോ പരീക്ഷണത്തിലിരിക്കുന്ന ഉപകരണങ്ങൾക്കോ കേടുപാടുകൾ എന്നിവയ്ക്ക് കാരണമായേക്കാം.
- ഈ മാനുവൽ നന്നായി വായിക്കുക പ്രവർത്തനത്തിന് മുമ്പ്.
- The ZOYI VC17B+ is rated for CAT IV 600V ഒപ്പം ക്യാറ്റ് III 600 വി. Do not exceed these voltagഇ പരിധികൾ.
- ഓരോ ഉപയോഗത്തിനും മുമ്പ് ടെസ്റ്റ് ലീഡുകൾക്ക് കേടുപാടുകൾ ഉണ്ടോയെന്ന് പരിശോധിക്കുക. ഇൻസുലേഷനിൽ കേടുപാടുകൾ സംഭവിച്ചിട്ടുണ്ടെങ്കിൽ മാറ്റിസ്ഥാപിക്കുക.
- മീറ്റർ കേടായതായി തോന്നുകയോ ശരിയായി പ്രവർത്തിക്കുന്നില്ലെങ്കിലോ അത് ഉപയോഗിക്കരുത്.
- Ensure the function dial is set to the correct range before making measurements.
- ഒറ്റയ്ക്ക് ജോലി ചെയ്യുന്നത് ഒഴിവാക്കുക.
- വോള്യവുമായി പ്രവർത്തിക്കുമ്പോൾ ജാഗ്രത പാലിക്കുകtag30V AC RMS, 42V പീക്ക്, അല്ലെങ്കിൽ 60V DC എന്നിവയ്ക്ക് മുകളിലാണ്, കാരണം ഇവ ഷോക്ക് അപകടമുണ്ടാക്കുന്നു.
- കുറഞ്ഞ ബാറ്ററി സൂചകം പ്രത്യക്ഷപ്പെടുമ്പോൾ ബാറ്ററികൾ ഉടൻ മാറ്റിസ്ഥാപിക്കുക.
3. പാക്കേജ് ഉള്ളടക്കം
നിങ്ങളുടെ പാക്കേജിൽ എല്ലാ ഇനങ്ങളും ഉണ്ടെന്ന് ഉറപ്പാക്കുക:
- ZOYI VC17B+ Digital Multimeter
- ടെസ്റ്റ് ലീഡുകൾ (2)
- AA ബാറ്ററികൾ (2)
- Thermocouple Probe (1)
- ഉപയോക്തൃ മാനുവൽ (ഈ പ്രമാണം)
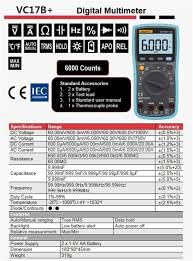
Figure 3.1: Standard Accessories included with the ZOYI VC17B+ Multimeter.
4. ഉൽപ്പന്നം കഴിഞ്ഞുview
Familiarize yourself with the components of the ZOYI VC17B+ multimeter:
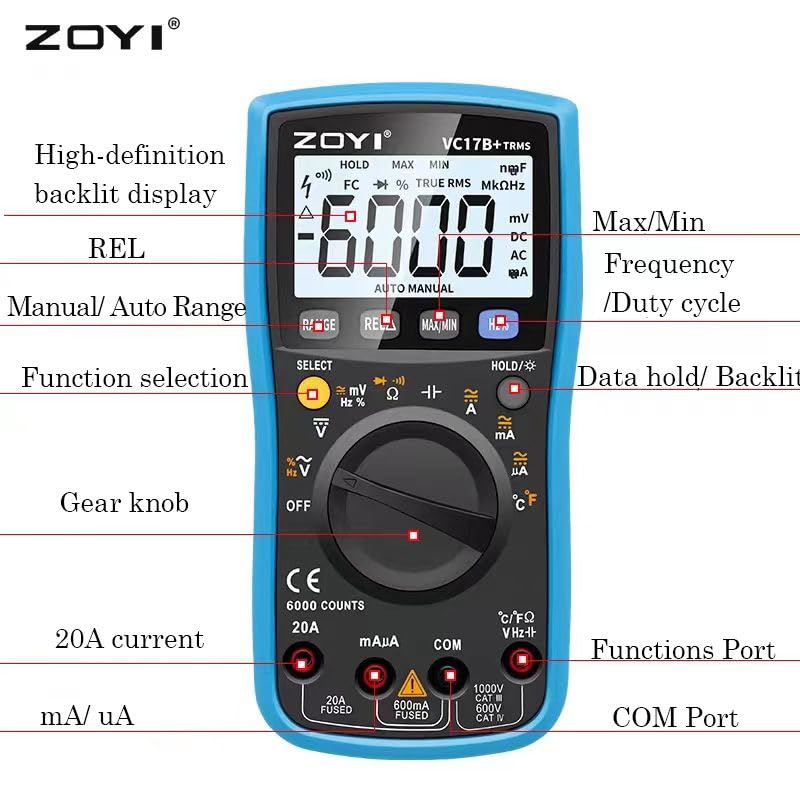
Figure 4.1: ZOYI VC17B+ Multimeter Components.
- ഡിസ്പ്ലേ: Large, high-definition backlit LCD for reading measurements.
- Function Dial (Gear Knob): Used to select the desired measurement function.
- ഇൻപുട്ട് ജാക്കുകൾ:
- COM: എല്ലാ അളവുകൾക്കുമുള്ള പൊതുവായ (നെഗറ്റീവ്) ഇൻപുട്ട്.
- VHzΩ: വോള്യത്തിനുള്ള പോസിറ്റീവ് ഇൻപുട്ട്tage, Frequency, Resistance, Capacitance, Diode, Continuity, and Temperature measurements.
- mA/uA: Positive input for milliampഇറേ, മൈക്രോampere current measurements (fused).
- 20A: Positive input for 20 Ampere current measurements (fused).
- ബട്ടണുകൾ:
- റേഞ്ച്: Manual/Auto Range selection.
- REL: Relative measurement function.
- പരമാവധി/മിനിറ്റ്: Records maximum and minimum values.
- Hz%: Selects Frequency or Duty Cycle.
- HOLD/☀: Data Hold function and Backlight activation.
- തിരഞ്ഞെടുക്കുക: Toggles between functions on a single dial position (e.g., AC/DC, Diode/Continuity).
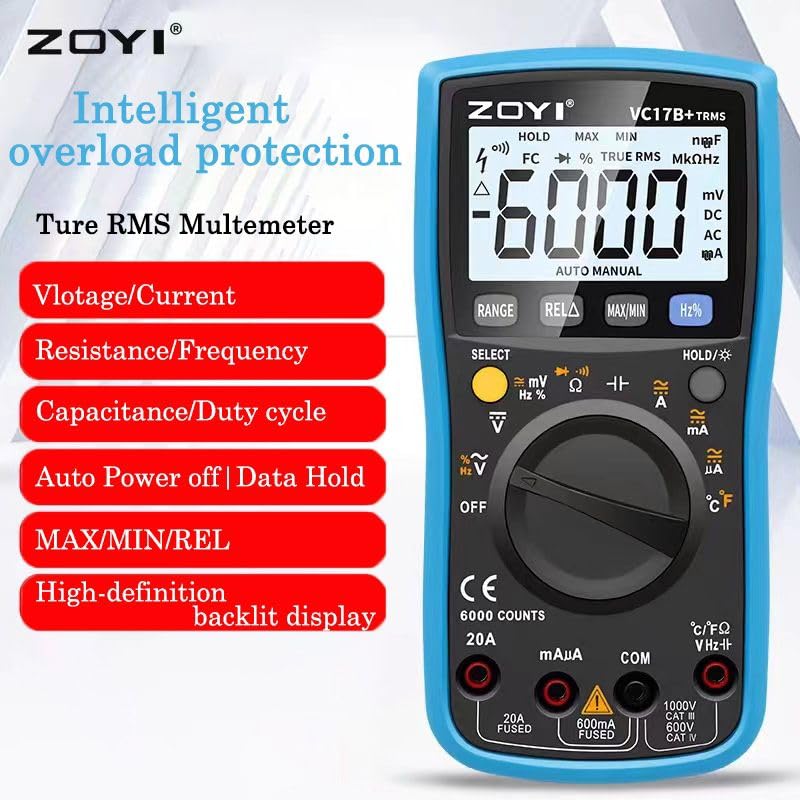
Figure 4.2: ZOYI VC17B+ Multimeter Front View.
5. സജ്ജീകരണം
5.1 ബാറ്ററി ഇൻസ്റ്റാളേഷൻ
- മൾട്ടിമീറ്റർ ഓഫാക്കിയിട്ടുണ്ടെന്ന് ഉറപ്പാക്കുക.
- മീറ്ററിന്റെ പിൻഭാഗത്ത് ബാറ്ററി കമ്പാർട്ട്മെന്റ് കണ്ടെത്തുക.
- ബാറ്ററി കവർ തുറക്കാൻ ഒരു സ്ക്രൂഡ്രൈവർ ഉപയോഗിക്കുക.
- Insert two AA batteries, observing correct polarity (+/-).
- ബാറ്ററി കവർ മാറ്റി സ്ക്രൂ ഉപയോഗിച്ച് സുരക്ഷിതമാക്കുക.
5.2 ടെസ്റ്റ് ലീഡുകൾ ബന്ധിപ്പിക്കുന്നു
Always connect the black test lead to the COM jack. Connect the red test lead to the appropriate input jack based on the measurement type:
- VHzΩ: വാല്യംtage, Resistance, Capacitance, Frequency, Diode, Continuity, and Temperature.
- mA/uA: For small current measurements.
- 20A: For large current measurements (up to 20A).
5.3 കിക്ക്സ്റ്റാൻഡ് ഉപയോഗിക്കുന്നു
The multimeter includes a built-in kickstand for convenient hands-free operation. Gently pull out the kickstand from the back of the unit to prop it up at an angle. Push it back in when not needed.


Figure 5.1: Multimeter back view (left) and with kickstand deployed (right).
6. പ്രവർത്തന നിർദ്ദേശങ്ങൾ
6.1 പൊതു പ്രവർത്തനം
- പവർ ഓൺ/ഓഫ്: Rotate the function dial from 'OFF' to any measurement function to turn the meter ON. Rotate back to 'OFF' to power OFF.
- ഓട്ടോ പവർ ഓഫ് (APO): The meter will automatically power off after approximately 15 minutes of inactivity to conserve battery life. Press any button or rotate the function dial to wake it up.
- ബാക്ക്ലൈറ്റ്: Press and hold the 'HOLD/☀' button to turn the backlight ON or OFF.
- ഡാറ്റ ഹോൾഡ്: Press the 'HOLD/☀' button briefly to freeze the current reading on the display. Press again to release.
- Auto/Manual Ranging: The meter defaults to auto-ranging. Press the 'RANGE' button to switch to manual ranging. In manual ranging, press 'RANGE' repeatedly to cycle through available ranges. Press and hold 'RANGE' to return to auto-ranging.
- ബട്ടൺ തിരഞ്ഞെടുക്കുക: In certain dial positions (e.g., Voltage, Diode/Continuity), press 'SELECT' to toggle between AC/DC, Diode Test, or Continuity Test.
6.2 നിർദ്ദിഷ്ട അളവെടുപ്പ് പ്രവർത്തനങ്ങൾ
6.2.1 വോളിയംtagഇ മെഷർമെന്റ് (എസി/ഡിസി)
- Insert the black test lead into the COM jack and the red test lead into the VHzΩ jack.
- Rotate the function dial to the 'V~' (AC Voltage) അല്ലെങ്കിൽ 'V=' (DC Voltage) position. If both are on one position, use 'SELECT' to choose.
- അളക്കേണ്ട സർക്യൂട്ടിനോ ഘടകത്തിനോ സമാന്തരമായി ടെസ്റ്റ് പ്രോബുകൾ ബന്ധിപ്പിക്കുക.
- വാല്യം വായിക്കുകtagഡിസ്പ്ലേയിലെ ഇ മൂല്യം.
6.2.2 കറന്റ് മെഷർമെന്റ് (എസി/ഡിസി)
ജാഗ്രത: Never connect the meter in parallel to a voltagകറന്റ് അളക്കുമ്പോൾ e ഉറവിടം. ഇത് ഫ്യൂസ് പൊട്ടിത്തെറിക്കുകയോ മീറ്ററിന് കേടുപാടുകൾ വരുത്തുകയോ ചെയ്തേക്കാം.
- Insert the black test lead into the COM jack.
- For mA/uA measurements, insert the red test lead into the mA/uA jack. For 20A measurements, insert the red test lead into the 20A jack.
- Rotate the function dial to the appropriate 'A~' (AC Current) or 'A=' (DC Current) position (mA, uA, or 20A). Use 'SELECT' if needed.
- Open the circuit and connect the test probes in series with the load.
- ഡിസ്പ്ലേയിലെ നിലവിലെ മൂല്യം വായിക്കുക.
6.2.3 പ്രതിരോധ അളവ് (Ω)
ജാഗ്രത: പ്രതിരോധം അളക്കുന്നതിന് മുമ്പ് സർക്യൂട്ട് ഡീ-എനർജൈസ് ചെയ്തിട്ടുണ്ടെന്നും എല്ലാ കപ്പാസിറ്ററുകളും ഡിസ്ചാർജ് ചെയ്തിട്ടുണ്ടെന്നും ഉറപ്പാക്കുക.
- Insert the black test lead into the COM jack and the red test lead into the VHzΩ jack.
- Rotate the function dial to the 'Ω' position.
- അളക്കേണ്ട ഘടകത്തിലുടനീളം ടെസ്റ്റ് പ്രോബുകൾ ബന്ധിപ്പിക്കുക.
- ഡിസ്പ്ലേയിലെ പ്രതിരോധ മൂല്യം വായിക്കുക.
6.2.4 തുടർച്ച പരിശോധന
- Insert the black test lead into the COM jack and the red test lead into the VHzΩ jack.
- Rotate the function dial to the 'Ω' position and press 'SELECT' until the continuity symbol (buzzer icon) is displayed.
- സർക്യൂട്ടിലോ ഘടകത്തിലോ ഉടനീളം ടെസ്റ്റ് പ്രോബുകൾ ബന്ധിപ്പിക്കുക.
- If continuity exists (resistance below approx. 50Ω), the buzzer will sound.
6.2.5 ഡയോഡ് ടെസ്റ്റ്
- Insert the black test lead into the COM jack and the red test lead into the VHzΩ jack.
- Rotate the function dial to the 'Ω' position and press 'SELECT' until the diode symbol (->|) is displayed.
- ചുവന്ന പ്രോബ് ഡയോഡിന്റെ ആനോഡിലേക്കും കറുത്ത പ്രോബ് ഡയോഡിന്റെ കാഥോഡിലേക്കും ബന്ധിപ്പിക്കുക. ഡിസ്പ്ലേ ഫോർവേഡ് വോള്യം കാണിക്കും.tagഇ ഡ്രോപ്പ്.
- പ്രോബുകൾ റിവേഴ്സ് ചെയ്യുക. നല്ല ഡയോഡിനായി ഡിസ്പ്ലേ 'OL' (ഓപ്പൺ ലൂപ്പ്) കാണിക്കണം.
6.2.6 കപ്പാസിറ്റൻസ് അളക്കൽ (F)
ജാഗ്രത: Discharge capacitors completely before testing to prevent damage to the meter.
- Insert the black test lead into the COM jack and the red test lead into the VHzΩ jack.
- Rotate the function dial to the 'F' (Capacitance) position.
- കപ്പാസിറ്ററിലുടനീളം ടെസ്റ്റ് പ്രോബുകൾ ബന്ധിപ്പിക്കുക.
- ഡിസ്പ്ലേയിലെ കപ്പാസിറ്റൻസ് മൂല്യം വായിക്കുക.
6.2.7 Frequency Measurement (Hz) and Duty Cycle (%)
- Insert the black test lead into the COM jack and the red test lead into the VHzΩ jack.
- Rotate the function dial to the 'Hz%' position.
- Press the 'Hz%' button to toggle between Frequency (Hz) and Duty Cycle (%).
- Connect the test probes in parallel to the signal source.
- ഡിസ്പ്ലേയിലെ ഫ്രീക്വൻസി അല്ലെങ്കിൽ ഡ്യൂട്ടി സൈക്കിൾ മൂല്യം വായിക്കുക.
6.2.8 Temperature Measurement (°C/°F)
- Insert the thermocouple probe into the VHzΩ (positive) and COM (negative) jacks, observing polarity.
- Rotate the function dial to the '°C/°F' position.
- The display will show the ambient temperature. Place the thermocouple tip on or near the object whose temperature is to be measured.
- Read the temperature value. The unit can be toggled between Celsius and Fahrenheit using the 'SELECT' button if available in this mode.
6.2.9 പരമാവധി/മിനിറ്റ് പ്രവർത്തനം
In any measurement mode, press the 'MAX/MIN' button to activate this function. The meter will display the maximum or minimum reading recorded since the function was activated. Press again to cycle between MAX, MIN, and current reading. Press and hold to exit.
6.2.10 REL (Relative Measurement) Function
Press the 'REL' button to store the current reading as a reference value. Subsequent measurements will be displayed as the difference from this reference value. Press 'REL' again to exit this mode.
7. പരിപാലനം
7.1 വൃത്തിയാക്കൽ
മീറ്റർ പരസ്യം ഉപയോഗിച്ച് തുടയ്ക്കുകamp തുണിയും നേരിയ ഡിറ്റർജന്റും ഉപയോഗിക്കുക. അബ്രാസീവ് വസ്തുക്കളോ ലായകങ്ങളോ ഉപയോഗിക്കരുത്. ഉപയോഗിക്കുന്നതിന് മുമ്പ് മീറ്റർ പൂർണ്ണമായും ഉണങ്ങിയെന്ന് ഉറപ്പാക്കുക.
7.2 ബാറ്ററി മാറ്റിസ്ഥാപിക്കൽ
When the low battery indicator appears on the display, replace the batteries as described in Section 5.1. Use two new AA batteries.
7.3 ഫ്യൂസ് മാറ്റിസ്ഥാപിക്കൽ
If the current measurement function fails, the fuse may need replacement. Refer to the specifications for the correct fuse type and rating. Fuse replacement should only be performed by qualified personnel.
7.4 സംഭരണം
മീറ്റർ ദീർഘനേരം ഉപയോഗിച്ചിട്ടില്ലെങ്കിൽ, ചോർച്ച തടയാൻ ബാറ്ററികൾ നീക്കം ചെയ്യുക. നേരിട്ട് സൂര്യപ്രകാശം ഏൽക്കാത്തതും ഉയർന്ന താപനില ഏൽക്കാത്തതുമായ തണുത്തതും വരണ്ടതുമായ സ്ഥലത്ത് മീറ്റർ സൂക്ഷിക്കുക.
8. പ്രശ്നപരിഹാരം
| പ്രശ്നം | സാധ്യമായ കാരണം | പരിഹാരം |
|---|---|---|
| ഡിസ്പ്ലേ ഇല്ല അല്ലെങ്കിൽ മങ്ങിയ ഡിസ്പ്ലേ | Dead or low batteries; Incorrect battery installation. | Replace batteries; Check battery polarity. |
| കറന്റ് അളക്കൽ ഇല്ല | Blown fuse; Incorrect input jack used. | Replace fuse (if qualified); Ensure red lead is in mA/uA or 20A jack. |
| 'OL' (ഓവർലോഡ്) പ്രദർശിപ്പിച്ചിരിക്കുന്നു | തിരഞ്ഞെടുത്ത ശ്രേണിയുടെയോ മീറ്ററിന്റെയോ പരമാവധി ശേഷിയെക്കാൾ അളവ് കൂടുതലാണ്. | Switch to a higher range (if in manual mode); Ensure measurement is within meter's limits. |
| കൃത്യമല്ലാത്ത വായനകൾ | Poor test lead connection; External interference; Damaged meter. | Check connections; Move away from strong electromagnetic fields; Contact support if meter is damaged. |
9 സ്പെസിഫിക്കേഷനുകൾ
Detailed technical specifications for the ZOYI VC17B+ Digital Multimeter:
9.1 പൊതു സവിശേഷതകൾ
- ബ്രാൻഡ്: സോയി
- മോഡൽ നമ്പർ: VC17B+
- ഡിസ്പ്ലേ: 6000 Counts, Large Backlit LCD
- ട്രൂ-ആർഎംഎസ്: അതെ
- ഊർജ്ജ സ്രോതസ്സ്: 2 x AA ബാറ്ററികൾ
- സുരക്ഷാ റേറ്റിംഗ്: CAT IV 600V, CAT III 600V
- അളവുകൾ (L x W x H): 180 x 90 x 45 മിമി (ഏകദേശം)
- ഭാരം: ഏകദേശം 310 ഗ്രാം (ബാറ്ററികൾ ഇല്ലാതെ)
- ഓട്ടോ പവർ ഓഫ്: അതെ
- ഡാറ്റ ഹോൾഡ്: അതെ
- കുറഞ്ഞ ബാറ്ററി അലേർട്ട്: അതെ

Figure 9.1: Physical Dimensions of the Multimeter.
9.2 ഇലക്ട്രിക്കൽ സ്പെസിഫിക്കേഷനുകൾ
Figure 9.2: Detailed Electrical Specifications.
| ഫംഗ്ഷൻ | പരിധി | കൃത്യത |
|---|---|---|
| ഡിസി വോളിയംtage | 60.00mV/600.0mV/6.000V/60.00V/600.0V/1000V | ±(0.5%+3) |
| എസി വോളിയംtage | 60.00mV/600.0mV/6.000V/60.00V/600.0V/750V | ±(1.0%+3) |
| ഡിസി കറൻ്റ് | 600.0uA/6000uA/60.00mA/600.0mA/6.000A/20.00A | ±(1.2%+3) |
| എസി കറന്റ് | 600.0uA/6000uA/60.00mA/600.0mA/6.000A/20.00A | ±(1.5%+3) |
| പ്രതിരോധം | 600.0Ω/6.000kΩ/60.00kΩ/600.0kΩ/6.000MΩ/60.00MΩ | ±(1.0%+3) |
| കപ്പാസിറ്റൻസ് | 9.999nF/99.99nF/999.9nF/9.999uF/99.99uF/999.9uF/9.999mF | ±(5.0%+20) |
| ആവൃത്തി | 9.999Hz/99.99Hz/999.9Hz/9.999kHz/99.99kHz/999.9kHz/9.999MHz | ±(0.1%+2) |
| താപനില | -20°C ~ 1000°C / -4°F ~ 1832°F | ±(2.5%+5) |
| ഡയോഡ്/തുടർച്ച | അതെ | അതെ |
10. വാറൻ്റിയും പിന്തുണയും
For warranty information, please refer to the warranty card included with your product or visit the official ZOYI website. For technical support or service inquiries, please contact your retailer or the manufacturer directly.
- നിർമ്മാതാവ്: ZOYI & ZOTEK Instruments
- Packer Contact Information: Skyking Instruments, Mumbai, INDIA