
1. ആമുഖം
Thank you for choosing the Reboot RBM2000 200Amp 5-in-1 Welding Machine. This versatile welder is designed for various welding applications, offering five distinct welding processes: Flux Core Gasless MIG, Solid Wire Gas MIG, Lift TIG, MMA (Manual Metal Arc)/Stick, and MAG (Metal Active Gas). This manual provides essential information for safe operation, setup, maintenance, and troubleshooting to ensure optimal performance and longevity of your welding equipment.
2 സുരക്ഷാ വിവരങ്ങൾ
മുന്നറിയിപ്പ്: വെൽഡിംഗ് അപകടകരമാണ്. പരിക്കുകളോ മരണമോ തടയാൻ എല്ലായ്പ്പോഴും സുരക്ഷാ മുൻകരുതലുകൾ പാലിക്കുക.
- Always wear appropriate personal protective equipment (PPE), including a welding helmet with proper shade, flame-resistant clothing, welding gloves, and safety shoes.
- Ensure adequate ventilation to avoid inhaling welding fumes, which can be hazardous to your health.
- Protect bystanders from arc rays and hot metal. Use welding screens or barriers.
- Never touch live electrical parts. Ensure the machine is properly grounded.
- Keep a fire extinguisher nearby and know how to use it. Remove flammable materials from the welding area.
- ഏതെങ്കിലും അറ്റകുറ്റപ്പണികൾ നടത്തുന്നതിനോ ആക്സസറികൾ മാറ്റുന്നതിനോ മുമ്പ് വൈദ്യുതി വിച്ഛേദിക്കുക.
- Read and understand all instructions in this manual before operating the welder.
3. പാക്കേജ് ഉള്ളടക്കം
Carefully unpack your Reboot RBM2000 welder and verify that all components are present. If any items are missing or damaged, contact customer support immediately.
- Reboot RBM2000 5-in-1 Welding Machine
- MIG Torch (MB15 type)
- Lift TIG Torch
- Electrode Holder (for MMA/Stick welding)
- ഗ്രൗണ്ട് Clamp
- ഗ്യാസ് ഹോസ്
- Power Cord (120V/240V compatible)
- Consumables Kit (42 pieces):
- 2 x Gas Nozzles
- 20 x Contact Tips 0.8mm (.030")
- 20 x Contact Tips 1.0mm (.040")
- ഉപയോക്തൃ മാനുവൽ

Image 3.1: The Reboot RBM2000 welding machine with all standard accessories, including the MIG torch, Lift TIG torch, electrode holder, ground clamp, gas hose, power cord, and a selection of consumables.
4. ഉൽപ്പന്നം കഴിഞ്ഞുview
4.1. പ്രധാന യൂണിറ്റ്
The RBM2000 features a compact design with a robust casing, designed for portability and durability. The front panel houses the control interface and output connections, while the rear panel includes the power input and gas connection.
4.2. നിയന്ത്രണ പാനൽ
The digital display and control knobs allow for precise adjustment of welding parameters. The synergic control feature simplifies setup by automatically recommending settings based on wire type and thickness.
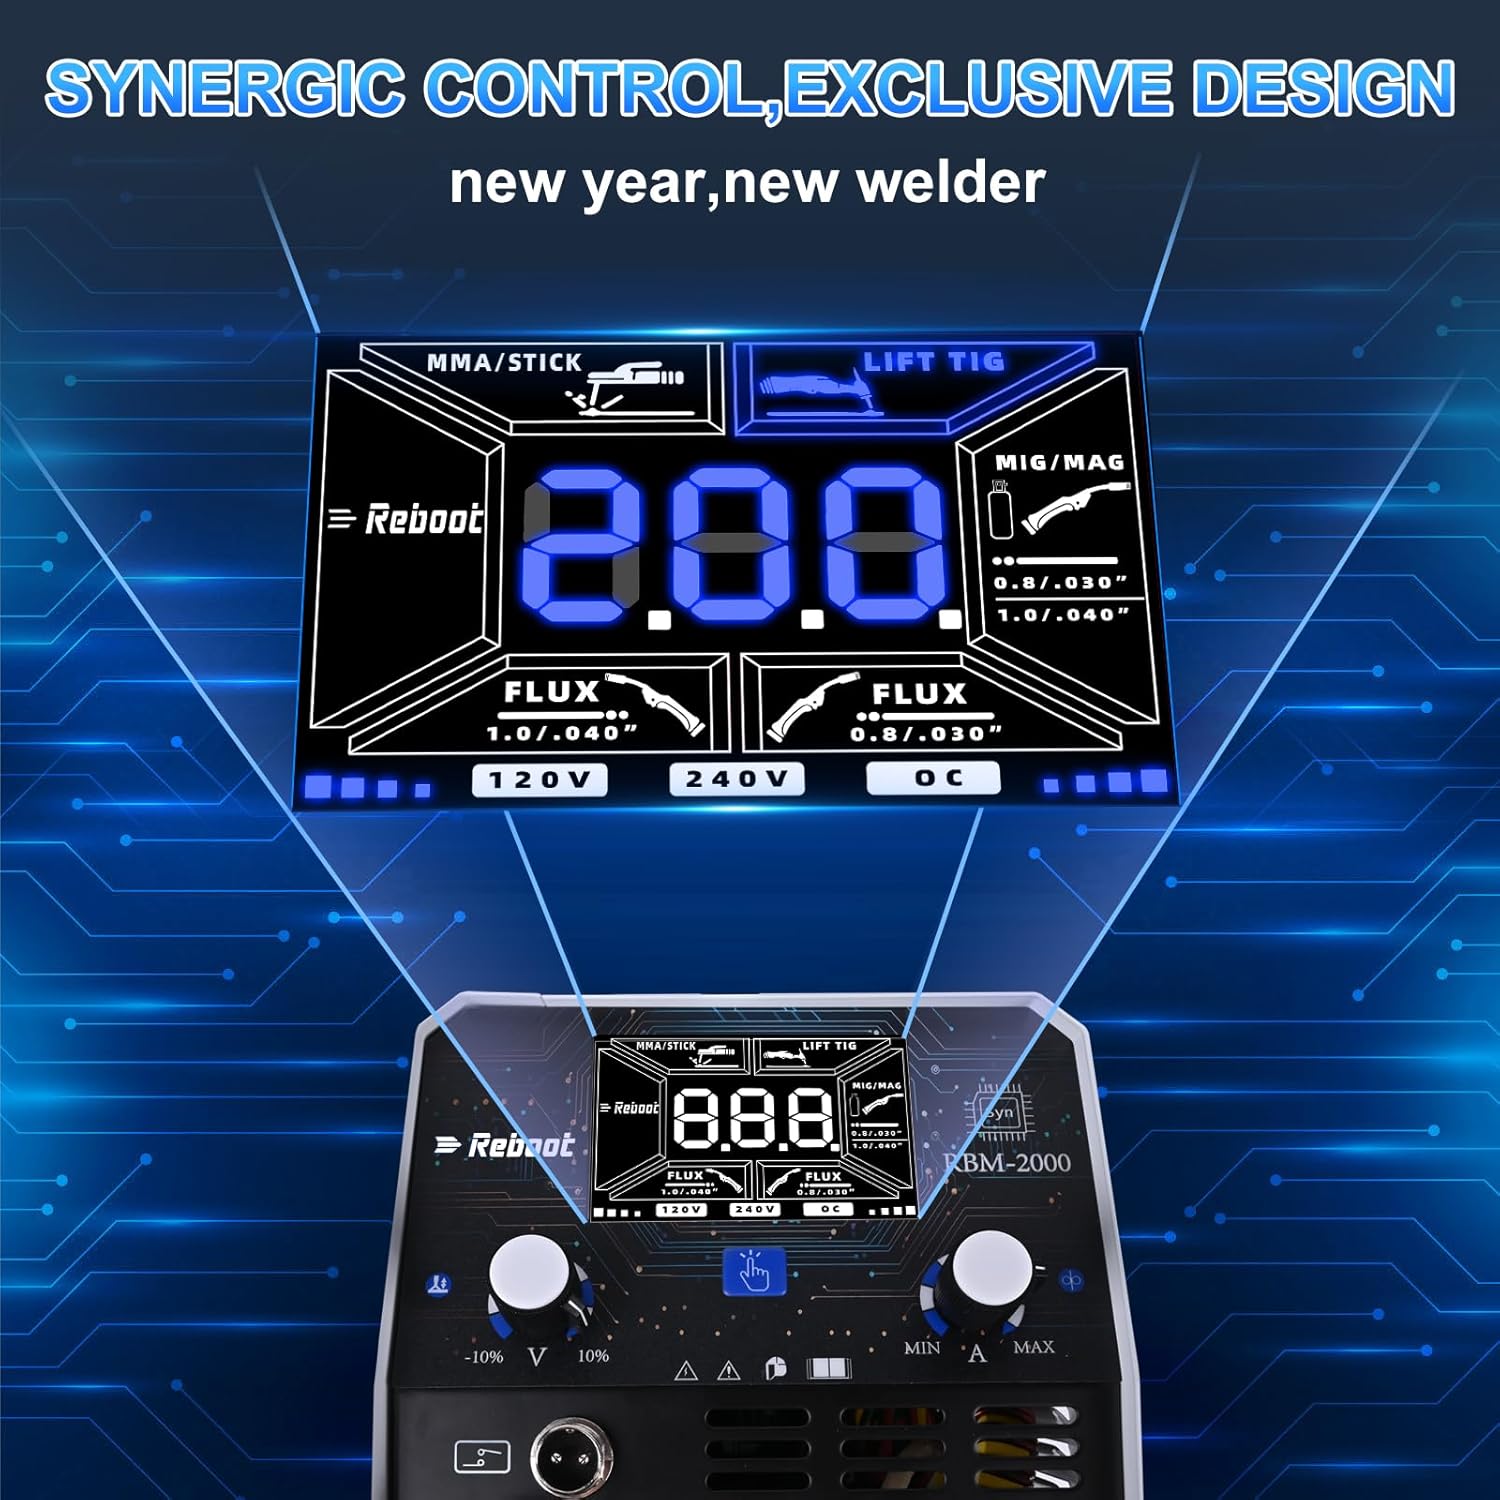
ചിത്രം 4.1: വിശദമായത് view of the RBM2000's control panel, showing the digital display for current and voltage, mode selection, and synergic control options for MIG, Flux Core, Lift TIG, and MMA/Stick welding.
- ഡിജിറ്റൽ ഡിസ്പ്ലേ: Shows welding current (Amps) ഒപ്പം വാല്യംtagഇ (വോൾട്ട്).
- മോഡ് തിരഞ്ഞെടുക്കൽ: Switch between MIG/MAG, Flux Core, Lift TIG, and MMA/Stick.
- Synergic Control: For MIG/MAG and Flux Core, select wire diameter and material, and the machine will suggest optimal settings.
- ക്രമീകരണ നോബുകൾ: Fine-tune current, voltage, and wire feed speed.
- ഇൻപുട്ട് വോളിയംtagഇ സൂചകം: Displays whether the machine is operating on 120V or 240V.
5. സജ്ജീകരണം
5.1. പവർ കണക്ഷൻ
The RBM2000 is a dual-voltage machine, compatible with both 120V and 240V power sources. The machine automatically detects the input voltage.
- Ensure the power source matches the machine's requirements.
- Connect the power cord securely to the welder and a grounded electrical outlet.
5.2. Gas Connection (for Gas MIG/MAG)
For Gas MIG/MAG welding, a shielding gas cylinder is required.
- ഗ്യാസ് ഹോസിന്റെ ഒരു അറ്റം വെൽഡറിന്റെ പിൻഭാഗത്തുള്ള ഗ്യാസ് ഇൻലെറ്റുമായി ബന്ധിപ്പിക്കുക.
- Connect the other end of the gas hose to your gas regulator on the shielding gas cylinder.
- ഗ്യാസ് ചോർച്ച തടയാൻ എല്ലാ കണക്ഷനുകളും ഇറുകിയതാണെന്ന് ഉറപ്പാക്കുക.
5.3. Wire Installation (MIG/Flux Core)
- Open the wire feed compartment.
- Mount the wire spool onto the spindle, ensuring it rotates freely.
- Feed the welding wire through the guide tube and into the drive rollers.
- Adjust the drive roller tension to prevent slipping or crushing the wire.
- With the MIG torch pointed away from yourself and others, press the trigger to feed the wire through the torch liner until it exits the contact tip.
5.4. ടോർച്ചും ഗ്രൗണ്ടും Clamp കണക്ഷൻ
- MIG ടോർച്ച്: Connect the MIG torch cable to the appropriate connector on the front panel.
- Lift TIG Torch: Connect the Lift TIG torch cable to the designated connector. Ensure the gas line (if used) is also connected.
- എംഎംഎ/സ്റ്റിക്ക്: ഇലക്ട്രോഡ് ഹോൾഡർ കേബിൾ പോസിറ്റീവ് (+) ടെർമിനലിലേക്കും ഗ്രൗണ്ട് cl-ലേക്കും ബന്ധിപ്പിക്കുക.amp cable to the negative (-) terminal for most electrodes (DCEN). Reverse for DCEP if required by your electrode.
- ഗ്രൗണ്ട് Clamp: എപ്പോഴും ഗ്രൗണ്ട് cl അറ്റാച്ചുചെയ്യുകamp securely to the workpiece or a clean, bare metal work surface. A poor ground connection can lead to unstable arcs and poor weld quality.

Image 5.1: Illustration of the cable and gas hose connections on the welding machine, highlighting the importance of secure and correct attachment for safe and effective operation.
6 ഓപ്പറേറ്റിംഗ് മോഡുകൾ
6.1. MIG Welding (Gas MIG / Flux Core Gasless MIG)
MIG welding is ideal for various metals and thicknesses, offering high productivity.
- മോഡ് തിരഞ്ഞെടുക്കൽ: Select 'MIG/MAG' or 'Flux Core' on the control panel.
- Synergic Control: Utilize the synergic function by selecting your wire diameter (e.g., 0.8mm or 1.0mm) and material type. The machine will automatically suggest optimal voltagഇ, വയർ ഫീഡ് വേഗത.
- ക്രമീകരണങ്ങൾ: Fine-tune voltage and wire feed speed as needed for your specific application.
- Gas (Gas MIG): Ensure shielding gas is flowing at the correct rate (typically 10-15 L/min).
- No Gas (Flux Core): No external shielding gas is required as the flux-cored wire produces its own shielding. Ensure polarity is set correctly for flux core (usually DCEN).
6.2. Lift TIG Welding
Lift TIG provides precise control and high-quality welds, especially on thinner materials.
- Torch Connection: Connect the Lift TIG torch to the machine.
- ഇലക്ട്രോഡ്: Insert a tungsten electrode into the collet and tighten the cap. Ensure the tungsten is properly ground.
- വാതകം: Connect an argon gas cylinder and set the flow rate (typically 5-10 L/min).
- പ്രവർത്തനം: Select 'Lift TIG' mode. Gently touch the tungsten to the workpiece, then lift slightly to initiate the arc. Maintain a consistent arc length and feed filler rod manually.

Image 6.1: An exploded diagram illustrating the various components of a Lift TIG torch, including the ceramic cup, collet body, collet, tungsten electrode, and back caps.

Image 6.2: The Lift TIG torch shown with its accompanying accessories, such as collect bodies, collects, ceramic cups, and short and long back caps, essential for TIG welding.

Image 6.3: This image demonstrates the multi-angle rotation capability of the Lift TIG torch, allowing for flexible positioning during welding tasks, compared to fixed-port torches.
6.3. MMA/Stick Welding
MMA/Stick welding is robust and suitable for outdoor use and thicker materials.
- കണക്ഷനുകൾ: Connect the electrode holder and ground clamp സെക്ഷൻ 5.4 ൽ വിവരിച്ചിരിക്കുന്നത് പോലെ.
- ഇലക്ട്രോഡ് തിരഞ്ഞെടുക്കൽ: Choose the appropriate electrode type and diameter for your material and application.
- മോഡ് തിരഞ്ഞെടുക്കൽ: Select 'MMA/Stick' mode.
- നിലവിലെ ക്രമീകരണം: Set the welding current according to the electrode manufacturer's recommendations.
- പ്രവർത്തനം: Strike the arc by lightly scratching the electrode on the workpiece. Maintain a consistent arc length and travel speed.
7. പരിപാലനം
പതിവ് അറ്റകുറ്റപ്പണികൾ നിങ്ങളുടെ വെൽഡിംഗ് മെഷീനിന്റെ ദീർഘായുസ്സും സുരക്ഷിതമായ പ്രവർത്തനവും ഉറപ്പാക്കുന്നു.
- വൃത്തിയാക്കൽ: Periodically clean the machine's exterior with a dry, soft cloth. Use compressed air to blow out dust from inside the machine, ensuring power is disconnected first.
- ഉപഭോഗവസ്തുക്കൾ: Regularly inspect and replace worn-out contact tips, gas nozzles, and TIG ceramic cups/collets. Worn consumables can negatively impact weld quality.
- കേബിളുകൾ: Check welding cables for cuts, cracks, or damaged insulation. Replace damaged cables immediately.
- വയർ ഫീഡ് സിസ്റ്റം: Clean the drive rollers and wire liner to prevent wire feeding issues.

Image 7.1: A collection of welding consumables, specifically contact tips and gas nozzles, which are crucial for MIG welding and require regular inspection and replacement.

Image 7.2: This image provides detailed dimensions for MIG welding contact tips (0.8mm and 1.0mm aperture) and conical nozzles, aiding in proper selection and replacement.
8. പ്രശ്നപരിഹാരം
പ്രവർത്തന സമയത്ത് നിങ്ങൾ നേരിട്ടേക്കാവുന്ന സാധാരണ പ്രശ്നങ്ങളെ ഈ വിഭാഗം അഭിസംബോധന ചെയ്യുന്നു.
| പ്രശ്നം | സാധ്യമായ കാരണം | പരിഹാരം |
|---|---|---|
| മെഷീനിൽ വൈദ്യുതിയില്ല | Power cord unplugged, circuit breaker tripped, faulty power switch. | Check power cord connection, reset circuit breaker, contact service if switch is faulty. |
| No arc / Unstable arc | Poor ground connection, incorrect settings, worn consumables, wrong polarity. | ഗ്രൗണ്ട് ക്ലീനിംഗ് ഉറപ്പാക്കുകamp is on clean metal, verify settings for mode, replace consumables, check polarity. |
| Wire feeding issues (MIG/Flux Core) | Drive roller tension incorrect, clogged liner, wrong size contact tip, tangled wire spool. | Adjust drive roller tension, clean or replace liner, use correct contact tip, untangle wire. |
| വെൽഡിംഗ് ഗുണനിലവാരം മോശമാണ് | Incorrect settings, improper technique, contaminated workpiece, insufficient shielding gas. | Adjust parameters, practice technique, clean workpiece, check gas flow and connections. |
| Overheating / Thermal overload | Exceeding duty cycle, blocked ventilation. | Allow machine to cool down, ensure proper ventilation, reduce welding time. |
9 സ്പെസിഫിക്കേഷനുകൾ
| ഫീച്ചർ | വിവരണം |
|---|---|
| മോഡൽ | RBM2000 |
| ഇൻപുട്ട് വോളിയംtage | 120V / 240V (ഓട്ടോ സെൻസിംഗ്) |
| പരമാവധി put ട്ട്പുട്ട് കറന്റ് | 200 Amp |
| വെൽഡിംഗ് പ്രക്രിയകൾ | MIG (Gas/Gasless Flux Core), Lift TIG, MMA/Stick, MAG |
| Synergic Control | Yes (for MIG/MAG) |
| Consumables Included | 42 PCS (2x Gas Nozzle, 20x 0.8mm Contact Tip, 20x 1.0mm Contact Tip) |
| TIG Torch Type | Lift TIG Torch (suitable for 10-25 mm² interface) |
10. വാറൻ്റിയും പിന്തുണയും
Reboot products are manufactured to high-quality standards. For warranty information, technical support, or service inquiries, please refer to the warranty card included with your product or visit the official Reboot website. Please have your model number (RBM2000) and purchase date available when contacting support.