
ആമുഖം
This manual provides essential information for the safe and proper assembly, operation, and maintenance of your X-PRO X17 125cc Automatic Transmission Dirt Bike. Please read this manual thoroughly before operating the vehicle and retain it for future reference.
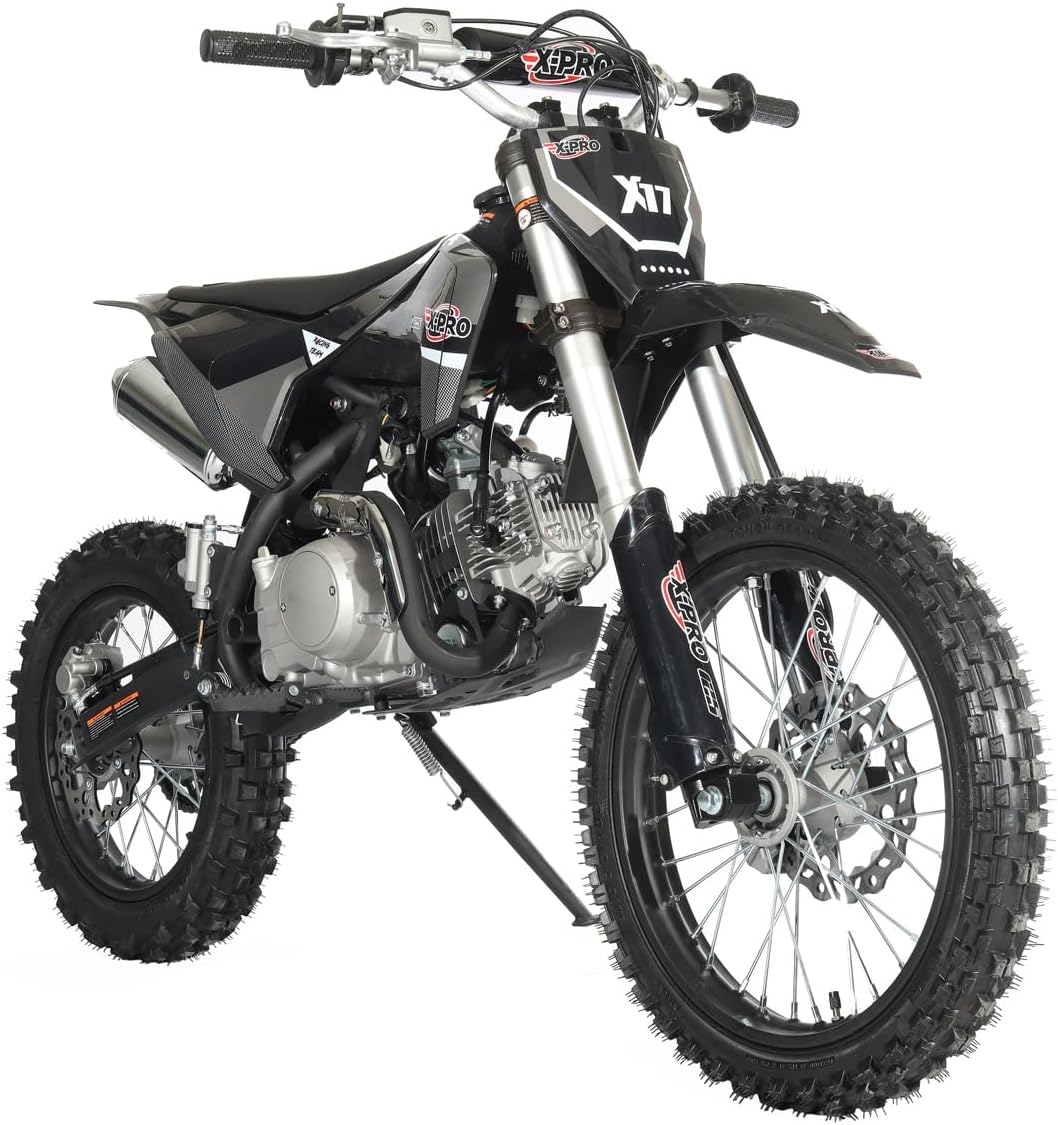
ചിത്രം 1: മുൻഭാഗം view of the X-PRO X17 125cc Dirt Bike.
സുരക്ഷാ വിവരങ്ങൾ
Always wear appropriate safety gear, including a helmet, eye protection, gloves, and protective clothing, when operating the dirt bike. This vehicle is designed for off-road use only. Never operate over speeds unsafe for your skill or road conditions. Proposition 65 Warning: This product may contain chemicals known to the State of California to cause cancer and birth defects or other reproductive harm.
അസംബ്ലിയും സജ്ജീകരണവും
Some assembly is required. This section outlines the steps for unpacking and assembling your X-PRO X17 dirt bike. It is recommended to have basic mechanical experience, tools, and assistance for assembly.
അസംബ്ലി വീഡിയോ ഗൈഡ്
For a visual guide, please refer to the official assembly video below:
Video: X-PRO X17 125cc Dirt Bike Assembly Video. This video demonstrates the unpacking and assembly process for the dirt bike. Note: The bike shown in the video may be a different color than your product.
ഘട്ടം ഘട്ടമായുള്ള അസംബ്ലി നിർദ്ദേശങ്ങൾ
- Unpacking the Crate: Carefully cut the straps and remove the cardboard packaging from the metal crate. Use appropriate tools to remove any zip ties securing components.
- ഘടകങ്ങൾ നീക്കം ചെയ്യുക: Locate and remove all accessory boxes and the front wheel from the crate.
- Remove Bike from Crate: Unscrew the bolts securing the bike to the metal frame. With assistance, carefully lift the bike off the frame and place it on a stable surface or a bike stand.
- Install Handlebar Mounts: Open the accessory box and retrieve the handlebar mounts. Install the lower handlebar clamps onto the triple tree, ensuring they are oriented correctly. Secure them with the provided bolts.
- ഹാൻഡിൽബാറുകൾ ഘടിപ്പിക്കുക: Place the handlebars into the lower clamps. Position the upper handlebar clamps over the handlebars and secure them with the bolts. Ensure the handlebars are centered and tightened securely.
- Install Throttle Assembly: Slide the throttle assembly onto the right handlebar. Secure it in place with the provided screws.
- Install Front Fender: Attach the front fender to the front fork assembly using the provided bolts.
- ഫ്രണ്ട് വീൽ ഇൻസ്റ്റാൾ ചെയ്യുക:
- Remove the protective plastic from the brake rotor.
- Insert the wheel spacers into the wheel hub.
- Align the front wheel with the fork legs.
- Carefully slide the axle through the fork legs and wheel hub.
- Secure the axle with the nut and tighten it using a wrench.
- Install Front Brake Caliper:
- Remove the protective spacer from the brake caliper.
- Position the brake caliper over the brake rotor.
- Align the caliper with the mounting points on the fork leg and secure it with the bolts. Tighten securely.
- ബാറ്ററി ബന്ധിപ്പിക്കുക:
- Remove the seat to access the battery compartment.
- Connect the positive (+) red cable to the positive terminal of the battery.
- Connect the negative (-) black cable to the negative terminal of the battery.
- എല്ലാ കണക്ഷനുകളും ഇറുകിയതും സുരക്ഷിതവുമാണെന്ന് ഉറപ്പാക്കുക.
- Install Handlebar Pad: Place the handlebar pad over the center of the handlebars.

Figure 2: Dirt bike securely packaged within a metal crate.

Figure 3: The dirt bike as it appears in its shipping box.
പ്രവർത്തന നിർദ്ദേശങ്ങൾ
പ്രീ-റൈഡ് ചെക്ക്
- ഇന്ധന നില: Ensure adequate fuel (unleaded gasoline) is in the tank.
- എണ്ണ നില: Check engine oil level before each ride.
- ടയറുകൾ: Inspect tire pressure and condition. Front Tire: 70/100-17", Rear Tire: 90/100-14".
- ബ്രേക്കുകൾ: Verify front and rear brakes are functioning correctly.
- ചെയിൻ: ചെയിൻ ടെൻഷനും ലൂബ്രിക്കേഷനും പരിശോധിക്കുക.
- ഫാസ്റ്റനറുകൾ: Ensure all nuts and bolts are tightened securely.
എഞ്ചിൻ ആരംഭിക്കുന്നു (ഇലക്ട്രിക് സ്റ്റാർട്ട്)
- ഇന്ധന വാൽവ് "ഓൺ" സ്ഥാനത്തേക്ക് തിരിക്കുക.
- If the engine is cold, pull the choke lever to the "ON" position.
- ഇഗ്നിഷൻ കീ "ഓൺ" സ്ഥാനത്തേക്ക് തിരിക്കുക.
- Press the electric start button.
- Once the engine starts, gradually push the choke lever to the "OFF" position as the engine warms up.
Automatic Transmission Operation
The X-PRO X17 features an automatic one-gear transmission, simplifying operation. To move forward, gently apply the throttle. To slow down or stop, release the throttle and apply the brakes. There is no clutch lever or gear shifting required.
മെയിൻ്റനൻസ്
Regular maintenance is crucial for the longevity and safe operation of your dirt bike. Perform the following checks and services at recommended intervals:
- എണ്ണ മാറ്റം: Change engine oil after the first 5 hours of operation, then every 10-15 hours or as specified in a detailed service manual (not included here).
- എയർ ഫിൽട്ടർ: പ്രത്യേകിച്ച് പൊടി നിറഞ്ഞ സാഹചര്യങ്ങളിൽ വാഹനമോടിക്കുമ്പോൾ, എയർ ഫിൽറ്റർ പതിവായി വൃത്തിയാക്കുകയോ മാറ്റിസ്ഥാപിക്കുകയോ ചെയ്യുക.
- സ്പാർക്ക് പ്ലഗ്: സ്പാർക്ക് പ്ലഗ് ഇടയ്ക്കിടെ പരിശോധിച്ച് വൃത്തിയാക്കുക. തേഞ്ഞുപോയിട്ടുണ്ടെങ്കിൽ മാറ്റിസ്ഥാപിക്കുക.
- ചെയിൻ മെയിൻ്റനൻസ്: Clean, lubricate, and adjust chain tension every few rides.
- ബ്രേക്ക് സിസ്റ്റം: Check brake fluid levels and inspect brake pads for wear. Bleed brakes if necessary.
- ഫാസ്റ്റനറുകൾ: എല്ലാ നട്ടുകളും, ബോൾട്ടുകളും, ഫാസ്റ്റനറുകളും ഇടയ്ക്കിടെ പരിശോധിച്ച് മുറുക്കുക.
- ടയറുകൾ: Monitor tire pressure and inspect for damage or excessive wear.
ട്രബിൾഷൂട്ടിംഗ്
This section provides basic troubleshooting steps for common issues. For complex problems, consult a qualified technician.
- എഞ്ചിൻ സ്റ്റാർട്ട് ആകുന്നില്ല:
- ഇന്ധന നില പരിശോധിക്കുക.
- Ensure ignition key is "ON".
- Verify battery connections are secure and battery is charged.
- Check spark plug for fouling or damage.
- Ensure choke is used correctly for cold starts.
- ശക്തി നഷ്ടം:
- Check air filter for clogging.
- Inspect fuel lines and carburetor for blockages.
- Verify spark plug condition.
- ബ്രേക്കുകൾ ഫലപ്രദമല്ല:
- ബ്രേക്ക് ദ്രാവക നില പരിശോധിക്കുക.
- ബ്രേക്ക് പാഡുകൾ തേയ്മാനത്തിനായി പരിശോധിക്കുക.
- Look for air in the brake lines (may require bleeding).
സ്പെസിഫിക്കേഷനുകൾ
| ഫീച്ചർ | സ്പെസിഫിക്കേഷൻ |
|---|---|
| എഞ്ചിൻ | 125cc, 4-Stroke, Single Cylinder, Air Cooled |
| പകർച്ച | Automatic One Gear |
| സിസ്റ്റം ആരംഭിക്കുക | ഇലക്ട്രിക് സ്റ്റാർട്ട് |
| മാക്സ് ടോർക് | 8.8(1±10%)/5500(1±5%) |
| പരമാവധി പവർ | 6.3(1±10%)/7500(1±5%) Kw/r/m |
| കാർബറേറ്റർ | PZ26 Jingke Carburetor |
| ഇഗ്നിഷൻ തരം | സി.ഡി.ഐ |
| ടോപ്പ് സ്പീഡ് | 45+ Mph (Dependent on rider weight and road conditions) |
| ഫ്രെയിം | Cradle Type Steel Tube Frame |
| ഫ്രണ്ട് ഫോർക്ക് | Inverted 45*48-700mm Forks, Non-Adjustable |
| പിൻ ഫോർക്ക് | ⌀10*275mm, Non-Adjustable |
| ഫ്രണ്ട് ബ്രേക്ക് | Hydraulic Single Piston Caliper, 210mm Disc |
| പിൻ ബ്രേക്ക് | Hydraulic Single Piston Caliper, 190mm Disc |
| ഫ്രണ്ട് ടയർ | 70/100-17" |
| പിൻ ടയർ | 90/100-14" |
| മൊത്തം ഭാരം | 151 പൗണ്ട് |
| ആകെ ഭാരം | 181 പൗണ്ട് |
| ഭാരം ശേഷി | 209 പൗണ്ട് |
| മൊത്തത്തിലുള്ള ദൈർഘ്യം | 64.2" |
| മൊത്തത്തിലുള്ള വീതി | 29.52" |
| മൊത്തത്തിലുള്ള ഉയരം | 41.34" |
| വീൽബേസ് | 42.32" |
| ഗ്രൗണ്ട് ക്ലിയറൻസ് | 13.58" |
| ഇന്ധന ശേഷി | 3.5L / 0.92 Gal |
| സീറ്റ് ഉയരം | 32.7" |
| എഞ്ചിൻ കിൽ സ്വിച്ച് | അതെ |
| കാൽ ബ്രേക്ക് | അതെ |
വാറൻ്റിയും പിന്തുണയും
The X-PRO X17 125cc Dirt Bike comes with a 90 Day Warranty Against Manufacturer Defects. For warranty claims, technical support, or to purchase parts, please contact X-PRO customer service. You can also visit the official X-PRO Store കൂടുതൽ വിവരങ്ങൾക്ക്.