1. ആമുഖവും അവസാനവുംview
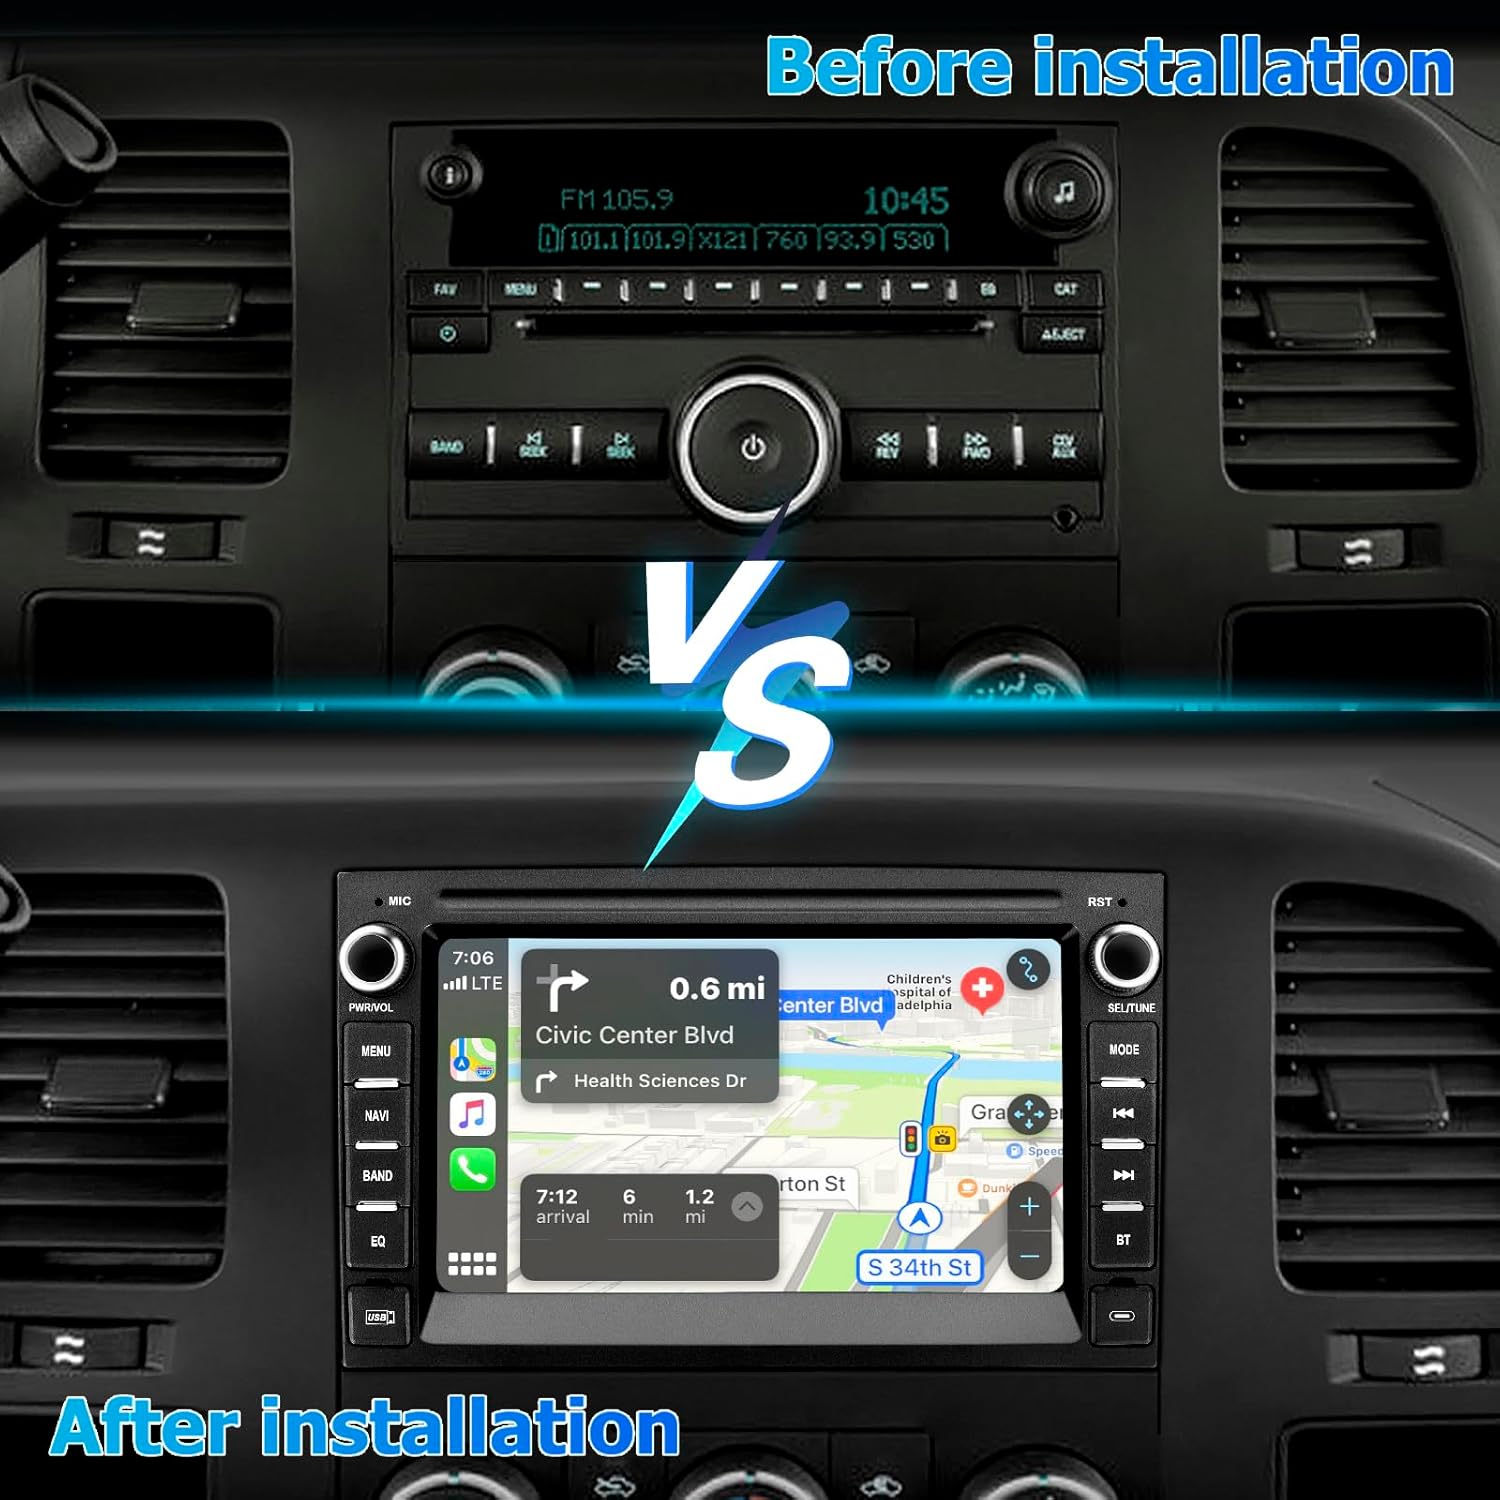
This manual provides detailed instructions for the installation, operation, and maintenance of your KOBANOICA Android 13 Car Radio Stereo. Please read this manual thoroughly before use to ensure proper functionality and safety. This head unit features a 7-inch touch screen, Android 13 operating system, 2GB RAM, 64GB ROM, wireless Apple CarPlay, Android Auto, Bluetooth, and GPS navigation.
2. പാക്കേജ് ഉള്ളടക്കം
താഴെ ലിസ്റ്റ് ചെയ്തിരിക്കുന്ന എല്ലാ ഇനങ്ങളും നിങ്ങളുടെ പാക്കേജിൽ ഉൾപ്പെടുത്തിയിട്ടുണ്ടെന്ന് ദയവായി പരിശോധിക്കുക:
- Head unit radio
- ഇൻസ്റ്റലേഷൻ ഹാർനെസ്
- ജിപിഎസ് മൊഡ്യൂൾ
- Speaker (for door chime/alerts in compatible vehicles)
- മൈക്രോഫോൺ
- ആൻ്റിന അഡാപ്റ്റർ കേബിൾ
- റിവേഴ്സിംഗ് ലൈൻ
- സ്ക്രൂഡ്രൈവർ
- ക്രോബാർ
- USB കേബിൾ
- യുഎസ്ബി അഡാപ്റ്റർ
- ആർസിഎ കേബിൾ
- പവർ കേബിൾ
- കഴിയും ബസ്

3. അനുയോജ്യമായ വാഹന മോഡലുകൾ
This KOBANOICA Android Car Stereo Radio is compatible with the following vehicle models and years:
- Chevy Silverado: 1500HD, 2500HD, 3500HD (2007-2014, Second Generation)
- Chevy Tahoe: (2007-2014, Third Generation)
- GMC Sierra: (2007-2011)
- GMC Savana: (2008-2013)
- GMC Yukon: (2007-2013)
- Buick Enclave: (2008-2012)

4. ഇൻസ്റ്റലേഷൻ
Professional installation is recommended. Ensure the vehicle's battery is disconnected before beginning installation. Refer to the wiring diagram provided in the package for specific connections.
4.1 പൊതുവായ ഇൻസ്റ്റലേഷൻ ഘട്ടങ്ങൾ
- Carefully remove the factory radio and trim using appropriate tools (a crowbar and screwdriver are included).
- Connect the main wiring harness from the new head unit to the vehicle's factory harness. Ensure all connections are secure.
- Connect the GPS antenna and microphone. Position the GPS antenna in a location with a clear view ആകാശത്തിൻ്റെ.
- If installing a backup camera, connect the reversing line and video input cable.
- Carefully slide the new head unit into the dashboard opening and secure it.
- Reinstall any removed trim pieces.
- Reconnect the vehicle's battery and test the unit.
4.2 Wiring Diagram and Specific Connections

4.3 പിൻ ക്യാമറ ഇൻസ്റ്റലേഷൻ

4.4 No Sound After Installation
If you experience no sound or only partial sound (e.g., rear speakers not working) after installation, please check the following:
- Try swapping the positions of the two plugs (purple and gray) for the Audio CAN.
- Check whether the audio input and output wires are connected correctly.
- ഉറപ്പാക്കുക AMP വയർ കൂടാതെ AMP CON (amplifier control) wire are properly connected.

4.5 ഇൻസ്റ്റലേഷൻ വീഡിയോകൾ
വീഡിയോ 4.5.1: ഇൻസ്റ്റലേഷൻ കഴിഞ്ഞുview for Sierra, Yukon, Chevrolet, Chevy Silverado, Hummer H2, and Tahoe radios.
Video 4.5.2: Product introduction before installation.
Video 4.5.3: Car radio installation for Chevy Silverado, Tahoe, GMC Sierra, and Yukon.
Video 4.5.4: Stereo installation video for GMC Sierra, Yukon, Buick, and Silverado.
5. പ്രാരംഭ സജ്ജീകരണവും കോൺഫിഗറേഷനും
After successful installation, power on the unit and follow these steps for initial setup.
5.1 ഭാഷാ ക്രമീകരണങ്ങൾ
പ്രദർശന ഭാഷ മാറ്റാൻ:
- പോകുക ക്രമീകരണങ്ങൾ > കൂടുതൽ ക്രമീകരണങ്ങൾ > ഭാഷയും ഇൻപുട്ടും > ഭാഷാ ക്രമീകരണങ്ങൾ > ഒരു ഭാഷ ചേർക്കുക.
- Select your desired language from the list.
Video 5.1.1: Adjusting Language Settings (starts at 0:05).
5.2 സമയ ക്രമീകരണങ്ങൾ
തീയതിയും സമയവും സജ്ജമാക്കാൻ:
- പോകുക ക്രമീകരണങ്ങൾ > കൂടുതൽ ക്രമീകരണങ്ങൾ > തീയതിയും സമയവും.
- തിരഞ്ഞെടുക്കുക ജിപിഎസ് നൽകിയ സമയം ഉപയോഗിക്കുക for automatic synchronization.
Video 5.2.1: Adjusting Time Settings (starts at 0:27).
5.3 സ്ക്രീൻ തെളിച്ചം ക്രമീകരിക്കൽ
സ്ക്രീൻ തെളിച്ചം ക്രമീകരിക്കാൻ:
- പോകുക ക്രമീകരണങ്ങൾ > പ്രദർശിപ്പിക്കുക > യാന്ത്രിക തെളിച്ച ക്രമീകരണം.
- You can also manually adjust Day and Night brightness levels.
Video 5.3.1: Adjusting Screen Brightness (starts at 0:36).
5.4 വൈഫൈ കണക്ഷൻ
വൈഫൈയിലേക്ക് കണക്റ്റുചെയ്യാൻ:
- പോകുക ക്രമീകരണങ്ങൾ > നെറ്റ്വർക്ക് > വൈഫൈ.
- വൈഫൈ ഓണാക്കുക On. Select your Wi-Fi network and enter the password.
- For subsequent connections, swipe down the screen and turn Wi-Fi on; it will connect automatically.
Video 5.4.1: Wi-Fi Connection (starts at 0:40).
5.5 ടച്ച് കാലിബ്രേഷൻ
If the touch screen is unresponsive or inaccurate, perform a calibration:
- പോകുക ക്രമീകരണങ്ങൾ > ഫാക്ടറി സജ്ജീകരണം. പാസ്വേഡ് നൽകുക 1234.
- തിരഞ്ഞെടുക്കുക കാലിബ്രേഷൻ സ്പർശിക്കുക. Follow the on-screen instructions to tap the crosshairs.
- Alternatively, place five fingers spread out on the screen to activate the five-point touch calibration interface.
Video 5.5.1: Touch Calibration (starts at 0:59).
5.6 Touch Screen Button Learning (Glass Screen Radio)
For units with touch screen buttons:
- പോകുക ക്രമീകരണങ്ങൾ > ഫാക്ടറി സജ്ജീകരണം. പാസ്വേഡ് നൽകുക 1234.
- തിരഞ്ഞെടുക്കുക Touch Button Learning. Follow the on-screen instructions to assign functions to the touch buttons.
Video 5.6.1: Touch Screen Button Learning (starts at 1:27).
5.7 Button Settings (Radio with Physical Buttons)
For units with physical buttons:
- പോകുക ക്രമീകരണങ്ങൾ > ഫാക്ടറി സജ്ജീകരണം. പാസ്വേഡ് നൽകുക 1234.
- തിരഞ്ഞെടുക്കുക Knob Panel Button Learning. Follow the on-screen instructions to assign functions to the physical buttons.
Video 5.7.1: Button Settings (starts at 1:54).
5.8 സ്റ്റിയറിംഗ് വീൽ കൺട്രോൾ ലേണിംഗ്
സ്റ്റിയറിംഗ് വീൽ നിയന്ത്രണങ്ങൾ കോൺഫിഗർ ചെയ്യാൻ:
- പോകുക ക്രമീകരണങ്ങൾ > ഫാക്ടറി സജ്ജീകരണം. പാസ്വേഡ് നൽകുക 1234.
- തിരഞ്ഞെടുക്കുക Party Control Learning. Follow the on-screen instructions to assign functions to your steering wheel buttons.
Video 5.8.1: Steering Wheel Control Learning (starts at 2:22).
5.9 Reverse Camera Format Selection
To select the correct reverse camera format:
- പോകുക ക്രമീകരണങ്ങൾ > ഫാക്ടറി സജ്ജീകരണം. പാസ്വേഡ് നൽകുക 1234.
- തിരഞ്ഞെടുക്കുക Backcar Source Settings and choose the appropriate format (e.g., CVBS, AHD, TVI).
Video 5.9.1: Reverse Camera Format Selection (starts at 2:47).
5.10 Car System Protocol Settings
To configure car system protocols:
- പോകുക ക്രമീകരണങ്ങൾ > ഫാക്ടറി സജ്ജീകരണം. പാസ്വേഡ് നൽകുക 1234.
- തിരഞ്ഞെടുക്കുക Can Settings. Configure Brand, Model, Year, and Protocol as required for your vehicle.
Video 5.10.1: Car System Protocol Settings (starts at 2:54).
5.11 UI Theme Settings
To customize the user interface theme:
- Long press the bottom of the main screen to enter the theme selection page.
- ഇടത്തോട്ടോ വലത്തോട്ടോ സ്വൈപ്പ് ചെയ്യുക view more themes and select your preferred one.
Video 5.11.1: UI Theme Settings (starts at 3:10).
5.12 Speed Unit Switch
To switch between km/h and mph:
- Tap the speed unit on the main screen to toggle between units.
Video 5.12.1: Speed Unit Switch (starts at 5:18).
5.13 ക്ലിയർ മെമ്മറി
To clear system memory and optimize performance:
- Swipe down the screen to access the quick settings panel.
- ടാപ്പ് ചെയ്യുക System Optimize icon to clear memory.
Video 5.13.1: Clear Memory (starts at 5:22).
6. പ്രവർത്തന നിർദ്ദേശങ്ങൾ
6.1 ബ്ലൂടൂത്ത് കണക്റ്റിവിറ്റി
The unit supports Bluetooth for hands-free calling and audio streaming. The Bluetooth connection password is 0000.
- Enter the radio Bluetooth interface.
- നിങ്ങളുടെ ഫോണിൽ ബ്ലൂടൂത്ത് ഓണാക്കുക.
- Find the radio Bluetooth name (Car BT) on your phone, select it, and complete the authorization to successfully connect.
- You can make calls and stream music after a successful Bluetooth connection.

Video 6.1.1: Bluetooth Settings (starts at 3:59).
6.2 Wireless Apple CarPlay
Connect your iPhone wirelessly for navigation, music, and more.
- തുറക്കുക Zlink5 app on the head unit.
- Confirm the Bluetooth name of the device (e.g., Car BT).
- Turn on Bluetooth on your iPhone and pair with Car BT.
- Turn on Wi-Fi on your iPhone and connect to the device's Wi-Fi hotspot.
- After successful connection, CarPlay will launch automatically.

Video 6.2.1: How to connect wireless CarPlay.
Video 6.2.2: CarPlay Settings (starts at 4:20).
6.3 Wireless Android Auto
Connect your Android phone wirelessly for navigation, music, and more.
- തുറക്കുക Zlink5 app on the head unit.
- Confirm the Bluetooth name of the device (e.g., Car BT).
- Turn on Bluetooth on your Android phone and pair with Car BT.
- Turn on Wi-Fi on your Android phone and connect to the device's Wi-Fi hotspot.
- After successful connection, Android Auto will launch automatically.

Video 6.3.1: How to connect wireless Android Auto.
Video 6.3.2: Android Auto Settings (starts at 4:51).
6.4 ജിപിഎസ് നാവിഗേഷൻ
The unit supports both online and offline GPS navigation. Connect to Wi-Fi to download maps and use online navigation apps like Google Maps.

6.5 FM/AM റേഡിയോ
Enjoy your favorite radio stations with the built-in FM/AM tuner. The FM radio is preset with 18 stations.

Video 6.5.1: Radio Settings (starts at 3:33).
6.6 EQ Adjustment
ബിൽറ്റ്-ഇൻ ഇക്വലൈസർ ഉപയോഗിച്ച് നിങ്ങളുടെ ഓഡിയോ അനുഭവം ഇഷ്ടാനുസൃതമാക്കുക.
- Access the EQ settings from the main menu or quick settings.
- Adjust frequency bands or select from preset sound modes (e.g., Pop, Rock, Jazz).

Video 6.6.1: EQ Settings (starts at 3:42).
7. പരിപാലനം
Proper maintenance ensures the longevity and optimal performance of your car radio stereo.
- സ്ക്രീൻ ക്ലീനിംഗ്: Use a soft, dry, lint-free cloth to clean the touchscreen. Avoid using abrasive cleaners, solvents, or harsh chemicals, as these can damage the screen.
- കണക്ഷൻ പരിശോധനകൾ: Periodically check all wiring connections to ensure they are secure and free from corrosion. Loose connections can lead to intermittent issues.
- സോഫ്റ്റ്വെയർ അപ്ഡേറ്റുകൾ: Regularly check for available software updates through the unit's settings menu. Updates can provide new features, performance improvements, and bug fixes.
- പരിസ്ഥിതി സംരക്ഷണം: യൂണിറ്റിന് തീവ്രമായ താപനില, ദീർഘനേരം നേരിട്ടുള്ള സൂര്യപ്രകാശം, അല്ലെങ്കിൽ അമിതമായ ഈർപ്പം എന്നിവ ഏൽക്കുന്നത് ഒഴിവാക്കുക.
8. പ്രശ്നപരിഹാരം
If you encounter any issues, refer to the following troubleshooting guide before contacting support.
| പ്രശ്നം | സാധ്യമായ കാരണം | പരിഹാരം |
|---|---|---|
| പവർ ഇല്ല | അയഞ്ഞ വൈദ്യുതി കണക്ഷൻ, ഫ്യൂസ് പൊട്ടി. | Check power connections. Inspect vehicle's fuse box and replace any blown fuses. |
| No Sound / Partial Sound | Incorrect speaker wiring, audio settings, AMP-CON wire issue. | Verify speaker connections. Check audio settings (EQ, balance). Ensure AMP-CON wire is correctly connected if using an external amplifier (refer to Section 4.4). |
| Bluetooth/CarPlay/Android Auto Connection Issues | Bluetooth/Wi-Fi off, pairing error, Zlink settings. | Ensure Bluetooth and Wi-Fi are enabled on both the head unit and your phone. Forget and re-pair devices. Check Zlink settings (refer to Sections 6.2 and 6.3). |
| GPS Signal Loss | Improper GPS antenna placement or connection. | ജിപിഎസ് ആന്റിന ശരിയായി ഇൻസ്റ്റാൾ ചെയ്തിട്ടുണ്ടെന്നും വ്യക്തമായ ഒരു കണക്ഷൻ ഉണ്ടെന്നും ഉറപ്പാക്കുക. view ആകാശത്തിന്റെ. ആന്റിന കണക്ഷൻ പരിശോധിക്കുക. |
| സ്റ്റിയറിംഗ് വീൽ നിയന്ത്രണങ്ങൾ പ്രവർത്തിക്കുന്നില്ല | Controls not learned or incorrect protocol. | Perform the steering wheel control learning procedure in the settings (refer to Section 5.8). Check car system protocol settings (Section 5.10). |
| Touch Screen Unresponsive/Inaccurate | കാലിബ്രേഷൻ ആവശ്യമാണ്. | Perform touch calibration in factory settings (refer to Section 5.5). |
9 സ്പെസിഫിക്കേഷനുകൾ
| ഫീച്ചർ | വിശദാംശങ്ങൾ |
|---|---|
| ഡിസ്പ്ലേ വലിപ്പം | 7 ഇഞ്ച് |
| ഓപ്പറേറ്റിംഗ് സിസ്റ്റം | ആൻഡ്രോയിഡ് 13 |
| റാം | 2 ജിബി |
| ROM | 64 ജിബി |
| കണക്റ്റിവിറ്റി ടെക്നോളജി | ബ്ലൂടൂത്ത്, യുഎസ്ബി, വൈ-ഫൈ |
| പ്രത്യേക സവിശേഷതകൾ | Android Auto, Apple CarPlay, Touchscreen, Built-In Wi-Fi |
| ഓഡിയോ put ട്ട്പുട്ട് മോഡ് | സ്റ്റീരിയോ |
| ഇനത്തിൻ്റെ ഭാരം | 2.88 പൗണ്ട് |
| പാക്കേജ് അളവുകൾ | 11.54 x 9.41 x 4.02 ഇഞ്ച് |
10. വാറൻ്റിയും പിന്തുണയും
Your KOBANOICA Car Radio Stereo comes with a 2 വർഷത്തെ നിർമ്മാതാവിൻ്റെ വാറൻ്റി.
For technical support, warranty claims, or any questions regarding your product, please contact KOBANOICA customer service through the retailer where the product was purchased. Please have your model number (B0DJVRWLNB) and proof of purchase ready when contacting support.