
1. ആമുഖം
This manual provides detailed instructions for the safe installation, operation, and maintenance of your Carro 36-inch Low Profile Ceiling Fan. Please read this manual thoroughly before installation and use, and retain it for future reference. This ceiling fan is designed for indoor living spaces, offering efficient air circulation and integrated lighting.

ചിത്രം 1.1: കഴിഞ്ഞുview of the Carro 36-inch Low Profile Ceiling Fan. This image displays the fan's compact design, white finish, and integrated light fixture.
2 സുരക്ഷാ വിവരങ്ങൾ
To reduce the risk of electric shock, fire, or injury to persons, read and follow all instructions carefully. Ensure the power is turned off at the circuit breaker before installation or servicing. All wiring must be in accordance with national and local electrical codes. Installation should be performed by a qualified electrician if you are unsure.
- Do not install the fan if the mounting location cannot support the fan's weight.
- Ensure the fan blades are at least 7 feet (2.1 meters) from the floor.
- കേടായ വയറിംഗോ ഘടകങ്ങളോ ഉപയോഗിച്ച് ഫാൻ പ്രവർത്തിപ്പിക്കരുത്.
- ഫാൻ ബ്ലേഡുകളുടെ പാതയിൽ വസ്തുക്കൾ സ്ഥാപിക്കുന്നത് ഒഴിവാക്കുക.
- ഈ ഫാൻ ഇൻഡോർ ഉപയോഗത്തിനായി മാത്രം രൂപകൽപ്പന ചെയ്തിട്ടുള്ളതാണ്.
3. പാക്കേജ് ഉള്ളടക്കം
ഇൻസ്റ്റാളേഷൻ ആരംഭിക്കുന്നതിന് മുമ്പ് എല്ലാ ഘടകങ്ങളും നിലവിലുണ്ടെന്ന് ഉറപ്പാക്കുക:
- Ceiling Fan Unit (including motor, blades, and integrated light) x1
- വിദൂര നിയന്ത്രണം x1
- Mounting Hardware Kit x1
- ഉപയോക്തൃ മാനുവൽ x1
4. സജ്ജീകരണവും ഇൻസ്റ്റാളേഷനും
The Carro 36-inch Low Profile Ceiling Fan features an intuitive flush-mount design, making it suitable for rooms with lower ceilings. Detailed instructions are provided in the separate installation guide included with your product. Ensure all electrical connections are secure and properly insulated.

ചിത്രം 4.1: ക്ലോസ്-അപ്പ് view of the fan's three white plastic blades. These blades are designed for efficient air movement and durability.
പ്രധാന ഇൻസ്റ്റലേഷൻ ഘട്ടങ്ങൾ:
- വൈദ്യുതി വിച്ഛേദിക്കൽ: പ്രധാന സർക്യൂട്ട് ബ്രേക്കറിൽ പവർ ഓഫ് ചെയ്യുക.
- മൌണ്ടിംഗ് ബ്രാക്കറ്റ്: മൗണ്ടിംഗ് ബ്രാക്കറ്റ് സീലിംഗ് ജംഗ്ഷൻ ബോക്സിൽ സുരക്ഷിതമായി ഘടിപ്പിക്കുക.
- വയറിംഗ്: Connect the fan's electrical wires to the household wiring according to the color-coded instructions.
- ഫാൻ അസംബ്ലി: മൗണ്ടിംഗ് ബ്രാക്കറ്റിലേക്ക് ഫാൻ മോട്ടോർ അസംബ്ലി അറ്റാച്ചുചെയ്യുക.
- ബ്ലേഡ് അറ്റാച്ച്മെൻ്റ്: Secure the fan blades to the motor housing.
- ലൈറ്റ് കിറ്റ് ഇൻസ്റ്റാളേഷൻ: സംയോജിത LED ലൈറ്റ് കിറ്റ് ബന്ധിപ്പിച്ച് സുരക്ഷിതമാക്കുക.
- അന്തിമ പരിശോധന: Ensure all connections are tight and the fan is securely mounted before restoring power.
5. പ്രവർത്തന നിർദ്ദേശങ്ങൾ
Your Carro ceiling fan is operated using the included remote control. Ensure the remote has fresh batteries installed.
5.1 ഫാൻ നിയന്ത്രണം
- പവർ ഓൺ/ഓഫ്: ഫാൻ ഓണാക്കാനോ ഓഫാക്കാനോ പവർ ബട്ടൺ അമർത്തുക.
- വേഗത ക്രമീകരണം: Use the speed control buttons to select from 10 adjustable fan speeds.
- വായുപ്രവാഹ ദിശ (വേനൽ/ശീതകാല മോഡ്): Press the reverse button to change the direction of the fan blades.

Image 5.1: Illustration of fan airflow in Summer Mode (downward airflow for cooling) and Winter Mode (upward airflow for recirculating warm air).
- സമ്മർ മോഡ്: ബ്ലേഡുകൾ എതിർ ഘടികാരദിശയിൽ കറങ്ങുന്നു, വായുവിനെ താഴേക്ക് തള്ളി തണുപ്പിക്കുന്ന കാറ്റ് സൃഷ്ടിക്കുന്നു.
- വിന്റർ മോഡ്: Blades rotate clockwise, drawing air up towards the ceiling to recirculate warm air.
5.2 ലൈറ്റ് കൺട്രോൾ
- ലൈറ്റ് ഓൺ/ഓഫ്: Press the light button to turn the integrated LED light on or off.
- വർണ്ണ താപനില ക്രമീകരണം: Cycle through warm (2700K), natural (3500K), and cool (4000K) light options.
- മങ്ങുന്നു: Use the dimming buttons to adjust the light brightness from 1% to 100%.
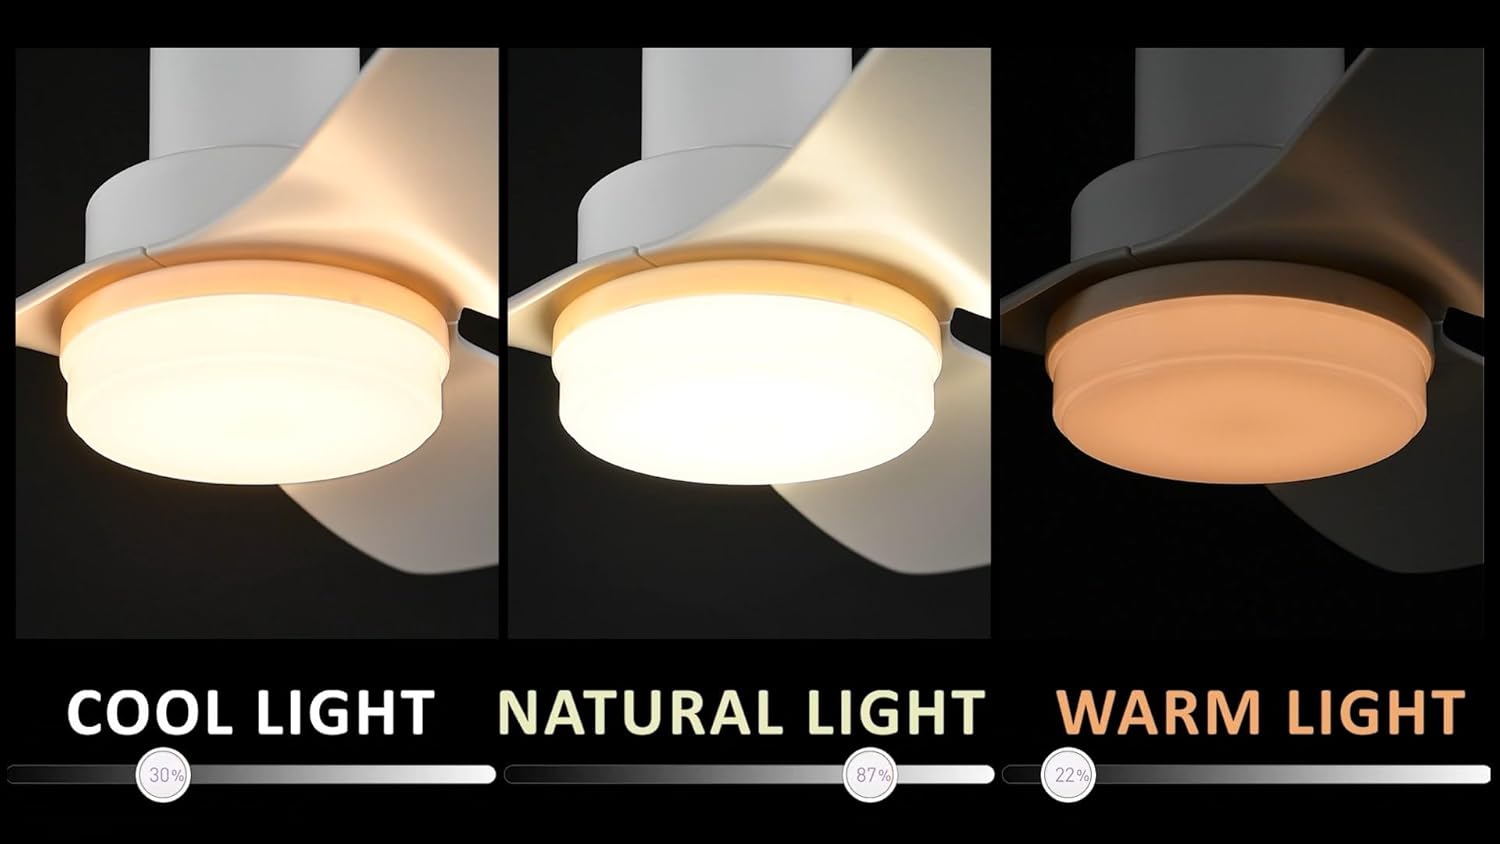
Image 5.2: Visual representation of the three adjustable light color temperatures: Cool Light (4000K), Natural Light (3500K), and Warm Light (2700K).
6. പരിപാലനം
പതിവ് അറ്റകുറ്റപ്പണികൾ നിങ്ങളുടെ സീലിംഗ് ഫാനിന്റെ മികച്ച പ്രകടനവും ദീർഘായുസ്സും ഉറപ്പാക്കുന്നു.
- വൃത്തിയാക്കൽ: Periodically clean the fan housing and blades with a soft, damp തുണി. ഉരച്ചിലുകളുള്ള ക്ലീനറുകളോ ലായകങ്ങളോ ഉപയോഗിക്കരുത്.
- ബ്ലേഡ് പരിശോധന: ഫാൻ ബ്ലേഡുകളിൽ വിള്ളലുകളോ കേടുപാടുകളോ ഉണ്ടോ എന്ന് പരിശോധിക്കുക. കേടായ ബ്ലേഡുകൾ ഉടൻ മാറ്റിസ്ഥാപിക്കുക.
- ദൃഢത പരിശോധന: Ensure all screws and fasteners are tight, especially those securing the blades and mounting bracket.
- ലൂബ്രിക്കേഷൻ ആവശ്യമില്ല: ഡിസി മോട്ടോർ സ്ഥിരമായി ലൂബ്രിക്കേറ്റ് ചെയ്തിരിക്കുന്നതിനാൽ അധിക ഓയിലിംഗ് ആവശ്യമില്ല.
7. പ്രശ്നപരിഹാരം
നിങ്ങളുടെ സീലിംഗ് ഫാനിൽ പ്രശ്നങ്ങൾ അനുഭവപ്പെടുകയാണെങ്കിൽ, താഴെപ്പറയുന്ന പൊതുവായ പ്രശ്നങ്ങളും പരിഹാരങ്ങളും പരിശോധിക്കുക:
| പ്രശ്നം | സാധ്യമായ കാരണം | പരിഹാരം |
|---|---|---|
| ഫാൻ ആരംഭിക്കുന്നില്ല | ഫാനിലേക്ക് വൈദ്യുതിയില്ല; അയഞ്ഞ വയർ കണക്ഷനുകൾ; റിമോട്ട് കൺട്രോൾ ബാറ്ററി കുറവോ ജോടിയാക്കിയിട്ടില്ല. | സർക്യൂട്ട് ബ്രേക്കർ പരിശോധിക്കുക; എല്ലാ വയർ കണക്ഷനുകളും പരിശോധിക്കുക; റിമോട്ട് ബാറ്ററി മാറ്റിസ്ഥാപിക്കുക അല്ലെങ്കിൽ റിമോട്ട് വീണ്ടും ജോടിയാക്കുക. |
| വെളിച്ചം പ്രവർത്തിക്കുന്നില്ല | ലൈറ്റ് കിറ്റിലേക്കുള്ള വയർ കണക്ഷൻ അയഞ്ഞിരിക്കുന്നു; LED ഡ്രൈവർ പ്രശ്നം. | ലൈറ്റ് കിറ്റ് വയറിംഗ് പരിശോധിക്കുക; LED ഡ്രൈവർ സംശയിക്കുന്നുവെങ്കിൽ ഉപഭോക്തൃ പിന്തുണയുമായി ബന്ധപ്പെടുക. |
| ഫാൻ കുലുങ്ങുന്നു | അയഞ്ഞ ബ്ലേഡ് സ്ക്രൂകൾ; അസന്തുലിതമായ ബ്ലേഡുകൾ; അയഞ്ഞ മൗണ്ടിംഗ് ബ്രാക്കറ്റ്. | Tighten all blade screws; Use a balancing kit (not included) if necessary; Ensure mounting bracket is secure. |
| റിമോട്ട് കൺട്രോൾ പ്രതികരിക്കുന്നില്ല | ബാറ്ററികൾ കുറവോ ഡെഡ് ആയോ; റിമോട്ട് ഫാനുമായി ജോടിയാക്കിയിട്ടില്ല. | Replace batteries; Refer to the remote control pairing instructions in the installation guide. |
If you are unable to resolve the issue after following these steps, please contact Carro customer support.
8 സ്പെസിഫിക്കേഷനുകൾ
| ഫീച്ചർ | സ്പെസിഫിക്കേഷൻ |
|---|---|
| ബ്രാൻഡ് | കാരോ |
| മോഡൽ നമ്പർ | 89cd23b0-5492-4454-a1b6-bc9a842cba24 |
| വലിപ്പം | 36 ഇഞ്ച് |
| ഉൽപ്പന്ന അളവുകൾ (D x W x H) | 36"D x 36"W x 10.9"H |
| മൗണ്ടിംഗ് തരം | ഫ്ലഷ് മ .ണ്ട് |
| മോട്ടോർ തരം | ഡിസി മോട്ടോർ |
| വേഗതകളുടെ എണ്ണം | 10 |
| ബ്ലേഡുകളുടെ എണ്ണം | 3 |
| ബ്ലേഡ് മെറ്റീരിയൽ | പ്ലാസ്റ്റിക് |
| എയർ ഫ്ലോ കപ്പാസിറ്റി | മിനിറ്റിന് 2650 ക്യുബിക് അടി |
| വാല്യംtage | 120 വോൾട്ട് |
| നിയന്ത്രണ രീതി | Remote Control (Voice Control listed as a feature, but remote is primary) |
| ഇളം വർണ്ണ താപനില | 2700K (ഊഷ്മളമായത്), 3500K (സ്വാഭാവികം), 4000K (കൂൾ) |
| മങ്ങിക്കുന്ന ശ്രേണി | 1% മുതൽ 100% വരെ |
| ഇൻഡോർ/ഔട്ട്ഡോർ ഉപയോഗം | ഇൻഡോർ |
| സർട്ടിഫിക്കേഷൻ | ETL |
9. വാറൻ്റിയും പിന്തുണയും
Carro is committed to product quality and customer satisfaction. If you have any questions, concerns, or require assistance with your ceiling fan, please contact our professional after-sales support team. Refer to your purchase documentation or the Carro webനിർദ്ദിഷ്ട വാറന്റി വിശദാംശങ്ങൾക്കും ബന്ധപ്പെടാനുള്ള വിവരങ്ങൾക്കും സൈറ്റ്.