
ET120MC2 Pro
TOOLTOP ET120MC2 Pro Portable Smart Oscilloscope User Manual
Model: ET120MC2 Pro | Brand: Generic
1. ആമുഖം
This manual provides detailed instructions for the safe and effective operation of the TOOLTOP ET120MC2 Pro Portable Smart Oscilloscope. Please read this manual thoroughly before using the device to ensure proper functionality and to prevent damage.
The ET120MC2 Pro is a dual-channel oscilloscope with a 120MHz single-channel bandwidth and 40MHz dual-channel bandwidth, featuring a 500MSa/S sampling rate. It is designed for various applications including home appliance inspection, automobile diagnosis, scientific research, education, product development, and power testing.
2 സുരക്ഷാ വിവരങ്ങൾ
Always observe the following safety precautions to avoid injury and prevent damage to the instrument or other devices connected to it.
- വെറ്റ് അല്ലെങ്കിൽ ഡിയിൽ ഉപകരണം പ്രവർത്തിപ്പിക്കരുത്amp വ്യവസ്ഥകൾ.
- സ്ഫോടനാത്മക അന്തരീക്ഷത്തിൽ ഉപകരണം പ്രവർത്തിപ്പിക്കരുത്.
- അമിതമായി ചൂടാക്കുന്നത് തടയാൻ ശരിയായ വായുസഞ്ചാരം ഉറപ്പാക്കുക.
- ചാർജ് ചെയ്യുന്നതിന് നിർദ്ദിഷ്ട പവർ അഡാപ്റ്റർ മാത്രം ഉപയോഗിക്കുക.
- ഉപകരണം ഡിസ്അസംബ്ലിംഗ് ചെയ്യാനോ പരിഷ്ക്കരിക്കാനോ ശ്രമിക്കരുത്.
- ശക്തമായ വൈദ്യുതകാന്തിക മണ്ഡലങ്ങളിൽ നിന്ന് ഉപകരണം അകറ്റി നിർത്തുക.
- പരമാവധി ടെസ്റ്റ് വോളിയംtage: 1X: 80Vpp, 10X: 800Vpp. Do not exceed these limits.
3. ബോക്സിൽ എന്താണുള്ളത്?
പാക്കേജ് തുറക്കുമ്പോൾ, എല്ലാ ഘടകങ്ങളും നിലവിലുണ്ടെന്നും നല്ല നിലയിലാണെന്നും ദയവായി പരിശോധിക്കുക.
- TOOLTOP ET120MC2 Pro Oscilloscope Body
- അന്വേഷണം
- ചാർജിംഗ് കേബിൾ
- ഉപയോക്തൃ മാനുവൽ (ഈ പ്രമാണം)
- തുണി സഞ്ചി

ചിത്രം: മുൻഭാഗം view of the TOOLTOP ET120MC2 Pro Portable Smart Oscilloscope, showing its display and control buttons.
4. സജ്ജീകരണം
4.1 ബാറ്ററി ചാർജ് ചെയ്യുന്നു
The device comes with a built-in lithium battery. Before first use, it is recommended to fully charge the battery. Connect the charging cable to the DC5V/1A/2A input port on the device and to a suitable USB power adapter.
- Charging indicator: The display will show a charging icon.
- Standby time: Approximately 4 hours on a full charge.
4.2 അന്വേഷണം ബന്ധിപ്പിക്കുന്നു
Connect the oscilloscope probe to the input channel of the device. Ensure a secure connection. For accurate measurements, calibrate the probe before use if necessary.

Image: The TOOLTOP ET120MC2 Pro Oscilloscope shown alongside its probe, illustrating the connection setup.
5. പ്രവർത്തന നിർദ്ദേശങ്ങൾ
5.1 പവർ ഓൺ/ഓഫ്
Press and hold the power button (usually located on the side or top) to turn the device on or off. The device has an auto-shutdown feature if no operation is detected for 15 minutes.
5.2 അടിസ്ഥാന തരംഗരൂപ പ്രദർശനം
Once powered on, the device will display the waveform. The 320x240 high-definition color LCD display provides clear and accurate waveforms.

Image: Diagram highlighting key features of the oscilloscope, including waveform detection, signal output, compact body, safety chamois, free adjustment, efficient and precise measurements, waveform storage, and lithium battery.
5.3 AUTO Function
അമർത്തുക ഓട്ടോ button for automatic waveform adaptation to the screen. This eliminates the need for manual parameter adjustments, simplifying operation.

Image: Illustration demonstrating the "AUTO" function, showing how pressing the AUTO button automatically adjusts the waveform to fit the screen.
5.4 Waveform Scanning Modes
The device supports three waveform scanning modes:
- സ്വയമേവ: Continuously scans and displays the waveform.
- സിംഗിൾ: Captures a single waveform when triggered.
- സാധാരണ: Displays the waveform only when a stable trigger condition is met.
5.5 പാരാമീറ്റർ ക്രമീകരണം
Waveform parameters such as time base, amplitude, and trigger slope can be manually set using the control buttons.

Image: A detailed diagram illustrating the control panel and the functions of each button for setting parameters on the TOOLTOP ET120MC2 Pro Oscilloscope.
- മെനു: Accesses the menu or goes back.
- F1: വോളിയം ക്രമീകരിക്കുന്നുtagഇ പാരാമീറ്ററുകൾ.
- F2: Adjusts time parameters.
- സംരക്ഷിക്കുക: Saves the current waveform.
- എസി/ഡിസി: Toggles input coupling between AC and DC.
- 1X/10X: Adjusts magnification.
- 50%: Sets trigger voltage to 50% of the waveform's average value.
- മുകളിലേക്കും താഴേക്കുമുള്ള അമ്പടയാളങ്ങൾ: Increase/decrease trigger level.
- MODE OK: Waveform zoom/movement; OK button.
- ഇടത്/വലത് അമ്പടയാളങ്ങൾ: Move waveform horizontally.
- Up/Down Arrows (with MODE OK): Shrink/zoom waveform vertically.
- TRIG: Selects trigger mode.
- എഡ്ജ്: Selects trigger edge (rising/falling).
- നിർത്തുക: Stops/runs the waveform acquisition.
5.6 Automatic Measurement Functions
The device supports automatic measurement of various waveform parameters:
- Vpp (Peak-to-Peak Voltage)
- Vrms (Root Mean Square Voltage)
- Vavg (Average Voltage)
- Vp (Peak Voltage)
- Vmax (Maximum Voltage)
- Vmin (Minimum Voltage)
- F (Frequency)
- T (Period)
- T+ (Positive Pulse Width)
- T- (Negative Pulse Width)
- Du+ (Positive Duty Cycle)
- Du- (Negative Duty Cycle)

Image: Screenshots of the oscilloscope display showing various automatic waveform measurement functions, including voltage, സമയ പാരാമീറ്ററുകൾ.
5.7 Signal Source Output
The oscilloscope can also function as a signal generator, outputting various waveforms:
- Sine wave/Triangular wave: 10Hz മുതൽ 100KHz വരെ
- Square wave: 10Hz മുതൽ 3MHz വരെ
- Square wave duty cycle: 10% മുതൽ 90% വരെ
- Putട്ട്പുട്ട് വോളിയംtage: 0-3Vpp
5.8 Waveform Storage and Management
The device can store up to 2500 DSO waveforms. It supports thumbnail browsing and waveform deletion for easy management of saved data.
6. പരിപാലനം
6.1 വൃത്തിയാക്കൽ
ഉപകരണം വൃത്തിയാക്കാൻ, മൃദുവായതും ഉണങ്ങിയതുമായ ഒരു തുണി ഉപയോഗിക്കുക. കഠിനമായ അഴുക്കിന്, അല്പം ഡി.amp cloth with mild detergent can be used. Do not use abrasive cleaners or solvents. Ensure the device is powered off and disconnected from any power source before cleaning.
6.2 സംഭരണം
When not in use for extended periods, store the oscilloscope in a cool, dry place, away from direct sunlight and extreme temperatures. The silicone protective covers on both sides of the fuselage provide anti-slip and anti-fall protection during handling and storage.
- Save conditions: -10°C to +60°C; <90%RH.
6.3 ബാറ്ററി കെയർ
To prolong battery life, avoid fully discharging the battery frequently. If storing for a long time, charge the battery to about 50% every few months.
7. പ്രശ്നപരിഹാരം
| പ്രശ്നം | സാധ്യമായ കാരണം | പരിഹാരം |
|---|---|---|
| ഉപകരണം പവർ ഓണാക്കുന്നില്ല. | ബാറ്ററി തീർന്നു. | Connect the charging cable and charge the device. |
| തരംഗരൂപം പ്രദർശിപ്പിച്ചിട്ടില്ല. | Probe not connected or faulty; Input signal too weak or out of range; Trigger settings incorrect. | Check probe connection; Verify input signal; Adjust trigger level or mode; Use AUTO function. |
| Waveform is unstable. | Trigger settings are not optimal. | Adjust trigger level, slope, or mode (e.g., to Normal or Single). |
| Screen is dim. | തെളിച്ച ക്രമീകരണം കുറവാണ്. | Adjust backlight brightness (8 levels available). |
8 സ്പെസിഫിക്കേഷനുകൾ
| പരാമീറ്റർ | മൂല്യം |
|---|---|
| Waveform Bandwidth | 120MHz |
| ചാനൽ അളവ് | 2 |
| പരമാവധി ടെസ്റ്റ് വോളിയംtage | 1X: 80Vpp, 10X: 800Vpp |
| പരമാവധി എസ്ampലിംഗ് നിരക്ക് | 500MSa/S (Software equivalent) |
| സംഭരണത്തിൻ്റെ ആഴം | 12.8div |
| ലംബ സംവേദനക്ഷമത | 50mV~100V |
| സമയ അടിസ്ഥാന ശ്രേണി | 6ns~50S |
| ട്രിഗർ മോഡ് | ഓട്ടോ/സാധാരണ/ഒറ്റ |
| ട്രിഗർ ചരിവ് | Rising / Falling |
| ഉയരുന്ന സമയം | <3nS |
| കപ്ലിംഗ് രീതി | ഡിസി/എസി |
| വാല്യംtagഇ കൃത്യത | 10% |
| ആവൃത്തി കൃത്യത | 1% |
| ഇൻപുട്ട് ഇംപെഡൻസ് | 1MΩ |
| Signal Source Output (Sine/Triangular) | 10Hz മുതൽ 100KHz വരെ |
| Signal Source Output (Square) | 10Hz ~ 3MHz |
| സ്ക്വയർ വേവ് ഡ്യൂട്ടി സൈക്കിൾ | 10%~90% |
| Putട്ട്പുട്ട് വോളിയംtage | 0-3Vpp |
| സ്ക്രീൻ റെസല്യൂഷൻ | 320*240 |
| ഡിസ്പ്ലേ തരം | 2.4 Inches TFT SCREEN |
| ഡിസ്പ്ലേ ഏരിയ | 50 മിമി x 40 മിമി |
| ബാക്ക്ലൈറ്റ് | White, 8 levels of brightness |
| ബാറ്ററി | ലിഥിയം ബാറ്ററി |
| സ്റ്റാൻഡ്ബൈ സമയം | ഏകദേശം 4 മണിക്കൂർ |
| ചാർജിംഗ് | DC5V/1A/2A |
| യാന്ത്രിക ഷട്ട്ഡൗൺ | 15 മിനിറ്റ് ഓപ്പറേഷൻ ഇല്ല |
| വലിപ്പം | 124x80x35(മില്ലീമീറ്റർ) |
| ഭാരം | ഏകദേശം 187 ഗ്രാം |
| വ്യവസ്ഥകൾ ഉപയോഗിക്കുക | 0°C~+40°C; <75%RH |
| Save Conditions | -10°C~+60°C; <90%RH |

Image: A visual representation of the product dimensions and key specifications, including display type, battery, and operating conditions.
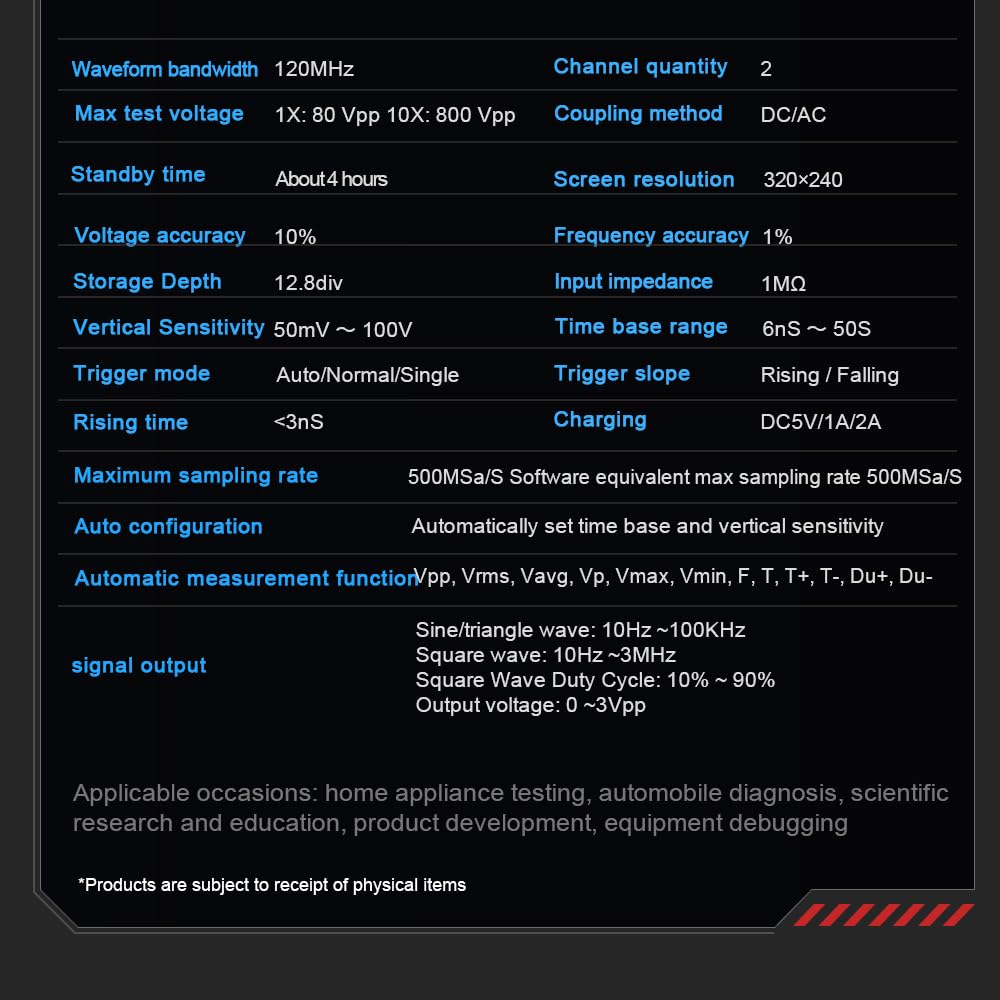
Image: A table summarizing detailed technical specifications of the oscilloscope, such as bandwidth, sampling rate, and signal output capabilities.
9. വാറൻ്റിയും പിന്തുണയും
വാറന്റി വിവരങ്ങൾക്കും സാങ്കേതിക പിന്തുണയ്ക്കും, ദയവായി നിർമ്മാതാവിന്റെ ഉദ്യോഗസ്ഥനെ കാണുക. webസൈറ്റിൽ ബന്ധപ്പെടുക അല്ലെങ്കിൽ വിൽപ്പനക്കാരനെ നേരിട്ട് ബന്ധപ്പെടുക. വാങ്ങിയതിന്റെ തെളിവായി നിങ്ങളുടെ വാങ്ങൽ രസീത് സൂക്ഷിക്കുക.
Manufacturer: Heegkyu
Date First Available: November 26, 2024
Ask a question about this manual
Ask about setup, troubleshooting, compatibility, parts, safety, or missing instructions. Manuals+ will review the question and use this page’s manual context to help answer it.