1. ആമുഖം
This manual provides detailed instructions for the installation, operation, and maintenance of your RSNAVI Android Car Stereo. This unit is designed to integrate advanced multimedia and navigation features into your Chrysler Grand Voyager (2011-2015 model years).
Please read this manual thoroughly before installation and use to ensure proper functionality and to maximize your experience with the device.

ചിത്രം 1.1: RSNAVI Android Car Stereo with included accessories.
This image displays the RSNAVI 9-inch Android Car Stereo unit integrated into a vehicle's dashboard, specifically designed for the Chrysler Grand Voyager. Surrounding the main unit are various accessories: a rearview camera for enhanced visibility, an external microphone for clear audio input during calls, and a cooling fan to maintain optimal operating temperature. The screen shows a map interface and various application icons, indicating its multimedia and navigation capabilities.
2. അനുയോജ്യതയും പാക്കേജ് ഉള്ളടക്കങ്ങളും
2.1 വാഹന അനുയോജ്യത
This RSNAVI Android Car Stereo is specifically designed for the Chrysler Grand Voyager manufactured between 2011, 2015. Before installation, confirm the year, size, and shape of your vehicle's center console to ensure proper fitment.
2.2 പാക്കേജ് ഉള്ളടക്കം
The standard package includes the following components:
- RSNAVI Android Car Stereo Head Unit
- കാൻബസ് ഡീകോഡർ
- പവർ കോർഡ്
- ആർസിഎ കേബിൾ
- റേഡിയോ ആന്റിന
- ജിപിഎസ് ആൻ്റിന
- USB Cables (Dual USB interface)
- ബാഹ്യ മൈക്രോഫോൺ
- പിൻഭാഗംview Camera (AHD/CVBS compatible)
- Installation Frame (if applicable for specific models)
3. സജ്ജീകരണവും ഇൻസ്റ്റാളേഷനും
3.1 പ്രീ-ഇൻസ്റ്റലേഷൻ പരിശോധന
- Ensure the vehicle's ignition is off and the battery is disconnected before starting any electrical work.
- സെക്ഷൻ 2.2 ൽ പട്ടികപ്പെടുത്തിയിരിക്കുന്ന എല്ലാ ഘടകങ്ങളും നിലവിലുണ്ടെന്ന് ഉറപ്പാക്കുക.
- Familiarize yourself with your vehicle's dashboard removal process. Online video tutorials specific to the Chrysler Grand Voyager 2011-2015 can be helpful.
3.2 വയറിംഗും കണക്ഷനും
The car stereo comes with dedicated wiring harnesses designed for your vehicle. Connect the power cord, RCA cables, radio antenna, GPS antenna, USB cables, external microphone, and rearview camera to their respective ports on the head unit and to the vehicle's wiring system.
- പവർ കോർഡ്: Connect to the vehicle's power supply, ensuring correct polarity. The included Canbus decoder facilitates integration with vehicle systems.
- ആർസിഎ കേബിളുകൾ: For audio/video input/output connections (e.g., external amplifier, additional monitors).
- ആന്റിന: Connect the radio antenna for FM/RDS reception and the GPS antenna for navigation functionality. Position the GPS antenna in a location with a clear view ആകാശത്തിൻ്റെ.
- USB ഇൻ്റർഫേസുകൾ: Use the dual USB interfaces for connecting USB drives, charging devices, or for wired CarPlay/Android Auto connections.
- ബാഹ്യ മൈക്രോഫോൺ: Connect for improved call quality and voice commands.
- പിൻഭാഗംview ക്യാമറ: Connect the camera to the 'Inverted Input' (AHD/CVBS) port. Ensure proper routing of the camera cable to the rear of the vehicle.

ചിത്രം 3.1: Included wiring harness and installation frame.
This image displays the specific wiring harness and a custom-fit frame provided with the RSNAVI car stereo. The harness includes various connectors for power, speakers, and data, designed to integrate seamlessly with the Chrysler Grand Voyager's electrical system. The frame ensures a flush and secure installation of the 9-inch head unit into the vehicle's dashboard opening.

ചിത്രം 3.2: Dashboard before and after stereo installation.
This image set illustrates the visual transformation of a Chrysler Grand Voyager dashboard. The top-left panel shows the original factory radio. The other panels demonstrate the RSNAVI Android Car Stereo installed, displaying various interfaces such as a navigation map, a media player, and the main application screen, highlighting the integrated appearance and functionality.
3.3 പോസ്റ്റ്-ഇൻസ്റ്റലേഷൻ പരിശോധനകൾ
- വാഹന ബാറ്ററി വീണ്ടും ബന്ധിപ്പിക്കുക.
- Turn on the ignition and power on the head unit.
- Test all functions: radio, Bluetooth, GPS, USB, steering wheel controls, and rearview ക്യാമറ.
- If any issues arise, refer to the Troubleshooting section or recheck connections.
4. പ്രവർത്തന നിർദ്ദേശങ്ങൾ
4.1 സിസ്റ്റം കഴിഞ്ഞുview
The RSNAVI car stereo operates on an Android system, providing a familiar and customizable user interface via its 9-inch touchscreen. The system supports various applications and features, similar to a smartphone or tablet.
4.2 വയർലെസ് കാർപ്ലേ / ആൻഡ്രോയിഡ് ഓട്ടോ
Connect your smartphone wirelessly to access Apple CarPlay or Android Auto. This feature allows for hands-free calls, access to phone contacts, emails, notifications, map navigation, music, and video playback directly on the car stereo display. This integration is designed to enhance driving safety by minimizing phone interaction.
- നിങ്ങളുടെ സ്മാർട്ട്ഫോണിൽ ബ്ലൂടൂത്തും വൈഫൈയും പ്രവർത്തനക്ഷമമാക്കിയിട്ടുണ്ടെന്ന് ഉറപ്പാക്കുക.
- On the car stereo, open the CarPlay or Android Auto application.
- നിങ്ങളുടെ ഉപകരണം ജോടിയാക്കാൻ ഓൺ-സ്ക്രീൻ നിർദ്ദേശങ്ങൾ പാലിക്കുക.
- Once connected, your phone's compatible apps will appear on the stereo display.

ചിത്രം 4.1: CarPlay, Android Auto, and Mirror Link interfaces.
This image illustrates the various smartphone integration options available with the RSNAVI car stereo. It shows the user interfaces for Wireless CarPlay and Android Auto, displaying familiar app icons for navigation, music, and communication. Additionally, it demonstrates the Mirror Link function, which allows the display of an iOS or Android phone screen directly onto the car stereo, enabling full control of the phone's interface.
4.3 ജിപിഎസ് നാവിഗേഷൻ
The unit features a dual navigation system supporting both offline and online maps. A built-in offline map is provided, but internet data download is required for initial setup or updates. Online maps require a Wi-Fi connection.
- Ensure the GPS antenna is properly installed and has a clear signal.
- To use offline maps, navigate to the map application and download the necessary regional data via a Wi-Fi connection.
- For online navigation, connect the unit to a Wi-Fi hotspot.
4.4 വൈഫൈ കണക്റ്റിവിറ്റി
Connect the car stereo to a Wi-Fi hotspot (e.g., from your smartphone) to access online features. This enables app installation from the Play Store, online navigation, and streaming media.
- Go to the system settings and select 'Wi-Fi'.
- വൈഫൈ ഓണാക്കി നിങ്ങൾക്ക് ആവശ്യമുള്ള നെറ്റ്വർക്ക് തിരഞ്ഞെടുക്കുക.
- ആവശ്യപ്പെടുകയാണെങ്കിൽ പാസ്വേഡ് നൽകുക.

ചിത്രം 4.2: GPS Navigation and WiFi Hotspot features.
This image highlights the navigation and connectivity capabilities of the RSNAVI car stereo. The top section displays a detailed GPS map with route guidance, indicating distance and estimated travel time. The bottom section illustrates the WiFi Hotspot feature, showing a screen filled with various streaming applications like Netflix, Hulu, and YouTube, demonstrating the unit's ability to access online content when connected to a network.
4.5 ബ്ലൂടൂത്ത് പ്രവർത്തനം
The integrated Bluetooth module allows for hands-free calling, phone book synchronization, and audio streaming from your smartphone.
- നിങ്ങളുടെ സ്മാർട്ട്ഫോണിൽ ബ്ലൂടൂത്ത് പ്രവർത്തനക്ഷമമാക്കുകയും അത് കണ്ടെത്താനാകുകയും ചെയ്യുക.
- On the car stereo, open the Bluetooth application and search for devices.
- Select your phone from the list and confirm the pairing code.
- ഒരിക്കൽ പെയർ ചെയ്താൽ, നിങ്ങൾക്ക് വയർലെസ് ആയി കോളുകൾ വിളിക്കാനും സ്വീകരിക്കാനും സംഗീതം പ്ലേ ചെയ്യാനും കഴിയും.
4.6 FM/RDS റേഡിയോ
The unit includes an FM/RDS radio tuner for clear channel reception and low noise. RDS (Radio Data System) provides additional information such as station name and program type.
- റേഡിയോ ആപ്ലിക്കേഷൻ തുറക്കുക.
- ലഭ്യമായ സ്റ്റേഷനുകൾ സ്വയമേവ കണ്ടെത്തി സംരക്ഷിക്കാൻ സ്കാൻ ഫംഗ്ഷൻ ഉപയോഗിക്കുക.
- Manually tune to frequencies or select from saved presets.
4.7 ഓഡിയോ ഇക്വലൈസർ (EQ)
Adjust the audio output using the built-in equalizer to customize the sound profile. This includes settings for bass, treble, and mid-range frequencies, as well as various sound field modes.
- Access the EQ settings from the main menu or audio settings.
- Select a preset or manually adjust the frequency bands to your preference.
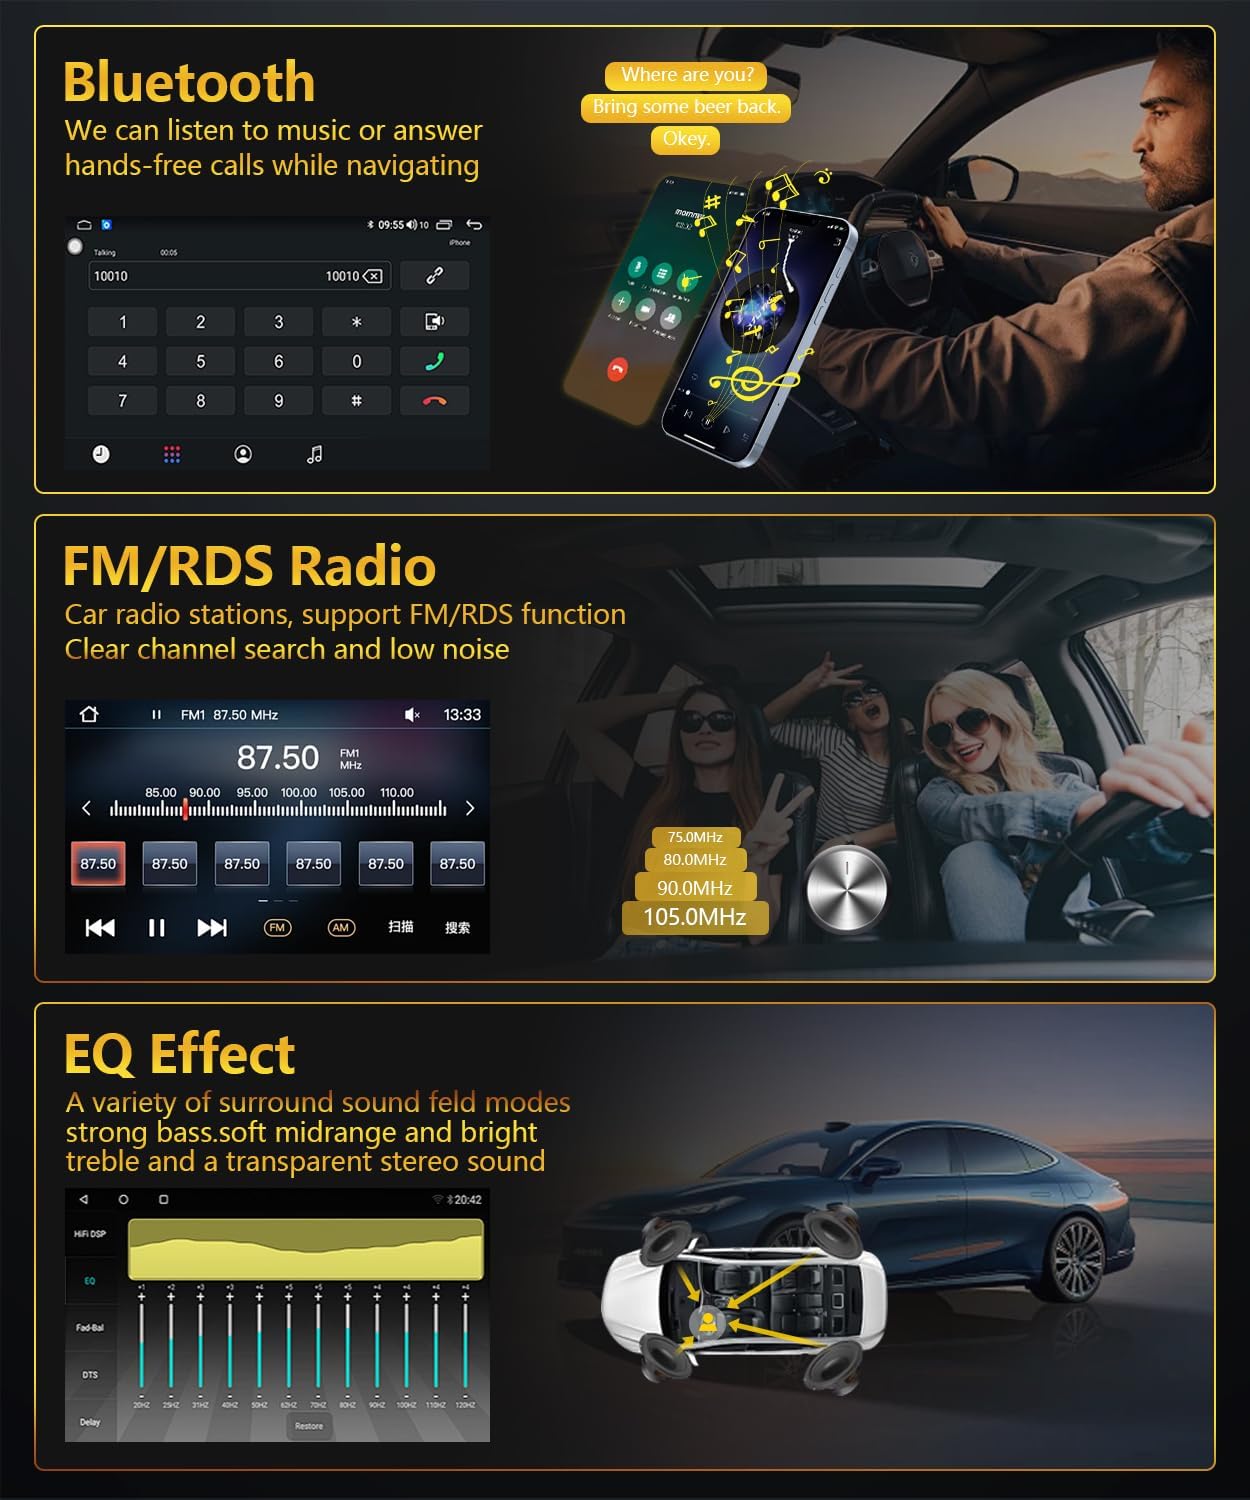
ചിത്രം 4.3: Bluetooth, FM/RDS Radio, and EQ Effect features.
This image showcases three key audio features of the RSNAVI car stereo. The top section displays the Bluetooth calling interface, showing a dial pad and contact information. The middle section illustrates the FM/RDS radio tuner, with frequency display and station presets. The bottom section presents an audio equalizer (EQ) interface, allowing users to fine-tune sound characteristics like bass, mid-range, and treble, accompanied by a diagram showing speaker placement in a car for optimal sound distribution.
4.8 റിവേഴ്സിംഗ് ക്യാമറ ഡിസ്പ്ലേ
യൂണിറ്റ് ഒരു പിൻഭാഗത്തെ പിന്തുണയ്ക്കുന്നുview camera input. When the vehicle is shifted into reverse gear, the screen automatically switches to display the camera feed, aiding in safe maneuvering. The included camera is waterproof and features night vision and a wide-angle view.
- പിൻഭാഗം ഉറപ്പാക്കുകview camera is correctly installed and connected to the 'Inverted Input'.
- Shift the vehicle into reverse gear; the display will automatically show the camera view.
4.9 സ്റ്റിയറിംഗ് വീൽ നിയന്ത്രണം
If your vehicle has original steering wheel control buttons, they can be configured to operate the car radio, providing convenient and safe control while driving.
- Access the 'Steering Wheel Control' settings in the system menu.
- Follow the on-screen instructions to map the vehicle's steering wheel buttons to the desired functions on the car stereo.

ചിത്രം 4.4: Reversing Display and Steering Wheel Control.
This image highlights two important safety and convenience features. The top section illustrates the rearview camera system, detailing its HD image quality, waterproof design, night vision, and wide-angle capabilities, with a visual representation of the camera's field of view. The bottom section displays the car stereo's interface for configuring steering wheel controls, showing various button functions like volume, track skip, and call management, allowing for seamless operation without taking hands off the wheel.
5. പരിപാലനം
5.1 പൊതു പരിചരണം
To ensure the longevity and optimal performance of your car stereo, follow these general maintenance guidelines:
- സ്ക്രീൻ ക്ലീനിംഗ്: ടച്ച്സ്ക്രീൻ മൃദുവായി തുടയ്ക്കാൻ മൃദുവായ, ലിന്റ് രഹിത തുണി ഉപയോഗിക്കുക. കഠിനമായ പാടുകൾക്ക്, ചെറുതായി dampതുണിയിൽ വെള്ളം അല്ലെങ്കിൽ സ്ക്രീൻ-സേഫ് ക്ലീനർ ഉപയോഗിക്കുക. കഠിനമായ രാസവസ്തുക്കളോ ഉരച്ചിലുകളോ ഉള്ള വസ്തുക്കൾ ഒഴിവാക്കുക.
- പൊടി നീക്കം: Periodically clean dust from the unit's vents and openings using a soft brush or compressed air to prevent overheating.
- താപനില: Avoid exposing the unit to extreme temperatures for extended periods. The operating temperature range is -20℃ to 75℃.
- സോഫ്റ്റ്വെയർ അപ്ഡേറ്റുകൾ: Check for available software updates periodically to ensure the system has the latest features and bug fixes.
6. പ്രശ്നപരിഹാരം
This section addresses common issues you might encounter with your RSNAVI Android Car Stereo.
6.1 പൊതുവായ പ്രശ്നങ്ങളും പരിഹാരങ്ങളും
- ശക്തിയില്ല:
- എല്ലാ പവർ കണക്ഷനുകളും ഫ്യൂസുകളും പരിശോധിക്കുക.
- Ensure the vehicle battery is properly connected.
- ശബ്ദമില്ല:
- സ്പീക്കർ കണക്ഷനുകൾ പരിശോധിക്കുക.
- വോളിയം ലെവലുകളും മ്യൂട്ട് ക്രമീകരണങ്ങളും പരിശോധിക്കുക.
- ശരിയായ ഓഡിയോ ഉറവിടം തിരഞ്ഞെടുത്തിട്ടുണ്ടെന്ന് ഉറപ്പാക്കുക.
- ജിപിഎസ് സിഗ്നൽ നഷ്ടം:
- GPS ആന്റിന സുരക്ഷിതമായി ബന്ധിപ്പിച്ചിട്ടുണ്ടെന്നും വ്യക്തമായ ഒരു സ്ഥലത്ത് സ്ഥാപിച്ചിട്ടുണ്ടെന്നും ഉറപ്പാക്കുക. view ആകാശത്തിൻ്റെ.
- If using offline maps, ensure map data has been fully downloaded.
- ബ്ലൂടൂത്ത് കണക്റ്റിവിറ്റി പ്രശ്നങ്ങൾ:
- സ്റ്റീരിയോയിലും ഫോണിലും ബ്ലൂടൂത്ത് പ്രവർത്തനക്ഷമമാക്കിയിട്ടുണ്ടെന്ന് ഉറപ്പാക്കുക.
- മുമ്പത്തെ ജോടിയാക്കലുകൾ ഇല്ലാതാക്കി വീണ്ടും ജോടിയാക്കാൻ ശ്രമിക്കുക.
- രണ്ട് ഉപകരണങ്ങളും പുനരാരംഭിക്കുക.
- Poor UI Responsiveness:
- ആവശ്യമില്ലാത്ത പശ്ചാത്തല ആപ്ലിക്കേഷനുകൾ അടയ്ക്കുക.
- ഒരു സിസ്റ്റം പുനരാരംഭിക്കുക.
- സ്റ്റിയറിംഗ് വീൽ നിയന്ത്രണങ്ങൾ പ്രവർത്തിക്കുന്നില്ല:
- Verify the Canbus decoder is correctly installed.
- Reconfigure the steering wheel control settings in the system menu.
6.2 ഫാക്ടറി ക്രമീകരണങ്ങൾ
If persistent issues occur, a factory reset may resolve them. The factory setting keyword is 3368. Use this option with caution as it will erase all user data and settings.
7 സ്പെസിഫിക്കേഷനുകൾ
| ഫീച്ചർ | സ്പെസിഫിക്കേഷൻ |
|---|---|
| സിസ്റ്റം | ആൻഡ്രോയിഡ് |
| ചിപ്സെറ്റ് | യുഐഎസ്81411 |
| സ്ക്രീൻ വലിപ്പം | 9 ഇഞ്ച് |
| മെമ്മറി (റാം + റോം) | 2 ജിബി (റാം) + 64 ജിബി (റോം) |
| സ്ക്രീൻ റെസല്യൂഷൻ | 1280*720 |
| റേഡിയോ ചിപ്പ് | യുഐഎസ് |
| പവർ ഔട്ട്പുട്ട് | 4 x 45W |
| പ്രവർത്തന താപനില | -20℃ മുതൽ 75℃ വരെ |
| ശക്തി Ampലൈഫയർ ചിപ്പ് | TDA7388 |
| റേഡിയോ ബാൻഡ് | എഫ്എം/ആർഡിഎസ് |
| വീഡിയോ ഔട്ട്പുട്ട് | പിന്തുണച്ചു |
| Inverted Input | AHD/CVBS (Rearview ക്യാമറ) |
| ബാഹ്യ മൈക്രോഫോൺ | പിന്തുണച്ചു |
| സ്പ്ലിറ്റ്-സ്ക്രീൻ | പിന്തുണച്ചു |
| മാപ്പ് | Built-in offline map (Internet download data required) |
| വൈഫൈ | പിന്തുണച്ചു |
| USB | ഡ്യുവൽ യുഎസ്ബി ഇന്റർഫേസ് |
| കണക്റ്റിവിറ്റി ടെക്നോളജി | ബ്ലൂടൂത്ത്, യുഎസ്ബി, വൈ-ഫൈ |
| ഓഡിയോ put ട്ട്പുട്ട് മോഡ് | സ്റ്റീരിയോ |
| ഉൾപ്പെടുത്തിയ ഘടകങ്ങൾ | Canbus, Car Radio, Power cord, RCA Cable, Radio Antenna |
| ഉൽപ്പന്ന അളവുകൾ | 33.02 x 27 x 11.02 സെ.മീ; 1 കി.ഗ്രാം |
| മോഡൽ നമ്പർ | 4 Core 2G-64G CAM |
8. വാറണ്ടിയും ഉപഭോക്തൃ പിന്തുണയും
RSNAVI is committed to providing quality products and support. Your purchase includes:
- 30 ദിവസത്തെ പണം തിരികെ നൽകൽ ഗ്യാരണ്ടി: നിങ്ങളുടെ വാങ്ങലിൽ നിങ്ങൾ തൃപ്തനല്ലെങ്കിൽ, 30 ദിവസത്തിനുള്ളിൽ അത് തിരികെ നൽകുന്നതിലൂടെ മുഴുവൻ റീഫണ്ടും ലഭിക്കും.
- 24-മാസ വാറന്റി: The product is covered by a 24-month warranty against manufacturing defects.
- ആജീവനാന്ത സാങ്കേതിക പിന്തുണ: RSNAVI offers lifetime technical assistance for any questions regarding installation or use.
For any questions or assistance, please contact our customer service team via email. We aim to respond and address your concerns within 24 hours.