
BGT-HG6RU9249
User Manual for Generic Bathroom Basin മിക്സർ ടാപ്പ്
Model: BGT-HG6RU9249
1. ആമുഖം
വാങ്ങിയതിന് നന്ദി.asing the Generic Bathroom Basin Mixer Tap. This manual provides essential information for the safe installation, operation, and maintenance of your new faucet. Please read this manual thoroughly before installation and keep it for future reference.
This modern single-hole, deck-mounted faucet is designed for use with bathroom basins, providing both hot and cold water mixing capabilities. It features a durable construction with a brushed nickel finish and a ceramic plate spool for reliable performance.
2 സുരക്ഷാ വിവരങ്ങൾ
- ഏതെങ്കിലും ഇൻസ്റ്റാളേഷൻ അല്ലെങ്കിൽ അറ്റകുറ്റപ്പണികൾ ആരംഭിക്കുന്നതിന് മുമ്പ് എല്ലായ്പ്പോഴും പ്രധാന ജലവിതരണം ഓഫ് ചെയ്യുക.
- ഇൻസ്റ്റാളേഷൻ സമയത്ത് സുരക്ഷാ ഗ്ലാസുകൾ, കയ്യുറകൾ പോലുള്ള ഉചിതമായ വ്യക്തിഗത സംരക്ഷണ ഉപകരണങ്ങൾ ധരിക്കുക.
- ഇൻസ്റ്റലേഷൻ പ്രക്രിയയുടെ ഏതെങ്കിലും ഭാഗത്തെക്കുറിച്ച് നിങ്ങൾക്ക് ഉറപ്പില്ലെങ്കിൽ, യോഗ്യതയുള്ള ഒരു പ്ലംബറെ സമീപിക്കുക.
- ജലവിതരണം പുനഃസ്ഥാപിക്കുന്നതിനുമുമ്പ് എല്ലാ കണക്ഷനുകളും സുരക്ഷിതമാണെന്നും ചോർച്ചയില്ലാത്തതാണെന്നും ഉറപ്പാക്കുക.
- Do not use abrasive cleaners or harsh chemicals on the faucet's finish, as this may damage it.
3. പാക്കേജ് ഉള്ളടക്കം
ഇൻസ്റ്റാളേഷൻ ആരംഭിക്കുന്നതിന് മുമ്പ് എല്ലാ ഘടകങ്ങളും നിലവിലുണ്ടെന്ന് ദയവായി പരിശോധിക്കുക:
- Bathroom Basin Mixer Tap (Main Unit)
- Hot and Cold Water Supply Hoses (2)
- Mounting Hardware (Washer, Gasket, Mounting Nut)
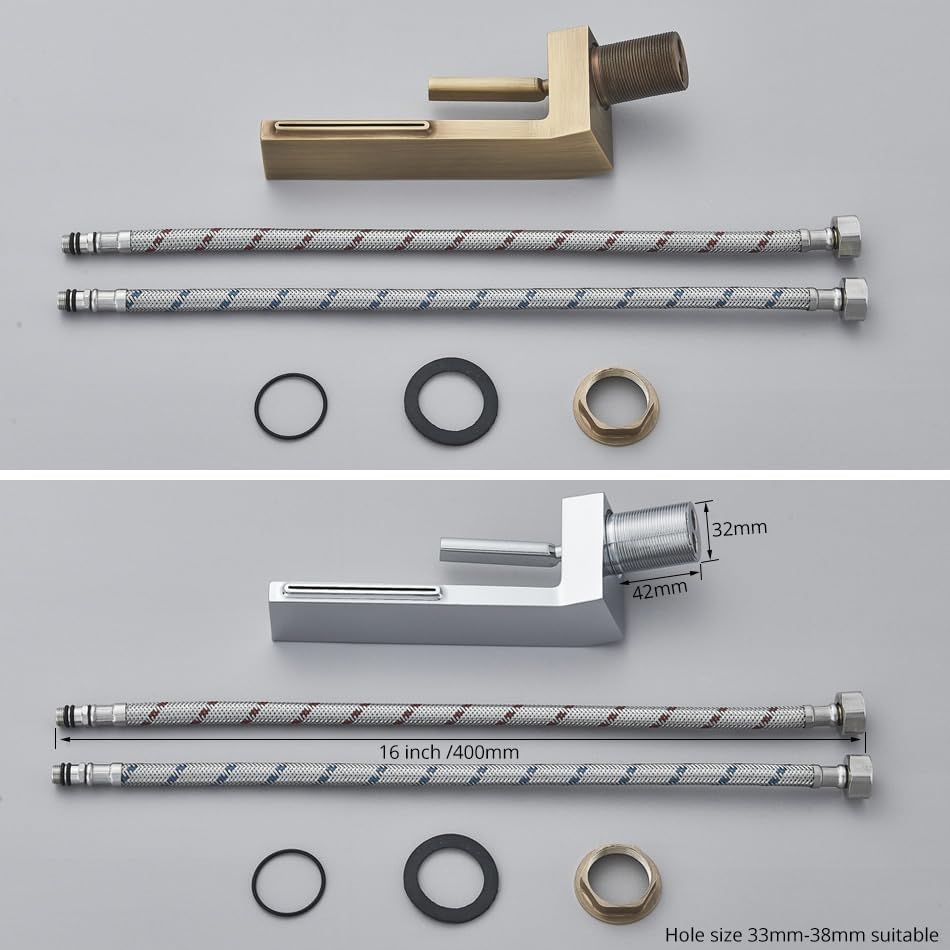
Image: All components included in the package. This includes the main faucet body, two flexible water supply hoses, and the necessary washers and nuts for secure deck mounting.
4 സ്പെസിഫിക്കേഷനുകൾ
| ഫീച്ചർ | വിശദാംശങ്ങൾ |
|---|---|
| മോഡൽ നമ്പർ | BGT-HG6RU9249 |
| ഹൗസിംഗ് മെറ്റീരിയൽ | Metal (High-purity solid brass) |
| നിയന്ത്രണ തരം | സിംഗിൾ ലിവർ |
| ഉപരിതല ചികിത്സ | ബ്രഷ് ചെയ്ത നിക്കൽ |
| Valve Core Material | Ceramic Plate Spool |
| ഇൻസ്റ്റലേഷൻ തരം | Deck Mounted, Single Hole |
| ഉൽപ്പന്ന അളവുകൾ | 1"D x 1"W x 1"H (Refer to diagram for detailed measurements) |
| ജലസംരക്ഷണ സവിശേഷത | High-performance aerator (saves 30% water) |

Image: Dimensional drawing of the faucet. Key measurements include a height of 80mm, a base width of 38mm, and a depth of 65mm. The mounting hole size is suitable for 33mm-38mm openings.
5. സജ്ജീകരണവും ഇൻസ്റ്റാളേഷനും
ആരംഭിക്കുന്നതിന് മുമ്പ്, നിങ്ങൾക്ക് ഇനിപ്പറയുന്ന ഉപകരണങ്ങൾ ഉണ്ടെന്ന് ഉറപ്പാക്കുക:
- ക്രമീകരിക്കാവുന്ന റെഞ്ച്
- ഫിലിപ്സ് ഹെഡ് സ്ക്രൂഡ്രൈവർ
- പ്ലംബർ പുട്ടി അല്ലെങ്കിൽ സിലിക്കൺ സീലന്റ്
- ടെഫ്ലോൺ ടേപ്പ്
- ബക്കറ്റ് (ഡ്രിപ്പുകൾ പിടിക്കാൻ)
ഇൻസ്റ്റലേഷൻ ഘട്ടങ്ങൾ:
- ജലവിതരണം ഓഫാക്കുക: Locate the main water shut-off valve for your home or the shut-off valves under the sink. Turn them off completely. Open the existing faucet to drain any remaining water from the lines.
- പഴയ ഫൗസറ്റ് നീക്കം ചെയ്യുക (ബാധകമെങ്കിൽ): Disconnect the water supply lines from the old faucet and unscrew the mounting nuts. Carefully remove the old faucet from the sink. Clean the sink surface thoroughly.
- Prepare New Faucet: Apply a thin bead of plumber's putty or silicone sealant around the base of the new faucet where it will meet the sink deck.
- Faucet ഇൻസ്റ്റാൾ ചെയ്യുക: Insert the faucet's threaded shank through the single hole in your basin. From underneath the sink, slide the rubber gasket, then the metal washer, and finally thread on the mounting nut. Hand-tighten the nut.
- സുരക്ഷിത ഫ്യൂസെറ്റ്: Ensure the faucet is properly aligned and centered on the basin. Use an adjustable wrench to firmly tighten the mounting nut. Do not overtighten.
- Connect Water Supply Hoses: Attach the hot and cold water supply hoses to the corresponding inlets on the bottom of the faucet. The hoses are typically marked or color-coded (red for hot, blue for cold). Use Teflon tape on the threaded connections for a secure, leak-free seal.
- ജലവിതരണവുമായി ബന്ധിപ്പിക്കുക: Connect the other ends of the supply hoses to your hot and cold water supply valves. Tighten securely with an adjustable wrench.
- ചോർച്ച പരിശോധിക്കുക: Slowly turn on the main water supply. Check all connections for leaks. If any leaks are detected, tighten the connections further.
- Flush Faucet: Once installed and leak-free, remove the aerator from the faucet spout. Turn on both hot and cold water for a few minutes to flush out any debris from the lines. Turn off the water, reattach the aerator, and test the faucet's operation.
6. പ്രവർത്തന നിർദ്ദേശങ്ങൾ
The Generic Bathroom Basin Mixer Tap features a single lever for controlling both water flow and temperature.
- ജലപ്രവാഹം: Lift the lever upwards to increase water flow. Push it downwards to decrease or turn off the water.
- താപനില നിയന്ത്രണം: Move the lever to the left for hot water and to the right for cold water. Adjust the position between hot and cold to achieve your desired water temperature.

Image: The installed brushed nickel faucet in operation, demonstrating the waterfall-style water flow from the wide spout and the single lever control.
7. പരിപാലനം
Proper care and maintenance will ensure the longevity and appearance of your faucet.
- വൃത്തിയാക്കൽ: സോഫ്റ്റ്, ഡി-ടൈപ്പർ ഉപയോഗിച്ച് ടാപ്പ് പതിവായി വൃത്തിയാക്കുക.amp cloth and mild soap. Rinse thoroughly with clean water and dry with a soft towel to prevent water spots.
- കഠിനമായ ക്ലീനറുകൾ ഒഴിവാക്കുക: Do not use abrasive cleaners, scouring pads, ammonia-based cleaners, bleach, or other harsh chemicals, as these can damage the finish.
- എയറേറ്റർ ക്ലീനിംഗ്: If water flow becomes restricted, the aerator may be clogged. Unscrew the aerator from the spout, clean any debris, and rinse it before reattaching.
8. പ്രശ്നപരിഹാരം
| പ്രശ്നം | സാധ്യമായ കാരണം | പരിഹാരം |
|---|---|---|
| താഴ്ന്ന ജലപ്രവാഹം | അടഞ്ഞുപോയ എയറേറ്റർ; ഭാഗികമായി അടഞ്ഞ ഷട്ട്-ഓഫ് വാൽവ്; ജലവിതരണ സംവിധാനത്തിലെ അവശിഷ്ടങ്ങൾ. | Clean or replace aerator; fully open shut-off valves; flush water lines. |
| കണക്ഷനുകളിലെ ചോർച്ചകൾ | അയഞ്ഞ കണക്ഷനുകൾ; തേഞ്ഞുപോയ വാഷറുകൾ; ആവശ്യത്തിന് ടെഫ്ലോൺ ടേപ്പ് ഇല്ല. | Tighten connections; replace washers; reapply Teflon tape. |
| ജല താപനില പ്രശ്നങ്ങൾ | Incorrect hot/cold supply connections; water heater issues. | Verify hot/cold connections; check water heater settings. |
| ഫൗസറ്റ് ഡ്രിപ്പുകൾ | തേഞ്ഞുപോയ സെറാമിക് കാട്രിഡ്ജ്. | പകരം കാട്രിഡ്ജിനായി ഉപഭോക്തൃ പിന്തുണയുമായി ബന്ധപ്പെടുക. |
9. വാറൻ്റി വിവരങ്ങൾ
This product comes with a limited warranty. Please refer to the following details:
- വാറൻ്റി കാലയളവ്: വാങ്ങിയ തീയതി മുതൽ 3 മാസം.
- This warranty covers defects in material and workmanship under normal use. It does not cover damage resulting from improper installation, misuse, abuse, accident, or unauthorized repairs.
10. ഉപഭോക്തൃ പിന്തുണ
If you have any questions, require assistance with installation, or need to report a defect, please contact the seller or retailer from whom you purchased this product. Please have your model number (BGT-HG6RU9249) and proof of purchase ready when contacting support.
Ask a question about this manual
Ask about setup, troubleshooting, compatibility, parts, safety, or missing instructions. Manuals+ will review the question and use this page’s manual context to help answer it.