
WMic-T1
WMic-T1 UHF Wireless Microphone System User Manual
Model: WMic-T1
1. ആമുഖം
Thank you for choosing the WMic-T1 UHF Wireless Microphone System. This manual provides detailed instructions for the proper setup, operation, and maintenance of your new microphone system. Please read this manual thoroughly before using the product to ensure optimal performance and longevity. This system is designed for high-quality audio capture in various applications, including vlogging, live streaming, interviews, and video recording.
2. പാക്കേജ് ഉള്ളടക്കം
താഴെ ലിസ്റ്റ് ചെയ്തിരിക്കുന്ന എല്ലാ ഇനങ്ങളും നിങ്ങളുടെ പാക്കേജിൽ ഉൾപ്പെടുത്തിയിട്ടുണ്ടെന്ന് ദയവായി പരിശോധിക്കുക. ഏതെങ്കിലും ഇനങ്ങൾ നഷ്ടപ്പെട്ടിട്ടുണ്ടെങ്കിലോ കേടായിട്ടുണ്ടെങ്കിലോ, ദയവായി നിങ്ങളുടെ റീട്ടെയിലറെ ബന്ധപ്പെടുക.

ചിത്രം: കഴിഞ്ഞുview of the WMic-T1 UHF Wireless Microphone System package contents, including the transmitter, receiver, and accessories.
- 1 x ട്രാൻസ്മിറ്റർ
- 1 x റിസീവർ
- 1 x കോൾഡ് ഷൂ അഡാപ്റ്റർ
- 1 x ലാവലിയർ മൈക്രോഫോൺ
- 1 x 3.5mm TRRS Output Cable (for smartphones)
- 1 x 3.5mm TRS Output Cable (for cameras)
- 2 x ബെൽറ്റ് ക്ലിപ്പുകൾ
- 1 x സ്റ്റോറേജ് ബാഗ്
- 1 x യൂസർ മാനുവൽ (ഇംഗ്ലീഷ്)
3. ഉൽപ്പന്നം കഴിഞ്ഞുview
The WMic-T1 system consists of a transmitter and a receiver, both compact and lightweight, designed for portability and ease of use. They feature a clear display for channel and battery status.
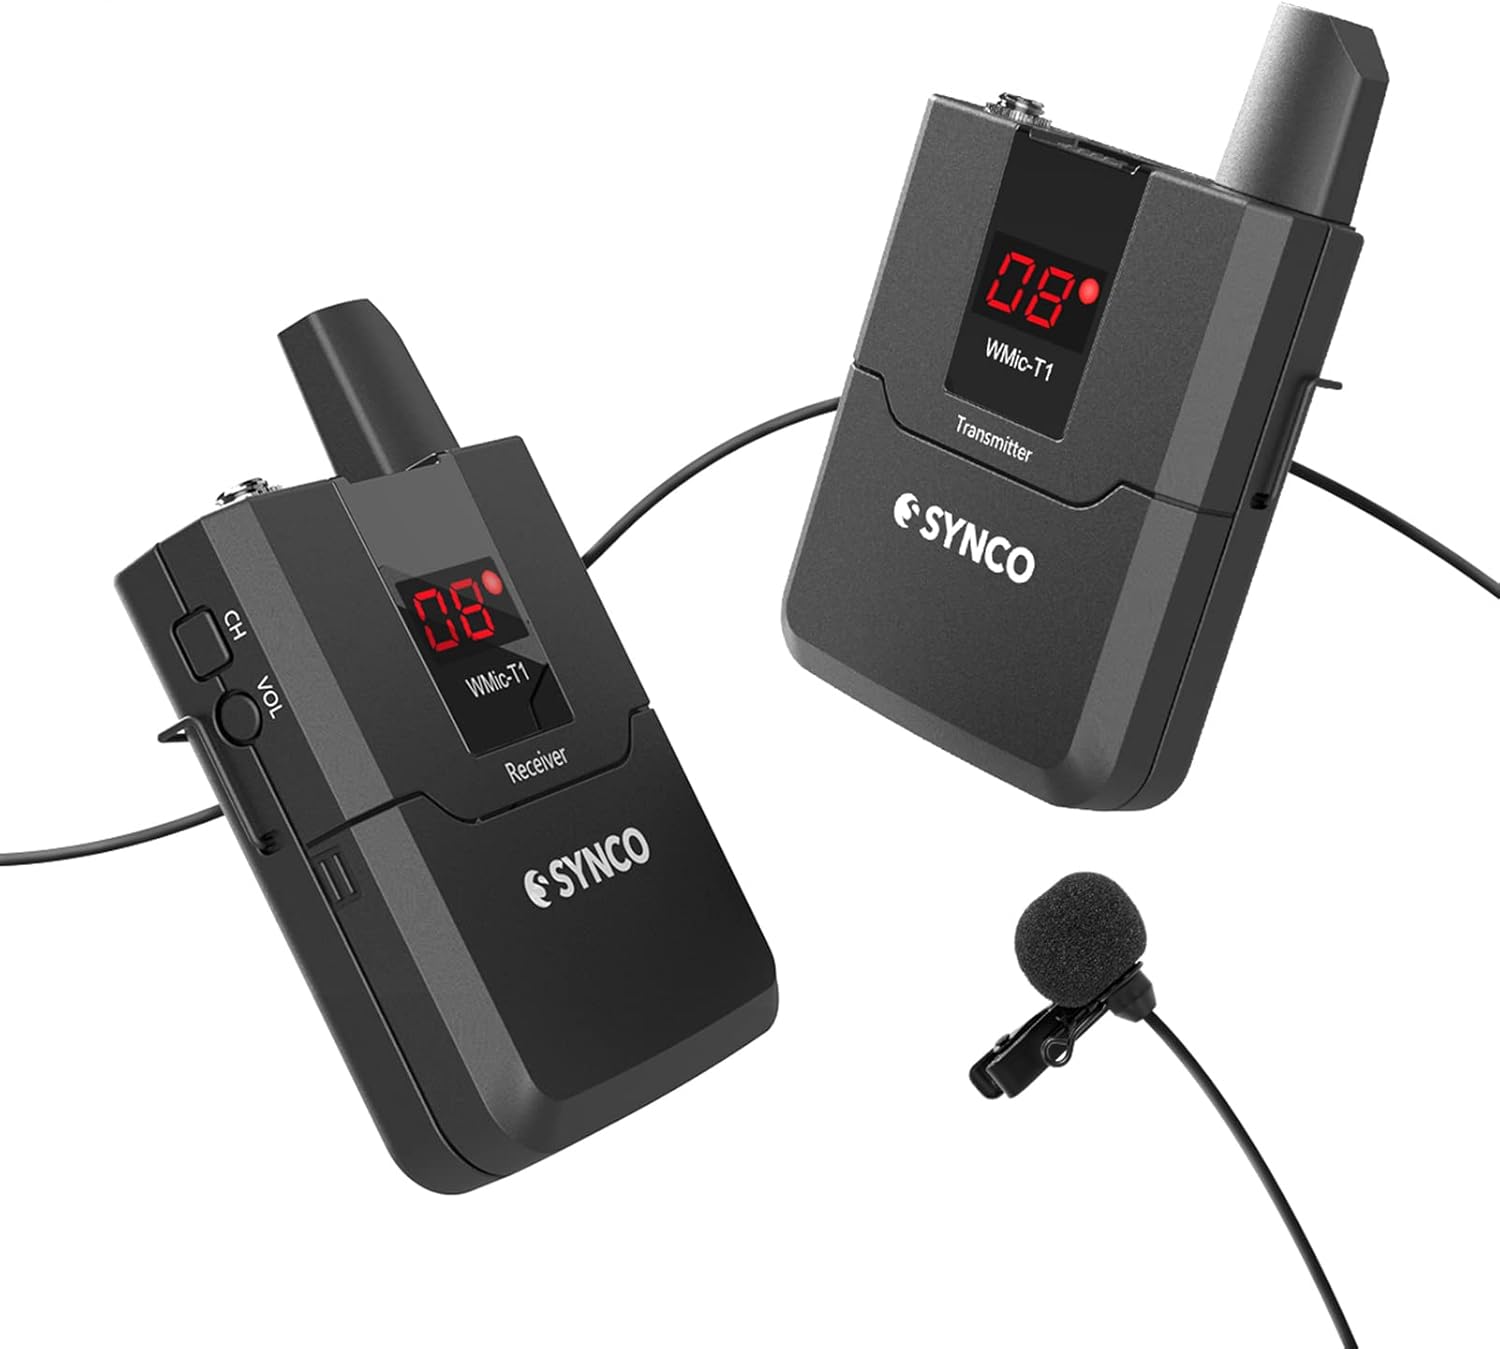
Image: The WMic-T1 wireless microphone system, showing both the transmitter and receiver units along with the lavalier microphone.
3.1 പ്രധാന സവിശേഷതകൾ
- UHF വയർലെസ് ട്രാൻസ്മിഷൻ: Supports 16 switchable channels for stable and interference-free audio.
- വിപുലീകരിച്ച ശ്രേണി: Effective transmission distance of up to 50 meters (164 feet) in open areas.
- കുറഞ്ഞ ശബ്ദ പ്രകടനം: Utilizes DSP technology to minimize signal noise, achieving a Signal-to-Noise Ratio (SNR) of 70dB.
- Omnidirectional Lavalier Microphone: Captures sound from all directions with high detail, ideal for hands-free operation.
- ബഹുമുഖ കണക്റ്റിവിറ്റി: Includes 3.5mm TRRS and TRS output cables for compatibility with smartphones, cameras, camcorders, and audio recorders.
- ഒതുക്കമുള്ളതും ഭാരം കുറഞ്ഞതുമായ ഡിസൈൻ: Easy to carry and mount with included cold shoe adapter and belt clips.
3.2 ഘടകങ്ങളും നിയന്ത്രണങ്ങളും
ചിത്രം: വിശദമായത് views of the WMic-T1 units, highlighting the cold shoe mount, display screen, battery compartment, and belt clip attachment points.
- വൈദ്യുതി സ്വിച്ച്: യൂണിറ്റ് ഓണാക്കുകയോ ഓഫാക്കുകയോ ചെയ്യുന്നു.
- Channel (CH) Button: Used to select and switch between the 16 available UHF channels.
- Volume (VOL) Control: റിസീവറിന്റെ ഓഡിയോ ഔട്ട്പുട്ട് ലെവൽ ക്രമീകരിക്കുന്നു.
- 3.5mm Mic Input (Transmitter): Connects the lavalier microphone.
- 3.5mm Audio Output (Receiver): Connects to your recording device (camera, phone, etc.).
- ഡിസ്പ്ലേ സ്ക്രീൻ: Shows current channel, battery status, and signal strength.
- ബാറ്ററി കമ്പാർട്ട്മെൻ്റ്: രണ്ട് AA ബാറ്ററികളാണ് ഉള്ളത്.
- ബെൽറ്റ് ക്ലിപ്പ്: For attaching the unit to clothing or a belt.
- കോൾഡ് ഷൂ അഡാപ്റ്റർ: For mounting the receiver onto a camera's hot shoe.

Image: Illustrates the compact size of the WMic-T1 units compared to a smartphone, along with explanations of the multiple indicator lights (battery, IR/RF, audio).
3.3 ഇൻഡിക്കേറ്റർ ലൈറ്റുകൾ
- ബാറ്ററി സൂചകം: Turns red and flickers when power is low.
- IR/RF Light: Stays on when the channel is successfully matched between transmitter and receiver.
- Audio Green Light: Flickers when audio input is detected.
4. സജ്ജീകരണം
4.1 ബാറ്ററി ഇൻസ്റ്റാളേഷൻ
Both the transmitter and receiver require two AA batteries (not included). Ensure correct polarity when inserting the batteries.

Image: Diagram showing the battery compartment of the WMic-T1 units and how to correctly insert two AA batteries.
- Open the battery compartment cover on the back of the transmitter/receiver.
- Insert two AA batteries, matching the positive (+) and negative (-) terminals as indicated inside the compartment.
- ബാറ്ററി കമ്പാർട്ട്മെൻ്റ് കവർ സുരക്ഷിതമായി അടയ്ക്കുക.
4.2 Connecting the Microphone and Output Cables
Connect the lavalier microphone to the transmitter and the appropriate output cable to the receiver based on your recording device.
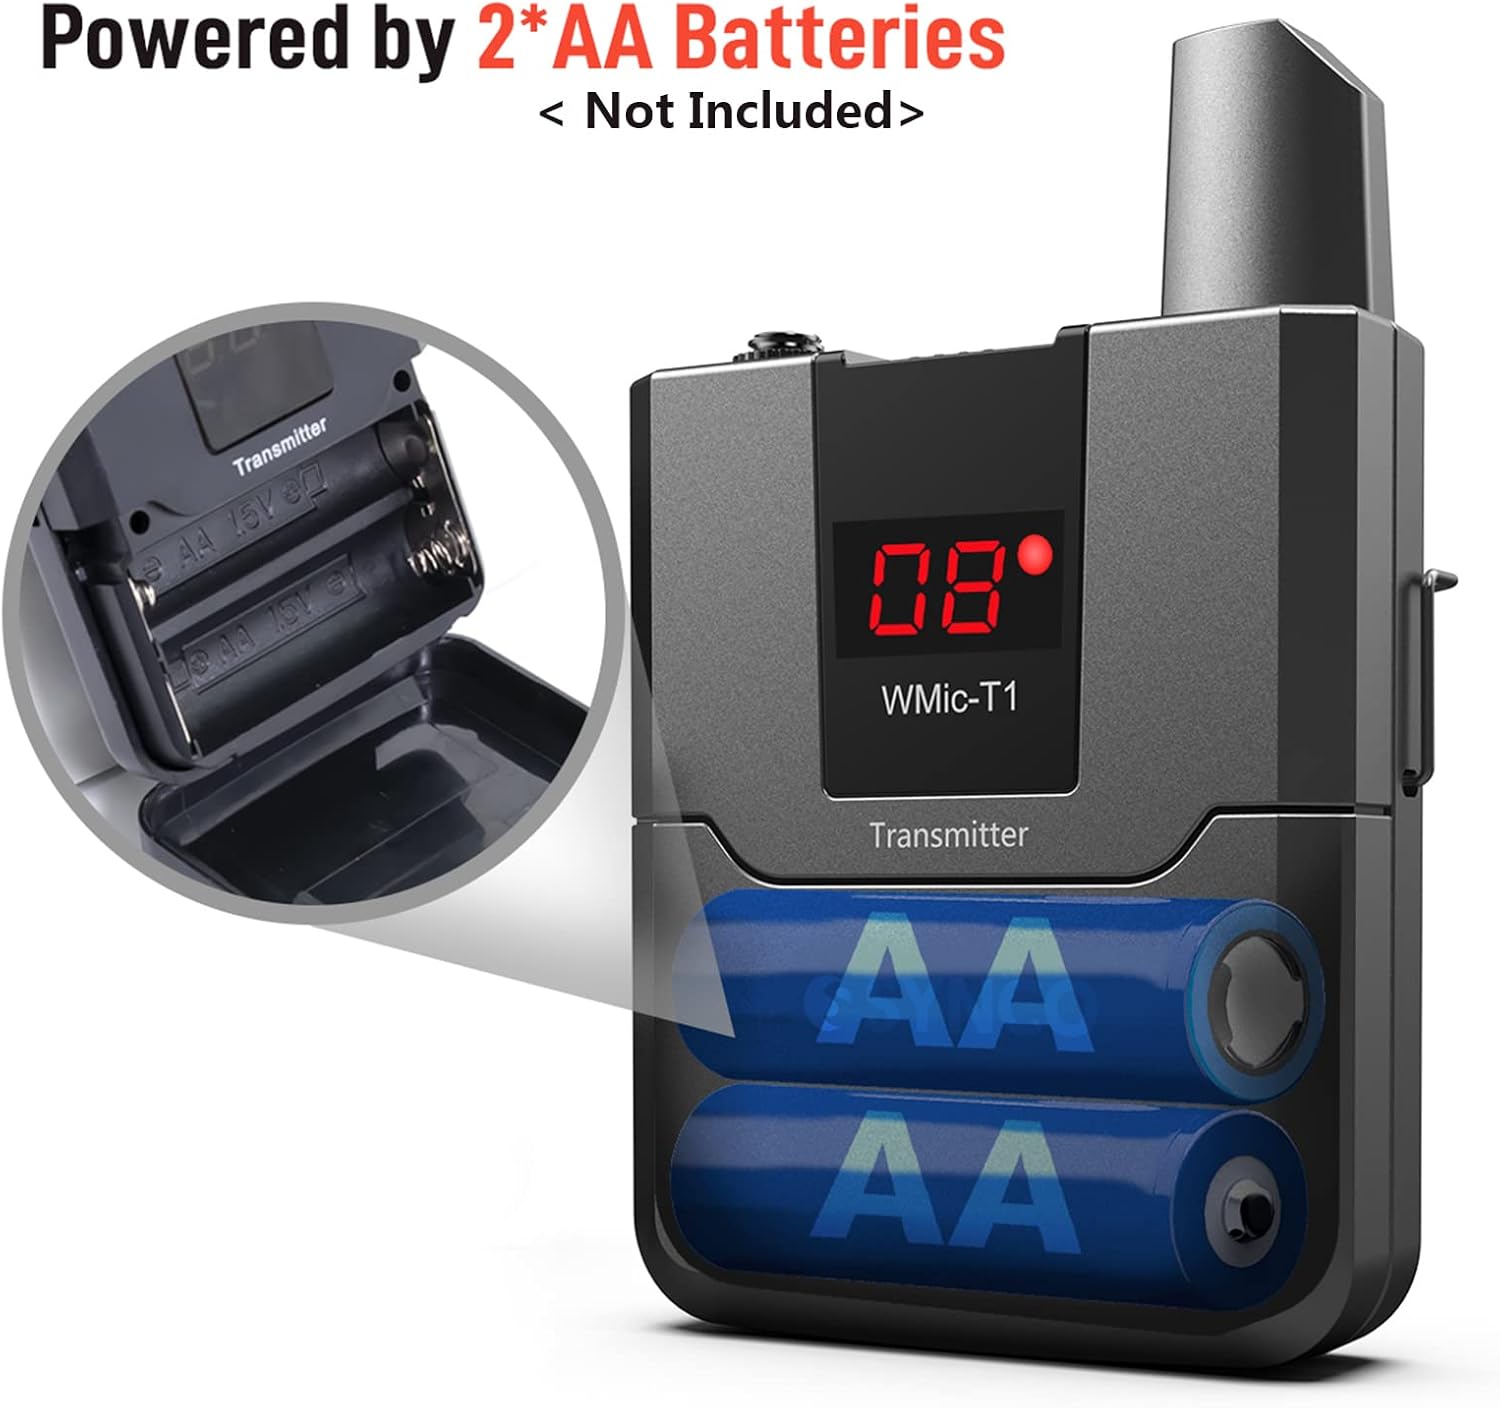
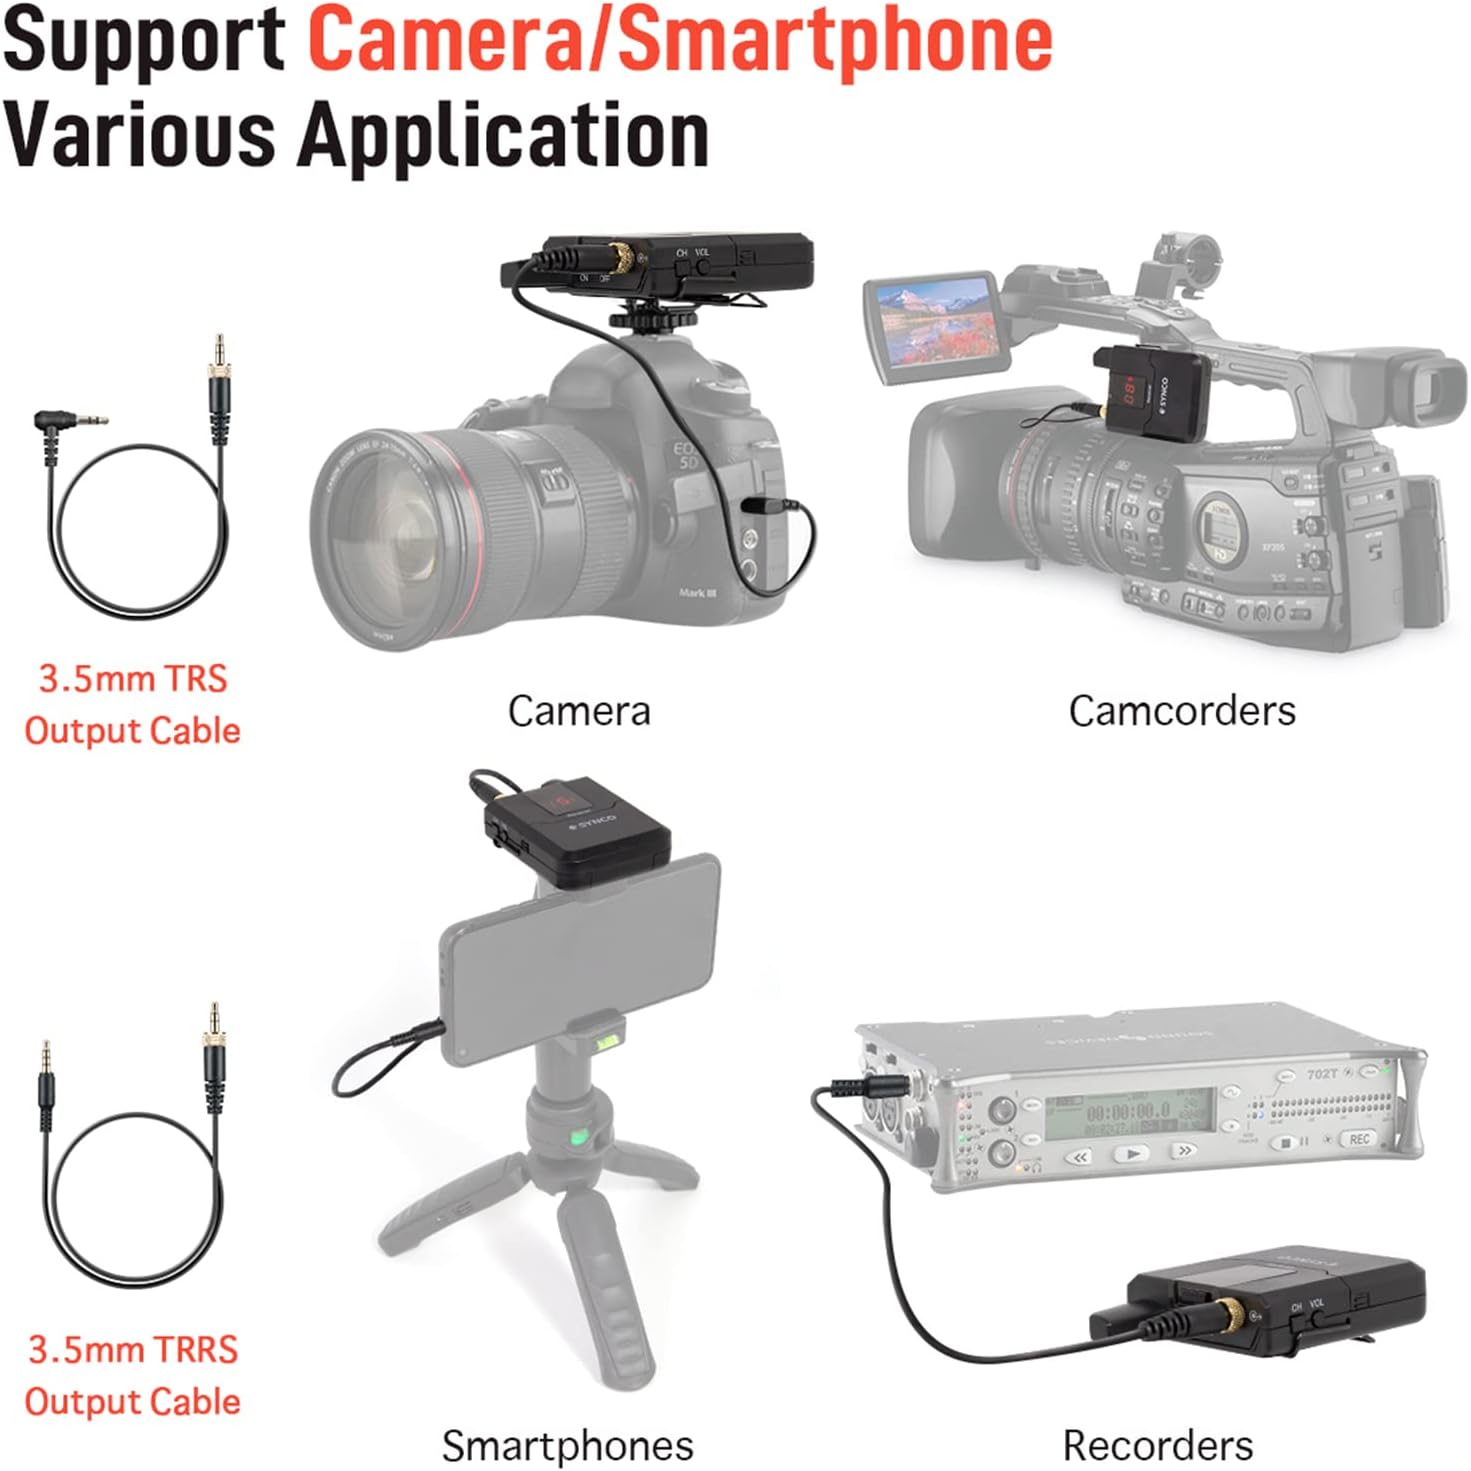
Image: Illustrations demonstrating how to connect the WMic-T1 receiver to various devices like cameras, camcorders, smartphones, and audio recorders using the 3.5mm TRS and TRRS cables.
- Plug the 3.5mm jack of the lavalier microphone into the MIC input port on the transmitter.
- For smartphones, use the 3.5mm TRRS output cable. Connect one end to the receiver's audio output and the other end to your smartphone's 3.5mm audio jack.
- For cameras, camcorders, or audio recorders, use the 3.5mm TRS output cable. Connect one end to the receiver's audio output and the other end to your device's 3.5mm audio input.
4.3 യൂണിറ്റുകൾ മൌണ്ട് ചെയ്യൽ
Use the provided accessories to conveniently mount the transmitter and receiver.
- ബെൽറ്റ് ക്ലിപ്പ്: Attach the belt clip to the back of both the transmitter and receiver. This allows you to clip them onto clothing, belts, or pockets for hands-free operation.
- കോൾഡ് ഷൂ അഡാപ്റ്റർ: Attach the cold shoe adapter to the receiver. This allows you to slide the receiver onto the hot shoe mount of your camera or camcorder.
5. പ്രവർത്തന നിർദ്ദേശങ്ങൾ
5.1 പവർ ഓൺ/ഓഫ്
Slide the power switch on both the transmitter and receiver to the 'ON' position to power them on. Slide to 'OFF' to power them off.
5.2 Channel Selection and Pairing
The WMic-T1 system supports 16 switchable channels to avoid interference. The transmitter and receiver must be on the same channel to communicate.

Image: Visual representation of the 50-meter transmission range and the 16 switchable channels feature of the WMic-T1 system.
- ട്രാൻസ്മിറ്ററും റിസീവറും ഓണാക്കുക.
- Press the 'CH' button on either the transmitter or receiver to cycle through the available channels (01-16).
- Ensure that both units are set to the same channel number. The IR/RF light on the display will remain solid when a successful connection is established.
- If you experience interference, switch to a different channel until a clear signal is found.
5.3 വോളിയം ക്രമീകരണം
Adjust the output volume of the receiver using the 'VOL' control to match the input level requirements of your recording device. It is recommended to start with a lower volume and gradually increase it to avoid clipping.
5.4 മൈക്രോഫോൺ ഉപയോഗം
The omnidirectional lavalier microphone is designed to pick up sound from all directions, making it versatile for various speaking positions.

Image: Close-up of the omnidirectional lavalier microphone being clipped onto clothing, illustrating its 360-degree sound pickup capability.
- Clip the lavalier microphone to your collar, tie, or other clothing, approximately 15-20 cm (6-8 inches) from your mouth for optimal sound capture.
- Ensure the microphone is not covered by clothing to prevent muffled sound.
5.5 ശബ്ദം കുറയ്ക്കൽ
The WMic-T1 incorporates DSP technology to effectively reduce background noise, ensuring clear audio recordings.

Image: Graphic illustrating the 70dB Signal-to-Noise Ratio (SNR) and extremely low noise performance of the WMic-T1, highlighting its DSP technology.
While the system is designed for low noise, always try to record in a quiet environment to achieve the best possible audio quality.
6. പരിപാലനം
Proper maintenance will extend the life of your WMic-T1 system.
- വൃത്തിയാക്കൽ: Use a soft, dry cloth to clean the units. Do not use liquid cleaners or solvents, as they may damage the components.
- സംഭരണം: When not in use, store the system in the provided storage bag in a cool, dry place, away from direct sunlight and extreme temperatures.
- ബാറ്ററി കെയർ: Remove batteries from the units if they will not be used for an extended period to prevent battery leakage and damage.
- കേബിൾ കെയർ: Avoid sharp bends or kinks in the cables to prevent internal wire damage.
7. പ്രശ്നപരിഹാരം
If you encounter issues with your WMic-T1 system, refer to the following troubleshooting guide:
| പ്രശ്നം | സാധ്യമായ കാരണം | പരിഹാരം |
|---|---|---|
| ശബ്ദ ഔട്ട്പുട്ട് ഇല്ല | Units not powered on കുറഞ്ഞ ബാറ്ററികൾ Incorrect channel pairing കേബിളുകൾ ശരിയായി ബന്ധിപ്പിച്ചിട്ടില്ല Recording device input issue | Ensure both units are ON ബാറ്ററികൾ മാറ്റിസ്ഥാപിക്കുക Verify transmitter and receiver are on the same channel എല്ലാ കേബിൾ കണക്ഷനുകളും പരിശോധിക്കുക Test recording device with another audio source |
| Poor sound quality / Interference | മറ്റ് വയർലെസ് ഉപകരണങ്ങളിൽ നിന്നുള്ള ഇടപെടൽ Too far from receiver യൂണിറ്റുകൾക്കിടയിലുള്ള തടസ്സങ്ങൾ കുറഞ്ഞ ബാറ്ററി | Switch to a different channel Reduce distance between transmitter and receiver വ്യക്തമായ കാഴ്ച ഉറപ്പാക്കുക ബാറ്ററികൾ മാറ്റിസ്ഥാപിക്കുക |
| Lavalier mic not picking up sound | Mic not plugged in correctly Mic damaged Transmitter issue | Ensure mic is fully inserted into transmitter Try another lavalier mic if available Check transmitter's power and channel |
| Battery indicator flickering red | കുറഞ്ഞ ബാറ്ററി പവർ | Replace both AA batteries immediately |
8 സ്പെസിഫിക്കേഷനുകൾ
Technical specifications for the WMic-T1 UHF Wireless Microphone System:
- മോഡൽ: WMic-T1
- നിറം: കറുപ്പ്
- ചാനലുകൾ: 16 (UHF)
- സിഗ്നൽ-ടു-നോയ്സ് അനുപാതം (SNR): 70dB
- ട്രാൻസ്മിഷൻ ദൂരം: 50 മീറ്റർ വരെ (164 അടി)
- വൈദ്യുതി വിതരണം: 2 x AA batteries (not included) for each unit (Transmitter and Receiver)
- ഔട്ട്പുട്ട് കേബിളുകൾ: 3.5mm TRRS (for phone), 3.5mm TRS (for camera)
9. വാറൻ്റിയും പിന്തുണയും
വാറന്റി വിവരങ്ങൾ, സാങ്കേതിക പിന്തുണ, അല്ലെങ്കിൽ സേവന അന്വേഷണങ്ങൾ എന്നിവയ്ക്കായി, വാങ്ങുന്ന സമയത്ത് നൽകിയിരിക്കുന്ന ഡോക്യുമെന്റേഷൻ പരിശോധിക്കുകയോ നിങ്ങളുടെ റീട്ടെയിലറെ ബന്ധപ്പെടുകയോ ചെയ്യുക. ഏതെങ്കിലും വാറന്റി ക്ലെയിമുകൾക്കായി നിങ്ങളുടെ വാങ്ങിയതിന്റെ തെളിവ് സൂക്ഷിക്കുക.
Ask a question about this manual
Ask about setup, troubleshooting, compatibility, parts, safety, or missing instructions. Manuals+ will review the question and use this page’s manual context to help answer it.