Bagotte A21
ബാഗോട്ട് റോബോട്ട് വാക്വം ആൻഡ് മോപ്പ് മോഡൽ A21 യൂസർ മാനുവൽ
സജ്ജീകരണം, പ്രവർത്തനം, പരിപാലനം എന്നിവയ്ക്കുള്ള നിങ്ങളുടെ ഗൈഡ്
1. പ്രധാന സുരക്ഷാ നിർദ്ദേശങ്ങൾ
Please read this user manual carefully before using the Bagotte Robot Vacuum and Mop Model A21. Keep this manual for future reference.
- 8 വയസ്സും അതിനുമുകളിലും പ്രായമുള്ള കുട്ടികൾക്കും ശാരീരികമോ ഇന്ദ്രിയപരമോ മാനസികമോ ആയ കഴിവുകൾ കുറഞ്ഞവർക്കും അനുഭവപരിചയവും അറിവും ഇല്ലാത്തവർക്കും സുരക്ഷിതമായ രീതിയിൽ ഉപകരണം ഉപയോഗിക്കുന്നതുമായി ബന്ധപ്പെട്ട മേൽനോട്ടമോ നിർദ്ദേശമോ നൽകുകയും അപകടസാധ്യതകൾ മനസ്സിലാക്കുകയും ചെയ്തിട്ടുണ്ടെങ്കിൽ ഈ ഉപകരണം ഉപയോഗിക്കാൻ കഴിയും. .
- കുട്ടികൾ ഉപകരണം ഉപയോഗിച്ച് കളിക്കരുത്. മേൽനോട്ടമില്ലാതെ കുട്ടികൾ വൃത്തിയാക്കലും ഉപയോക്തൃ പരിപാലനവും നടത്തരുത്.
- നിർമ്മാതാവ് നൽകുന്ന യഥാർത്ഥ പവർ അഡാപ്റ്റർ മാത്രം ഉപയോഗിക്കുക.
- തുറന്ന തീജ്വാലകളോ ദുർബലമായ വസ്തുക്കളോ ഉള്ള പരിതസ്ഥിതികളിൽ റോബോട്ട് ഉപയോഗിക്കരുത്.
- Ensure the charging station is placed on a level surface against a wall, with no obstacles within 1 meter on either side and 2 meters in front.
- Before cleaning, remove power cords, small objects, and any items that could entangle the robot.
- Do not immerse the robot or its electronic components in water.
- ഏതെങ്കിലും അറ്റകുറ്റപ്പണികൾ നടത്തുന്നതിന് മുമ്പ് റോബോട്ട് ഓഫ് ചെയ്ത് ചാർജിംഗ് സ്റ്റേഷൻ അൺപ്ലഗ് ചെയ്യുക.
2. പാക്കേജ് ഉള്ളടക്കം
അൺപാക്ക് ചെയ്യുമ്പോൾ എല്ലാ ഘടകങ്ങളും ഉണ്ടെന്നും നല്ല നിലയിലാണെന്നും ഉറപ്പാക്കുക.

Image: All items included in the Bagotte Robot Vacuum A21 package.
- A21 Robot Vacuum Cleaner * 1
- Charging Station * 1
- Remote Control (2 AAA batteries included) * 1
- പവർ അഡാപ്റ്റർ * 1
- 2-in-1 Water Tank * 1
- സൈഡ് ബ്രഷുകൾ * 2
- Mop Holder * 1
- Mop Cloth * 2
- Hepa Filters * 1
- ക്ലീനിംഗ് ബ്രഷ് * 1
- ഉപയോക്തൃ മാനുവൽ * 1
3. ഉൽപ്പന്നം കഴിഞ്ഞുview
The Bagotte A21 is a 3-in-1 robot vacuum designed for vacuuming, sweeping, and mopping. It features a slim design, powerful suction, and multiple control options.

Image: Bagotte Robot Vacuum A21 main unit and accessories.
പ്രധാന യൂണിറ്റ് ഘടകങ്ങൾ
- മുകളിലെ കവർ: Power button, Wi-Fi indicator.
- ഫ്രണ്ട് ബമ്പർ: Collision sensors.
- സൈഡ് ബ്രഷുകൾ: For sweeping edges and corners.
- ഡ്രൈവിംഗ് വീലുകൾ: For movement.
- ചവറ്റുകുട്ട/വാട്ടർ ടാങ്ക്: ഡ്രൈ ആൻഡ് വെറ്റ് ക്ലീനിംഗിനായി സംയോജിത യൂണിറ്റ്.
- ചാർജിംഗ് കോൺടാക്റ്റുകൾ: For automatic recharging.
- Bottom Sensors: Cliff sensors to prevent falls.
4. സജ്ജീകരണം
4.1 ചാർജിംഗ് സ്റ്റേഷൻ പ്ലേസ്മെന്റ്
Place the charging station against a wall on a hard, level surface. Ensure there are no obstacles within 1 meter (3.3 feet) to the left and right, and 2 meters (6.6 feet) in front of the charging station. This allows the robot to return for charging without obstruction.

Image: Robot vacuum returning to its charging station.
4.2 പ്രാരംഭ ചാർജിംഗ്
Connect the power adapter to the charging station and plug it into a wall outlet. Place the robot onto the charging station, ensuring the charging contacts align. For first-time use, charge the robot for at least 6 hours to ensure the battery is fully conditioned.
4.3 സൈഡ് ബ്രഷുകൾ ഇൻസ്റ്റാൾ ചെയ്യൽ
Attach the side brushes to the corresponding posts on the bottom of the robot until they click into place. Ensure the brushes are securely fastened.
4.4 Installing the 2-in-1 Water Tank/Dustbin
To use the mopping function, fill the water tank with clean water. Attach the mop cloth to the mop holder, then slide the mop holder onto the water tank. Insert the combined 2-in-1 water tank/dustbin unit into the back of the robot until it clicks securely.

Image: Components for 3-in-1 cleaning functionality.
5. പ്രവർത്തന നിർദ്ദേശങ്ങൾ
5.1 പവർ ഓൺ/ഓഫ്
- പവർ ഓൺ: Press and hold the power button on the robot for a few seconds until the indicator light turns on.
- പവർ ഓഫ്: ഇൻഡിക്കേറ്റർ ലൈറ്റ് ഓഫ് ആകുന്നതുവരെ പവർ ബട്ടൺ കുറച്ച് സെക്കൻഡ് അമർത്തിപ്പിടിക്കുക.
5.2 ക്ലീനിംഗ് മോഡുകൾ
The robot offers four cleaning modes to suit different needs:

Image: Illustration of different cleaning modes.
- ഓട്ടോ ക്ലീനിംഗ്: The robot automatically cleans in a systematic pattern.
- സ്പോട്ട് ക്ലീനിംഗ്: The robot cleans a specific area in a spiral pattern for concentrated cleaning.
- എഡ്ജ് ക്ലീനിംഗ്: റോബോട്ട് ചുവരുകളിലും ഫർണിച്ചറിന്റെ അരികുകളിലും വൃത്തിയാക്കുന്നു.
- മാനുവൽ ക്ലീനിംഗ്: Control the robot's direction using the remote control or app.
5.3 App Control (Tuya Smart App)
Download the Tuya Smart app from your smartphone's app store. Follow the in-app instructions to connect your robot to your home's 2.4GHz Wi-Fi network. The app allows for advanced control and scheduling.
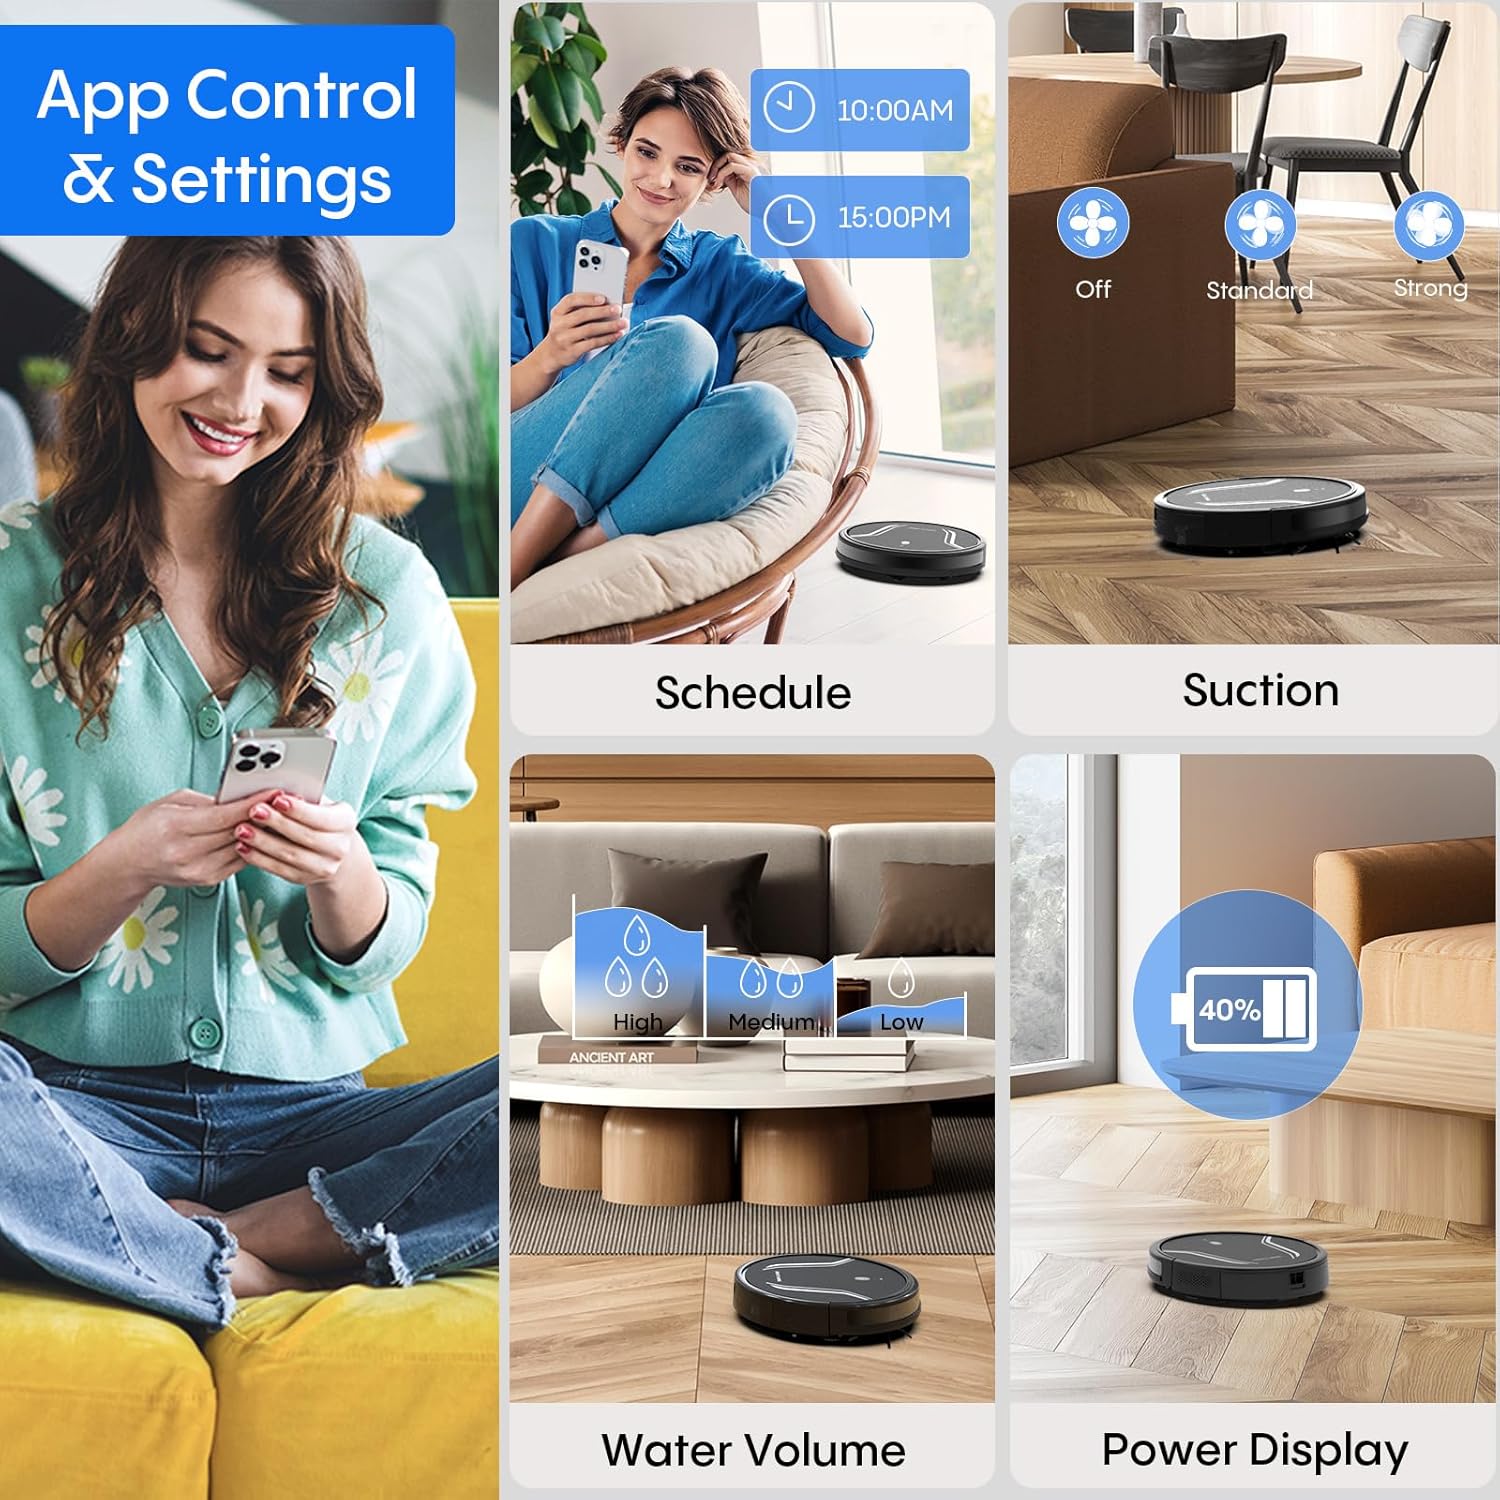
Image: App control interface for the robot vacuum.
- ഷെഡ്യൂളിംഗ്: റോബോട്ടിന് യാന്ത്രികമായി വൃത്തിയാക്കാൻ പ്രത്യേക സമയം സജ്ജമാക്കുക.
- ക്ലീനിംഗ് മോഡുകൾ: Select desired cleaning modes.
- സക്ഷൻ പവർ: Adjust suction levels (e.g., Standard, Strong).
- ജലത്തിൻ്റെ അളവ്: Control water flow for mopping (e.g., Low, Medium, High).
- ബാറ്ററി നില: Monitor the robot's battery level.
- Find My Robot: Locate the robot if it gets stuck or lost.
5.4 വിദൂര നിയന്ത്രണം
Use the included remote control to manually direct the robot, start/pause cleaning, select cleaning modes, and send it back to the charging station.
5.5 വോയ്സ് കൺട്രോൾ (അലക്സ/ഗൂഗിൾ അസിസ്റ്റന്റ്)
Once connected to the Tuya Smart app, you can link your robot to Amazon Alexa or Google Assistant for voice commands. For example, say "Alexa, turn on the robot."

Image: Robot vacuum controlled via voice command.
5.6 ഓട്ടോമാറ്റിക് റീചാർജിംഗ്
When the battery level is low, the robot will automatically return to its charging station to recharge. You can also manually send it back using the app or remote control.
6. പരിപാലനം
പതിവ് അറ്റകുറ്റപ്പണികൾ ഒപ്റ്റിമൽ പ്രകടനം ഉറപ്പാക്കുകയും നിങ്ങളുടെ റോബോട്ട് വാക്വമിന്റെ ആയുസ്സ് വർദ്ധിപ്പിക്കുകയും ചെയ്യുന്നു.
6.1 ഡസ്റ്റ്ബിൻ ശൂന്യമാക്കൽ
Press the release button to remove the 2-in-1 water tank/dustbin unit. Open the dustbin cover and empty its contents into a trash bin. It is recommended to empty the dustbin after each cleaning cycle.
6.2 ക്ലീനിംഗ് ഫിൽട്ടറുകൾ
Remove the HEPA filter and sponge filter from the dustbin. Tap them gently to remove dust. The filters are not washable and should be replaced every 3-6 months, depending on usage.
6.3 ക്ലീനിംഗ് സൈഡ് ബ്രഷുകൾ
Periodically check the side brushes for tangled hair or debris. Carefully remove any obstructions. If brushes are worn or damaged, replace them with new ones.
6.4 ക്ലീനിംഗ് സെൻസറുകൾ
Wipe the cliff sensors (located on the bottom of the robot) and the charging contacts (on both the robot and charging station) with a clean, dry cloth. This ensures proper navigation and charging.
6.5 Cleaning Mop Cloth and Water Tank
After each mopping session, remove the mop cloth and wash it thoroughly. Allow it to air dry completely before reattaching. Empty any remaining water from the water tank and rinse it out. Ensure the water tank is dry before storage.
7. പ്രശ്നപരിഹാരം
നിങ്ങളുടെ റോബോട്ട് വാക്വം ക്ലീനറിൽ പ്രശ്നങ്ങൾ നേരിടുകയാണെങ്കിൽ, ഇനിപ്പറയുന്ന പൊതുവായ പ്രശ്നങ്ങളും പരിഹാരങ്ങളും പരിശോധിക്കുക:
| പ്രശ്നം | സാധ്യമായ കാരണം | പരിഹാരം |
|---|---|---|
| റോബോട്ട് ഓണാക്കുന്നില്ല | ബാറ്ററി ചാർജ് കുറവാണ്; പവർ ബട്ടൺ ശരിയായി അമർത്തിയിട്ടില്ല. | Charge the robot; Press and hold the power button until the indicator lights up. |
| റോബോട്ട് ചാർജ് ചെയ്യുന്നില്ല | Charging contacts are dirty; Charging station not powered | Clean charging contacts on both robot and station; Ensure power adapter is plugged in. |
| റോബോട്ട് ഇടയ്ക്കിടെ കുടുങ്ങുന്നു | Too many obstacles; Cliff sensors are dirty | Clear the cleaning area of loose cables and small objects; Clean cliff sensors. |
| മോശം ക്ലീനിംഗ് പ്രകടനം | Dustbin full; Filters clogged; Side brushes worn | Empty dustbin; Clean or replace filters; Clean or replace side brushes. |
| മോപ്പിംഗ് പ്രവർത്തനം പ്രവർത്തിക്കുന്നില്ല. | Water tank empty; Mop cloth not attached; Water flow setting too low | Fill water tank; Attach mop cloth correctly; Adjust water flow setting in the app. |
| Wi-Fi-യിലേക്ക് കണക്റ്റുചെയ്യാൻ കഴിയില്ല | Incorrect Wi-Fi password; Not 2.4GHz network; Robot too far from router | Verify password; Ensure router is 2.4GHz; Move robot closer to router during setup. |
8 സ്പെസിഫിക്കേഷനുകൾ
| ഫീച്ചർ | വിശദാംശങ്ങൾ |
|---|---|
| മോഡൽ നമ്പർ | A21 |
| ഉൽപ്പന്ന അളവുകൾ | 15 x 12.5 x 4 ഇഞ്ച് |
| ഇനത്തിൻ്റെ ഭാരം | 7.24 പൗണ്ട് |
| സക്ഷൻ പവർ | 5000Pa വരെ |
| ഡസ്റ്റ് ബോക്സ് ശേഷി | 250mL (integrated with water tank) |
| വാട്ടർ ടാങ്ക് കപ്പാസിറ്റി | 200mL (integrated with dust box) |
| നിയന്ത്രണ രീതികൾ | App, Remote Control, Voice Control (Alexa/Google Assistant) |
| Wi-Fi അനുയോജ്യത | 2.4GHz മാത്രം |
| യാന്ത്രിക സവിശേഷതകൾ | Auto-recharge, Obstacle avoidance, Fall prevention |
9. വാറൻ്റിയും പിന്തുണയും
Bagotte provides a 12-month service warranty for the Robot Vacuum and Mop Model A21. For technical support, warranty claims, or any questions regarding your product, please contact Bagotte customer service through the official webസൈറ്റ് അല്ലെങ്കിൽ നിങ്ങളുടെ വാങ്ങൽ പ്ലാറ്റ്ഫോം.
Please have your model number (A21) and purchase information ready when contacting support.
Ask a question about this manual
Ask about setup, troubleshooting, compatibility, parts, safety, or missing instructions. Manuals+ will review the question and use this page’s manual context to help answer it.