
1. ആമുഖം
Thank you for choosing the TaskStar Electric Grease Gun. This manual provides essential information for the safe and effective use, maintenance, and troubleshooting of your new tool. Please read these instructions carefully before operation and retain them for future reference.
2 സുരക്ഷാ വിവരങ്ങൾ
Always observe basic safety precautions to reduce the risk of injury or damage. This tool operates under high pressure; improper use can cause serious injury.
- സുരക്ഷാ ഗ്ലാസുകളും കയ്യുറകളും ഉൾപ്പെടെയുള്ള ഉചിതമായ വ്യക്തിഗത സംരക്ഷണ ഉപകരണങ്ങൾ ധരിക്കുക.
- Do not point the grease gun at yourself or others.
- ജോലിസ്ഥലം നല്ല വെളിച്ചമുള്ളതാണെന്നും തടസ്സങ്ങളില്ലെന്നും ഉറപ്പാക്കുക.
- Use only recommended grease types (NLGI #2 grease).
- Disconnect the battery before performing any maintenance or changing accessories.
- കുട്ടികളെയും കാഴ്ചക്കാരെയും ഓപ്പറേഷൻ ഏരിയയിൽ നിന്ന് അകറ്റി നിർത്തുക.
3. പാക്കേജ് ഉള്ളടക്കം
താഴെ ലിസ്റ്റ് ചെയ്തിരിക്കുന്ന എല്ലാ ഇനങ്ങളും നിങ്ങളുടെ പാക്കേജിൽ ഉൾപ്പെടുത്തിയിട്ടുണ്ടെന്ന് ഉറപ്പാക്കുക:
- 1x Cordless Grease Gun
- 2x 4000mAh ബാറ്ററികൾ
- 1x ചാർജർ
- 1x 39.4" Flexible Hose
- 1x Extension Pipe
- 1x Standard Coupler
- 1x Pointed Nozzle
- 1x Quick-Release Coupler
- 1x സ്റ്റോറേജ് കേസ്
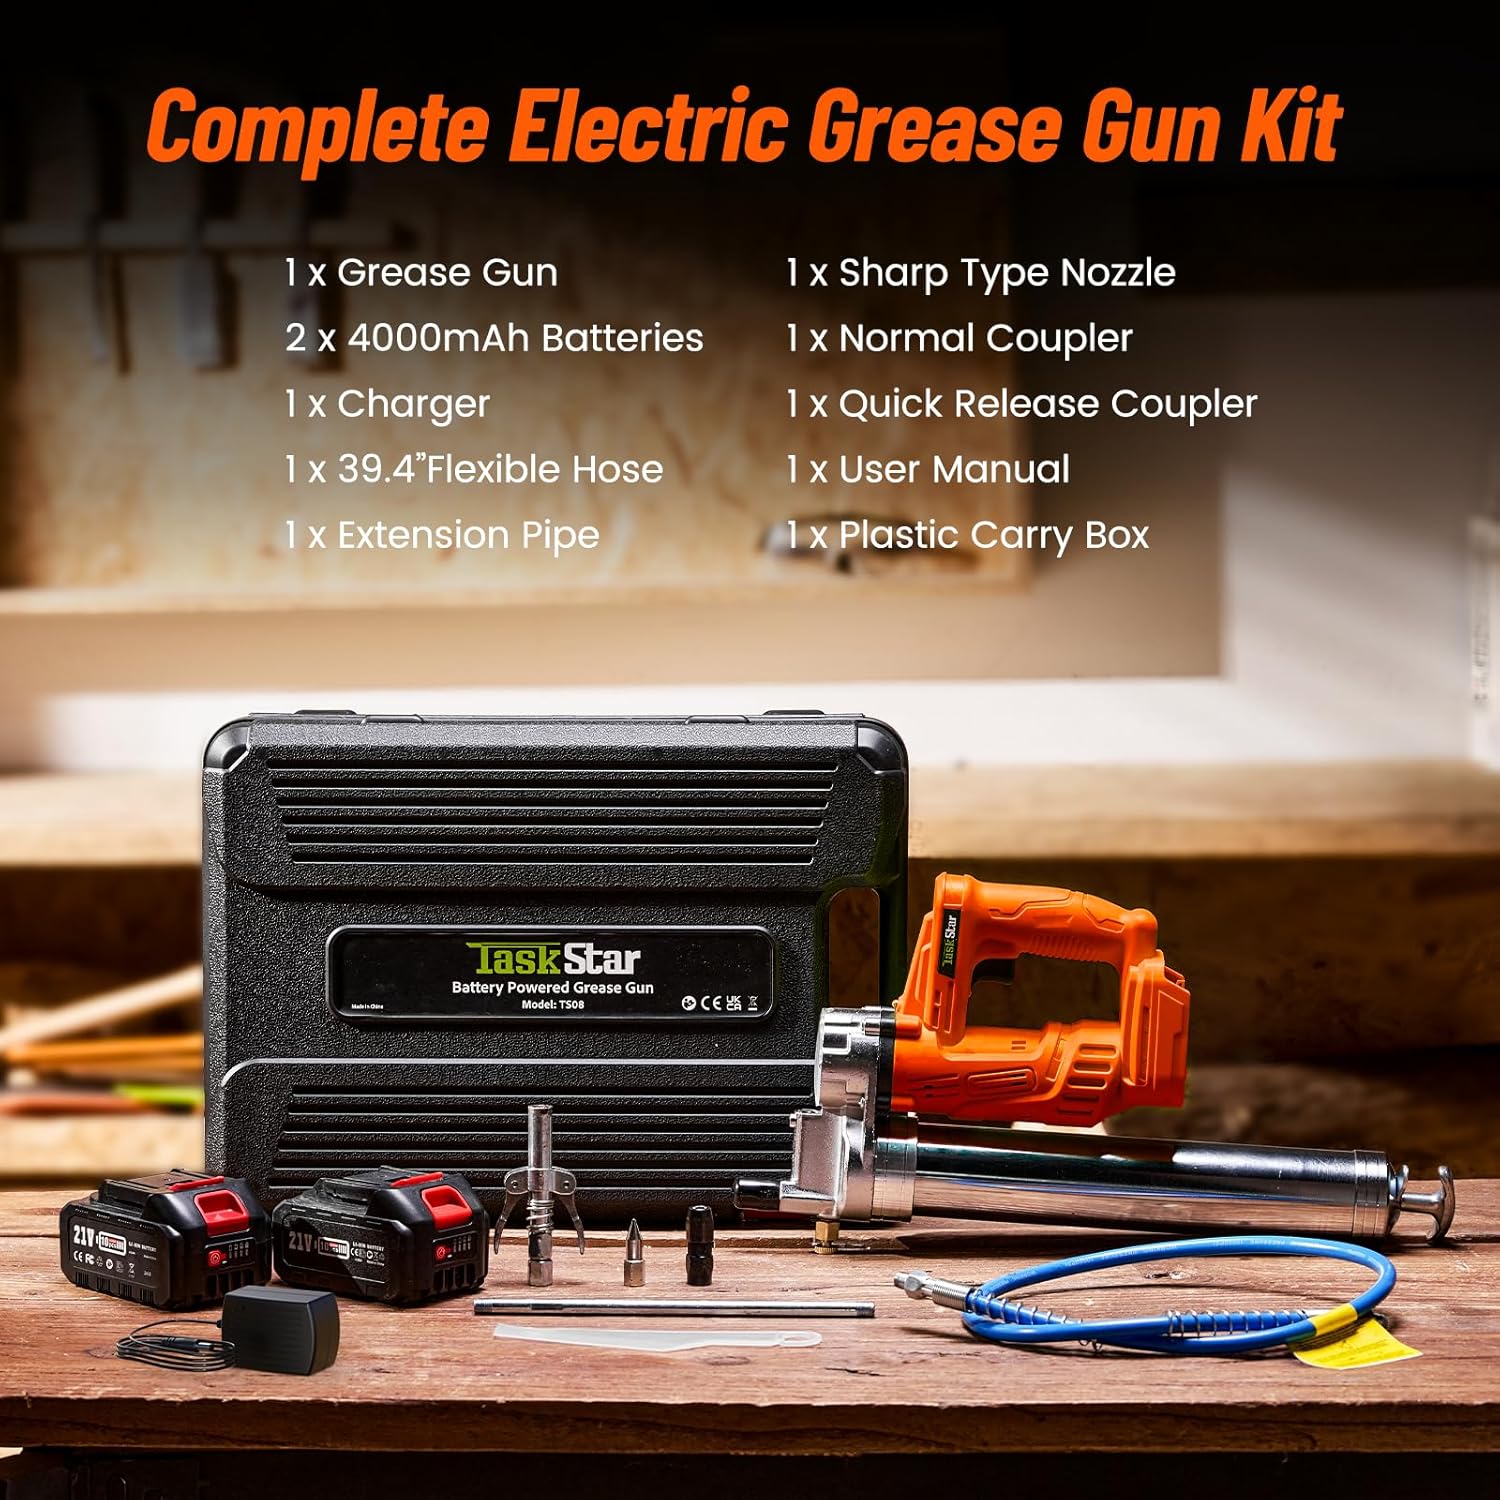
Image: Complete kit including the grease gun, two batteries, charger, hose, couplers, and storage case.
4. സജ്ജീകരണം
4.1. ബാറ്ററി ചാർജിംഗും ഇൻസ്റ്റാളേഷനും
- ബാറ്ററികൾ ചാർജ് ചെയ്യുക: Connect the charger to a power outlet and insert the 4000mAh lithium-ion batteries. Allow them to fully charge before first use. The charger indicator light will show charging status.
- ബാറ്ററി ഇൻസ്റ്റാൾ ചെയ്യുക: Slide a charged battery into the battery slot on the grease gun until it clicks securely into place.

Image: Two 4000mAh batteries, indicating extended runtime for multiple greasing tasks.
4.2. Grease Loading
The TaskStar Electric Grease Gun supports both 14 oz (400cc) grease cartridges and bulk loading.
കാട്രിഡ്ജ് ലോഡിംഗ്:
- ഗ്രീസ് തോക്കിന്റെ തലയിൽ നിന്ന് ബാരൽ അഴിക്കുക.
- Remove the cap from one end of a 14 oz grease cartridge and insert the open end into the barrel.
- Remove the seal from the other end of the cartridge.
- Screw the barrel back onto the grease gun head.
- പ്ലങ്കർ റോഡ് പൂർണ്ണമായും പിന്നിലേക്ക് വലിച്ച് സ്ഥലത്ത് ഉറപ്പിക്കുക.
Bulk Loading:
- ഗ്രീസ് തോക്കിന്റെ തലയിൽ നിന്ന് ബാരൽ അഴിക്കുക.
- Submerge the open end of the barrel into a container of bulk grease.
- Slowly pull the plunger rod back to draw grease into the barrel.
- Screw the barrel back onto the grease gun head.

Image: Illustration of how to load grease using either a cartridge or by bulk filling.

Image: Guide for compatible grease cartridge types, emphasizing consistent opening diameters of 53mm.
4.3. Attaching Hose and Coupler
- Screw the flexible hose onto the grease gun's outlet port.
- Attach either the standard coupler or the quick-release coupler to the end of the hose, depending on your application. Ensure it is tightened securely.
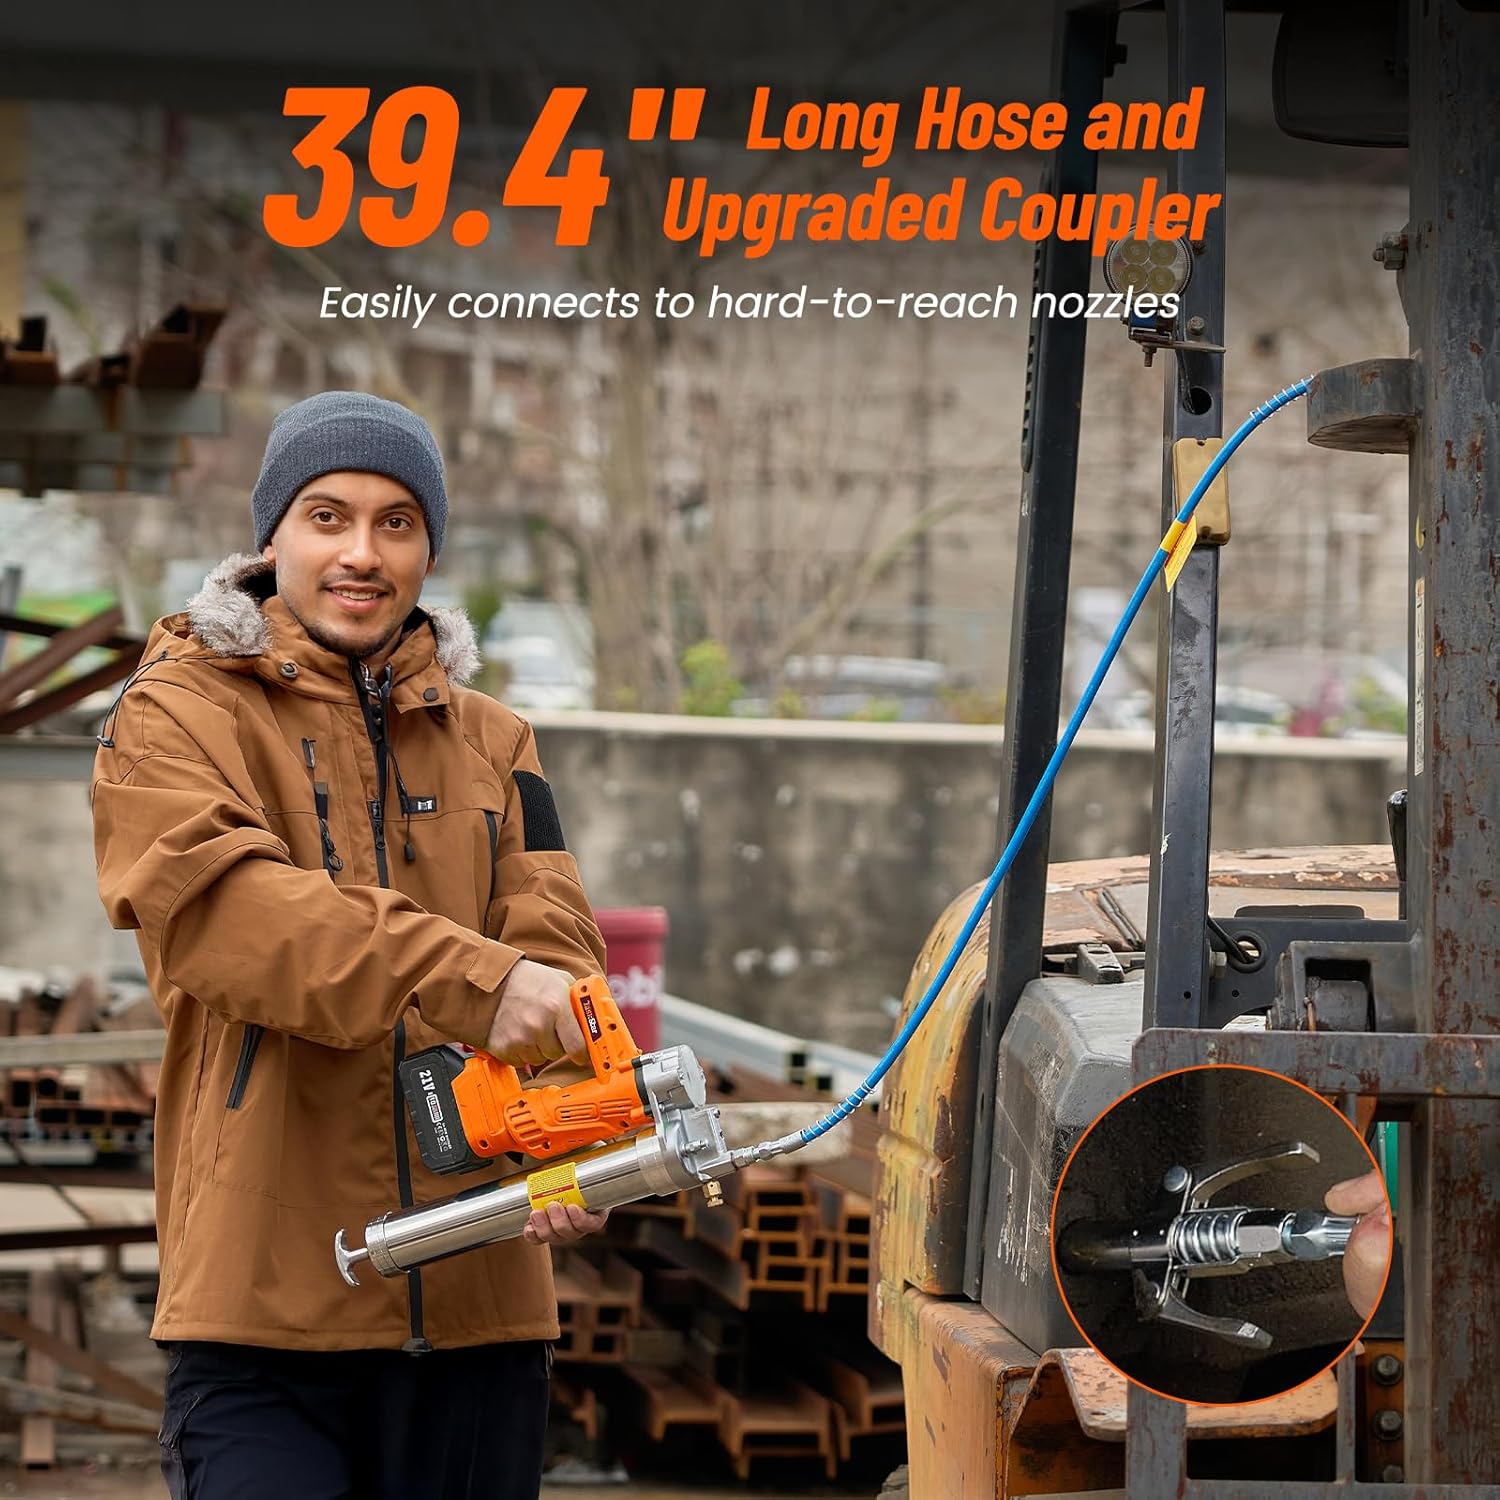
Image: The 39.4-inch long hose and upgraded coupler allow easy access to hard-to-reach grease points.
5. പ്രവർത്തന നിർദ്ദേശങ്ങൾ
- Prime the Gun (if necessary): If the gun is new or has been refilled, press the air bleed valve to release any trapped air until grease begins to flow.
- Connect to Zerk Fitting: Firmly press the coupler onto the grease zerk fitting until it locks into place. For quick-release couplers, ensure a secure connection.
- ഗ്രീസ് പുരട്ടുക: Press the trigger to dispense grease. The gun delivers up to 10,000 PSI and a flow rate of 4.6 oz/min. Apply grease until resistance is felt or the recommended amount is dispensed.
- വിച്ഛേദിക്കുക: Release the trigger. For quick-release couplers, pull back the collar to detach from the zerk fitting. For standard couplers, twist and pull firmly.

Image: The electric grease gun in operation, demonstrating its high working pressure and flow rate for efficient lubrication.

ചിത്രം: ഉദാample of the grease gun being used for transportation equipment greasing.
6. പരിപാലനം
- വൃത്തിയാക്കൽ: After each use, wipe down the grease gun and accessories to remove excess grease and dirt.
- സംഭരണം: Store the grease gun and batteries in the provided storage case in a cool, dry place, away from direct sunlight and extreme temperatures.
- ബാറ്ററി കെയർ: Do not store batteries in a discharged state. Recharge them periodically if not in use for extended periods.
- Coupler Inspection: Regularly inspect couplers and hoses for wear or damage. Replace if necessary to ensure a proper seal and prevent leaks.
7. പ്രശ്നപരിഹാരം
| പ്രശ്നം | സാധ്യമായ കാരണം | പരിഹാരം |
|---|---|---|
| ഗ്രീസ് ഒഴുക്കില്ല | Empty grease cartridge/barrel, air lock, clogged nozzle/hose, discharged battery. | Replace cartridge or refill, bleed air from the gun, clear obstruction, recharge battery. |
| Grease leaks from coupler | Coupler not properly seated, worn coupler, damaged zerk fitting. | Ensure coupler is fully engaged, replace coupler, replace zerk fitting. |
| Gun stops operating | Discharged battery, motor overload. | Recharge battery, allow motor to cool down. |
8 സ്പെസിഫിക്കേഷനുകൾ
| ഫീച്ചർ | സ്പെസിഫിക്കേഷൻ |
|---|---|
| മോഡൽ | TS08-Orange |
| പരമാവധി പ്രവർത്തന സമ്മർദ്ദം | 10,000 പി.എസ്.ഐ |
| ഫ്ലോ റേറ്റ് | 4.6 oz/മിനിറ്റ് |
| ബാറ്ററി തരം | ലിഥിയം-അയൺ |
| ബാറ്ററി ശേഷി | 2 x 4.0Ah (4000mAh) |
| ഗ്രീസ് കപ്പാസിറ്റി | 14 oz (400cc) Cartridge or Bulk |
| ഹോസ് നീളം | 39.4 ഇഞ്ച് |
| ഇനത്തിൻ്റെ ഭാരം | 6.38 പൗണ്ട് |
| പാക്കേജ് അളവുകൾ | 17.56 x 12.24 x 3.7 ഇഞ്ച് |
9. വാറൻ്റിയും പിന്തുണയും
TaskStar products are designed for durability and performance. For warranty information, technical support, or service inquiries, please refer to the contact details provided with your purchase documentation or visit the official TaskStar website. We offer 36 months of technical support and aim for fast responses within 24 hours.

Image: TaskStar customer support is available to assist with product inquiries.