
1. ആമുഖം
This manual provides detailed instructions for the installation, operation, and maintenance of your COUGAR OmnyX Mid Tower PC Case. Please read this manual thoroughly before beginning assembly to ensure correct setup and optimal performance. Keep this manual for future reference.
2 സുരക്ഷാ വിവരങ്ങൾ
- പിസി കേസിനുള്ളിൽ ഏതെങ്കിലും ഘടകങ്ങൾ ഇൻസ്റ്റാൾ ചെയ്യുന്നതിനോ സർവീസ് ചെയ്യുന്നതിനോ മുമ്പ് എല്ലായ്പ്പോഴും വാൾ ഔട്ട്ലെറ്റിൽ നിന്ന് വൈദ്യുതി വിതരണം വിച്ഛേദിക്കുക.
- സ്റ്റാറ്റിക് വൈദ്യുതി മൂലമുള്ള കേടുപാടുകൾ തടയാൻ എല്ലാ ഘടകങ്ങളും ശ്രദ്ധാപൂർവ്വം കൈകാര്യം ചെയ്യുക. ആന്റി-സ്റ്റാറ്റിക് റിസ്റ്റ് സ്ട്രാപ്പ് ഉപയോഗിക്കുന്നത് പരിഗണിക്കുക.
- നേരിട്ട് സൂര്യപ്രകാശം ഏൽക്കുന്ന സ്ഥലങ്ങളിലോ, താപ സ്രോതസ്സുകൾക്ക് സമീപമോ, ഉയർന്ന ഈർപ്പം ഉള്ള സ്ഥലങ്ങളിലോ പിസി കേസ് വയ്ക്കുന്നത് ഒഴിവാക്കുക.
- അമിതമായി ചൂടാകുന്നത് തടയാൻ കേസിനു ചുറ്റും ശരിയായ വായുസഞ്ചാരം ഉറപ്പാക്കുക.
- കുട്ടികളിൽ നിന്ന് ചെറിയ ഭാഗങ്ങളും ഉപകരണങ്ങളും സൂക്ഷിക്കുക.
3. പാക്കേജ് ഉള്ളടക്കം
നിങ്ങളുടെ പാക്കേജിൽ എല്ലാ ഇനങ്ങളും ഉണ്ടെന്ന് ഉറപ്പാക്കുക:
- COUGAR OmnyX Mid Tower PC Case
- ആക്സസറി ബോക്സ് (സ്ക്രൂകൾ, സ്റ്റാൻഡ്ഓഫുകൾ, കേബിൾ ടൈകൾ മുതലായവ അടങ്ങിയിരിക്കുന്നു)
- ഉപയോക്തൃ മാനുവൽ (ഈ പ്രമാണം)
- Pre-installed 160mm fans (quantity as specified in product details)
4. ഉൽപ്പന്നം കഴിഞ്ഞുview
The COUGAR OmnyX case is designed for high expandability and efficient cooling, suitable for various computing needs. Its symmetrical design allows for flexible placement, showcasing internal components from multiple angles. Key features include:
- സമമിതി രൂപകൽപ്പന: Allows for versatile orientation on your desk.
- Omnidirectional Dynamic Flow System (ODF): Optimized airflow for superior cooling performance.
- Quad 160mm Fans: Equipped with four large 160mm fans for powerful cooling.
- Ambidextrous I/O Module: Features 4x USB 3.0 Type-A and 2x USB 3.2 Gen 2 Type-C ports for convenient connectivity.
- ദ്രുത റിലീസ് സംവിധാനം: Tool-less panel removal for easy access and installation.
- Streamlined Cable Management: Dedicated channels and tie-down points for a clean build.
- Bracketless Vertical GPU Mount: Supports vertical GPU installation without additional brackets.
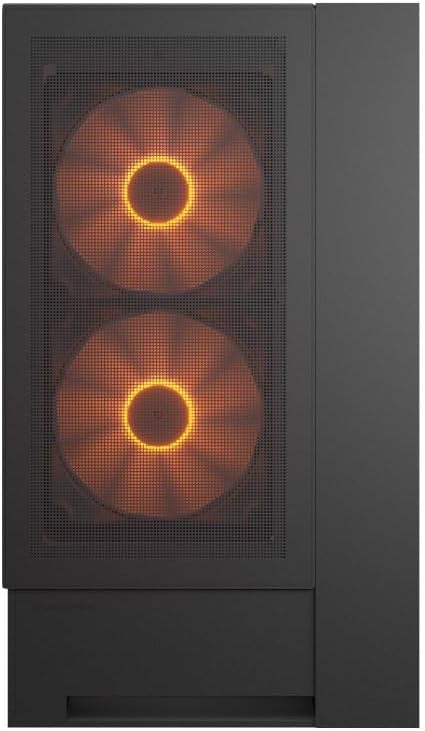
ഫ്രണ്ട് view of the COUGAR OmnyX PC case, highlighting the pre-installed 160mm fans.

Illustration of the symmetrical design, allowing flexible case orientation.

Close-up of the large 160mm fans providing powerful cooling.
ഔദ്യോഗിക ഉൽപ്പന്ന വീഡിയോ പ്രദർശനംasing the COUGAR OmnyX PC case features, including its symmetrical design, quad 160mm fans, ambidextrous I/O module, cable management, and quick release mechanism for easy installation.
5. സജ്ജീകരണവും ഇൻസ്റ്റാളേഷനും
5.1. തയ്യാറാക്കൽ
ആരംഭിക്കുന്നതിന് മുമ്പ്, നിങ്ങൾക്ക് വൃത്തിയുള്ളതും നല്ല വെളിച്ചമുള്ളതുമായ ഒരു വർക്ക്സ്പെയ്സും ഫിലിപ്സ് ഹെഡ് സ്ക്രൂഡ്രൈവർ ഉൾപ്പെടെയുള്ള ആവശ്യമായ ഉപകരണങ്ങളും ഉണ്ടെന്ന് ഉറപ്പാക്കുക.
5.2. പാനൽ നീക്കംചെയ്യൽ
The OmnyX case features a quick-release mechanism for easy panel removal. Gently pull the panels to detach them from the chassis. Refer to the exploded view ഘടകം തിരിച്ചറിയുന്നതിനായി.

വേർപെടുത്തി view of the COUGAR OmnyX case, showing removable panels and components.
5.3. മദർബോർഡ് ഇൻസ്റ്റാളേഷൻ
The OmnyX supports Mini ITX, Micro ATX, and ATX motherboards. Install the necessary standoffs for your motherboard size, then carefully place the motherboard and secure it with screws.

ആന്തരികം view showing the motherboard tray and mounting points.
5.4. ഗ്രാഫിക്സ് കാർഡ് (GPU) ഇൻസ്റ്റലേഷൻ
Install your graphics card into the appropriate PCIe slot. The case supports GPUs up to 380mm in length. For vertical GPU mounting, utilize the integrated bracketless vertical GPU mount.

Illustration of the bracketless vertical GPU mounting option.
5.5. ഡ്രൈവ് ഇൻസ്റ്റലേഷൻ
The case provides bays for 2x 3.5-inch drives and 2x 2.5-inch drives. Secure your storage devices in the designated locations using the provided screws.
5.6. പവർ സപ്ലൈ യൂണിറ്റ് (പിഎസ്യു) ഇൻസ്റ്റാളേഷൻ
Install your power supply unit in the rear-mount location. The case accommodates PSUs up to 200mm in length.
5.7. കേബിൾ മാനേജ്മെന്റ്
Utilize the dedicated cable management channels and tie-down points behind the motherboard tray to route and secure cables. This ensures optimal airflow and a clean internal appearance.

View illustrating the efficient cable management system within the case.
5.8. ഫ്രണ്ട് I/O കണക്ഷനുകൾ
Connect the front panel I/O cables (USB 3.0, USB 3.2 Gen 2 Type-C, audio, power, reset) to their corresponding headers on your motherboard. The ambidextrous I/O module offers flexible placement.

Close-up of the front I/O panel with USB ports and controls.
6. പ്രവർത്തന നിർദ്ദേശങ്ങൾ
6.1. പവർ ഓൺ/ഓഫ്
After all components are installed and cables connected, plug the power supply into a wall outlet. Press the power button on the front I/O panel to turn on your PC.
6.2. RGB ലൈറ്റിംഗ് നിയന്ത്രണം
The pre-installed fans feature RGB lighting. Control of the RGB effects and fan speed is typically managed through your motherboard's software or a dedicated controller if included. Refer to your motherboard manual for specific instructions on RGB synchronization.

Illustration depicting RGB LED and fan speed control capabilities.
7. പരിപാലനം
Regular maintenance helps ensure the longevity and performance of your PC case:
- പൊടി വൃത്തിയാക്കൽ: Periodically clean dust filters and internal components using compressed air or a soft brush. Dust accumulation can impede airflow and lead to overheating.
- ബാഹ്യ ശുചീകരണം: ഒരു മൃദുവായ, ഡി ഉപയോഗിച്ച് ബാഹ്യ പ്രതലങ്ങൾ തുടയ്ക്കുകamp തുണി. ഉരച്ചിലുകൾ ഉള്ള ക്ലീനറുകൾ ഒഴിവാക്കുക.
- കേബിൾ പരിശോധന: Ensure all internal cables remain securely connected and neatly routed.
8. പ്രശ്നപരിഹാരം
നിങ്ങൾക്ക് പ്രശ്നങ്ങൾ നേരിടുകയാണെങ്കിൽ, ഇനിപ്പറയുന്ന പൊതുവായ ട്രബിൾഷൂട്ടിംഗ് ഘട്ടങ്ങൾ പരിശോധിക്കുക:
- ശക്തിയില്ല: Check if the power supply is properly connected to the wall outlet and the motherboard. Ensure the power button cable is correctly connected to the motherboard header.
- കറങ്ങാത്ത ഫാനുകൾ: Verify that the fan cables are securely connected to the motherboard fan headers or a fan controller. Check BIOS settings for fan speed control.
- RGB പ്രവർത്തിക്കുന്നില്ല: Confirm RGB cables are connected to the correct motherboard headers or controller. Check your motherboard's RGB software for settings.
- അമിത ചൂടാക്കൽ: Ensure all fans are functioning correctly and oriented for optimal airflow. Clean any dust buildup from filters and components. Verify CPU cooler and GPU cooler installations.
For more complex issues, consult your component manuals or contact COUGAR support.
9 സ്പെസിഫിക്കേഷനുകൾ
| ഫീച്ചർ | സ്പെസിഫിക്കേഷൻ |
|---|---|
| മോഡലിൻ്റെ പേര് | ഓമ്നിഎക്സ് |
| മോഡൽ നമ്പർ | CGR-2WA3B-RGB |
| കേസ് തരം | മിഡ് ടവർ |
| മദർബോർഡ് പിന്തുണ | മിനി ITX / മൈക്രോ ATX / ATX |
| അളവുകൾ (D x W x H) | 300 x 470 x 520 മിമി |
| 3.5" ഡ്രൈവ് ബേകൾ | 2 |
| 2.5" ഡ്രൈവ് ബേകൾ | 2 |
| CPU കൂളർ ഉയരം പരിധി | 170 മി.മീ |
| GPU ദൈർഘ്യ പരിധി | 380 മി.മീ |
| പിഎസ്യു ദൈർഘ്യ പരിധി | 200 മി.മീ |
| മുൻകൂട്ടി ഇൻസ്റ്റാൾ ചെയ്ത ഫാനുകൾ | 4 x 160 മിമി |
| ഫ്രണ്ട് ഐ / ഒ പോർട്ടുകൾ | 4x USB 3.0 Type-A, 2x USB 3.2 Gen 2 Type-C |
| ഭാരം | 12.6 കി.ഗ്രാം |
10. വാറൻ്റിയും പിന്തുണയും
The COUGAR OmnyX PC Case comes with a 1 വർഷത്തെ വാറൻ്റി from the date of purchase. This warranty covers manufacturing defects and faulty components under normal use. It does not cover damage caused by misuse, accidents, unauthorized modifications, or improper installation.
For technical support, warranty claims, or further assistance, please visit the official COUGAR webസൈറ്റ് ചെയ്യുക അല്ലെങ്കിൽ നിങ്ങളുടെ പ്രാദേശിക റീട്ടെയിലറെ ബന്ധപ്പെടുക.
COUGAR ഉദ്യോഗസ്ഥൻ Webസൈറ്റ്: www.cougar-gaming.com