
ആമുഖം
This manual provides detailed instructions for the installation, operation, and maintenance of your ARES WING Heavy Duty Single Monitor Arm, Model GDT1009BK. This monitor arm is designed to support single monitors from 17 to 40 inches, including ultrawide and curved screens, with a weight capacity of up to 26.4 lbs. It offers flexible positioning and two installation methods: C-Clamp and Grommet mount.
സുരക്ഷാ വിവരങ്ങൾ
- ഭാരം ശേഷി: Do not exceed the maximum weight capacity of 26.4 lbs (12 kg). Overloading can cause instability and potential damage.
- മോണിറ്റർ വലുപ്പം: Ensure your monitor's size is within the supported range of 17-40 inches.
- ഡെസ്ക് കനം: Verify your desk thickness is compatible with the chosen mounting method (C-Clamp: 0.39"-3.3"; Grommet: 0.5"-1.8").
- VESA അനുയോജ്യത: This arm supports VESA patterns 75x75mm and 100x100mm. Check your monitor's VESA pattern before installation.
- സുരക്ഷിത ഇൻസ്റ്റാളേഷൻ: Always ensure all screws and clamps are securely tightened before attaching the monitor.
- ഗ്യാസ് സ്പ്രിംഗ് ക്രമീകരണം: Adjust the gas spring tension only when the monitor is attached to prevent the arm from springing up unexpectedly.
- കുട്ടികളും വളർത്തുമൃഗങ്ങളും: ശ്വാസംമുട്ടൽ അപകടങ്ങൾ തടയാൻ കുട്ടികളിൽ നിന്നും വളർത്തുമൃഗങ്ങളിൽ നിന്നും ചെറിയ ഭാഗങ്ങൾ അകറ്റി നിർത്തുക.
പാക്കേജ് ഉള്ളടക്കം
ഇൻസ്റ്റാളേഷൻ ആരംഭിക്കുന്നതിന് മുമ്പ് എല്ലാ ഘടകങ്ങളും നിലവിലുണ്ടെന്ന് ദയവായി പരിശോധിക്കുക.
- മോണിറ്റർ ആം അസംബ്ലി
- ഡെസ്ക് Clamp അടിസ്ഥാനം
- Grommet Mount Components
- വെസ പ്ലേറ്റ്
- Hardware Kit (screws, washers, Allen keys)
- ഇൻസ്ട്രക്ഷൻ മാനുവൽ
സ്പെസിഫിക്കേഷനുകൾ
| ഫീച്ചർ | സ്പെസിഫിക്കേഷൻ |
|---|---|
| ബ്രാൻഡ് | ആരെസ് വിംഗ് |
| മോഡൽ നമ്പർ | ജിഡിടി1009ബികെ |
| മൗണ്ടിംഗ് തരം | ടാബ്ലെറ്റ് മൗണ്ട് (C-Cl)amp & Grommet) |
| മെറ്റീരിയൽ | അലുമിനിയം |
| നിറം | വെള്ള |
| അനുയോജ്യമായ ഉപകരണങ്ങൾ | മോണിറ്റർ |
| Minimum Supported Screen Size | 17 ഇഞ്ച് |
| Maximum Supported Screen Size | 40 ഇഞ്ച് |
| ഭാരം ശേഷി | 26.4 പൗണ്ട് വരെ (12 കി.ഗ്രാം) |
| VESA അനുയോജ്യത | 75x75mm, 100x100mm |
| ഉയരം ക്രമീകരിക്കൽ | 17.63 ഇഞ്ച് |
| വിപുലീകരണ ശ്രേണി | 18.4 ഇഞ്ച് |
| സ്വിവൽ | ±180° |
| ഭ്രമണം | 360° |
| ചരിവ് | -45°/+80° |
| C-Clamp ഡെസ്ക് കനം | 0.39" - 3.3" |
| ഗ്രോമെറ്റ് ഡെസ്ക് കനം | 0.5" - 1.8" |
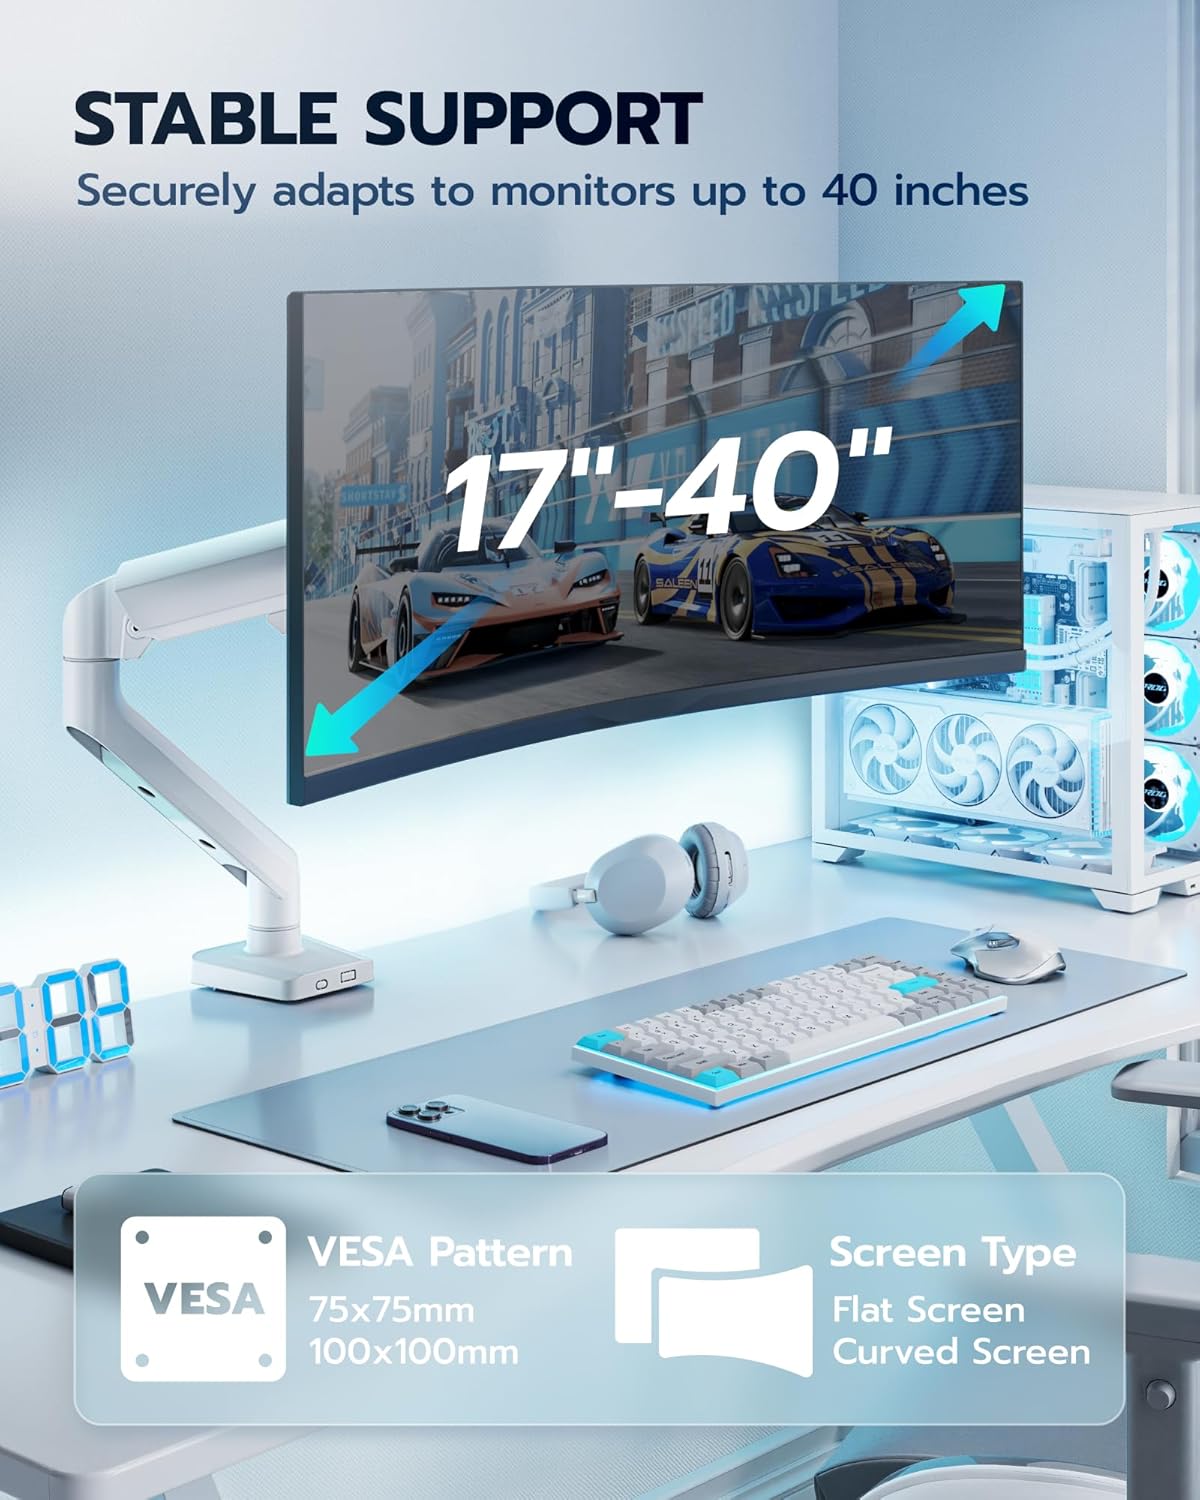
Image: The monitor arm securely holding a large ultrawide monitor, highlighting its compatibility with 17-40 inch screens and VESA 75x75mm/100x100mm patterns.
സജ്ജീകരണവും ഇൻസ്റ്റാളേഷനും
Follow these steps to install your ARES WING monitor arm. Two installation options are available: C-Clamp and Grommet Mount.
Step 1: Choose Your Mounting Option
The monitor arm offers two versatile installation options to suit various desk types. Ensure your desk meets the thickness requirements for the chosen method.

Image: Two installation options are shown: C-clamp for desks between 0.39 and 3.3 inches thick, and Grommet mount for desks between 0.39 and 1.8 inches thick.
C-Clamp ഇൻസ്റ്റലേഷൻ
C-Cl ഉപയോഗിക്കുകamp for desks with an edge. Ensure the desk thickness is between 0.39" and 3.3" and the contact surface width is at least 1.97".
- C-cl അറ്റാച്ചുചെയ്യുകamp base to the edge of your desk.
- Tighten the knob until the base is secure.

Image: Visual guide for C-Clamp installation, illustrating how to secure the clamp to the desk edge and ensure proper contact.
ഗ്രോമെറ്റ് ഇൻസ്റ്റാളേഷൻ
Use the Grommet mount for desks with an existing through-hole or if you plan to drill one. The desk thickness should be between 0.5" and 1.8", and the hole diameter between 0.39" and 2.36".
- Insert the grommet base through the desk hole.
- Secure the base from underneath the desk using the provided components.
Video: This video demonstrates the grommet installation process for a monitor arm. It shows how to secure the base through a desk hole and tighten it from below.
Step 2: Assemble the Arm and Attach Monitor
After securing the base, proceed with assembling the arm and attaching your monitor.
- Mount the Base to the Desk: (Already completed in Step 1).
- Assemble the Arms: Connect the arm sections to the base.
- Attach the Screen to Arm: Use the quick-release VESA plate for easy monitor attachment.

Image: A visual guide showing the three main steps for installing the monitor arm: mounting the base, assembling the arm, and attaching the monitor to the VESA plate.

Image: Close-up of the quick-install VESA head, demonstrating how the monitor plate slides into the arm and locks securely.
Video: This video provides a comprehensive installation guide for the ARES WING Heavy Duty Single Monitor Arm, covering all steps from mounting the base to attaching the monitor.
Step 3: Adjust Gas Spring Tension
After mounting the monitor, adjust the gas spring tension to match your monitor's weight. This ensures the arm holds the monitor securely at any height and allows for smooth adjustments.
- Use the provided Allen key to turn the adjustment screw on the arm.
- Turn clockwise to increase tension for heavier monitors, and counter-clockwise to decrease tension for lighter monitors.
- Adjust until the monitor stays in position when moved and can be adjusted with minimal effort.
Video: This video demonstrates how to adjust the gas spring tension on the monitor arm to ensure proper balance and smooth movement for your monitor.
പ്രവർത്തന നിർദ്ദേശങ്ങൾ
The ARES WING monitor arm offers a wide range of adjustments for optimal ergonomic positioning.
എർഗണോമിക് അഡ്ജസ്റ്റ്മെന്റുകൾ
നിങ്ങളുടെ ഇഷ്ടാനുസൃതമാക്കുക viewing experience with flexible height, tilt, swivel, and rotation options.
- ഉയരം ക്രമീകരിക്കൽ: The arm allows for 17.63 inches of vertical height adjustment. Gently push or pull the monitor to your desired height.
- വിപുലീകരണ ശ്രേണി: Extend or retract the arm up to 18.4 inches to bring the monitor closer or further away.
- ടിൽറ്റ്: Adjust the monitor's vertical angle from -45° to +80° to reduce glare and improve viewആശ്വാസം.
- സ്വിവൽ: Pivot the monitor ±180° horizontally to share your screen or change viewകോണുകൾ.
- റൊട്ടേഷൻ: ലാൻഡ്സ്കേപ്പ്, പോർട്രെയ്റ്റ് ഓറിയന്റേഷനുകൾക്കിടയിൽ മാറാൻ മോണിറ്റർ 360° തിരിക്കുക.

Image: This diagram illustrates the full range of motion for the monitor arm, including 360-degree rotation, ±180-degree swivel, and a tilt range of +80 to -45 degrees.

Image: An ergonomic setup showing a person comfortably using a monitor at eye-level, contrasted with an image of a person slouching due to a low monitor, highlighting the benefits of proper adjustment.

Image: A person rotating a monitor 360 degrees, demonstrating the arm's ability to switch between landscape and portrait orientations.
സംയോജിത കേബിൾ മാനേജുമെന്റ്
Keep your workspace tidy by routing cables through the integrated cable management channels on the arm.
- Open the cable covers on the underside of the arm.
- Route your monitor and power cables through the channels.
- കേബിളുകൾ മറയ്ക്കാൻ കവറുകൾ അടയ്ക്കുക.
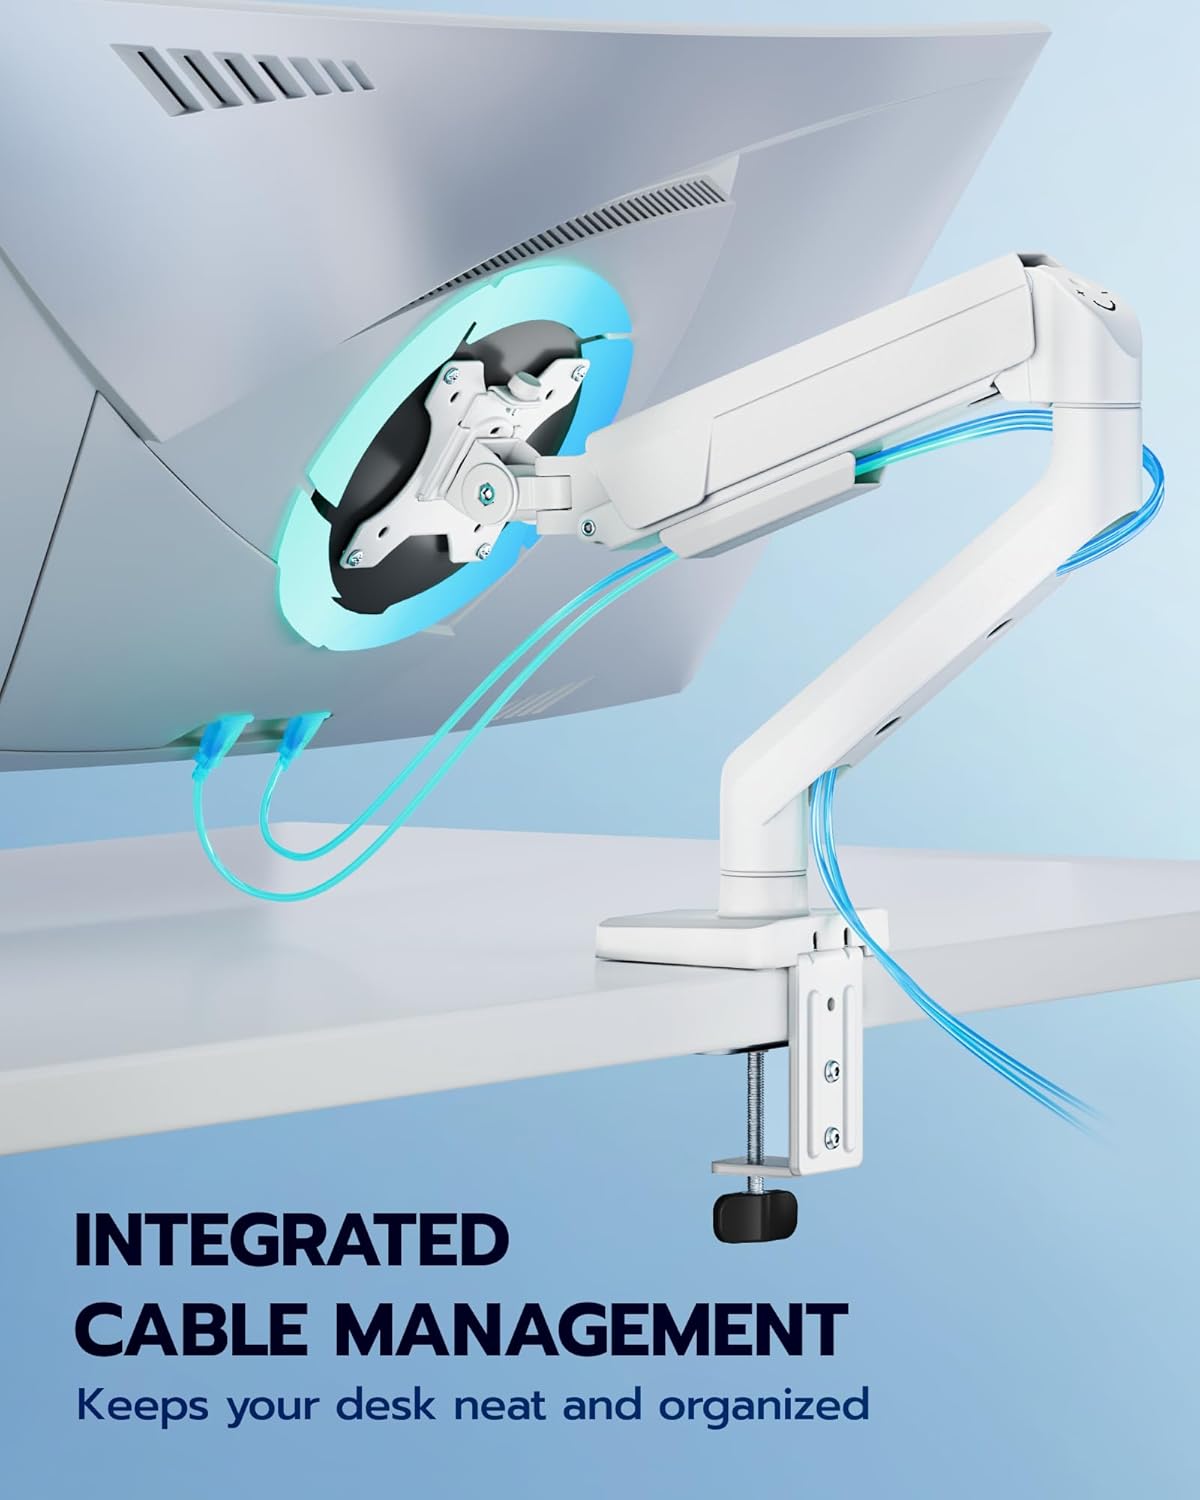
Image: The monitor arm with cables neatly organized and hidden within its integrated cable management system, contributing to a clean desk setup.
മെയിൻ്റനൻസ്
പതിവ് അറ്റകുറ്റപ്പണികൾ നിങ്ങളുടെ മോണിറ്റർ കൈയുടെ ദീർഘായുസ്സും മികച്ച പ്രകടനവും ഉറപ്പാക്കുന്നു.
- വൃത്തിയാക്കൽ: Wipe the arm and base with a soft, damp തുണി. ഉരച്ചിലുകൾ ഉണ്ടാക്കുന്ന ക്ലീനറുകളോ ലായകങ്ങളോ ഒഴിവാക്കുക.
- ദൃഢത പരിശോധിക്കുക: എല്ലാ സ്ക്രൂകളും കണക്ഷനുകളും ഇടയ്ക്കിടെ പരിശോധിക്കുക, പ്രത്യേകിച്ച് ഡെസ്ക് ക്ലോസ്.amp/grommet and VESA plate screws, to ensure they remain tight.
- ഗ്യാസ് സ്പ്രിംഗ്: If the monitor arm feels too loose or too stiff over time, re-adjust the gas spring tension as described in the "Setup and Installation" section.
ട്രബിൾഷൂട്ടിംഗ്
If you encounter issues with your monitor arm, refer to the following common problems and solutions.
- Problem: Monitor sags or does not stay at the desired height.
- പരിഹാരം: The gas spring tension is likely too low for your monitor's weight. Increase the gas spring tension by turning the adjustment screw clockwise with the provided Allen key. Ensure the monitor is attached before adjusting.
- Problem: Monitor arm is difficult to move or adjust.
- പരിഹാരം: The gas spring tension might be too high. Decrease the gas spring tension by turning the adjustment screw counter-clockwise. Also, check if any pivot points are overly tightened and loosen them slightly if necessary.
- Problem: Monitor wobbles or feels unstable.
- പരിഹാരം: ഡെസ്ക് cl ഉറപ്പാക്കുകamp or grommet mount is securely fastened to the desk. Check that the VESA plate screws attaching the monitor to the arm are tight. Verify your monitor's weight is within the arm's capacity.
- Problem: Cables are not staying in the management channels.
- പരിഹാരം: Ensure the cable covers are properly closed and snapped into place. If cables are too thick or numerous, consider using external cable ties for additional support.
വാറൻ്റിയും പിന്തുണയും
ARES WING products are designed for durability and performance. For specific warranty details, please refer to the warranty card included with your product or contact ARES WING customer support.
If you require further assistance or have questions not covered in this manual, please visit the official ARES WING webസൈറ്റ് അല്ലെങ്കിൽ അവരുടെ ഉപഭോക്തൃ സേവന ടീമിനെ ബന്ധപ്പെടുക.