
ആമുഖം
This manual provides essential information for the setup, operation, maintenance, and troubleshooting of your AWOW Mini PC, Model BA7. Please read these instructions carefully before using the device.

ചിത്രം: കഴിഞ്ഞുview of the AWOW BA7 Mini PC, highlighting its compact design and key features.
പാക്കേജ് ഉള്ളടക്കം
പാക്കേജിൽ എല്ലാ ഇനങ്ങളും ഉണ്ടെന്ന് ഉറപ്പാക്കുക:
- AWOW BA7 Mini PC
- പവർ അഡാപ്റ്റർ
- മൗണ്ടിംഗ് സ്ക്രൂകൾ
- വെസ മൗണ്ട് ബ്രാക്കറ്റ്
- HDMI കേബിൾ
- ഉപയോക്തൃ മാനുവൽ (ഈ പ്രമാണം)

Image: Illustration of the AWOW BA7 Mini PC and its included accessories: power adapter, screws, VESA mount, HDMI cable, and user manual.
സജ്ജീകരണ നിർദ്ദേശങ്ങൾ
- പെരിഫറലുകൾ ബന്ധിപ്പിക്കുക: Connect your keyboard, mouse, and monitor(s) to the appropriate ports on the Mini PC.
ചിത്രം: മുൻഭാഗം view of the Mini PC showing the Power Button, Type-C port, USB 3.2 ports, and 3.5mm Audio Jack.

ചിത്രം: പിൻഭാഗം view of the Mini PC showing the DC IN, DP1.2, HDMI2.0, USB 2.0 ports, and RJ45 LAN port.
- പവർ കണക്ഷൻ: മിനി പിസിയിലെ DC IN പോർട്ടിലേക്ക് പവർ അഡാപ്റ്റർ ബന്ധിപ്പിക്കുക, തുടർന്ന് അഡാപ്റ്റർ ഒരു പവർ ഔട്ട്ലെറ്റിലേക്ക് പ്ലഗ് ചെയ്യുക.
- പവർ ഓൺ: Press the power button located on the front of the Mini PC. The system will boot up.
- പ്രാരംഭ സജ്ജീകരണം: ഭാഷ, പ്രദേശം, നെറ്റ്വർക്ക് കണക്ഷൻ, ഉപയോക്തൃ അക്കൗണ്ട് സൃഷ്ടിക്കൽ എന്നിവയുൾപ്പെടെ Windows 11 Pro പ്രാരംഭ സജ്ജീകരണം പൂർത്തിയാക്കാൻ ഓൺ-സ്ക്രീൻ നിർദ്ദേശങ്ങൾ പാലിക്കുക.
- നെറ്റ്വർക്ക് കണക്ഷൻ:
- വയർ: Connect an Ethernet cable to the RJ45 LAN port for a stable wired connection.
- വയർലെസ്: During Windows setup or via Windows settings, connect to your Wi-Fi network using the built-in WiFi 6.
പ്രവർത്തന നിർദ്ദേശങ്ങൾ
അടിസ്ഥാന പ്രവർത്തനം
- പവർ ഓൺ/ഓഫ്: Press the power button to turn on the PC. To shut down, use the Windows Start menu options (Shut down, Restart, Sleep). A short press on the power button can put the PC to sleep. A long press (approx. 5 seconds) will force a shutdown.
- ഡിസ്പ്ലേ ഔട്ട്പുട്ട്: The Mini PC supports up to three 4K displays simultaneously via DP, HDMI, and USB-C. Connect your monitors and configure display settings in Windows.

Image: A user working with a triple monitor setup, demonstrating the Mini PC's multi-display capability.
- USB കണക്റ്റിവിറ്റി: Utilize the USB 2.0 and USB 3.0 ports for connecting external devices such as external hard drives, USB flash drives, printers, and other peripherals. The Type-C port also supports data transfer and display output.
- ഓഡിയോ: 3.5mm ഓഡിയോ ജാക്കിലേക്ക് ഹെഡ്ഫോണുകളോ സ്പീക്കറുകളോ ബന്ധിപ്പിക്കുക.
വിപുലമായ ഉപയോഗം
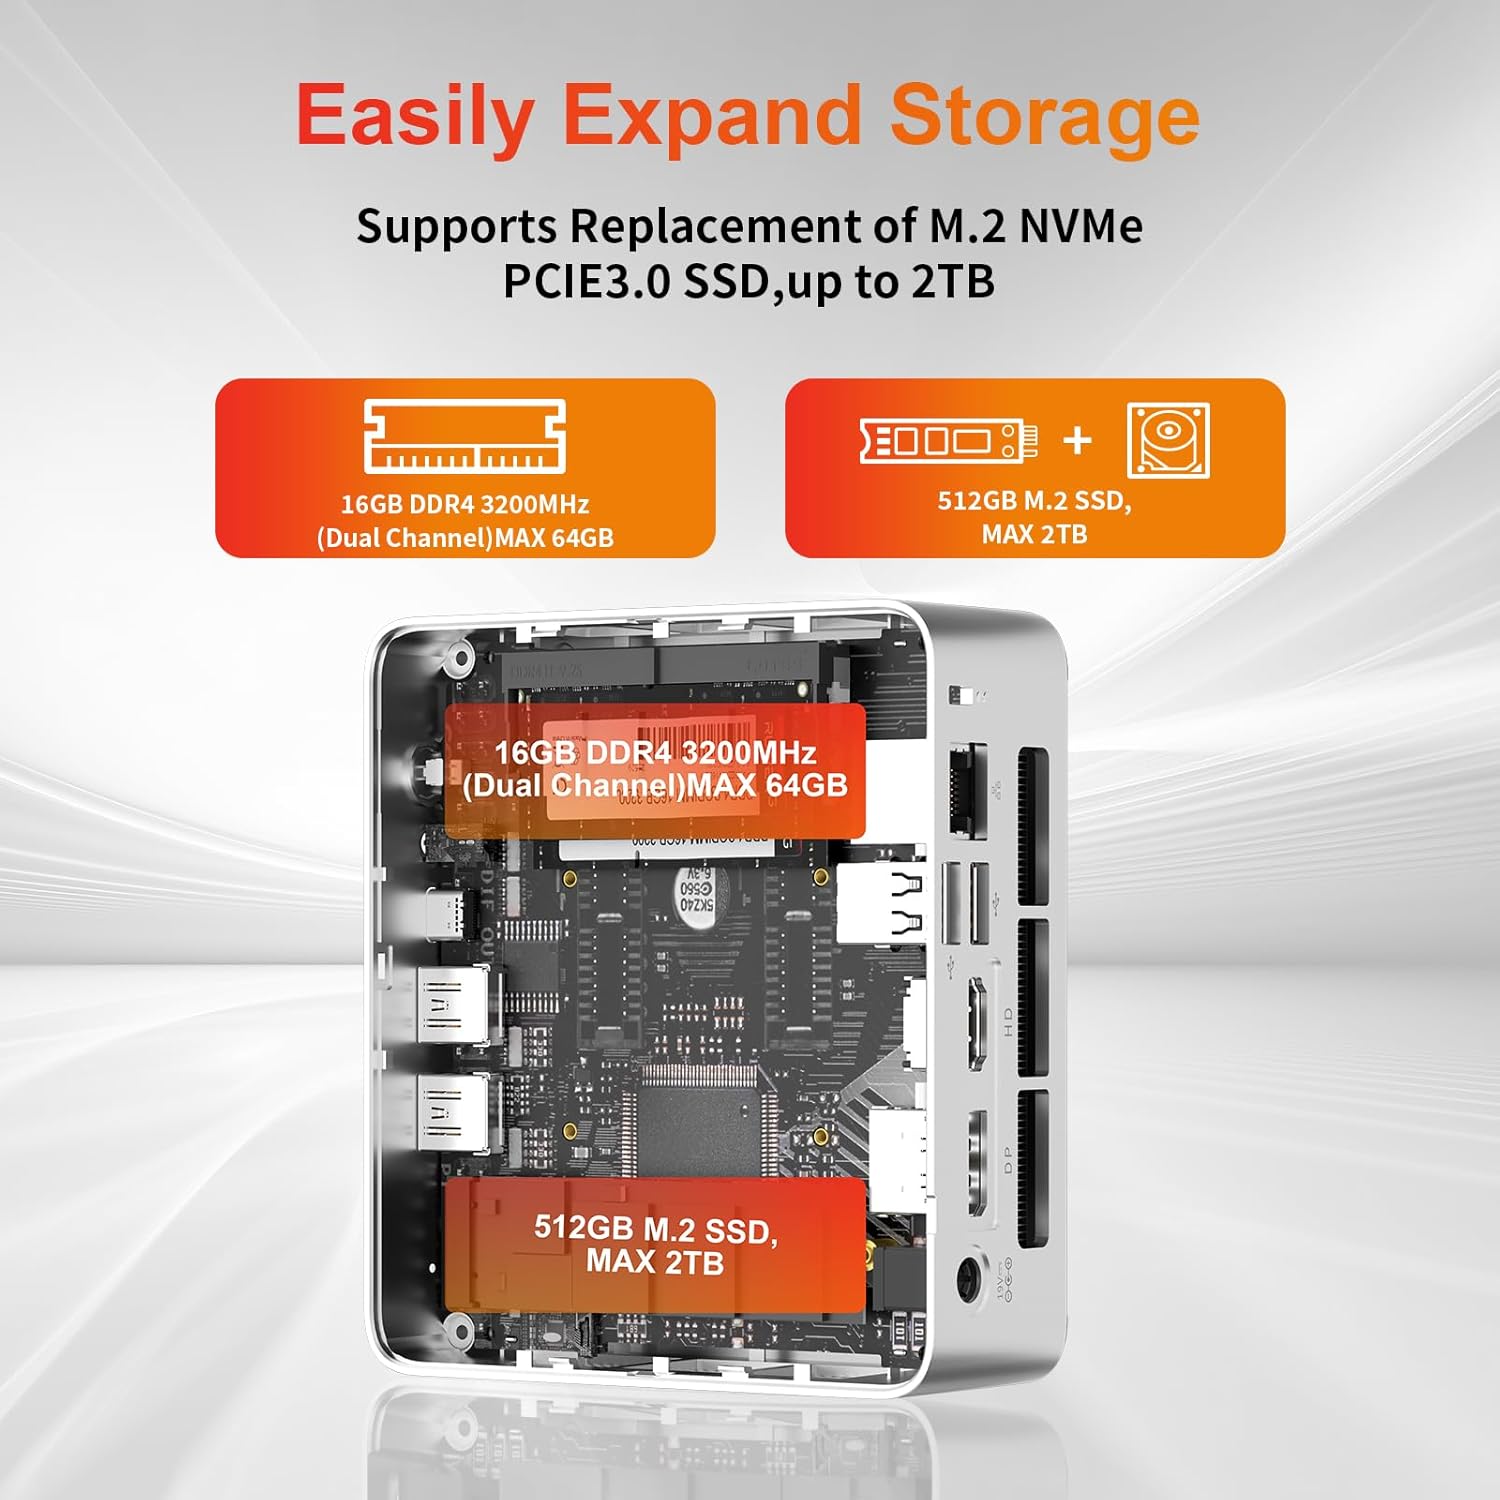
- സംഭരണ വിപുലീകരണം: The Mini PC supports replacement of the M.2 NVMe PCIe 3.0 SSD up to 2TB. It also supports memory expansion up to 64GB DDR4.

Image: Diagram illustrating the internal components and options for expanding storage (M.2 SSD up to 2TB) and RAM (DDR4 up to 64GB).
- വെസ മൗണ്ടിംഗ്: Use the included VESA mount bracket to attach the Mini PC to the back of a compatible monitor or to a wall mount, saving desk space.
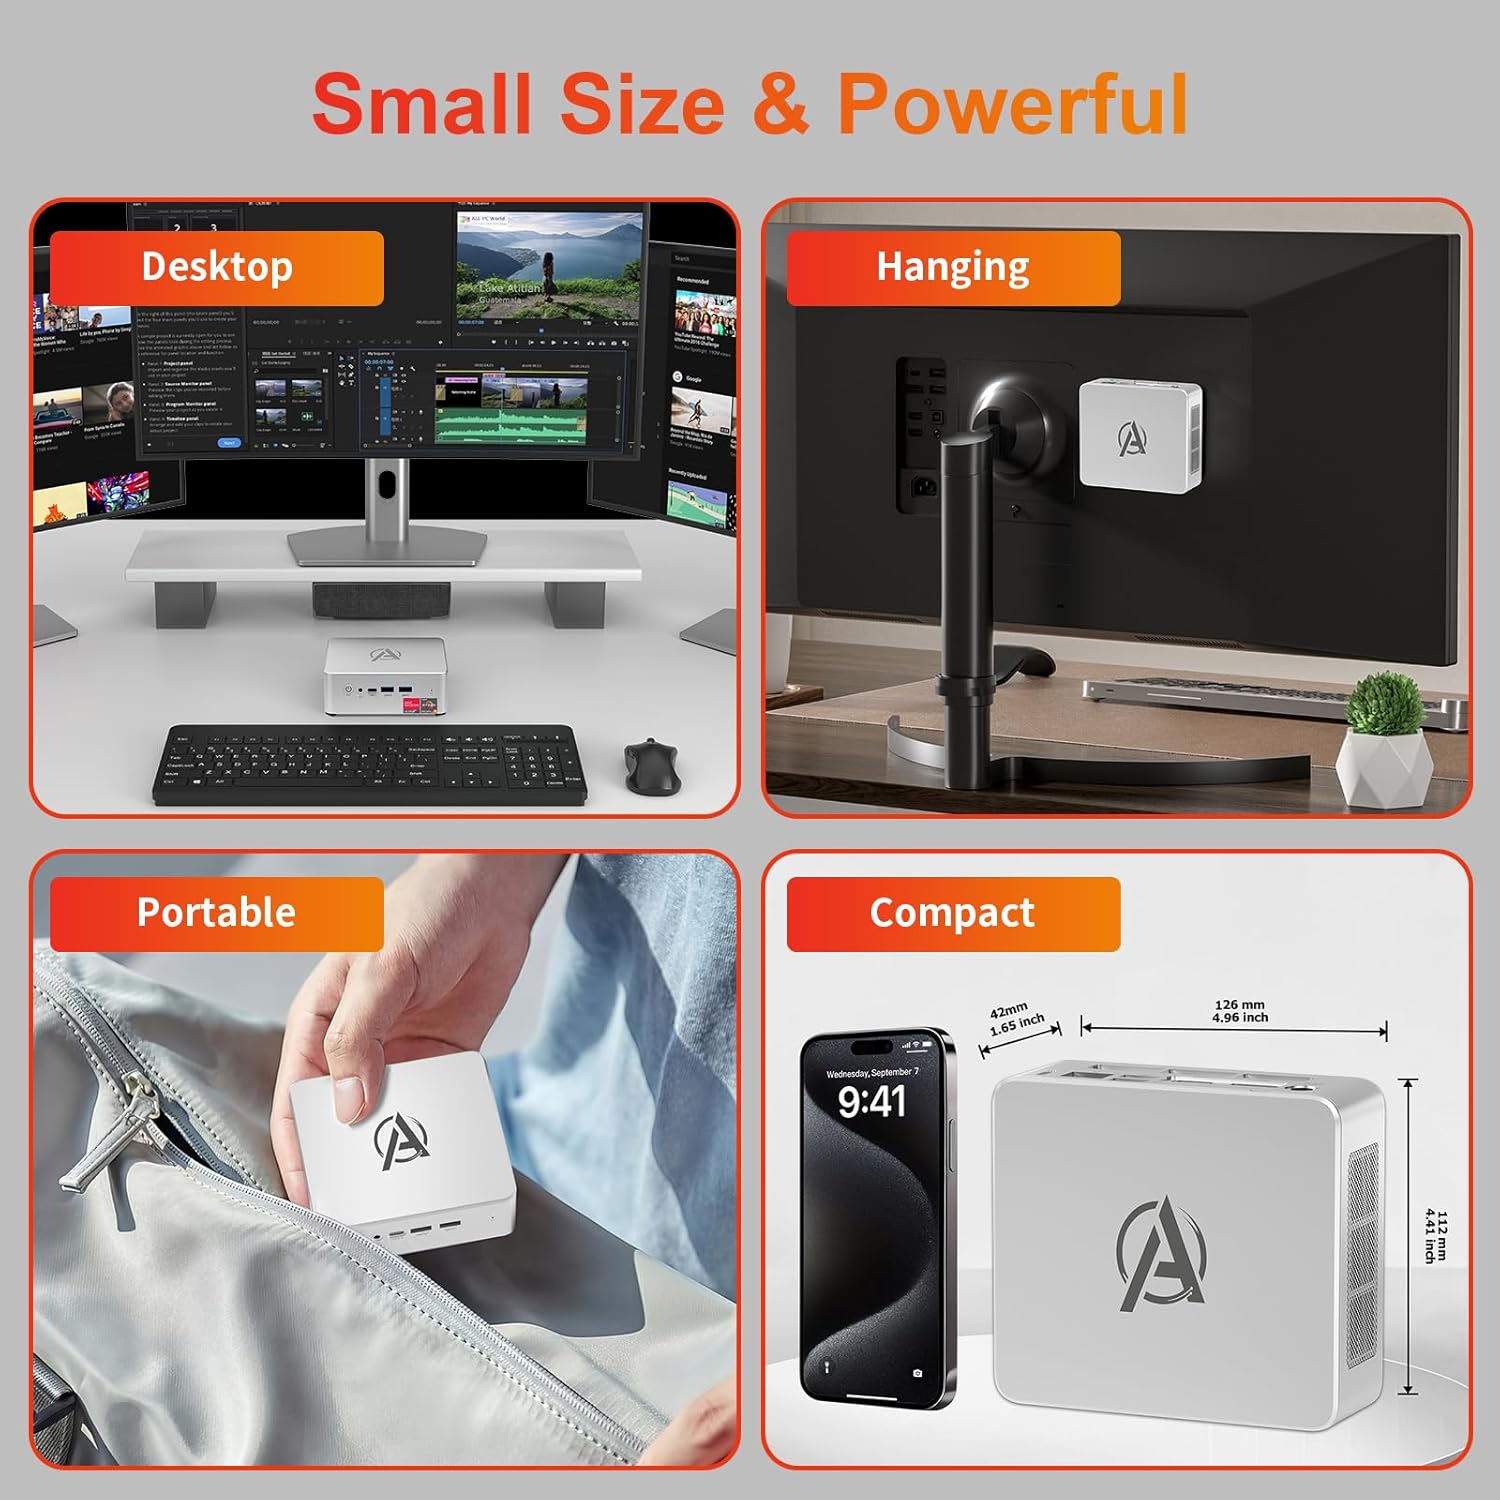
Image: Various usage scenarios for the Mini PC, including desktop, VESA-mounted behind a monitor, portable, and compact size comparison.
മെയിൻ്റനൻസ്
- വൃത്തിയാക്കൽ: Use a soft, dry cloth to clean the exterior of the Mini PC. Do not use liquid cleaners or aerosols. Ensure ventilation openings are free from dust.
- സോഫ്റ്റ്വെയർ അപ്ഡേറ്റുകൾ: മികച്ച പ്രകടനവും സുരക്ഷയും ഉറപ്പാക്കാൻ വിൻഡോസ് അപ്ഡേറ്റുകളും ഡ്രൈവർ അപ്ഡേറ്റുകളും പതിവായി പരിശോധിച്ച് ഇൻസ്റ്റാൾ ചെയ്യുക.
- ചൂട് മാനേജ്മെൻ്റ്: Ensure the Mini PC is placed in a well-ventilated area. Avoid blocking the air vents. The intelligent cooling system is designed for low noise and efficient heat dissipation.

Image: Diagram illustrating the internal cooling fan and heat sink, showing airflow for efficient heat dissipation.
- സ്റ്റോറേജ് മാനേജ്മെന്റ്: അനാവശ്യമായത് ഇടയ്ക്കിടെ വൃത്തിയാക്കുക files and applications to maintain system performance.
ട്രബിൾഷൂട്ടിംഗ്
- ശക്തിയില്ല:
- പവർ അഡാപ്റ്റർ മിനി പിസിയിലും പവർ ഔട്ട്ലെറ്റിലും സുരക്ഷിതമായി ബന്ധിപ്പിച്ചിട്ടുണ്ടോ എന്ന് പരിശോധിക്കുക.
- പവർ ഔട്ട്ലെറ്റ് പ്രവർത്തനക്ഷമമാണെന്ന് ഉറപ്പാക്കുക.
- മറ്റൊരു പവർ ഔട്ട്ലെറ്റ് പരീക്ഷിക്കുക.
- ഡിസ്പ്ലേ ഇല്ല:
- Verify that the HDMI/DP/USB-C cable is securely connected to both the Mini PC and the monitor.
- മോണിറ്റർ ഓണാക്കിയിട്ടുണ്ടെന്നും ശരിയായ ഇൻപുട്ട് ഉറവിടത്തിലേക്ക് സജ്ജീകരിച്ചിട്ടുണ്ടെന്നും ഉറപ്പാക്കുക.
- ലഭ്യമെങ്കിൽ മറ്റൊരു ഡിസ്പ്ലേ കേബിളോ മോണിറ്ററോ പരീക്ഷിച്ചുനോക്കൂ.
- മന്ദഗതിയിലുള്ള പ്രകടനം:
- പശ്ചാത്തലത്തിൽ പ്രവർത്തിക്കുന്ന അനാവശ്യ ആപ്ലിക്കേഷനുകൾ അടയ്ക്കുക.
- ശേഷിക്കുന്ന ഏതെങ്കിലും വിൻഡോസ് അപ്ഡേറ്റുകൾ അല്ലെങ്കിൽ ഡ്രൈവർ അപ്ഡേറ്റുകൾക്കായി പരിശോധിച്ച് ഇൻസ്റ്റാൾ ചെയ്യുക.
- SSD-യിൽ മതിയായ ഇടമുണ്ടെന്ന് ഉറപ്പാക്കുക.
- Monitor CPU and RAM usage in Task Manager to identify resource-intensive processes.
- നെറ്റ്വർക്ക് കണക്റ്റിവിറ്റി പ്രശ്നങ്ങൾ:
- For wired connections, ensure the Ethernet cable is properly connected and the router is working.
- For Wi-Fi, check if the Wi-Fi adapter is enabled and connected to the correct network. Restart your router/modem.
- സിസ്റ്റം ഫ്രീസുചെയ്യുന്നു/ക്രാഷുചെയ്യുന്നു:
- മിനി പിസി പുനരാരംഭിക്കുക.
- Ensure the system is not overheating (check ventilation).
- Run a system diagnostic or check Windows Event Viewer for error messages.
സ്പെസിഫിക്കേഷനുകൾ
| മോഡൽ | AWOW BA7 Mini PC |
| പ്രോസസ്സർ | എഎംഡി റൈസൺ 5 7430U (6 കോറുകൾ, 12 ത്രെഡുകൾ, 4.3 GHz വരെ) |
| ഗ്രാഫിക്സ് | ഇന്റഗ്രേറ്റഡ് എഎംഡി റേഡിയൻ ഗ്രാഫിക്സ് |
| റാം | 16GB DDR4 (64GB വരെ വികസിപ്പിക്കാവുന്നതാണ്) |
| സംഭരണം | 512GB PCIe 3.0 M.2 SSD (Expandable up to 2TB) |
| ഓപ്പറേറ്റിംഗ് സിസ്റ്റം | വിൻഡോസ് 11 പ്രോ |
| വീഡിയോ ഔട്ട്പുട്ട് | DP1.2 (4K@60Hz), HDMI2.0 (4K@60Hz), USB-C (4K@60Hz) - Supports Triple Display |
| കണക്റ്റിവിറ്റി | WiFi 6, Bluetooth 5.2, 1000Mbps RJ45 LAN |
| തുറമുഖങ്ങൾ | 2x USB 3.2, 2x USB 2.0, 1x Type-C (Full Function), 1x DP1.2, 1x HDMI2.0, 1x RJ45 LAN, 1x 3.5mm Audio Jack, 1x DC IN |
| അളവുകൾ | 126mm x 112mm x 42mm (ഏകദേശം 4.96 x 4.41 x 1.65 ഇഞ്ച്) |
| ഭാരം | 398 ഗ്രാം (ഉപകരണം മാത്രം) Image: The Mini PC with its dimensions (126mm x 112mm x 42mm) and weight (398g) labeled. |
വാറൻ്റിയും പിന്തുണയും
AWOW provides comprehensive support for its products.
- വാറൻ്റി: This product includes a 12-month service period from the date of purchase, covering manufacturing defects.
- സാങ്കേതിക സഹായം: Lifetime technical support is available for all AWOW products.
- ബന്ധപ്പെടുക: For technical assistance, warranty claims, or any product-related inquiries, please visit the official AWOW webസൈറ്റ് അല്ലെങ്കിൽ അവരുടെ ഉപഭോക്തൃ സേവനവുമായി ബന്ധപ്പെടുക.

Image: AWOW brand message emphasizing fulfillment, lifetime technical support, and 12-month service.