
1. ആമുഖം
The TechniSat VIOLA 200 is a portable digital radio designed for clear reception of both DAB+ and analog FM radio stations. It features a compact design, an intuitive LCD display, and flexible power options, making it suitable for use at home or on the go. This manual provides essential information for setting up, operating, and maintaining your VIOLA 200 radio.
2 സുരക്ഷാ വിവരങ്ങൾ
- ഉപകരണം ഉപയോഗിക്കുന്നതിന് മുമ്പ് എല്ലാ നിർദ്ദേശങ്ങളും ശ്രദ്ധാപൂർവ്വം വായിക്കുക.
- Keep the radio away from water, moisture, and high humidity environments.
- Do not expose the device to extreme temperatures (hot or cold) or direct sunlight.
- Use only the supplied AC power adapter (DC 5V/600mA) or specified AA batteries.
- Do not attempt to open, disassemble, or repair the radio yourself. Refer all servicing to qualified personnel.
- പ്രവർത്തന സമയത്ത് ഉപകരണത്തിന് ചുറ്റും ശരിയായ വായുസഞ്ചാരം ഉറപ്പാക്കുക.
3. പാക്കേജ് ഉള്ളടക്കം
പാക്കേജിൽ എല്ലാ ഇനങ്ങളും ഉണ്ടോ എന്ന് ദയവായി പരിശോധിക്കുക:
- TechniSat VIOLA 200 Portable DAB+/FM Radio
- AC Power Adapter (DC 5V/600mA)
- ഉപയോക്തൃ മാനുവൽ
4. ഉൽപ്പന്നം കഴിഞ്ഞുview
Familiarize yourself with the main components and controls of your VIOLA 200 radio.

ചിത്രം 4.1: മുൻഭാഗം View of TechniSat VIOLA 200
This image displays the front of the TechniSat VIOLA 200 radio, highlighting its LCD screen, speaker grille, and the central control knob surrounded by function buttons.
നിയന്ത്രണങ്ങളും തുറമുഖങ്ങളും:
- ഓൺ/ഓഫ് ബട്ടൺ: റേഡിയോ ഓൺ അല്ലെങ്കിൽ ഓഫ് ചെയ്യുന്നു.
- Tune/Scan Button: Initiates station scanning or fine-tunes frequencies.
- Vol-/OK & Vol+/OK (Main Knob): Rotates to adjust volume or navigate menus; press to confirm selections.
- പ്രിയപ്പെട്ട ബട്ടൺ: Accesses and saves favorite stations.
- വിവരം/മെനു ബട്ടൺ: Displays station information or accesses the main menu.
- DAB+/FM Button: Switches between DAB+ and FM radio modes.
- LCD ഡിസ്പ്ലേ: Two-line display showing station information, time, and menu options.
- ടെലിസ്കോപ്പിക് ആന്റിന: Extend for optimal radio signal reception.
- 3.5 എംഎം ഹെഡ്ഫോൺ ജാക്ക്: സ്വകാര്യ ശ്രവണത്തിനായി.
- USB-C (DC IN 5V/0.6A): പവർ ഇൻപുട്ട് പോർട്ട്.
- ബാറ്ററി കമ്പാർട്ട്മെൻ്റ്: Located on the back, for 4x AA batteries.

ചിത്രം 4.2: പിൻഭാഗം View with Ports and Battery Compartment
This image shows the back of the TechniSat VIOLA 200, detailing the 3.5mm headphone jack, the USB-C DC IN port, and the battery compartment.
5. സജ്ജീകരണം
5.1 റേഡിയോ പവർ ചെയ്യുന്നു
The VIOLA 200 can be powered using the included AC adapter or with AA batteries.
എസി പവർ ഉപയോഗിക്കുന്നത്:
- Connect the small end of the supplied AC power adapter to the USB-C port labeled "DC IN 5V/0.6A" on the back of the radio.
- എസി പവർ അഡാപ്റ്ററിന്റെ മറ്റേ അറ്റം ഒരു സ്റ്റാൻഡേർഡ് വാൾ ഔട്ട്ലെറ്റിലേക്ക് പ്ലഗ് ചെയ്യുക.
ബാറ്ററി പവർ ഉപയോഗിക്കുന്നത്:
For portable use, the radio requires 4x AA batteries (not included).
- റേഡിയോയുടെ പിൻഭാഗത്ത് ബാറ്ററി കമ്പാർട്ട്മെൻ്റ് കണ്ടെത്തുക.
- ബാറ്ററി കമ്പാർട്ട്മെന്റ് കവർ തുറക്കുക.
- Insert 4x AA batteries, ensuring the correct polarity (+/-) as indicated inside the compartment.
- ബാറ്ററി കമ്പാർട്ട്മെൻ്റ് കവർ സുരക്ഷിതമായി അടയ്ക്കുക.
5.2 Antenna Positioning
For optimal radio reception, fully extend the telescopic antenna. Adjust its position and angle to achieve the best signal quality.
6. പ്രവർത്തന നിർദ്ദേശങ്ങൾ
6.1 പവർ ഓൺ/ഓഫ്
അമർത്തുക ഓൺ/ഓഫ് button located on the front panel to turn the radio on or off.
6.2 Selecting Radio Mode (DAB+/FM)
അമർത്തുക DAB+/FM button to switch between Digital Audio Broadcasting (DAB+) and Frequency Modulation (FM) radio modes.
6.3 DAB+ Radio Operation
- ഉപയോഗിച്ച് DAB+ മോഡിലേക്ക് മാറുക DAB+/FM ബട്ടൺ.
- Upon first use, the radio will automatically perform a full scan for available DAB+ stations. This may take a few moments.
- Once the scan is complete, rotate the main knob (Vol-/OK, Vol+/OK) to browse through the list of available stations.
- Press the main knob (OK) to select and start listening to a station.
- To perform a new scan, press and hold the Tune/Scan ബട്ടൺ.
6.4 എഫ്എം റേഡിയോ പ്രവർത്തനം
- ഉപയോഗിച്ച് FM മോഡിലേക്ക് മാറുക DAB+/FM ബട്ടൺ.
- യാന്ത്രിക സ്കാൻ: അമർത്തുക Tune/Scan button briefly to automatically scan for the next available FM station.
- സ്വമേധയാലുള്ള ട്യൂണിംഗ്: Rotate the main knob (Vol-/OK, Vol+/OK) ഒരു പ്രത്യേക ഫ്രീക്വൻസിയിലേക്ക് സ്വമേധയാ ട്യൂൺ ചെയ്യാൻ.
- The radio supports RDS (Radio Data System), which may display station names and other information on the LCD screen if broadcasted by the station.
6.5 Saving Favorite Stations
You can save up to 40 favorite stations for each mode (DAB+ and FM).
- Tune to the desired station you wish to save.
- അമർത്തിപ്പിടിക്കുക ഇഷ്ടം button until the display shows a preset number.
- Rotate the main knob to select the desired preset number (e.g., P01, P02, etc.).
- Press the main knob (OK) to confirm and save the station.
Recalling Favorite Stations:
- അമർത്തുക ഇഷ്ടം ബട്ടൺ ചുരുക്കത്തിൽ.
- Rotate the main knob to scroll through your saved favorite stations.
- Press the main knob (OK) to select and listen to the desired favorite station.
6.6 വോളിയം നിയന്ത്രണം
Rotate the main knob (Vol-/OK, Vol+/OK) clockwise to increase the volume and counter-clockwise to decrease it.
6.7 ഹെഡ്ഫോൺ ഉപയോഗം
To listen privately, plug standard 3.5mm headphones into the headphone jack on the back of the radio. The internal speaker will automatically mute when headphones are connected.
6.8 വിവരങ്ങൾ പ്രദർശിപ്പിക്കുക
അമർത്തുക വിവരം/മെനു button repeatedly to cycle through various information displayed on the LCD screen, such as program type, signal strength, time, and date.

Figure 6.1: LCD Display
This image provides a close-up of the radio's LCD display, showing typical station information during operation.
7. പരിപാലനം
7.1 വൃത്തിയാക്കൽ
To clean the radio, use a soft, dry cloth. Do not use liquid cleaners, abrasive pads, or chemical solvents, as these can damage the surface of the device.
7.2 ബാറ്ററി മാറ്റിസ്ഥാപിക്കൽ
When the batteries are low, the radio's performance may degrade. Replace all four AA batteries simultaneously with new ones, ensuring correct polarity.
7.3 സംഭരണം
If the radio will not be used for an extended period, remove the batteries to prevent leakage and store the device in a cool, dry place.
8. പ്രശ്നപരിഹാരം
If you encounter issues with your VIOLA 200, refer to the following common problems and solutions:
| പ്രശ്നം | സാധ്യമായ കാരണം | പരിഹാരം |
|---|---|---|
| റേഡിയോ ഓൺ ചെയ്യുന്നില്ല. | No power supply or dead batteries. | Check AC adapter connection. If using batteries, ensure they are correctly inserted and charged. |
| മോശം അല്ലെങ്കിൽ റേഡിയോ സ്വീകരണം ഇല്ല. | ആന്റിന നീട്ടിയിട്ടില്ല, ദുർബലമായ സിഗ്നൽ അല്ലെങ്കിൽ ഇടപെടൽ. | Fully extend the telescopic antenna. Reposition the radio to a location with better signal. Perform a new station scan. |
| സ്പീക്കറിൽ നിന്ന് ശബ്ദമില്ല. | Volume too low, headphones connected, or mute activated. | Increase volume. Disconnect headphones. Check if the radio is muted. |
| ഡിസ്പ്ലേ ശൂന്യമാണ് അല്ലെങ്കിൽ വായിക്കാൻ കഴിയാത്തതാണ്. | Power issue or display settings. | Ensure radio is powered on. Check display brightness settings via the menu. |
9 സ്പെസിഫിക്കേഷനുകൾ
Detailed technical specifications for the TechniSat VIOLA 200 radio:
- മോഡൽ: VIOLA 200
- ബ്രാൻഡ്: ടെക്നിസാറ്റ്
- ട്യൂണിംഗ് സാങ്കേതികവിദ്യ: DAB+/FM (with RDS and PLL)
- ഊർജ്ജ സ്രോതസ്സ്: AC Adapter (DC 5V/600mA) or 4x AA Batteries (not included)
- സ്പീക്കർ: Mono, 1W RMS
- കണക്ഷനുകൾ: 3.5mm Headphone Jack, USB-C (for power)
- ഡിസ്പ്ലേ: ബാക്ക്ലൈറ്റുള്ള എൽസിഡി
- അളവുകൾ (L x W x H): 15.5 സെ.മീ x 6 സെ.മീ x 9.3 സെ.മീ
- Favorite Presets: 40 per band (DAB+, FM)
- നിറം: കറുപ്പ്
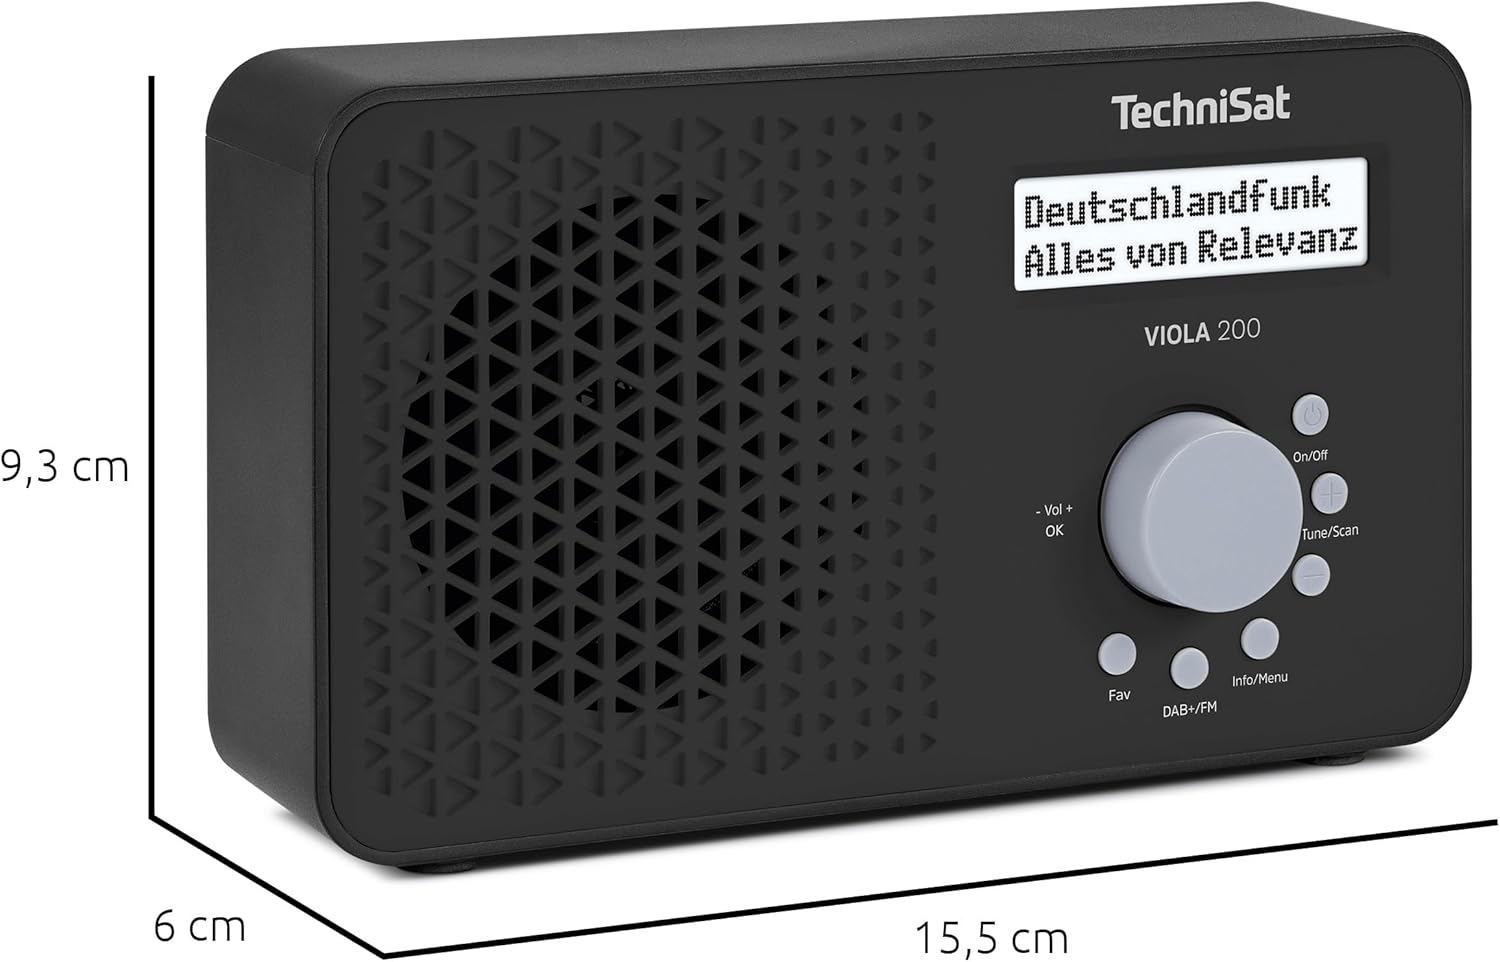
ചിത്രം 9.1: ഉൽപ്പന്ന അളവുകൾ
This image illustrates the physical dimensions of the TechniSat VIOLA 200 radio.
10. വാറൻ്റി
The TechniSat VIOLA 200 comes with a 2-year manufacturer's warranty. Please retain your proof of purchase for any warranty claims. For detailed terms and conditions, refer to the official TechniSat webസൈറ്റ് അല്ലെങ്കിൽ അവരുടെ ഉപഭോക്തൃ പിന്തുണയുമായി ബന്ധപ്പെടുക.
11. പിന്തുണ
For further assistance, troubleshooting, or additional product information, please visit the official TechniSat webസൈറ്റിൽ ബന്ധപ്പെടുക അല്ലെങ്കിൽ അവരുടെ ഉപഭോക്തൃ പിന്തുണാ വിഭാഗവുമായി ബന്ധപ്പെടുക. കോൺടാക്റ്റ് വിശദാംശങ്ങൾ സാധാരണയായി നിർമ്മാതാവിന്റെ വെബ്സൈറ്റിൽ കാണാം. webസൈറ്റ് അല്ലെങ്കിൽ വാറന്റി ഡോക്യുമെന്റേഷനിൽ.