
1. ഉൽപ്പന്നം കഴിഞ്ഞുview
The RIDGID 18V SubCompact Brushless 1/2 inch Drill/Driver Kit (Model R87012K) combines powerful brushless motor technology with a compact tool design. This kit is engineered for a wide range of demanding drilling and driving applications, offering a lightweight and efficient solution for both professional and home use.
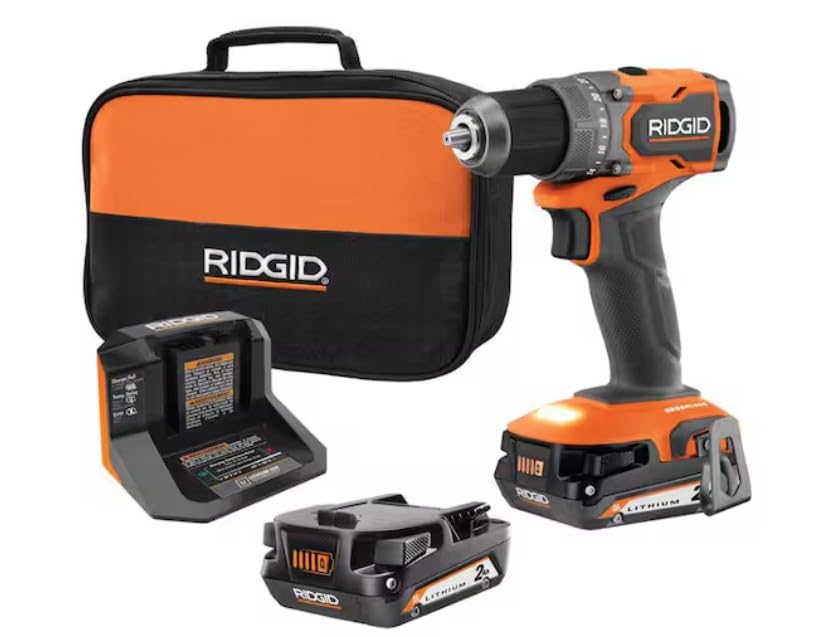
Figure 1: RIDGID 18V SubCompact Brushless 1/2 inch Drill/Driver Kit.
പ്രധാന സവിശേഷതകൾ
- Lightweight Design for enhanced maneuverability.
- Powerful Brushless Motor delivering 500 in./lbs. of torque and 0-450 / 0-1,750 RPM.
- 15% lighter and 25% more compact compared to the 18V Brushless model (R86114).
- 24-position clutch for precise torque control to match various applications.
- 2-speed gearbox to optimize power and speed for different tasks.
- Integrated LED Light for improved visibility in low-light conditions.
- 100% compatible with all RIDGID 18V batteries.
2 സുരക്ഷാ വിവരങ്ങൾ
ഈ പവർ ടൂളിനൊപ്പം നൽകിയിരിക്കുന്ന എല്ലാ സുരക്ഷാ മുന്നറിയിപ്പുകളും നിർദ്ദേശങ്ങളും ചിത്രീകരണങ്ങളും സ്പെസിഫിക്കേഷനുകളും എപ്പോഴും വായിച്ച് മനസ്സിലാക്കുക. താഴെ പട്ടികപ്പെടുത്തിയിരിക്കുന്ന എല്ലാ നിർദ്ദേശങ്ങളും പാലിക്കുന്നതിൽ പരാജയപ്പെടുന്നത് വൈദ്യുതാഘാതം, തീപിടുത്തം, കൂടാതെ/അല്ലെങ്കിൽ ഗുരുതരമായ പരിക്കിന് കാരണമാകാം.
പൊതു പവർ ടൂൾ സുരക്ഷാ മുന്നറിയിപ്പുകൾ
- വർക്ക് ഏരിയ സുരക്ഷ: നിങ്ങളുടെ ജോലിസ്ഥലം വൃത്തിയുള്ളതും നല്ല വെളിച്ചമുള്ളതുമായി സൂക്ഷിക്കുക. അലങ്കോലമായതോ ഇരുണ്ടതോ ആയ സ്ഥലങ്ങൾ അപകടങ്ങൾ ക്ഷണിച്ചുവരുത്തുന്നു. കത്തുന്ന ദ്രാവകങ്ങൾ, വാതകങ്ങൾ അല്ലെങ്കിൽ പൊടി എന്നിവയുടെ സാന്നിധ്യം പോലുള്ള സ്ഫോടനാത്മകമായ അന്തരീക്ഷത്തിൽ വൈദ്യുതി ഉപകരണങ്ങൾ പ്രവർത്തിപ്പിക്കരുത്.
- ഇലക്ട്രിക്കൽ സുരക്ഷ: പവർ ടൂൾ പ്ലഗുകൾ ഔട്ട്ലെറ്റുമായി പൊരുത്തപ്പെടണം. പ്ലഗിൽ ഒരിക്കലും ഒരു തരത്തിലും മാറ്റം വരുത്തരുത്. കോഡ് ദുരുപയോഗം ചെയ്യരുത്. പവർ ടൂൾ കൊണ്ടുപോകുന്നതിനോ വലിക്കുന്നതിനോ പ്ലഗ് അൺപ്ലഗ് ചെയ്യുന്നതിനോ ഒരിക്കലും കോഡ് ഉപയോഗിക്കരുത്.
- വ്യക്തിഗത സുരക്ഷ: Always wear eye protection. Use safety glasses, goggles, or a face shield. Wear hearing protection when operating power tools for extended periods. Dress properly. Do not wear loose clothing or jewelry. Keep hair and clothing away from moving parts.
- ഉപകരണ ഉപയോഗവും പരിചരണവും: പവർ ടൂളിനെ ബലമായി ഉപയോഗിക്കരുത്. നിങ്ങളുടെ ആപ്ലിക്കേഷന് അനുയോജ്യമായ പവർ ടൂൾ ഉപയോഗിക്കുക. എന്തെങ്കിലും ക്രമീകരണങ്ങൾ നടത്തുന്നതിനോ, ആക്സസറികൾ മാറ്റുന്നതിനോ, പവർ ടൂളുകൾ സൂക്ഷിക്കുന്നതിനോ മുമ്പ് പവർ സ്രോതസ്സിൽ നിന്ന് പ്ലഗ് വിച്ഛേദിക്കുക കൂടാതെ/അല്ലെങ്കിൽ പവർ ടൂളിൽ നിന്ന് ബാറ്ററി പായ്ക്ക് നീക്കം ചെയ്യുക.
- ബാറ്ററി ടൂൾ ഉപയോഗവും പരിചരണവും: നിർമ്മാതാവ് വ്യക്തമാക്കിയ ചാർജർ ഉപയോഗിച്ച് മാത്രം റീചാർജ് ചെയ്യുക. പ്രത്യേകമായി നിയുക്ത ബാറ്ററി പായ്ക്കുകൾ ഉള്ള പവർ ടൂളുകൾ മാത്രം ഉപയോഗിക്കുക.
3. ഉൾപ്പെടുത്തിയിരിക്കുന്ന ഘടകങ്ങൾ
Your RIDGID 18V SubCompact Brushless 1/2 in. Drill/Driver Kit includes the following items:
- R87012 18V SubCompact Brushless 1/2 in. Drill/Driver
- (2) 2.0 Ah Batteries
- ചാർജർ
- Belt Hook with Screw
- Driving Bit
- ടൂൾ ബാഗ്
4. സജ്ജീകരണം
ബാറ്ററി ഇൻസ്റ്റാളേഷനും നീക്കംചെയ്യലും
To install the battery, align the battery pack with the base of the tool and slide it in until it clicks securely into place. To remove the battery, press the two pinch tabs on the sides of the battery pack and slide it out.

Figure 2: Proper battery installation into the drill/driver.
ബിറ്റ് ഇൻസ്റ്റലേഷനും നീക്കം ചെയ്യലും
The drill/driver features a 1/2 inch ratcheting chuck for secure bit retention. To install a bit, twist the chuck counter-clockwise to open the jaws. Insert the bit fully into the chuck, then twist the chuck clockwise by hand until the bit is firmly secured. You will hear a clicking sound as it ratchets into place, indicating a secure grip. To remove a bit, twist the chuck counter-clockwise to loosen the jaws and pull the bit out.
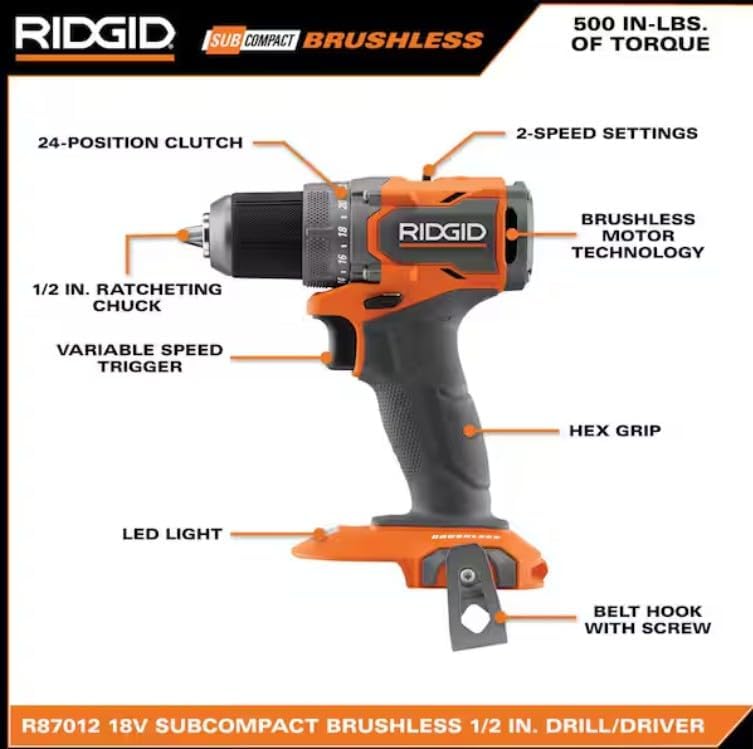
Figure 3: Key components of the drill/driver, including the 1/2 inch ratcheting chuck.
ബാറ്ററി ചാർജ് ചെയ്യുന്നു
Connect the charger to a standard power outlet. Insert the battery pack into the charger. The indicator lights on the battery will show the charge level. Allow the battery to fully charge before first use and whenever the charge level is low. Refer to the charger's specific instructions for detailed charging times and indicator meanings.

Figure 4: Battery with visible charge level indicator.
5. പ്രവർത്തന നിർദ്ദേശങ്ങൾ
പവർ ചെയ്യുന്നത് ഓൺ/ഓഫ്
To operate the drill/driver, press the variable speed trigger. The tool will start rotating. Release the trigger to stop the tool. The speed is proportional to how far the trigger is pressed.
വേഗത ക്രമീകരണങ്ങൾ ക്രമീകരിക്കുന്നു
The drill/driver features a 2-speed gearbox located on top of the tool. Slide the switch to position '1' for lower speed and higher torque, ideal for driving screws or drilling large holes. Slide the switch to position '2' for higher speed and lower torque, suitable for drilling smaller holes.
Adjusting Clutch Settings
The 24-position clutch allows you to adjust the torque output to prevent over-driving screws or damaging materials. Rotate the clutch collar to select the desired torque setting. Lower numbers provide less torque, while higher numbers provide more. For drilling, set the clutch to the drill icon for maximum torque.
LED ലൈറ്റ് ഉപയോഗിച്ച്
The integrated LED light illuminates the work area when the trigger is pressed, improving visibility in dimly lit spaces.
പൊതു പ്രവർത്തനം
When drilling or driving, ensure the workpiece is securely clamped. Apply steady, even pressure to the tool. For drilling, start with a pilot hole if necessary, especially in hard materials or near edges. For driving, select a clutch setting that allows the screw to be driven flush without stripping the head or damaging the material.
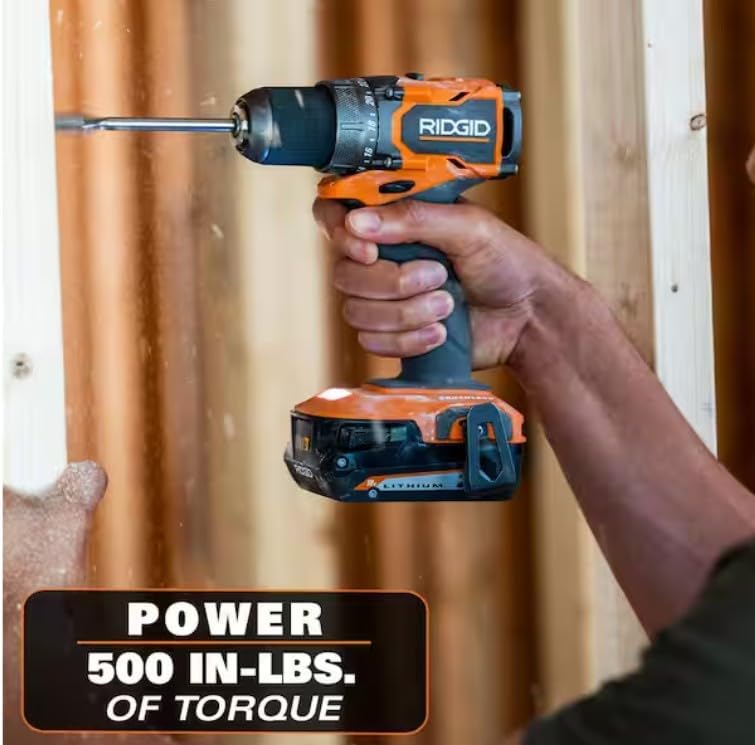
Figure 5: Driving a screw into wood with the drill/driver.

Figure 6: Operating the drill/driver in a confined area.

Figure 7: Installing cabinet hardware with the drill/driver.

Figure 8: Drilling into a metal channel.

Figure 9: Drilling into a wooden stud.
6. പരിപാലനം
വൃത്തിയാക്കൽ
Keep the tool's air vents clear and free of debris to prevent overheating. Use a clean, dry cloth to wipe down the tool. Do not use solvents or harsh chemicals, as these can damage plastic parts.
സംഭരണം
Store the tool, batteries, and charger in a cool, dry place, away from direct sunlight and moisture. Ensure batteries are partially charged before long-term storage. Keep out of reach of children.
ബാറ്ററി കെയർ
Do not store batteries in discharged condition. Recharge them regularly, even if not in use, to maintain optimal performance and lifespan. Avoid exposing batteries to extreme temperatures.
7. പ്രശ്നപരിഹാരം
- ഉപകരണം ആരംഭിക്കുന്നില്ല: Ensure the battery is fully charged and properly inserted. Check that the forward/reverse selector is not in the center (locked) position.
- കുറഞ്ഞ പവർ/പ്രകടനം: The battery may be low on charge. Recharge the battery. Ensure the correct speed and clutch settings are selected for the task.
- അമിത ചൂടാക്കൽ: Ensure the tool's ventilation slots are not blocked. Allow the tool to cool down before continuing use. Avoid continuous heavy-duty operation.
- ചക്കിൽ ബിറ്റ് സ്ലിപ്പിംഗ്: Ensure the chuck is tightened securely by hand. The ratcheting mechanism should click into place.
പ്രശ്നങ്ങൾ നിലനിൽക്കുകയാണെങ്കിൽ, ഉപഭോക്തൃ പിന്തുണയുമായി ബന്ധപ്പെടുക.
8 സ്പെസിഫിക്കേഷനുകൾ
| സ്പെസിഫിക്കേഷൻ | മൂല്യം |
|---|---|
| ബ്രാൻഡ് | RIDGID |
| മോഡൽ നമ്പർ | R87012K |
| പവർ ഉറവിടം | ബാറ്ററി പവർ |
| വാല്യംtage | 18 വോൾട്ട് |
| Ampഉന്മേഷം | 2 Amps |
| പരമാവധി റൊട്ടേഷണൽ സ്പീഡ് | 1750 ആർപിഎം |
| പരമാവധി ചക്ക് വലിപ്പം | 0.5 ഇഞ്ച് |
| പരമാവധി ടോർക്ക് | 500 ഇഞ്ച് പൗണ്ട് |
| വേഗതകളുടെ എണ്ണം | 2 |
| ഡ്രിൽ തരം | കോമ്പിനേഷൻ ഡ്രിൽ |
| ബാറ്ററി ശേഷി | 2 Amp മണിക്കൂറുകൾ |
| മെറ്റൽ ഡ്രില്ലിംഗ് ശേഷി | 0.5 ഇഞ്ച് |
| മെറ്റീരിയൽ തരം | പ്ലാസ്റ്റിക് |
| യു.പി.സി | 693070933615 |
9. വാറൻ്റി വിവരങ്ങൾ
This RIDGID product is covered by the manufacturer's warranty. For specific details regarding warranty coverage, terms, and conditions, please refer to the warranty card included with your product or visit the official RIDGID webസൈറ്റ്. വാറന്റി ക്ലെയിമുകൾക്കായി നിങ്ങളുടെ വാങ്ങലിന്റെ തെളിവ് സൂക്ഷിക്കുക.
10. ഉപഭോക്തൃ പിന്തുണ
For technical assistance, replacement parts, or any questions regarding your RIDGID 18V SubCompact Brushless 1/2 in. Drill/Driver Kit, please contact RIDGID customer support. Contact information can be found on the official RIDGID webസൈറ്റ് അല്ലെങ്കിൽ നിങ്ങളുടെ ഉൽപ്പന്നത്തിനൊപ്പം നൽകിയിരിക്കുന്ന ഡോക്യുമെന്റേഷനിൽ.