ഉൽപ്പന്നം കഴിഞ്ഞുview
The InoKraft NEO Airless Paint Sprayer Kit is designed for efficient and smooth application of paint for various DIY projects, including home interiors, exteriors, furniture, and fences. This manual provides essential information for safe and effective use, setup, operation, maintenance, and troubleshooting of your sprayer.
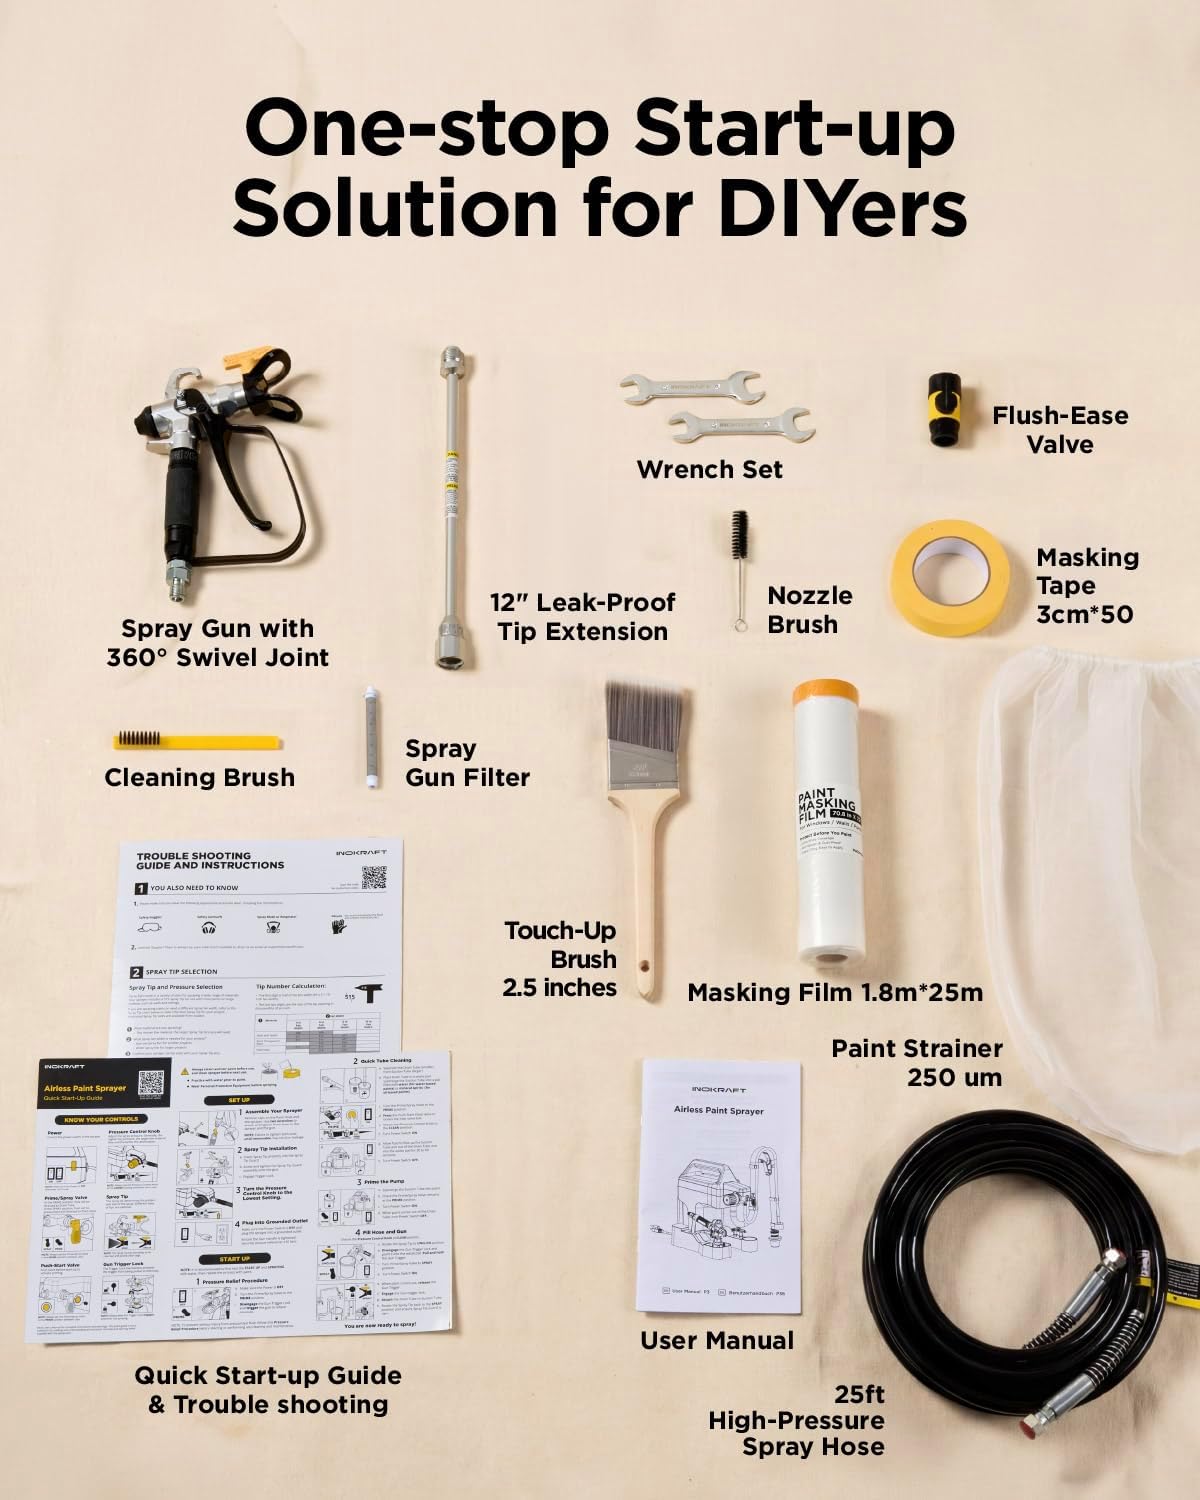
Know Your Sprayer: Components
Familiarize yourself with the components of your InoKraft NEO Airless Paint Sprayer Kit:
- Airless Paint Sprayer Unit
- Spray Gun with 360° Swivel Joint
- നോസൽ 515
- നോസൽ അഡാപ്റ്റർ
- 12'' Leak-Proof Tip Extension
- 25ft High-Pressure Spray Hose
- Flush-Ease Valve
- Strainer 250 um
- Masking Film 1.8m*25m
- Masking Tape 3cm*50m
- Touch-Up Brush
- Cleaning Kit (Cleaning Brush, Nozzle Brush)
- റെഞ്ച് സെറ്റ്
- Instruction Guide (User manual, Troubleshooting, Quick Guide)
For a visual guide to understanding your sprayer's components, please watch the video below:
Video: Learn about the various parts and functions of your InoKraft NEO Airless Paint Sprayer.
Setup and Start-up
Proper setup is crucial for optimal performance and safety. Follow these steps to assemble and prepare your sprayer for use:
1. Assemble Your Sprayer
- Connect the high-pressure spray hose to the sprayer unit. Use a wrench to ensure a tight connection.
- Connect the spray gun to the other end of the high-pressure hose. Use two wrenches to fully secure this connection.
- Ensure the trigger lock on the spray gun is engaged when not spraying.
- Turn the pressure control knob counterclockwise all the way down to the lowest setting.
- Plug the sprayer into a grounded outlet.
2. Pressure Relief Procedure (Before Starting/Maintenance)
To prevent serious injury from pressurized fluid, always perform this procedure before starting, stopping, or performing any maintenance:
- പവർ സ്വിച്ച് ഓഫ് ചെയ്യുക.
- Engage the gun trigger lock.
- Turn the pressure control knob to the lowest setting.
- Turn the Prime/Spray valve to the PRIME position.
- Point the gun into a waste pail. Disengage the trigger lock and pull the trigger to relieve pressure.
- Engage the gun trigger lock.
3. Flush Storage Fluid (Quick Tube Cleaning)
Your sprayer is shipped with storage fluid. Flush it out before first use:
- Separate the two tubes (suction and drain). Place the drain tube into a waste pail.
- Submerge the suction tube into a pail filled with water (for water-based materials) or mineral spirits (for oil-based materials).
- Press the Push-Start button twice.
- Rotate the pressure control knob to the CLEAN position.
- Ensure the Prime/Spray valve is at the PRIME position.
- Power ON the sprayer.
- Allow the sprayer to pump. Flushing fluid will flow up the suction tube and out the drain tube. Allow it to circulate for 30 seconds until the fluid flows smoothly.
- Lower the pressure and Power OFF the sprayer. Your sprayer is now flushed clean.
4. Adding Paint to the Sprayer
- Submerge the suction tube into your paint pail.
- Ensure the Prime/Spray valve remains at the PRIME position.
- Power ON the sprayer. Increase the pressure control until the motor starts.
- Wait to see the paint flow smoothly out of the drain tube.
- Lower the pressure and Power OFF the sprayer. The pump is now primed with paint.
5. Fill the Hose and Gun
- Rotate the spray tip to the UNCLOG position.
- Disengage the gun trigger lock and point the gun into a waste pail. Pull and hold the gun trigger.
- Turn the Prime/Spray valve to the SPRAY position.
- പവർ സ്വിച്ച് ഓണാക്കുക.
- When paint comes out of the gun, release the gun trigger.
- Engage the gun trigger lock.
- Attach the drain tube to the suction tube.
- Rotate the spray tip back to the SPRAY position.
Your sprayer is now fully set up and ready for operation. Test spray on a piece of cardboard to ensure proper function before beginning your project.
Video: Detailed guide on setting up and starting your InoKraft NEO Airless Paint Sprayer.
പ്രവർത്തന നിർദ്ദേശങ്ങൾ
The InoKraft NEO Airless Paint Sprayer is designed for ease of use and delivers a smooth, even finish without the need for pre-thinning most paints. The 360° Swivel Joint on the spray gun provides enhanced agility and precision during operation.
Always maintain a consistent distance and angle from the surface for best results. Overlap each pass slightly to ensure full coverage and avoid streaks.


ശുചീകരണവും പരിപാലനവും
Regular cleaning and proper storage are essential to extend the life of your InoKraft NEO Airless Paint Sprayer. The Flush-Ease Valve allows for quick cleaning in approximately 10 minutes.
1. Short-Term Storage (Up to 2 Days)
- Engage the gun trigger lock and unplug the power cord.
- Leave the suction tube and drain tube in the paint pail.
- Cover the paint pail tightly with plastic wrap.
2. Cleaning the Pump (Using Buckets)
After performing the Pressure Relief Procedure:
- Lift both the suction tube and drain tube from the paint pail, allowing excess paint to drain back.
- Separate the tubes.
- Place the suction tube into a pail of clean flushing fluid (water for water-based paint, mineral spirits for oil-based paint). Place the drain tube into a waste pail.
- Turn the Prime/Spray valve to the PRIME position.
- Turn the pressure control knob to the CLEAN position.
- പവർ സ്വിച്ച് ഓണാക്കുക.
- Allow the fluid to circulate until the fluid coming out of the drain tube is relatively clear (approx. 20 seconds).
- Turn down the pressure control and Power OFF the sprayer.
3. Recover Unused Paint and Clean the Paint Hose
- Disengage the gun trigger lock. With the gun pointed into the paint bucket, pull the trigger.
- Turn the Prime/Spray valve to the SPRAY position.
- Rotate the spray tip to the UNCLOG position. Turn the power switch ON.
- While continuing to hold the gun trigger, increase the pressure to the CLEAN position.
- Do this until you see paint diluted with water or flushing fluid coming out of the gun. Then immediately redirect the gun into the waste pail when the water is clear.
- Turn the pressure control knob to the lowest setting.
- ട്രിഗർ ലോക്കിൽ ഏർപ്പെടുക.
- Turn the Prime/Spray valve to the PRIME position.
- പവർ സ്വിച്ച് ഓഫ് ചെയ്യുക.
4. Cleaning the Gun and Rest Parts
- ഹോസിൽ നിന്ന് തോക്ക് വിച്ഛേദിക്കുക.
- Remove the gun handle and gun filter.
- Remove the spray tip guard assembly.
- എല്ലാ ഭാഗങ്ങളും ചെറുചൂടുള്ള സോപ്പ് വെള്ളത്തിലോ ഫ്ലഷിംഗ് ദ്രാവകത്തിലോ ബ്രഷ് ഉപയോഗിച്ച് വൃത്തിയാക്കുക.
- Inspect all parts for any damage before reassembling for the next use.
5. ദീർഘകാല സംഭരണം
To prevent freezing and corrosion during long-term storage:
- Unscrew the inlet screen from the suction tube (if needed). Place the drain tube in the waste pail.
- Turn the pressure control knob to the CLEAN position. Turn the Prime/Spray valve to the PRIME position.
- While holding the suction tube above the sprayer, pour approximately 2 ounces (1/4 cup) of storage fluid into the suction tube. Turn the power switch ON.
- When oil is flushed through the suction tube and out the drain tube, turn the power switch OFF.
- To keep the fluid from draining out of the drain tube, turn the Prime/Spray valve to the SPRAY position.
- പവർ കോർഡ് അൺപ്ലഗ് ചെയ്യുക.
Your sprayer is now properly cleaned and stored, ready for your next project.
Video: How to clean your InoKraft NEO Airless Paint Sprayer using buckets.
Video: How to clean your InoKraft NEO Airless Paint Sprayer using a garden hose.
ട്രബിൾഷൂട്ടിംഗ്
Here are solutions to common issues you might encounter with your InoKraft NEO Airless Paint Sprayer:
Problem: Sprayer is not running
If your sprayer is not running, first ensure it is plugged in and the power switch is ON. The motor of an airless sprayer does not activate immediately upon switching on and does not run all the time. If the sprayer is not running, try turning the pressure control clockwise to increase the pressure. You should hear the pump begin to run. It is normal for the sprayer to shut off when the pump system reaches the appropriate pressure setting. When you start spraying, the pump should kick back into action.
Video: Troubleshooting - Why isn't my sprayer running?
Problem: Sprayer runs, but paint dribbles or has a bad spray pattern
If your sprayer runs but the paint is barely dribbling out, spurts, or has a bad spray pattern, consider the following:
- സമ്മർദ്ദ ക്രമീകരണം: Ensure the pressure is not set too low. Turn up the pressure control knob clockwise.
- Clogged Spray Tip: The spray tip may be partially clogged. Rotate the spray tip to the UNCLOG position, disengage the gun trigger lock, and trigger the gun in a waste area to clear the clog. Then rotate the spray tip back to the SPRAY position.
- Gun Filter: The gun filter might be clogged and needs to be cleaned or replaced.
- Inlet Screen/Suction Tube: The inlet screen might be clogged, or the suction tube is not fully immersed in paint. Clean the inlet screen or ensure the suction tube is properly submerged.
- Worn/Incorrect Spray Tip: If the spray pattern is more round and less wide/narrow, your spray tip is likely worn and should be replaced. Also, ensure you are using the correct tip size for your paint type (refer to the paint & stain chart in your user manual).
Video: Troubleshooting - Sprayer runs, but paint dribbles or has a bad spray pattern.
Video: Troubleshooting - How to prevent and clear tip clogs.
Problem: Sprayer is leaking
If your sprayer is leaking, always perform the Pressure Relief Procedure before attempting any maintenance. Leaks can occur due to improperly tightened fittings or worn components:
- അയഞ്ഞ കണക്ഷനുകൾ: Paint leaking often happens if fittings (hose to sprayer, gun to hose) are not sufficiently tightened. Use the provided wrenches to firmly secure all connections.
- Spray Tip/Guard Leak: If the leak is between the spray tip and guard, remove the tip and inspect the area. Ensure both the spray tip and guard are clean. This leak could be due to a worn-out spray tip or seal. If the leak persists, consider replacing both the spray tip and seal.
- Tip Extension: If using a tip extension, ensure its connections are securely fastened with a large wrench.
Video: Troubleshooting - What to do if my sprayer is leaking?
സ്പെസിഫിക്കേഷനുകൾ
| ഫീച്ചർ | വിശദാംശങ്ങൾ |
|---|---|
| ബ്രാൻഡ് | InoKraft |
| മോഡലിൻ്റെ പേര് | NEO |
| മോഡൽ നമ്പർ | IK01099 |
| പവർ ഉറവിടം | AC |
| പരമാവധി മർദ്ദം | 3000 പി.എസ്.ഐ |
| ഹോസ് നീളം | 25 ഇഞ്ച് |
| ഇനത്തിൻ്റെ ഭാരം | 10.1 പൗണ്ട് |
| ഇനത്തിൻ്റെ അളവുകൾ (W x H) | 13.78"ആംശം x 10.24"ആംശം |
| മെറ്റീരിയൽ | പ്ലാസ്റ്റിക്, സ്റ്റെയിൻലെസ്സ് സ്റ്റീൽ |
വാറൻ്റിയും പിന്തുണയും
For warranty information, please refer to the documentation included with your product. InoKraft offers protection plans for extended coverage.
If you require further assistance or have questions not covered in this manual, please contact InoKraft customer support:
- ഇമെയിൽ: support@inokraft.com