
1 സുരക്ഷാ വിവരങ്ങൾ
Always prioritize safety when operating the ANYCUBIC Photon P1 Resin 3D Printer. Resin materials can be toxic and may cause skin irritation or respiratory issues. Follow these guidelines:
- സംരക്ഷണ ഗിയർ ധരിക്കുക: Always wear appropriate personal protective equipment (PPE), including nitrile gloves and safety glasses, when handling resin or printed models.
- മതിയായ വെന്റിലേഷൻ ഉറപ്പാക്കുക: Operate the printer in a well-ventilated area to minimize exposure to resin fumes. Avoid operating in enclosed spaces without proper air circulation.
- ചർമ്മ സമ്പർക്കം ഒഴിവാക്കുക: Prevent direct skin contact with liquid resin. In case of contact, wash thoroughly with soap and water.
- ശരിയായ നീക്കം ചെയ്യൽ: Dispose of uncured resin and resin-contaminated materials according to local regulations. Do not pour liquid resin down drains.
- കുട്ടികൾക്കും വളർത്തുമൃഗങ്ങൾക്കും എത്തിപ്പെടാതെ സൂക്ഷിക്കുക: The printer and resin should be stored in a secure location inaccessible to children and pets.
2. ഉൽപ്പന്നം കഴിഞ്ഞുview
The ANYCUBIC Photon P1 is a high-precision resin 3D printer designed for detailed and reliable printing. It features advanced technologies to enhance stability, print success rates, and user experience.
- Ultimate Stability Ball Screw: Employs stable ball screws and precision guide rails for smoother lifting and lowering, minimizing motion vibration.
- 14K Precision & LighTurbo COB 4.0: Delivers high resolution (13312 x 5120 px) with uniform light distribution for consistent and accurate prints.
- Wave Release Technology: Generates micro-airflow during plate lifting, reducing release force by 60% for easier model detachment and higher success rates.
- Smart Leveling 3.0: Factory-calibrated with automatic self-checks and real-time pressure feedback, eliminating the need for manual bed leveling.
- AI Monitoring: Features an AI-powered inspection system for build plate installation, bottom layer separation, resin level, and residue detection.
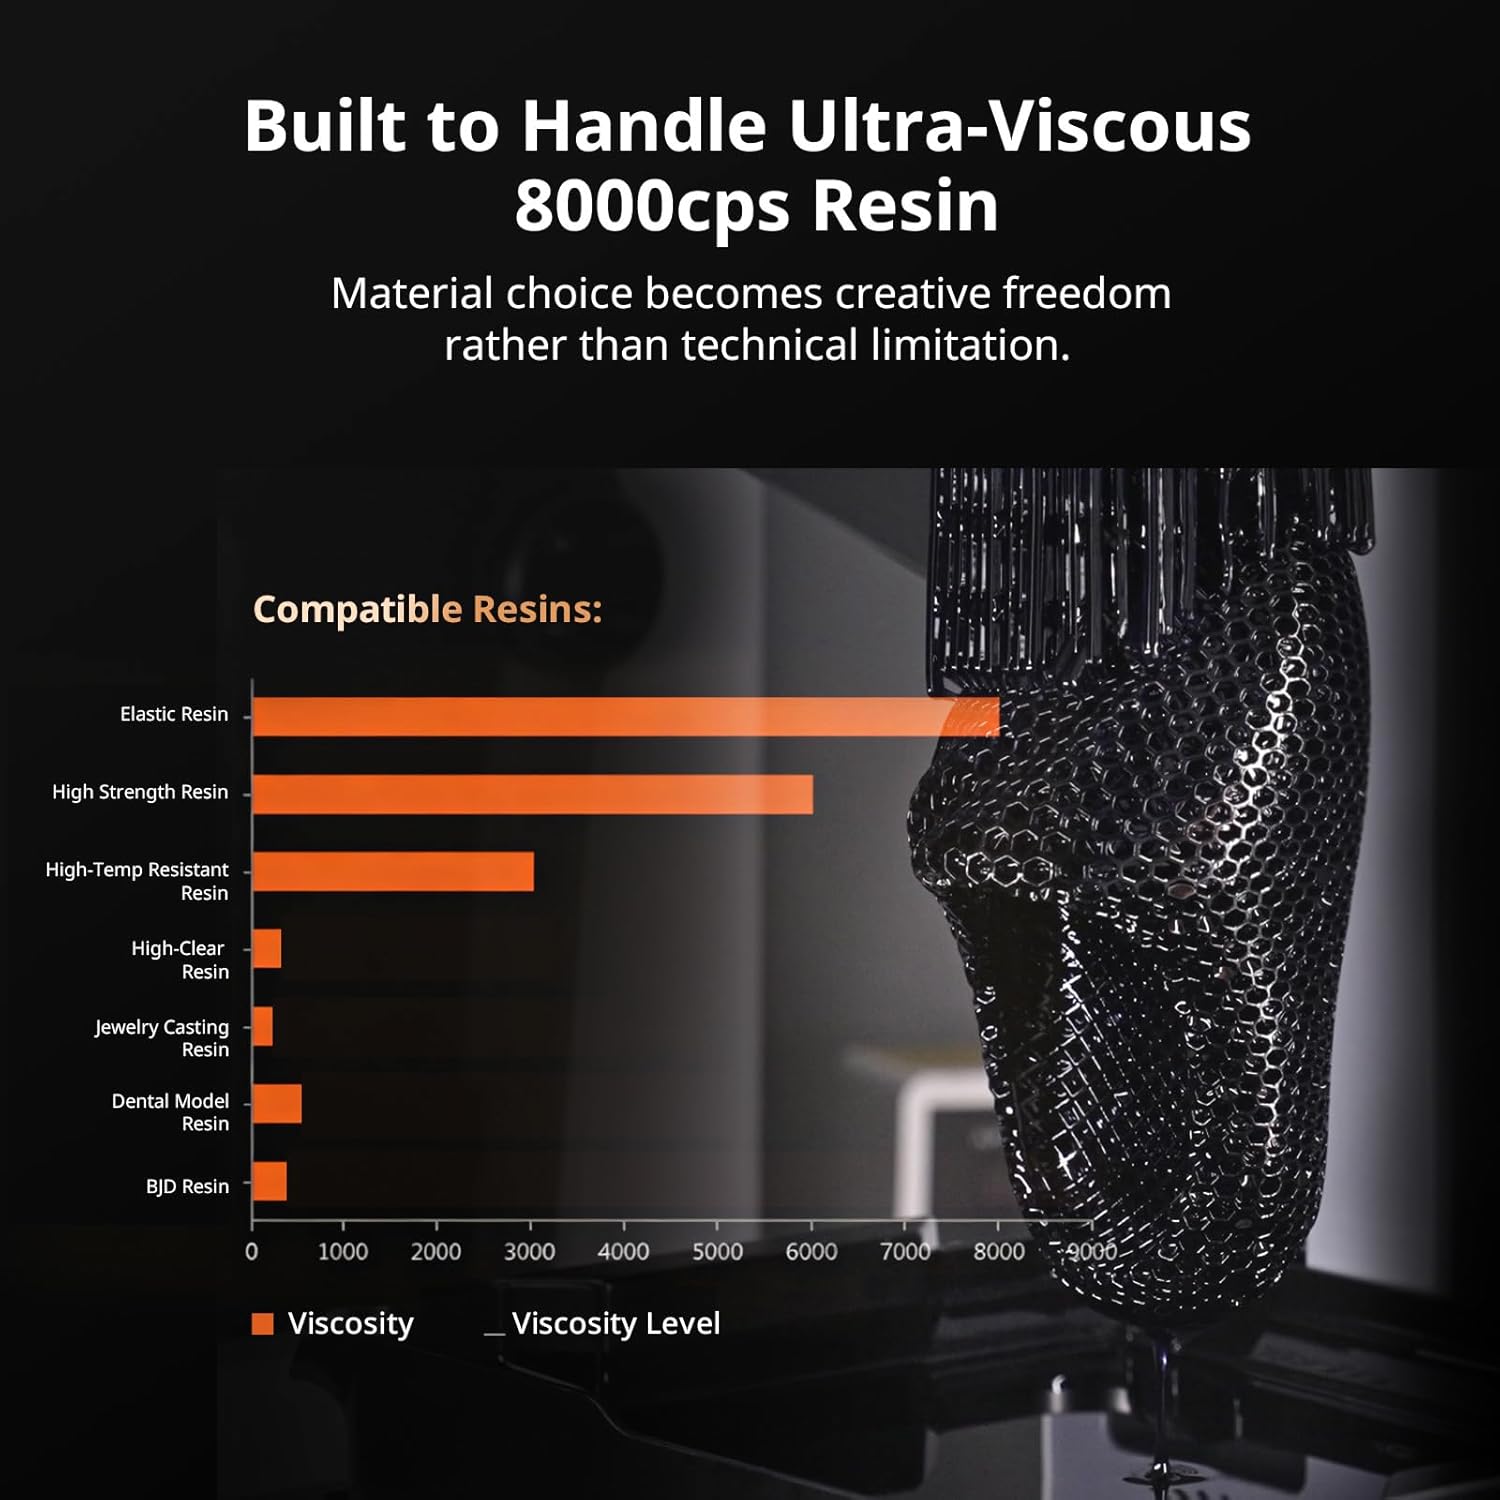
- 8000cps Resin Compatible: Capable of handling ultra-high viscosity resins, expanding material compatibility for advanced projects.
- വലിയ ബിൽഡ് വലുപ്പം: Offers a generous build volume of 8.78 x 4.96 x 9.05 inches (6.5L).
3. ബോക്സിൽ എന്താണുള്ളത്?
Your ANYCUBIC Photon P1 package includes the following items:
- 3D പ്രിൻ്റർ
4. സജ്ജീകരണ ഗൈഡ്
4.1 അൺബോക്സിംഗും പ്രാരംഭ പരിശോധനയും
പ്രിന്റർ പാക്കേജിംഗിൽ നിന്ന് ശ്രദ്ധാപൂർവ്വം നീക്കം ചെയ്യുക. ഗതാഗത സമയത്ത് എല്ലാ ഘടകങ്ങളും കേടുപാടുകൾ സംഭവിച്ചിട്ടുണ്ടോ എന്ന് പരിശോധിക്കുക. പ്രിന്ററിൽ നിന്ന് എല്ലാ സംരക്ഷണ ഫിലിമുകളും പാക്കേജിംഗ് വസ്തുക്കളും നീക്കം ചെയ്യുക.
വീഡിയോ: Unboxing of the ANYCUBIC Photon P1. This video demonstrates the careful unboxing process, including the removal of protective packaging and internal components.
4.2 Build Plate Installation
Attach the build plate to the Z-axis assembly. Ensure it is securely fastened according to the on-screen instructions or user manual diagrams.

ചിത്രം: Close-up of the ANYCUBIC Photon P1 build plate being installed onto the Z-axis. The textured surface of the build plate is visible.
4.3 Resin Vat Installation
Place the resin vat onto the printer's platform. Ensure it is correctly seated and secured to prevent resin leaks during operation.
ചിത്രം: എ വിശദമായി view of the resin vat installed on the ANYCUBIC Photon P1, showing the Wave Release Film and the overall structure of the vat.
4.4 Leveling the Build Plate
The Photon P1 features Smart Leveling 3.0, which is factory-calibrated. However, it is recommended to perform an initial leveling check. Follow the on-screen prompts to ensure proper calibration.

ചിത്രം: The intelligent leveling system 3.0 of the ANYCUBIC Photon P1 in action, showing the build plate being automatically adjusted over a leveling paper.
4.5 പവറിലേക്കും നെറ്റ്വർക്കിലേക്കും കണക്റ്റുചെയ്യുന്നു
Connect the power cable to the printer and a suitable power outlet. Install the Wi-Fi antenna for network connectivity and remote operation.
വീഡിയോ: This segment of the unboxing video demonstrates connecting the Wi-Fi antenna and performing the initial leveling process for the Photon P1.
5. പ്രവർത്തന നിർദ്ദേശങ്ങൾ
5.1 Preparing Your Model with Slicing Software
Use the ANYCUBIC Photon Workshop 4.0 slicing software to prepare your 3D models. This software allows you to adjust print settings, add supports, and slice your model into layers for printing.

ചിത്രം: Screenshot of the Photon Workshop 4.0 software interface, showing a 3D model being prepared for slicing with support structures.
5.2 Loading Resin
Carefully pour resin into the resin vat, ensuring it does not exceed the maximum fill line. The Photon P1 is compatible with resins up to 8000cps viscosity.

ചിത്രം: A chart illustrating the compatibility of the ANYCUBIC Photon P1 with various resin types, highlighting its ability to handle resins up to 8000cps viscosity.
5.3 ഒരു പ്രിന്റ് ആരംഭിക്കുന്നു
Transfer your sliced model file to the printer via USB or network. Select the file on the printer's touchscreen and initiate the print. The AI monitoring system will perform checks before and during the print.
വീഡിയോ: ഒരു ചെറിയ വീഡിയോ പ്രദർശനംasing the ANYCUBIC Photon P1 in operation, highlighting its precision and the quality of printed details.

ചിത്രം: Diagram illustrating the AI-powered inspection system of the ANYCUBIC Photon P1, showing checks for build plate installation, bottom layer separation, resin level, and residue detection.
6. പരിപാലനം
6.1 Cleaning the Build Plate and Resin Vat
After each print, carefully remove the build plate and clean any residual resin. Clean the resin vat periodically to ensure optimal print quality and longevity of the FEP film. Use isopropyl alcohol (IPA) for cleaning.
6.2 കാർബൺ ഫിൽട്ടർ
The Photon P1 includes a carbon filter to help reduce resin fumes. Replace the carbon filter periodically as recommended in the full user manual to maintain effective air purification.

ചിത്രം: An illustration highlighting the quiet printing operation of the ANYCUBIC Photon P1, indicating noise levels below 45dB, suitable for home or office environments.
7. പ്രശ്നപരിഹാരം
If you encounter issues with your Photon P1, refer to the following common problems and solutions:
- Print Failure/Poor Adhesion: Ensure the build plate is properly leveled. Check exposure settings in your slicing software. Verify the resin vat's FEP film is clean and undamaged.
- Resin Overflow: Do not overfill the resin vat. The maximum fill line should be observed, especially considering the displacement from the build plate.
- AI Monitoring Alerts: Address any alerts from the AI inspection system regarding build plate installation, bottom layer separation, resin levels, or residue.
8 സ്പെസിഫിക്കേഷനുകൾ
| ഫീച്ചർ | വിശദാംശങ്ങൾ |
|---|---|
| ഉൽപ്പന്ന അളവുകൾ | 16.93 x 24.41 x 16.54 ഇഞ്ച് |
| ഇനത്തിൻ്റെ ഭാരം | 38 പൗണ്ട് |
| ബ്രാൻഡ് | ഏതെങ്കിലും ക്യൂബിക് |
| മെറ്റീരിയൽ | അലുമിനിയം |
| നിറം | വെള്ള |
| അനുയോജ്യമായ ഉപകരണങ്ങൾ | ലാപ്ടോപ്പ്, പേഴ്സണൽ കമ്പ്യൂട്ടർ, സ്മാർട്ട്ഫോൺ |
9. വാറൻ്റിയും പിന്തുണയും
The ANYCUBIC Photon P1 Resin 3D Printer comes with a manufacturer's warranty. For detailed warranty information, technical support, or service inquiries, please refer to the official ANYCUBIC webസൈറ്റിൽ ബന്ധപ്പെടുക അല്ലെങ്കിൽ അവരുടെ ഉപഭോക്തൃ സേവനവുമായി നേരിട്ട് ബന്ധപ്പെടുക. വാറന്റി ക്ലെയിമുകൾക്കായി നിങ്ങളുടെ വാങ്ങൽ രസീത് സൂക്ഷിക്കുക.