ആമുഖം
Thank you for choosing the CRUA 34-inch Curved Gaming Monitor. This manual provides essential information for setting up, operating, maintaining, and troubleshooting your new monitor. Please read this manual thoroughly before use to ensure optimal performance and to prevent damage.

ചിത്രം: മുൻഭാഗം view of the CRUA 34-inch Curved Gaming Monitor.
പാക്കേജ് ഉള്ളടക്കം
താഴെ കൊടുത്തിരിക്കുന്ന എല്ലാ ഇനങ്ങളും നിങ്ങളുടെ പാക്കേജിൽ ഉണ്ടെന്ന് ഉറപ്പാക്കുക:
- CRUA 34-inch Curved Gaming Monitor
- മോണിറ്റർ സ്റ്റാൻഡ് (ബേസും കഴുത്തും)
- പവർ അഡാപ്റ്ററും കേബിളും
- HDMI കേബിൾ
- ഡിസ്പ്ലേപോർട്ട് (DP) കേബിൾ
- ഉപയോക്തൃ മാനുവൽ
- Mounting Screws (for stand assembly)
സജ്ജമാക്കുക
1. സ്റ്റാൻഡ് അസംബ്ലിംഗ്
- മോണിറ്റർ അതിന്റെ പാക്കേജിംഗിൽ നിന്ന് ശ്രദ്ധാപൂർവ്വം നീക്കം ചെയ്യുക, മൃദുവായ പ്രതലത്തിൽ അതിനെ സംരക്ഷിച്ചു നിർത്തുക.
- നൽകിയിരിക്കുന്ന സ്ക്രൂകൾ ഉപയോഗിച്ച് മോണിറ്റർ പാനലിൽ സ്റ്റാൻഡ് നെക്ക് ഘടിപ്പിക്കുക.
- സ്റ്റാൻഡ് ബേസ് സ്റ്റാൻഡ് നെക്കിൽ ഉറപ്പിക്കുക.
- കൂട്ടിച്ചേർത്ത മോണിറ്റർ ഒരു സ്ഥിരതയുള്ളതും പരന്നതുമായ പ്രതലത്തിൽ സ്ഥാപിക്കുക.
2. കേബിളുകൾ ബന്ധിപ്പിക്കുന്നു
മോണിറ്ററിന്റെ പിൻ പോർട്ടുകളിലേക്ക് ആവശ്യമായ കേബിളുകൾ ബന്ധിപ്പിക്കുക:
- പവർ കേബിൾ: പവർ അഡാപ്റ്റർ മോണിറ്ററിന്റെ ഡിസി ഇൻപുട്ടിലേക്കും പിന്നീട് ഒരു പവർ ഔട്ട്ലെറ്റിലേക്കും ബന്ധിപ്പിക്കുക.
- വീഡിയോ ഇൻപുട്ട്: Connect either an HDMI cable (HDMI 2.0) or a DisplayPort cable (DP 1.4) from your computer's graphics card to the corresponding port on the monitor.
- ഓഡിയോ ഔട്ട്പുട്ട്: If using external speakers, connect them to the 3.5mm audio output jack.
3. വാൾ മൗണ്ടിംഗ് (ഓപ്ഷണൽ)
The monitor supports VESA 100x100mm wall mounts. Remove the stand before attaching a compatible wall mount bracket (not included).

ചിത്രം: പിൻഭാഗം view of the monitor detailing HDMI, DP, Audio, DC ports, and the 100x100mm VESA wall bracket area.
പ്രവർത്തന നിർദ്ദേശങ്ങൾ
1. പവർ ഓൺ/ഓഫ്
Press the power button, usually located on the bottom or back of the monitor, to turn it on or off. The power indicator light will illuminate when the monitor is on.
2. ഓൺ-സ്ക്രീൻ ഡിസ്പ്ലേ (OSD) മെനു
Use the control buttons (joystick or individual buttons) located on the monitor to navigate the OSD menu. This menu allows you to adjust various display settings.
3. ഡിസ്പ്ലേ ക്രമീകരണങ്ങൾ ക്രമീകരിക്കുന്നു
Within the OSD menu, you can modify settings such as:
- തെളിച്ചം/തീവ്രത: മൊത്തത്തിലുള്ള പ്രകാശത്തിന്റെയും ദൃശ്യതീവ്രതയുടെയും അളവ് ക്രമീകരിക്കുക.
- വർണ്ണ ക്രമീകരണങ്ങൾ: വർണ്ണ താപനില, ഗാമ, വ്യക്തിഗത RGB മൂല്യങ്ങൾ എന്നിവ സൂക്ഷ്മമായി ക്രമീകരിക്കുക.
- ഇൻപുട്ട് ഉറവിടം: Manually select between HDMI and DisplayPort inputs.
- പുതുക്കൽ നിരക്ക്: Ensure your system is configured to utilize the monitor's 165Hz refresh rate for smooth visuals.
- എഎംഡി ഫ്രീസിങ്ക്: Enable or disable FreeSync to synchronize the monitor's refresh rate with your GPU's frame rate, reducing screen tearing and stuttering.
ഫീച്ചറുകൾ
The CRUA 34-inch Curved Gaming Monitor is designed to provide an immersive visual experience with high performance and versatile connectivity.
- 34-inch UltraWide WQHD Display: Experience a vast panoramic view with a 3440x1440 resolution and a 21:9 aspect ratio. This provides ample screen space for multitasking, content creation, and immersive gaming.
- 165Hz Refresh Rate & AMD FreeSync: Enjoy ultra-smooth gameplay and responsive visuals with a high 165Hz refresh rate. AMD FreeSync technology eliminates screen tearing and motion blur by synchronizing the monitor's refresh rate with your graphics card.
- 3800R Ultra-Curved Immersion: The 3800R curvature wraps the screen around your natural field of view, enhancing immersion and providing a more comfortable viewing experience during extended sessions.
- വൈബ്രൻ്റ് വർണ്ണ പുനർനിർമ്മാണം: The VA panel offers 120% sRGB color gamut coverage, 16.7 million display colors, 355 cd/m² brightness, and a 4000:1 contrast ratio, delivering rich, accurate, and vivid visuals.
- Integrated Speakers & Flexible Connectivity: Built-in speakers provide convenient audio without additional hardware. Multiple connectivity options include HDMI 2.0 and DisplayPort 1.4 inputs, ensuring compatibility with various devices.
- എർഗണോമിക് ഡിസൈൻ: The stand supports tilt adjustment for comfortable viewing angles. VESA 100x100mm compatibility allows for flexible mounting options in home offices, gaming rooms, or studios.

Image: Visual comparison demonstrating the higher detail of UWQHD (3440x1440) resolution versus FHD (1920x1080).

Image: Depiction of 165Hz refresh rate and the visual difference with AMD FreeSync enabled versus disabled, showing reduced tearing.
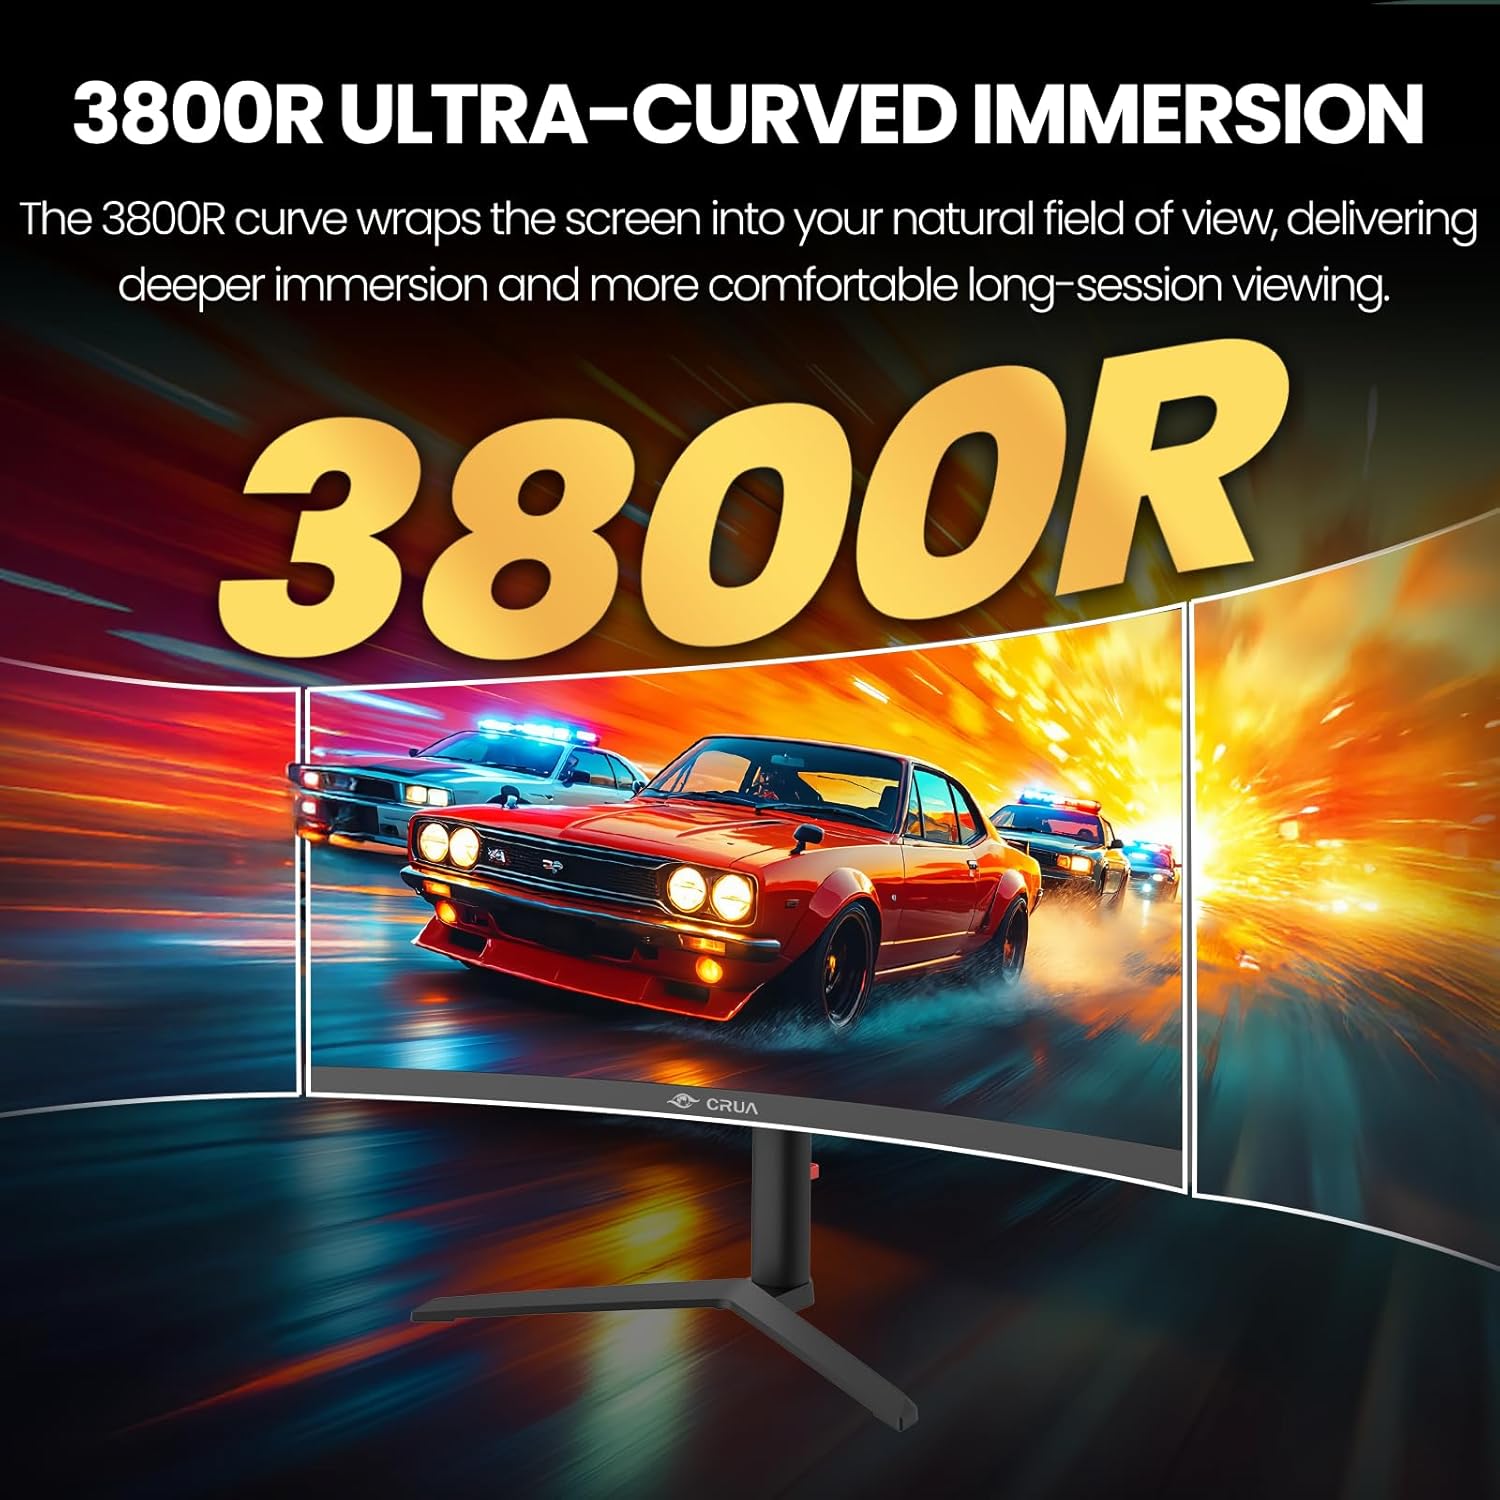
Image: Visual representation of the 3800R ultra-curved screen, demonstrating how it enhances immersion.
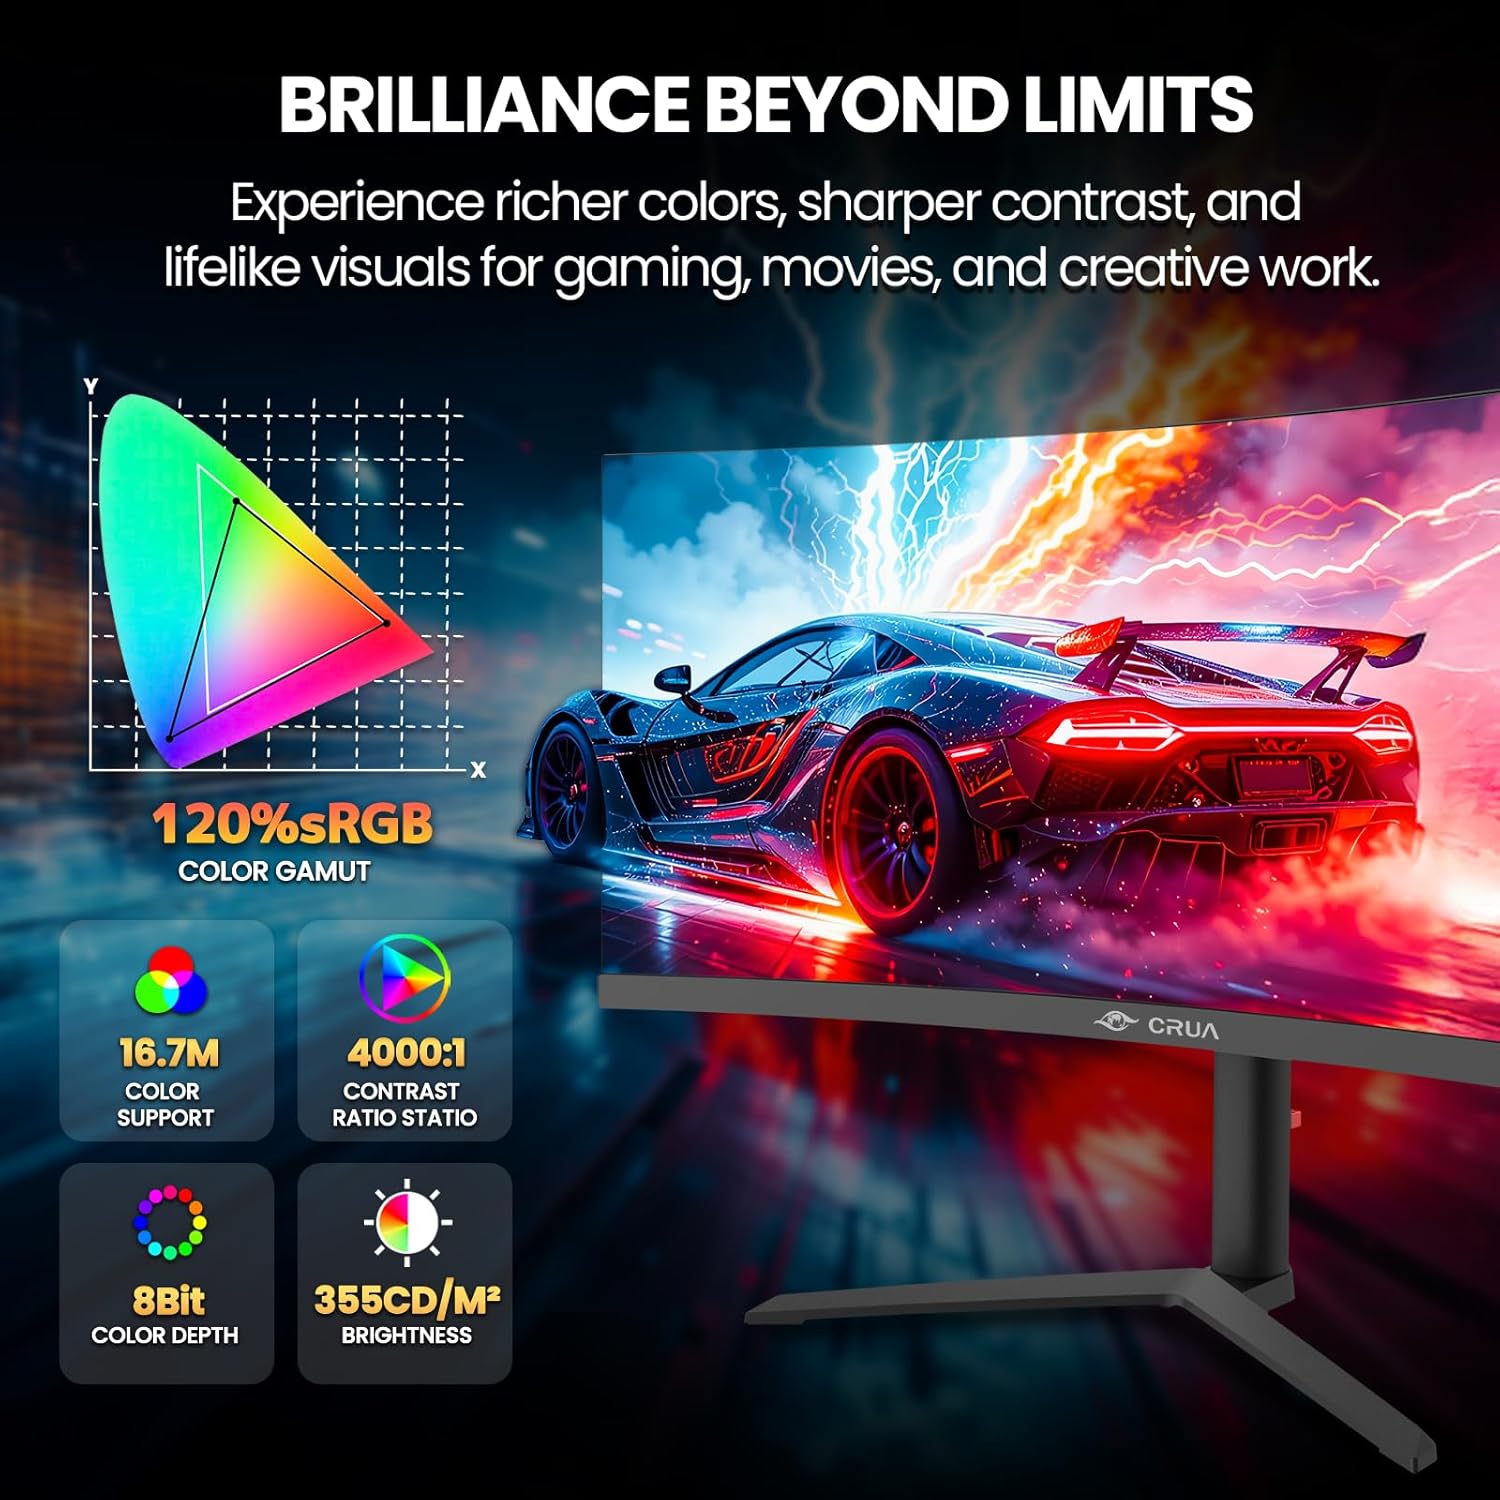
Image: Details on the monitor's color performance, highlighting 120% sRGB, 16.7 million colors, 4000:1 contrast ratio, and 355 cd/m² brightness.
സ്പെസിഫിക്കേഷനുകൾ
| ഫീച്ചർ | സ്പെസിഫിക്കേഷൻ |
|---|---|
| ബ്രാൻഡ് | CRUA |
| മോഡൽ നമ്പർ | CR340QA |
| സ്ക്രീൻ വലിപ്പം | 34 ഇഞ്ച് |
| റെസലൂഷൻ | 3440 x 1440 (WQHD Ultra Wide) |
| വീക്ഷണാനുപാതം | 21:9 |
| വക്രത | 3800R |
| പാനൽ തരം | VA |
| പുതുക്കിയ നിരക്ക് | 165 Hz |
| പ്രതികരണ സമയം | 1 എം.എസ് |
| തെളിച്ചം | 355 cd/m² |
| കോൺട്രാസ്റ്റ് റേഷ്യോ | 4000:1 |
| വർണ്ണ ഗാമറ്റ് | 120% sRGB |
| Viewing ആംഗിൾ | 178° (H) / 178° (V) |
| അഡാപ്റ്റീവ് സിൻക് ടെക്നോളജി | എഎംഡി ഫ്രീസിങ്ക് |
| കണക്റ്റിവിറ്റി | 2x HDMI 2.0, 2x DisplayPort 1.4, 1x 3.5mm Audio Out |
| ബിൽറ്റ്-ഇൻ സ്പീക്കറുകൾ | അതെ |
| VESA മൗണ്ട് അനുയോജ്യത | 100 x 100 മി.മീ |
| അളവുകൾ (D x W x H) | 10.2 x 81.3 x 35.6 സെ.മീ (ഏകദേശം) |
| ഭാരം | 20 പൗണ്ട് (ഏകദേശം) |
ട്രബിൾഷൂട്ടിംഗ്
നിങ്ങളുടെ മോണിറ്ററിൽ പ്രശ്നങ്ങൾ നേരിടുകയാണെങ്കിൽ, ഇനിപ്പറയുന്ന പൊതുവായ പ്രശ്നങ്ങളും പരിഹാരങ്ങളും പരിശോധിക്കുക:
- ശക്തിയില്ല:
- മോണിറ്ററിലേക്കും പ്രവർത്തിക്കുന്ന പവർ ഔട്ട്ലെറ്റിലേക്കും പവർ കേബിൾ സുരക്ഷിതമായി ബന്ധിപ്പിച്ചിട്ടുണ്ടെന്ന് ഉറപ്പാക്കുക.
- പവർ അഡാപ്റ്റർ ശരിയായി പ്രവർത്തിക്കുന്നുണ്ടെന്ന് ഉറപ്പാക്കുക.
- സിഗ്നലില്ല:
- Check that the HDMI or DisplayPort cable is firmly connected to both the monitor and your computer.
- OSD മെനു വഴി ശരിയായ ഇൻപുട്ട് ഉറവിടം തിരഞ്ഞെടുക്കുക.
- Ensure your computer's graphics card is properly installed and drivers are up to date.
- മിന്നിമറയുന്ന അല്ലെങ്കിൽ വികലമായ ചിത്രം:
- Check the video cable for damage or loose connections. Try a different cable if available.
- Adjust the refresh rate settings on your computer.
- Disable or enable AMD FreeSync in the OSD menu to see if it resolves the issue.
- No Audio from Built-in Speakers:
- Ensure the monitor's volume is not muted or set too low in the OSD menu.
- Check your computer's audio output settings to ensure the monitor is selected as the playback device.
മെയിൻ്റനൻസ്
Proper maintenance helps prolong the life of your monitor:
- സ്ക്രീൻ വൃത്തിയാക്കൽ: മൃദുവായതും, ലിന്റ് രഹിതവുമായ ഒരു തുണി ഉപയോഗിച്ച് സ്ക്രീൻ സൌമ്യമായി തുടയ്ക്കുക. കഠിനമായ അടയാളങ്ങൾക്ക്, സ്ക്രീനിൽ നേരിട്ട് പുരട്ടുന്നതിനു പകരം, തുണിയിൽ പുരട്ടിയ മോണിറ്റർ-നിർദ്ദിഷ്ട ക്ലീനിംഗ് ലായനി ഉപയോഗിക്കുക.
- സി വൃത്തിയാക്കൽasing: മോണിറ്റർ വൃത്തിയാക്കാൻ മൃദുവായതും ഉണങ്ങിയതുമായ തുണി ഉപയോഗിക്കുക c.asing. അബ്രാസീവ് ക്ലീനറുകളോ ലായകങ്ങളോ ഒഴിവാക്കുക.
- വെൻ്റിലേഷൻ: അമിതമായി ചൂടാകുന്നത് തടയാൻ മോണിറ്ററിന്റെ വെന്റിലേഷൻ ദ്വാരങ്ങൾ അടഞ്ഞിട്ടില്ലെന്ന് ഉറപ്പാക്കുക.
- ഉപയോഗത്തിലില്ലാത്തപ്പോൾ പവർ ഓഫ്: Turn off the monitor when not in use for extended periods to save energy and extend its lifespan.
വാറൻ്റിയും പിന്തുണയും
CRUA is committed to providing high-quality computer monitors and premium customer service. If you have any questions, concerns, or require assistance with your product, please do not hesitate to contact our support team. We are dedicated to helping our customers and resolving any issues you may encounter.
Please refer to your purchase documentation or the official CRUA webനിർദ്ദിഷ്ട വാറന്റി നിബന്ധനകൾക്കും ബന്ധപ്പെടാനുള്ള വിവരങ്ങൾക്കും സൈറ്റ്.