![]()

ABX00087 UNO R4 വൈഫൈ ഡെവലപ്മെന്റ് ബോർഡ്
Cricket Shot Recognition using Arduino UNO R4 WiFi + ADXL345 + Edge
പ്രേരണ
This document provides a complete workflow for building a cricket shot recognition system using Arduino UNO R4 WiFi with an ADXL345 accelerometer and Edge Impulse Studio. The project involves collecting accelerometer data, training a machine learning model, and deploying the trained model back to the Arduino for real-time shot classification.
Cricket shots considered in this project:
– Cover Drive
– Straight Drive
– Pull Shot
ഘട്ടം 1: ഹാർഡ്വെയർ ആവശ്യകതകൾ
– Arduino UNO R4 WiFi
– ADXL345 Accelerometer (I2C)
– Jumper wires
– Breadboard (optional)
- യുഎസ്ബി ടൈപ്പ്-സി കേബിൾ
ഘട്ടം 2: സോഫ്റ്റ്വെയർ ആവശ്യകതകൾ
– Arduino IDE (latest)
– Edge Impulse Studio account (free)
– Edge Impulse CLI tools (Node.js required)
– Adafruit ADXL345 library
Step 3: Wiring the ADXL345
Connect the ADXL345 sensor to the Arduino UNO R4 WiFi as follows:
വിസിസി → 3.3വി
GND → GND
SDA → SDA (A4)
SCL → SCL (A5)
CS → 3.3V (optional, for I2C mode)
SDO → floating or GND
Step 4: Make IDE Sensor Ready
ആർഡ്വിനോ ഐഡിഇയിൽ സെൻസർ ലൈബ്രറികൾ എങ്ങനെ ഇൻസ്റ്റാൾ ചെയ്യാം?
ആർഡ്വിനോ IDE തുറക്കുക
Open Tools → Manage Libraries… and install: Adafruit ADXL345 Unified Adafruit Unified Sensor
(If you have LSM6DSO or MPU6050 instead: install SparkFun LSM6DSO , Adafruit LSM6DS or MPU6050 accordingly.)
Step 5: Arduino Sketch for Data Collection
Upload this sketch to your Arduino UNO R4 WiFi. It streams accelerometer data in CSV format (x,y,z) at ~18 Hz for Edge Impulse.
#ഉൾപ്പെടുത്തുക
#include <Adafruit_ADXL345_U.h>
Adafruit_ADXL345_Unified accel =
Adafruit_ADXL345_Unified(12345);
അസാധുവായ സജ്ജീകരണം() {
Serial.begin(115200);
if (!accel.begin()) {
Serial.println(“No ADXL345 detected”);
അതേസമയം (1);
}
accel.setRange(ADXL345_RANGE_4_G);
}
അസാധുവായ ലൂപ്പ്() {
sensors_event_t e;
accel.getEvent(&e);
Serial.print (e.acceleration.x);
സീരിയൽ.പ്രിന്റ്(“,”);
Serial.print(e.acceleration.y);
സീരിയൽ.പ്രിന്റ്(“,”);
Serial.println(e.acceleration.z);delay(55); // ~18 Hz
}
Set Up Edge Impulse

Step 6: Connecting to Edge Impulse
- Close Arduino Serial Monitor.
- Run the command: edge-impulse-data-forwarder –frequency 18
- Enter axis names: accX, accY, accZ
- Name your device: Arduino-Cricket-Board
- Confirm connection in Edge Impulse Studio under ‘Devices’.


ഘട്ടം 7: ഡാറ്റ ശേഖരണം
In Edge Impulse Studio → Data acquisition:
– Device: Arduino-Cricket-Board
– Sensor: Accelerometer (3 axes)
– എസ്ample length: 2000 ms (2 seconds)
– ആവൃത്തി: 18 Hz
Record at least 40 samples per class:
– Cover Drive
– Straight Drive
– Pull Shot Collect Data Exampലെസ്
കവർ ഡ്രൈവ്
Device: Arduino-Cricket-Board
Label: Cover Drive
Sensor: Sensor with 3 axes (accX, accY, accZ)
Sample length: 10000ms
ആവൃത്തി: 18 Hz
Example Raw Data:
accX -0.32
accY 9.61
accZ -0.12
Straight Drive
Device: Arduino-Cricket-Board
Label: Straight Drive
Sensor: Sensor with 3 axes (accX, accY, accZ)
Sample length: 10000ms
ആവൃത്തി: 18 Hz
Example Raw Data:
accX 1.24
accY 8.93
accZ -0.42
Pull Shot
Device: Arduino-Cricket-Board
Label: Pull Shot
Sensor: Sensor with 3 axes (accX, accY, accZ)
Sample length:10000 ms
ആവൃത്തി: 18 Hz
Example Raw Data:
accX 2.01
accY 7.84
accZ -0.63 
Step 8: Impulse Design
Open Create impulse:
ഇൻപുട്ട് ബ്ലോക്ക്: സമയ ശ്രേണി ഡാറ്റ (3 അക്ഷങ്ങൾ).
Window size: 1000 ms Window increase (stride): 200 ms Enable: Axes, Magnitude (optional), frequency 18.
Processing block: Spectral analysis (a.k.a. Spectral Features for motion). Window size: 1000 ms Window increase (stride): 200 ms Enable: Axes, Magnitude (optional), keep all defaults first.
പഠന ബ്ലോക്ക്: വർഗ്ഗീകരണം (കേരസ്).
ഇംപൾസ് സംരക്ഷിക്കുക ക്ലിക്ക് ചെയ്യുക. 
Generate features:
സ്പെക്ട്രൽ വിശകലനത്തിലേക്ക് പോയി, പാരാമീറ്ററുകൾ സംരക്ഷിക്കുക ക്ലിക്കുചെയ്യുക, തുടർന്ന് പരിശീലന സെറ്റിനായി സവിശേഷതകൾ സൃഷ്ടിക്കുക.

Train a small model
Go to Classifier (Keras) and use a compact config like:
Neural network: 1–2 dense layers (e.g., 60 → 30), ReLU
Epochs: 40–60
Learning rate: 0.001–0.005
Batch size: 32
Data split: 80/20 (train/test)
Save and train the data
Evaluate and Check Model testing with the holdout set.
Inspect the confusion matrix; if circle and up overlap, collect more diverse data or tweak
Spectral parameters (window size / noise floor).
Step 9: Deployment to Arduino
Go to Deployment:
Choose Arduino library (C++ library also works).
മോഡൽ വലുപ്പം ചുരുക്കാൻ EON കംപൈലർ (ലഭ്യമെങ്കിൽ) പ്രാപ്തമാക്കുക. 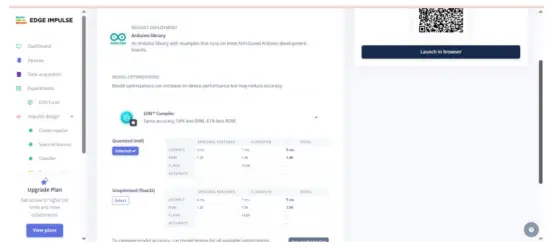 Download the .zip, then in Arduino IDE: Sketch → Include Library → Add .ZIP Library… This adds exampസ്റ്റാറ്റിക് ബഫർ, തുടർച്ചയായത് എന്നിവ പോലുള്ളവ File → ഉദാampലെസ് →
Your Project Name – Edge Impulse. Inference sketch for Arduino UNO EK R4 WiFi + ADXL345.
Step 10: Arduino Inference Sketch
#ഉൾപ്പെടുത്തുക
#include <Adafruit_ADXL345_Unified.h>
#include <your_project_inference.h> // Replace with Edge Impulse header
Adafruit_ADXL345_Unified accel =
Adafruit_ADXL345_Unified(12345);
static bool debug_nn = false;
അസാധുവായ സജ്ജീകരണം() {
Serial.begin(115200);
while (!Serial) {}
if (!accel.begin()) {
Serial.println(“ERROR: ADXL345 not detected”);
അതേസമയം (1);
}
accel.setRange(ADXL345_RANGE_4_G);
}
അസാധുവായ ലൂപ്പ്() {
float buffer[EI_CLASSIFIER_DSP_INPUT_FRAME_SIZE] = {0};
for (size_t ix = 0; ix < EI_CLASSIFIER_DSP_INPUT_FRAME_SIZE; ix +=
3) {
uint64_t next_tick = micros() + (EI_CLASSIFIER_INTERVAL_MS *
1000);
sensors_event_t e;
accel.getEvent(&e);
buffer[ix + 0] = e.acceleration.x;
buffer[ix + 1] = e.acceleration.y;
buffer[ix + 2] = e.acceleration.z;
int32_t wait = (int32_t)(next_tick – micros());
if (wait > 0) delayMicroseconds(wait);
}
signal_t signal;
int err = numpy::signal_from_buffer(buffer,
EI_CLASSIFIER_DSP_INPUT_FRAME_SIZE, &signal);
if (err != 0) return;
ei_impulse_result_t result = {0};
EI_IMPULSE_ERROR res = run_classifier(&signal, &result,
debug_nn);
if (res != EI_IMPULSE_OK) return;
for (size_t ix = 0; ix < EI_CLASSIFIER_LABEL_COUNT; ix++) {
ei_printf(“%s: %.3f “, result.classification[ix].label,
result.classification[ix].value);
}
#if EI_CLASSIFIER_HAS_ANOMALY == 1
ei_printf(“anomaly: %.3f”, result.anomaly);
#endif
ei_printf(“\n”);
}
ഔട്ട്പുട്ട് മുൻampLe:
 നുറുങ്ങുകൾ:
നിങ്ങളുടെ ഡാറ്റ ഫോർവേഡർ ഫ്രീക്വൻസിയുമായി (ഉദാ: 100 Hz → 10 ms) EI_CLASSIFIER_INTERVAL_MS സമന്വയിപ്പിച്ച് നിലനിർത്തുക. എഡ്ജ് ഇംപൾസ് ലൈബ്രറി നിങ്ങളുടെ ഇംപൾസിൽ നിന്ന് ഈ സ്ഥിരാങ്കം യാന്ത്രികമായി സജ്ജമാക്കുന്നു.
നിങ്ങൾക്ക് തുടർച്ചയായ കണ്ടെത്തൽ (സ്ലൈഡിംഗ് വിൻഡോ) വേണമെങ്കിൽ, തുടർച്ചയായ എക്സ് എന്നതിൽ നിന്ന് ആരംഭിക്കുക.ample EI ലൈബ്രറിയിൽ ഉൾപ്പെടുത്തിയിട്ടുണ്ട്, കൂടാതെ ADXL345 റീഡുകളിൽ സ്വാപ്പും ഉണ്ട്.
We will be adding video tutorials soon; till then, stay tuned – https://www.youtube.com/@RobuInlabs
And If you still have some doubts, you can check out this video by Edged Impulse: https://www.youtube.com/watch?v=FseGCn-oBA0&t=468s
![]()
പ്രമാണങ്ങൾ / വിഭവങ്ങൾ
 |
Arduino ABX00087 UNO R4 WiFi Development Board [pdf] ഉപയോക്തൃ ഗൈഡ് R4 WiFi, ADXL345, ABX00087 UNO R4 WiFi Development Board, ABX00087, UNO R4 WiFi Development Board, WiFi Development Board, Development Board, Board |