1. ആമുഖം
This manual provides essential information for the safe and efficient operation of your Singer Tiny Tailor Mending Sewing Machine, Model TT600. Designed for quick mending tasks, this compact and portable machine offers a durable lockstitch for various fabric repairs.

Image 1.1: The Singer Tiny Tailor Mending Sewing Machine shown in its original packaging. This image provides a general overview of the product as it appears when unboxed.
2. സുരക്ഷാ നിർദ്ദേശങ്ങൾ
തീപിടുത്തം, വൈദ്യുതാഘാതം അല്ലെങ്കിൽ വ്യക്തികൾക്ക് പരിക്കേൽക്കാനുള്ള സാധ്യത കുറയ്ക്കുന്നതിന് ഈ ഉപകരണം ഉപയോഗിക്കുന്നതിന് മുമ്പ് ദയവായി എല്ലാ നിർദ്ദേശങ്ങളും വായിക്കുക.
- Always unplug the machine from the electrical outlet immediately after using and before cleaning, making any adjustments, or removing/attaching any parts.
- Do not operate the machine with a damaged cord or plug, or if it has been dropped or damaged.
- ചലിക്കുന്ന എല്ലാ ഭാഗങ്ങളിൽ നിന്നും വിരലുകൾ അകറ്റി നിർത്തുക. തയ്യൽ മെഷീൻ സൂചിക്ക് ചുറ്റും പ്രത്യേക ശ്രദ്ധ ആവശ്യമാണ്.
- നിർമ്മാതാവ് ശുപാർശ ചെയ്യുന്ന അറ്റാച്ച്മെന്റുകൾ മാത്രം ഉപയോഗിക്കുക.
- ഒരു തുറസ്സിലും ഒരു വസ്തുവും ഇടുകയോ തിരുകുകയോ ചെയ്യരുത്.
- വെളിയിൽ ഉപയോഗിക്കരുത്.
- എയറോസോൾ (സ്പ്രേ) ഉൽപ്പന്നങ്ങൾ ഉപയോഗിക്കുന്നിടത്തോ ഓക്സിജൻ നൽകുന്നിടത്തോ പ്രവർത്തിക്കരുത്.
3. പാക്കേജ് ഉള്ളടക്കം
പാക്കേജിൽ എല്ലാ ഇനങ്ങളും ഉണ്ടെന്ന് ഉറപ്പാക്കുക:
- Singer Tiny Tailor Mending Sewing Machine (Model TT600)
- കാൽ നിയന്ത്രണം
- പവർ അഡാപ്റ്റർ
- അധിക സൂചി
- Bobbins (pre-wound or empty)
- സൂചി ത്രെഡർ
- Seam Opener/Thread Trimmer
- നിർദ്ദേശ മാനുവൽ (ഈ പ്രമാണം)
4. ഭാഗങ്ങൾ തിരിച്ചറിയൽ
Familiarize yourself with the components of your sewing machine:
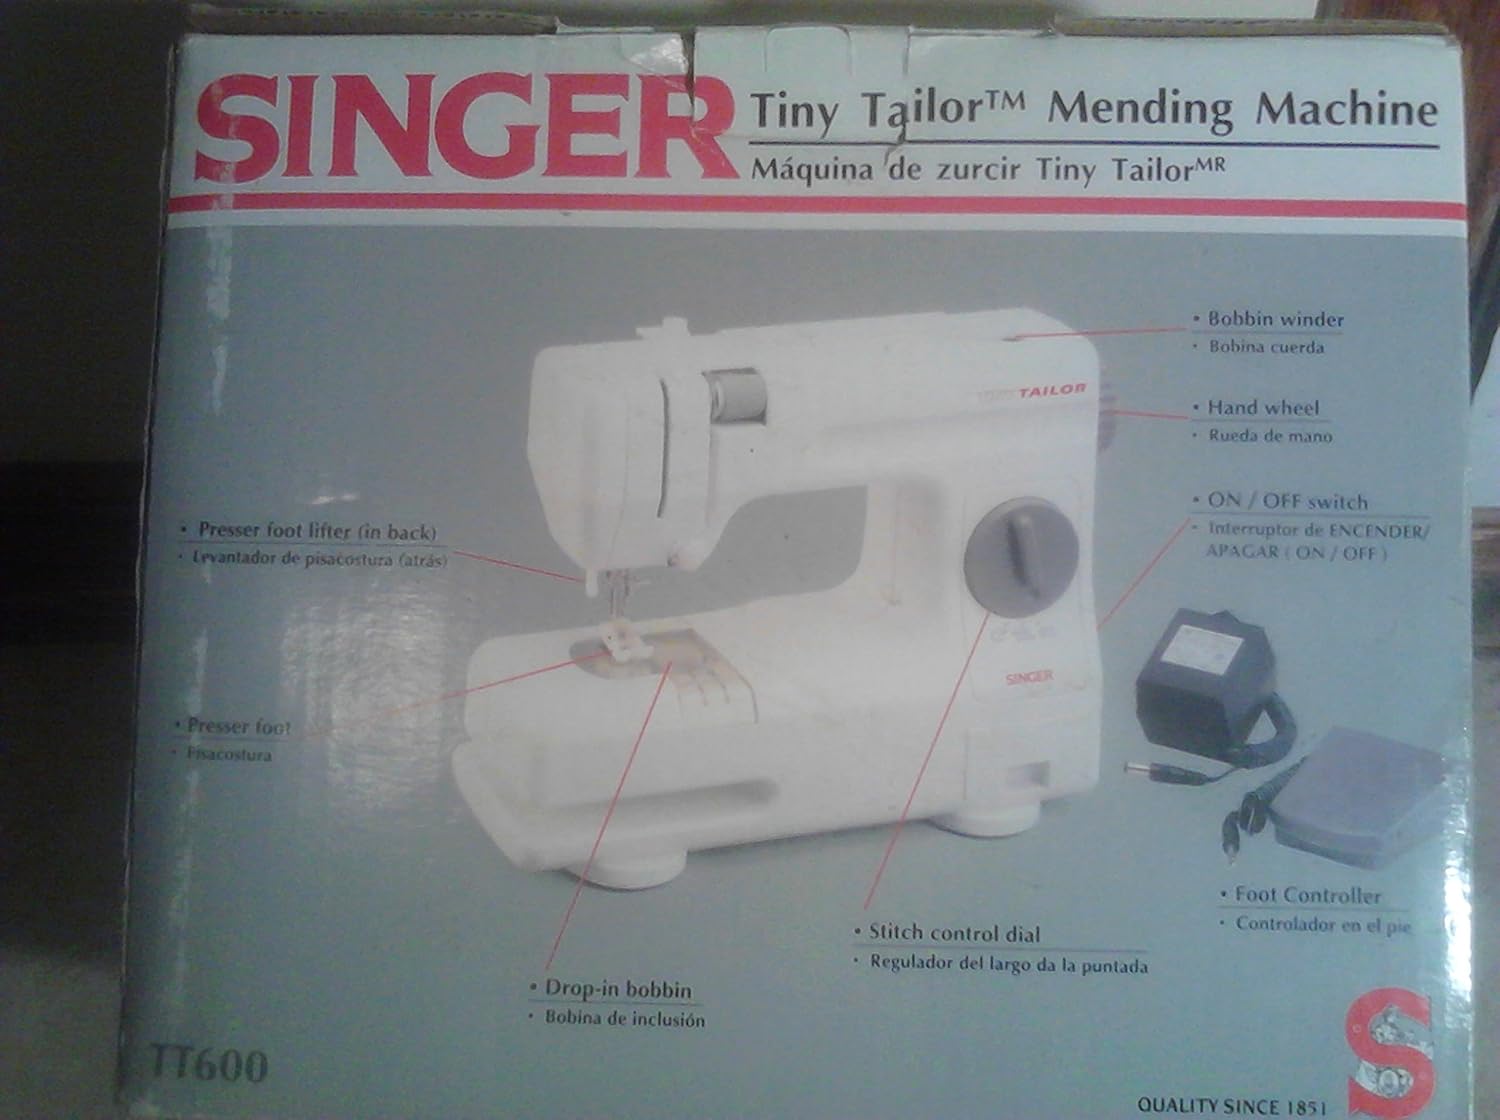
Image 4.1: Diagram illustrating the key parts of the Singer Tiny Tailor Mending Sewing Machine, including the bobbin winder, hand wheel, ON/OFF switch, presser foot lifter, presser foot, drop-in bobbin, stitch control dial, and foot controller.
- ബോബിൻ വിൻഡർ: ബോബിനുകളിൽ നൂൽ ചുറ്റി കെട്ടാൻ ഉപയോഗിക്കുന്നു.
- കൈ ചക്രം: സൂചി സ്വമേധയാ ഉയർത്തുകയും താഴ്ത്തുകയും ചെയ്യുന്നു.
- ഓൺ/ഓഫ് സ്വിച്ച്: മെഷീൻ ഓൺ അല്ലെങ്കിൽ ഓഫ് ആക്കുന്നു.
- പ്രഷർ ഫൂട്ട് ലിഫ്റ്റർ: Raises and lowers the presser foot.
- പ്രഷർ ഫൂട്ട്: Holds fabric firmly in place while sewing.
- Drop-in Bobbin: Easy access bobbin system.
- Stitch Control Dial: Adjusts the length of the stitch.
- കാൽ കൺട്രോളർ: Controls the sewing speed, freeing hands for fabric guidance.
5. സജ്ജീകരണം
5.1 പവർ കണക്ഷൻ
- Ensure the ON/OFF switch is in the "OFF" position.
- Insert the power adapter plug into the machine's power jack.
- പവർ അഡാപ്റ്റർ ഒരു സാധാരണ ഇലക്ട്രിക്കൽ ഔട്ട്ലെറ്റിലേക്ക് പ്ലഗ് ചെയ്യുക.
5.2 Foot Control Connection
- Locate the foot control jack on the machine.
- Insert the foot control plug firmly into the jack.
5.3 ബോബിൻ വൈൻഡിംഗ്
- സ്പൂൾ പിന്നിൽ ഒരു സ്പൂൾ ത്രെഡ് വയ്ക്കുക.
- Guide the thread through the tension disc for bobbin winding.
- ബോബിൻ വൈൻഡർ സ്പിൻഡിൽ ഒരു ഒഴിഞ്ഞ ബോബിൻ വയ്ക്കുക.
- Wrap the thread around the bobbin a few times, then push the bobbin winder spindle to the right.
- Turn on the machine and gently press the foot control until the bobbin is sufficiently wound.
- Push the bobbin winder spindle back to the left and trim the thread.
5.4 Inserting the Drop-in Bobbin
- ബോബിൻ കവർ പ്ലേറ്റ് തുറക്കുക.
- നൂൽ ശരിയായ ദിശയിൽ (സാധാരണയായി എതിർ ഘടികാരദിശയിൽ) അഴിക്കുന്നുണ്ടെന്ന് ഉറപ്പാക്കിക്കൊണ്ട്, മുറിവ് ബോബിൻ ബോബിൻ കേസിൽ തിരുകുക.
- ബോബിൻ ത്രെഡ് ടെൻഷൻ സ്പ്രിംഗിലൂടെയും ത്രെഡ് ഗൈഡ് സ്ലോട്ടിലൂടെയും നയിക്കുക.
- ബോബിൻ കവർ പ്ലേറ്റ് അടയ്ക്കുക.
5.5 മുകളിലെ ത്രെഡ് ത്രെഡ് ചെയ്യൽ
- പ്രസ്സർ ഫുട്ട് ലിഫ്റ്റർ ഉയർത്തുക.
- സ്പൂൾ പിന്നിൽ ഒരു സ്പൂൾ ത്രെഡ് വയ്ക്കുക.
- Guide the thread through the upper thread guides and tension discs as indicated by the machine's markings.
- Thread the needle from front to back using the needle threader or manually.
- സൂചിക്കുഴയിലൂടെ ഏകദേശം 6 ഇഞ്ച് നൂൽ വലിക്കുക.
5.6 ബോബിൻ ത്രെഡ് ഉയർത്തൽ
- നിങ്ങളുടെ ഇടതു കൈകൊണ്ട് മുകളിലെ നൂൽ ലഘുവായി പിടിക്കുക.
- Turn the hand wheel towards you to lower the needle into the needle plate and then raise it again.
- The needle thread will catch the bobbin thread, forming a loop.
- Pull the loop to bring the bobbin thread up through the needle plate opening.
- മുകളിലെ ത്രെഡും ബോബിൻ ത്രെഡും പ്രഷർ പാദത്തിനടിയിലൂടെയും മെഷീനിന്റെ പിൻഭാഗത്തേക്കും വലിക്കുക.
6. മെഷീൻ പ്രവർത്തിപ്പിക്കുക
6.1 Basic Stitching
- Place the fabric under the presser foot, aligning the edge with a seam guide if available.
- Lower the presser foot using the presser foot lifter.
- ഓൺ/ഓഫ് സ്വിച്ച് ഉപയോഗിച്ച് മെഷീൻ ഓണാക്കുക.
- Gently press the foot control to start sewing. The harder you press, the faster the machine will sew.
- Guide the fabric gently with both hands, ensuring it feeds evenly. Do not pull or push the fabric forcefully.
- To stop sewing, release the foot control.
- Raise the needle to its highest position by turning the hand wheel.
- Raise the presser foot and pull the fabric away from the machine.
- Trim the threads using the seam opener/thread trimmer or scissors.
6.2 Adjusting Stitch Length
The Stitch Control Dial allows you to adjust the length of your stitches. Turn the dial to select the desired stitch length. Experiment on scrap fabric to find the appropriate setting for your project.
6.3 Mending Techniques
The Tiny Tailor is ideal for quick mending. For tears, align the edges of the fabric and stitch across the tear, overlapping the stitches slightly for reinforcement. For seams, simply stitch along the original seam line. For delicate fabrics, use a finer needle and thread and a shorter stitch length.
7. പരിപാലനം
7.1 വൃത്തിയാക്കൽ
Regular cleaning helps maintain your machine's performance:
- വൃത്തിയാക്കുന്നതിന് മുമ്പ് എല്ലായ്പ്പോഴും മെഷീൻ അൺപ്ലഗ് ചെയ്യുക.
- Use a soft brush or lint brush to remove lint and dust from the bobbin area and under the needle plate.
- മൃദുവായതും ഉണങ്ങിയതുമായ തുണി ഉപയോഗിച്ച് മെഷീനിന്റെ പുറംഭാഗം തുടയ്ക്കുക. ലിക്വിഡ് ക്ലീനറുകളോ കഠിനമായ രാസവസ്തുക്കളോ ഉപയോഗിക്കരുത്.
7.2 സൂചി മാറ്റിസ്ഥാപിക്കൽ
Replace the needle regularly, especially if it becomes bent, dull, or if you experience skipped stitches or thread breakage.
- മെഷീൻ അൺപ്ലഗ് ചെയ്തിട്ടുണ്ടെന്ന് ഉറപ്പാക്കുക.
- സൂചി cl അഴിക്കുകamp സ്ക്രൂ.
- പഴയ സൂചി നീക്കം ചെയ്യുക.
- മെഷീനിന്റെ പിൻഭാഗത്തേക്ക് അഭിമുഖമായി പരന്ന വശം വരുന്ന തരത്തിൽ ഒരു പുതിയ സൂചി തിരുകുക, അത് കഴിയുന്നിടത്തോളം മുകളിലേക്ക് തള്ളുക.
- സൂചി മുറുക്കുക clamp സുരക്ഷിതമായി സ്ക്രൂ ചെയ്യുക.
8. പ്രശ്നപരിഹാരം
| പ്രശ്നം | സാധ്യമായ കാരണം | പരിഹാരം |
|---|---|---|
| മെഷീൻ ഓണാക്കുന്നില്ല | Power cord not plugged in; ON/OFF switch off. | Check power connections; ensure switch is ON. |
| തുന്നലുകൾ ഒഴിവാക്കി | Bent or dull needle; incorrect needle size; improper threading. | Replace needle; ensure correct needle for fabric; re-thread machine. |
| ത്രെഡ് പൊട്ടൽ | Incorrect tension; poor quality thread; needle bent or dull; improper threading. | Adjust tension; use good quality thread; replace needle; re-thread machine. |
| തുണി ഊരുന്നില്ല | Presser foot not lowered; lint under needle plate. | Lower presser foot; clean bobbin area. |
| Bobbin thread tangling | Improper bobbin insertion; incorrect bobbin winding. | Re-insert bobbin correctly; re-wind bobbin evenly. |
9 സ്പെസിഫിക്കേഷനുകൾ
| മോഡൽ നമ്പർ | TT600 |
| ബ്രാൻഡ് | സിംഗർ |
| ASIN | B000KGIHVI |
| യു.പി.സി | 037431203144 |
| നിറം | വെള്ള |
| ഇലക്ട്രിക് ആണ് | അതെ |
| ബാറ്ററികൾ ആവശ്യമാണ് | ഇല്ല |
| ഇനത്തിൻ്റെ ഭാരം | 6.05 പൗണ്ട് |
| പാക്കേജ് അളവുകൾ | 13.4 x 10.3 x 8.5 ഇഞ്ച് |
10. വാറൻ്റിയും പിന്തുണയും
For warranty information, product registration, or technical support, please refer to the official SINGER webസൈറ്റിൽ ബന്ധപ്പെടുക അല്ലെങ്കിൽ അവരുടെ ഉപഭോക്തൃ സേവനവുമായി നേരിട്ട് ബന്ധപ്പെടുക. വാങ്ങിയതിന്റെ തെളിവായി നിങ്ങളുടെ വാങ്ങൽ രസീത് സൂക്ഷിക്കുക.
കുറിപ്പ്: പ്രദേശത്തെയും റീട്ടെയിലറെയും ആശ്രയിച്ച് നിർദ്ദിഷ്ട വാറന്റി നിബന്ധനകൾ വ്യത്യാസപ്പെടാം.


