1. ആമുഖം
വാങ്ങിയതിന് നന്ദി.asing the Atlanta 1669/19 Quartz Alarm Clock. This digital alarm clock features a silent movement, a light sensor for automatic display illumination, and a snooze function. This manual provides detailed instructions for setup, operation, and maintenance to ensure optimal performance and longevity of your device.
2 സുരക്ഷാ വിവരങ്ങൾ
- വെള്ളം, ഉയർന്ന ആർദ്രത എന്നിവയിൽ നിന്ന് ഉപകരണം അകറ്റി നിർത്തുക.
- Avoid exposing the clock to direct sunlight or extreme temperatures.
- ക്ലോക്ക് സ്വയം വേർപെടുത്താനോ നന്നാക്കാനോ ശ്രമിക്കരുത്. യോഗ്യതയുള്ള സേവന ഉദ്യോഗസ്ഥരെ ബന്ധപ്പെടുക.
- ഉപയോഗിച്ച ബാറ്ററികൾ പ്രാദേശിക നിയന്ത്രണങ്ങൾ അനുസരിച്ച് ഉത്തരവാദിത്തത്തോടെ നീക്കം ചെയ്യുക.
- പഴയതും പുതിയതുമായ ബാറ്ററികളോ വ്യത്യസ്ത തരം ബാറ്ററികളോ മിക്സ് ചെയ്യരുത്.
3. പാക്കേജ് ഉള്ളടക്കം
- Atlanta 1669/19 Quartz Alarm Clock Unit
- ഉപയോക്തൃ മാനുവൽ (ഈ പ്രമാണം)
കുറിപ്പ്: ബാറ്ററികൾ ഉൾപ്പെടുത്തിയിട്ടില്ല, പ്രത്യേകം വാങ്ങണം.
4. ഉൽപ്പന്നം കഴിഞ്ഞുview
The Atlanta 1669/19 features a clear digital display, intuitive controls, and a light sensor for enhanced visibility in low-light conditions.
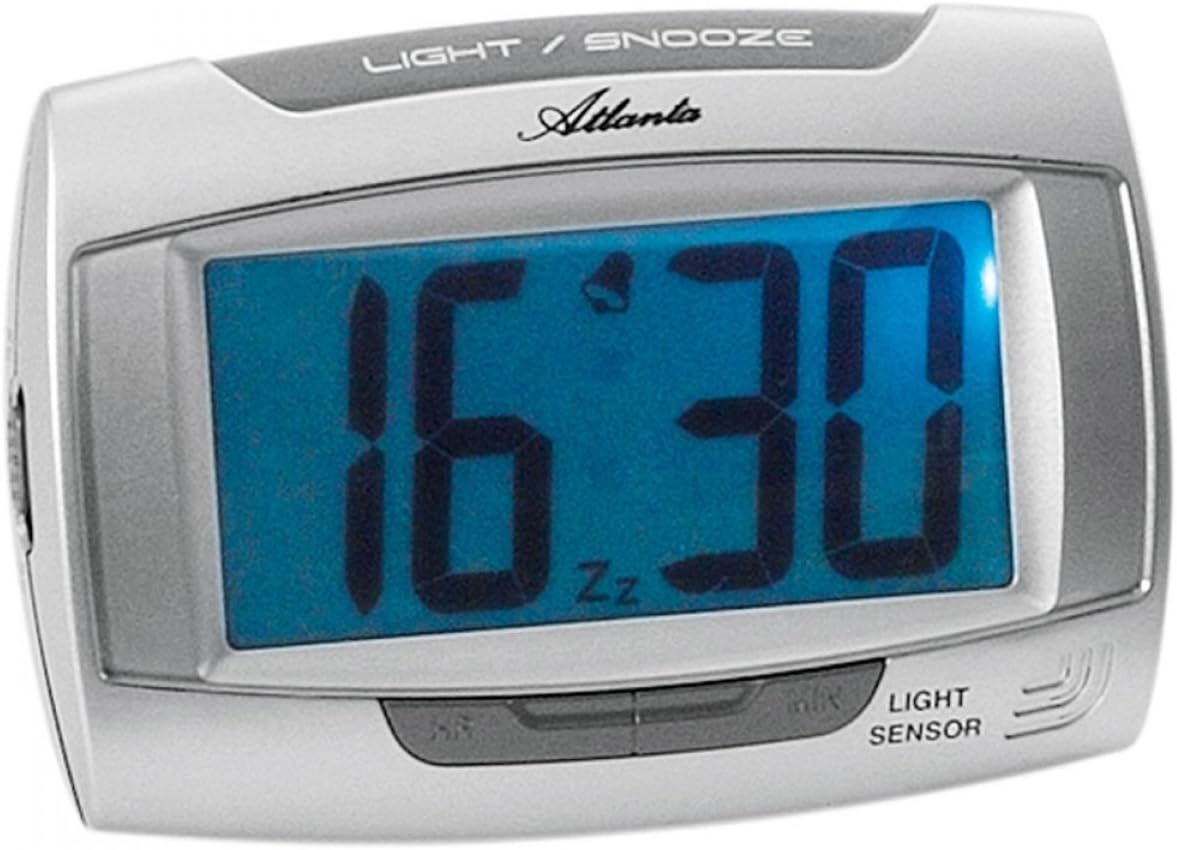
ചിത്രം 1: ഫ്രണ്ട് view of the Atlanta 1669/19 Quartz Alarm Clock. The clock features a large digital display, a "LIGHT / SNOOZE" button at the top, and a "LIGHT SENSOR" indicator at the bottom right. The display shows the time 16:30, with an alarm bell icon and 'Zz' indicating snooze functionality.
പ്രധാന ഘടകങ്ങൾ:
- ഡിജിറ്റൽ ഡിസ്പ്ലേ: Shows time and alarm status.
- LIGHT / SNOOZE Button: Activates temporary backlight and snooze function.
- ലൈറ്റ് സെൻസർ: Automatically illuminates the display in dark environments.
- Control Buttons (Rear/Side): സമയവും അലാറവും സജ്ജീകരിക്കുന്നതിന്.
- Battery Compartment (Rear): Holds the required batteries.
5. സജ്ജീകരണം
5.1. ബാറ്ററി ഇൻസ്റ്റാളേഷൻ
- അലാറം ക്ലോക്കിന്റെ പിൻഭാഗത്ത് ബാറ്ററി കമ്പാർട്ട്മെന്റ് കവർ കണ്ടെത്തുക.
- Remove the cover by sliding or lifting it.
- Insert the required batteries (typically 1x AA, refer to compartment markings) ensuring correct polarity (+ and -).
- ബാറ്ററി കമ്പാർട്ട്മെന്റ് കവർ സുരക്ഷിതമായി മാറ്റിസ്ഥാപിക്കുക.
5.2. പ്രാരംഭ സമയ ക്രമീകരണം
Upon battery installation, the display will typically show a default time. You will need to set the current time.
- Locate the time setting buttons, usually labeled "SET", "HOUR", and "MINUTE" or similar, on the back or side of the clock.
- Press the "SET" button (or equivalent) to enter time setting mode. The hour digits may start flashing.
- Use the "HOUR" button to adjust the hour.
- Press "SET" again to move to minute setting. The minute digits may start flashing.
- Use the "MINUTE" button to adjust the minutes.
- Press "SET" one more time to confirm and exit time setting mode.
6. പ്രവർത്തന നിർദ്ദേശങ്ങൾ
6.1. അലാറം സജ്ജമാക്കുന്നു
- Locate the alarm setting buttons, typically labeled "ALARM SET", "ALARM HOUR", and "ALARM MINUTE" or similar.
- Press the "ALARM SET" button to enter alarm setting mode. The alarm hour digits may flash.
- Use the "ALARM HOUR" button to adjust the desired alarm hour.
- Press "ALARM SET" again to move to alarm minute setting. The alarm minute digits may flash.
- Use the "ALARM MINUTE" button to adjust the desired alarm minutes.
- Press "ALARM SET" one more time to confirm and exit alarm setting mode.
6.2. അലാറം സജീവമാക്കൽ/നിർജ്ജീവമാക്കൽ
There is usually a switch or button to turn the alarm on or off. Look for a switch labeled "ALARM ON/OFF" or an alarm icon button. When the alarm is active, an alarm icon (e.g., a bell) will typically appear on the display.
6.3. സ്നൂസ് ഫംഗ്ഷൻ
When the alarm sounds, press the large "LIGHT / SNOOZE" button located on the top of the clock. This will temporarily silence the alarm, and it will sound again after a few minutes (typically 5-9 minutes). The "Zz" icon on the display indicates that the snooze function is active.
6.4. Light Sensor and Display Backlight
- Automatic Backlight (Light Sensor): The clock is equipped with a light sensor. When enabled, the display will automatically illuminate with a soft, constant light in dark environments, making it easy to read the time at night without pressing any buttons. Look for a switch or button labeled "SENSOR ON/OFF" or similar to enable or disable this feature.
- Temporary Backlight: To briefly illuminate the display in any lighting condition, press the "LIGHT / SNOOZE" button on the top of the clock. The backlight will stay on for a few seconds and then turn off automatically.
7. പരിപാലനം
- വൃത്തിയാക്കൽ: Wipe the clock with a soft, dry cloth. Do not use abrasive cleaners or solvents, as these may damage the casinജി അല്ലെങ്കിൽ ഡിസ്പ്ലേ.
- ബാറ്ററി മാറ്റിസ്ഥാപിക്കൽ: When the display dims or the clock stops functioning correctly, it is time to replace the batteries. Follow the battery installation steps in Section 5.1.
- സംഭരണം: If the clock will not be used for an extended period, remove the batteries to prevent leakage and damage.
8. പ്രശ്നപരിഹാരം
| പ്രശ്നം | സാധ്യമായ കാരണം | പരിഹാരം |
|---|---|---|
| ക്ലോക്ക് ഡിസ്പ്ലേ ശൂന്യമാണ് അല്ലെങ്കിൽ മങ്ങിയതാണ്. | കുറഞ്ഞതോ ഡെഡ് ബാറ്ററികളോ; തെറ്റായ ബാറ്ററി ഇൻസ്റ്റാളേഷൻ. | ബാറ്ററികൾ പുതിയവ ഉപയോഗിച്ച് മാറ്റിസ്ഥാപിക്കുക, ശരിയായ ധ്രുവത ഉറപ്പാക്കുക. |
| അലാറം മുഴങ്ങുന്നില്ല. | Alarm is not activated; alarm time is incorrect; low batteries. | Ensure alarm is switched ON (bell icon visible); verify alarm time setting; replace batteries. |
| Automatic backlight not working. | Light sensor feature is disabled; insufficient darkness. | Ensure the light sensor switch is ON; test in a completely dark room. |
| സമയം തെറ്റാണ്. | Time was not set correctly; batteries were removed/replaced. | Reset the current time following Section 5.2. |
9 സ്പെസിഫിക്കേഷനുകൾ
| മോഡൽ | 1669/19 |
| ബ്രാൻഡ് | അറ്റ്ലാൻ്റ |
| ഓപ്പറേഷൻ മോഡ് | ഡിജിറ്റൽ |
| പ്രത്യേക സവിശേഷതകൾ | Alarm, Lighting (Light Sensor) |
| മെറ്റീരിയൽ | പ്ലാസ്റ്റിക് |
| ഫ്രെയിം മെറ്റീരിയൽ | പ്ലാസ്റ്റിക് |
| മൗണ്ടിംഗ് തരം | ടേബിൾടോപ്പ് |
| നിറം | Blue (display), Silver-coloured (case) |
| ബാറ്ററികൾ ആവശ്യമാണ് | Yes (Type not specified, typically AA or AAA for such clocks) |
| ബാറ്ററികൾ ഉൾപ്പെടുത്തിയിട്ടുണ്ട് | ഇല്ല |
| അളവുകൾ (ഏകദേശം.) | 11 x 7 സെ.മീ |
10. വാറൻ്റിയും പിന്തുണയും
വാറന്റി വിവരങ്ങൾക്കോ സാങ്കേതിക പിന്തുണയ്ക്കോ, വാങ്ങുന്ന സമയത്ത് നൽകിയിട്ടുള്ള ഡോക്യുമെന്റേഷൻ പരിശോധിക്കുകയോ നിങ്ങളുടെ റീട്ടെയിലറെ ബന്ധപ്പെടുകയോ ചെയ്യുക. ഏതെങ്കിലും വാറന്റി ക്ലെയിമുകൾക്കായി നിങ്ങളുടെ വാങ്ങിയതിന്റെ തെളിവ് സൂക്ഷിക്കുക.


