1. ആമുഖം
This manual provides essential information for the safe and efficient operation of your NEC PA600X LCD Projector. Please read this manual thoroughly before using the projector and retain it for future reference. The NEC PA600X is designed for high-quality projection with features including 6000 lumens brightness and 1024 x 768 native resolution.
2 സുരക്ഷാ വിവരങ്ങൾ
- ഇലക്ട്രിക്കൽ സുരക്ഷ: Always connect the projector to a grounded power outlet. Do not use damaged power cords. Disconnect power before cleaning or servicing.
- ചൂടും വെന്റിലേഷനും: Ensure adequate ventilation around the projector. Do not block ventilation openings. Avoid placing the projector near heat sources.
- Lamp സുരക്ഷ: പ്രൊജക്ടർ എൽamp operates at high temperatures and pressures. Allow the projector to cool down completely before moving it or performing maintenance. Do not look directly into the lens when the lamp ഓണാണ്.
- കൈകാര്യം ചെയ്യൽ: പ്രൊജക്ടർ ശ്രദ്ധയോടെ കൈകാര്യം ചെയ്യുക. താഴെ വീഴുകയോ ശക്തമായ ആഘാതങ്ങൾക്ക് വിധേയമാക്കുകയോ ചെയ്യരുത്.
- ദ്രാവക എക്സ്പോഷർ: മഴ, ഈർപ്പം അല്ലെങ്കിൽ ഏതെങ്കിലും ദ്രാവകങ്ങൾ എന്നിവയിൽ പ്രൊജക്ടറിനെ തുറന്നുകാട്ടരുത്.
3. ഉൽപ്പന്നം കഴിഞ്ഞുview
Familiarize yourself with the various parts and connections of your NEC PA600X projector.
3.1 ഫ്രണ്ട് View
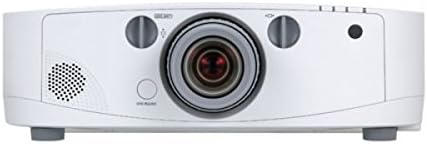
ചിത്രം 3.1: ഫ്രണ്ട് view of the projector. Key components include the projection lens, manual focus and zoom rings, and the power button located below the lens.
3.2 ടോപ്പ് View

ചിത്രം 3.2: മുകളിൽ view of the projector. This image highlights the integrated control panel with navigation buttons and the lens shift adjustment knob.
3.3 പിൻഭാഗം View (Input/Output Ports)
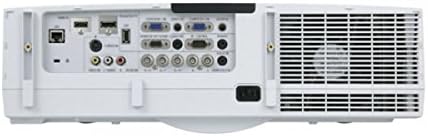
ചിത്രം 3.3: പിൻഭാഗം view of the projector, showing the comprehensive array of input and output ports, including HDMI, VGA, USB, S-Video, DisplayPort, and audio connections.
3.4 വശം View (നിയന്ത്രണ പാനൽ)

ചിത്രം 3.4: വശം view of the projector, illustrating the main control panel buttons for power, menu navigation, and input selection, as well as the lamp ആക്സസ് പാനൽ.
4. സജ്ജീകരണം
4.1 പ്ലേസ്മെൻ്റ്
Position the projector on a stable, level surface or mount it securely. Ensure there is sufficient space around the projector for proper ventilation. The distance from the screen will determine the image size. Adjust the projector's position to achieve the desired image size and focus.
4.2 ഉപകരണങ്ങൾ ബന്ധിപ്പിക്കുന്നു
- പവർ കണക്ഷൻ: പവർ കോർഡ് പ്രൊജക്ടറിന്റെ എസി ഇൻലെറ്റിലേക്കും പിന്നീട് ഗ്രൗണ്ടഡ് ഇലക്ട്രിക്കൽ ഔട്ട്ലെറ്റിലേക്കും ബന്ധിപ്പിക്കുക.
- വീഡിയോ ഉറവിടങ്ങൾ:
- എച്ച്ഡിഎംഐ: Use an HDMI cable to connect your source device (e.g., laptop, Blu-ray player) to an HDMI input port on the projector.
- വിജിഎ (ഡി-സബ്): Connect a VGA cable from your computer's VGA output to a VGA input port on the projector.
- ഡിസ്പ്ലേ പോർട്ട്: Connect a DisplayPort cable from your source device to the DisplayPort input.
- എസ്-വീഡിയോ/കോമ്പോസിറ്റ്: For older devices, use S-Video or composite video cables to connect to the corresponding ports.
- ഓഡിയോ ഉറവിടങ്ങൾ: If your video source does not transmit audio via HDMI or DisplayPort, or if you prefer external audio, connect audio cables from your source to the projector's audio input ports. The projector has built-in speakers, but external speakers can be connected for enhanced audio.
- USB: Connect USB devices for presentations or firmware updates.
4.3 പവർ ഓൺ/ഓഫ്
- പവർ ഓണാക്കാൻ: Press the power button on the projector's control panel or the remote control (if available). The power indicator light will illuminate.
- പവർ ഓഫ് ചെയ്യാൻ: Press the power button again. A confirmation message may appear. Press the power button a second time to confirm shutdown. Allow the projector to cool down before unplugging it.
5. പ്രൊജക്ടർ പ്രവർത്തിപ്പിക്കൽ
5.1 അടിസ്ഥാന പ്രവർത്തനം
- ഇൻപുട്ട് തിരഞ്ഞെടുക്കൽ: Use the "Input" button on the control panel to cycle through available input sources (HDMI, VGA, DisplayPort, etc.) until your desired source is displayed.
- മെനു നാവിഗേഷൻ: Press the "Menu" button to access the on-screen display (OSD) menu. Use the arrow buttons to navigate through options and the "Enter" button to select. Press "Exit" to close the menu.
5.2 ഇമേജ് അഡ്ജസ്റ്റ്മെന്റ്
- ഫോക്കസ്: Rotate the focus ring on the projector lens until the image appears sharp and clear on the screen.
- സൂം: Rotate the zoom ring on the projector lens to adjust the size of the projected image.
- കീസ്റ്റോൺ തിരുത്തൽ: If the image appears trapezoidal, use the keystone correction function in the OSD menu to square the image. This can be found under the "Image" or "Setup" menu.
- ലെൻസ് ഷിഫ്റ്റ്: Use the lens shift knob (visible on the top view image) to physically move the projected image up, down, left, or right without tilting the projector, minimizing keystone distortion.
5.3 ഓഡിയോ ക്രമീകരണങ്ങൾ
Adjust the volume using the dedicated volume controls on the control panel or within the OSD menu. You can also select audio input sources if multiple are connected.
6. പരിപാലനം
പതിവ് അറ്റകുറ്റപ്പണികൾ മികച്ച പ്രകടനം ഉറപ്പാക്കുകയും നിങ്ങളുടെ പ്രൊജക്ടറിന്റെ ആയുസ്സ് വർദ്ധിപ്പിക്കുകയും ചെയ്യുന്നു.
6.1 എൽamp മാറ്റിസ്ഥാപിക്കൽ
പ്രൊജക്ടർ എൽamp പരിമിതമായ ആയുസ്സ് ഉണ്ട്. lamp indicator lights up or the image brightness significantly decreases, the lamp needs replacement. Always use genuine NEC replacement lamps. Refer to the side view image (Figure 3.4) for the lamp access panel location.
- Power off the projector and unplug the power cord.
- പ്രൊജക്ടർ കുറഞ്ഞത് 60 മിനിറ്റെങ്കിലും തണുപ്പിക്കാൻ അനുവദിക്കുക.
- l കണ്ടെത്തി തുറക്കുക.amp മൂടുക.
- പഴയ എൽ ശ്രദ്ധാപൂർവ്വം നീക്കം ചെയ്യുകamp module and install the new one, ensuring it is securely seated.
- എൽ അടയ്ക്കുകamp cover and secure it.
- എൽ പുനഃസജ്ജമാക്കുകamp timer in the OSD menu (usually under "Setup" or "Information").
6.2 എയർ ഫിൽറ്റർ വൃത്തിയാക്കൽ/മാറ്റിസ്ഥാപിക്കൽ
Clean the air filter regularly to prevent overheating and maintain image quality. The filter location is typically on the side or bottom of the projector.
- Power off the projector and unplug the power cord.
- Locate and remove the air filter cover.
- Remove the filter and clean it with a soft brush or vacuum cleaner. If heavily soiled or damaged, replace it with a new one.
- Reinstall the filter and close the cover.
- Reset the filter timer in the OSD menu (if applicable).
6.3 പൊതുവായ ശുചീകരണം
- പ്രൊജക്ടർ സിasing: മൃദുവായതും ഉണങ്ങിയതും ലിന്റ് രഹിതവുമായ തുണി ഉപയോഗിച്ച് പുറംഭാഗം തുടയ്ക്കുക. അബ്രസീവ് ക്ലീനറുകളോ ലായകങ്ങളോ ഉപയോഗിക്കരുത്.
- പ്രൊജക്ഷൻ ലെൻസ്: Gently clean the lens with a lens cleaning cloth or lens paper. Avoid touching the lens surface with your fingers.
7. പ്രശ്നപരിഹാരം
നിങ്ങളുടെ പ്രൊജക്ടറിൽ നിങ്ങൾ നേരിട്ടേക്കാവുന്ന പൊതുവായ പ്രശ്നങ്ങളെ ഈ വിഭാഗം അഭിസംബോധന ചെയ്യുന്നു.
| പ്രശ്നം | സാധ്യമായ കാരണം | പരിഹാരം |
|---|---|---|
| ചിത്രമൊന്നും പ്രദർശിപ്പിച്ചിട്ടില്ല |
|
|
| ചിത്രം മങ്ങിയതാണ് |
|
|
| ചിത്രം ട്രപസോയിഡൽ ആണ് |
|
|
| പ്രൊജക്ടർ അമിതമായി ചൂടാകുകയോ ഓഫാകുകയോ ചെയ്യുന്നു |
|
|
8 സ്പെസിഫിക്കേഷനുകൾ
| ഫീച്ചർ | വിശദാംശങ്ങൾ |
|---|---|
| ബ്രാൻഡ് | NEC |
| മോഡൽ നമ്പർ | 60003084 (PA600X) |
| തെളിച്ചം റേറ്റിംഗ് | 6000 ല്യൂമൻസ് |
| നേറ്റീവ് റെസല്യൂഷൻ | 1024 x 768 (XGA) |
| കോൺട്രാസ്റ്റ് റേഷ്യോ | 2000:1 |
| ഇനത്തിൻ്റെ ഭാരം | 16.98 പൗണ്ട് (ഏകദേശം 7.7 കിലോഗ്രാം) |
| ഉൽപ്പന്ന അളവുകൾ | 14.41 x 19.65 x 6.46 ഇഞ്ച് (ഏകദേശം 36.6 x 49.9 x 16.4 സെ.മീ) |
| കണക്റ്റിവിറ്റി ടെക്നോളജി | USB, HDMI, S-Video, D-Sub (VGA), DisplayPort |
| പ്രത്യേക ഫീച്ചർ | സംയോജിത സ്പീക്കറുകൾ |
9. വാറൻ്റിയും പിന്തുണയും
For detailed warranty information, please refer to the warranty card included with your product or visit the official NEC website. For technical support, service, or inquiries about replacement parts, please contact NEC customer support through their official channels. Keep your purchase receipt and product serial number handy when contacting support.
You can typically find support information on the official NEC webസൈറ്റ്: www.nec.com


