1. ആമുഖം
This manual provides detailed instructions for the installation, operation, and maintenance of the uxcell H3Y-2 AC 220V Delay Timer Time Relay. This device is designed for precise time control in industrial automation systems and various mechanical equipment, offering a reliable power-on delay function.
2. ഉൽപ്പന്നം കഴിഞ്ഞുview ഫീച്ചറുകളും
The uxcell H3Y-2 is a compact and efficient time relay featuring a DPDT (Double Pole Double Throw) contact type. It operates on AC 220V and offers a time delay range of 0 to 10 minutes, adjustable via a transparent setting knob. Key features include:
- മോഡൽ: H3Y-2
- ബന്ധപ്പെടാനുള്ള തരം: ഡിപിഡിടി (ഡബിൾ പോൾ ഡബിൾ ത്രോ)
- ഓപ്പറേറ്റിംഗ് വോളിയംtage: എസി 220 വി
- കോൺടാക്റ്റ് റേറ്റിംഗ്: 5A 250VAC (Resistive Load)
- സമയ പരിധി: 0 മുതൽ 10 മിനിറ്റ് വരെ ക്രമീകരിക്കാം
- ടെർമിനലുകൾ: 8-pin solder terminal for secure connections
- മൗണ്ടിംഗ്: Compatible with 35mm DIN Rail
- സൂചകങ്ങൾ: LED indicators for Power (PW) and Output Status (UP)
- ക്രമീകരണം: Large, transparent knob for easy time setting

ചിത്രം 1: മുൻഭാഗം view of the uxcell H3Y-2 Delay Timer Time Relay, showing the adjustable time knob and indicator lights.
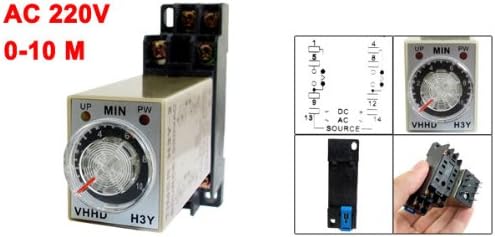
Figure 2: Various perspectives of the H3Y-2 relay, including its 8-pin socket and a basic wiring schematic.
3. സജ്ജീകരണവും ഇൻസ്റ്റാളേഷനും
മുന്നറിയിപ്പ്: Ensure all power is disconnected before attempting any installation or wiring to prevent electric shock or damage to the device.
3.1 മൗണ്ടിംഗ്
- Identify a suitable 35mm DIN Rail in your control panel or enclosure.
- Attach the provided 8-pin DIN Rail socket to the DIN Rail. Ensure it is securely fastened.
- Insert the H3Y-2 time relay into the 8-pin socket. It should click into place.
3.2 വയറിംഗ്
The relay uses an 8-pin solder terminal for electrical connections. Refer to the wiring diagram (Figure 2) for specific pin assignments. Ensure all connections are tight and correct for AC 220V operation.
- Connect the AC 220V power supply to the designated input terminals on the 8-pin socket.
- Connect the load (device to be controlled) to the DPDT output contacts.
- Verify all wiring against the schematic to prevent misconnections.
4. ഓപ്പറേഷൻ
4.1 Setting the Time Delay
- Locate the transparent time setting knob on the front of the H3Y-2 relay.
- Rotate the knob to align the red indicator with the desired time value between 0 and 10 minutes.
4.2 Powering On and Function
- Once installation and wiring are complete and verified, restore power to the circuit.
- The Power (PW) LED indicator on the relay will illuminate, indicating that the device is receiving power.
- The relay will begin its timed delay countdown.
- Upon completion of the set delay time, the Output Status (UP) LED will illuminate, and the relay contacts will switch, activating the connected load.
- The relay maintains this state until power is removed and reapplied, initiating a new delay cycle.
5 സ്പെസിഫിക്കേഷനുകൾ
| ഫീച്ചർ | സ്പെസിഫിക്കേഷൻ |
|---|---|
| ഉൽപ്പന്നത്തിൻ്റെ പേര് | Time Relay + Socket |
| ടൈപ്പ് ചെയ്യുക | H3Y-2 |
| ബന്ധപ്പെടാനുള്ള തരം | ഡിപിഡിടി (ഡബിൾ പോൾ ഡബിൾ ത്രോ) |
| ഓപ്പറേറ്റിംഗ് വോളിയംtage | എസി 220 വി |
| കോൺടാക്റ്റ് റേറ്റിംഗ് | 5A 250VAC (Resistive Load) |
| സമയ പരിധി | 0-10 മിനിറ്റ് |
| ടെർമിനലുകളുടെ എണ്ണം | 8 |
| മൗണ്ടിംഗ് തരം | 35 എംഎം ഡിൻ റെയിൽ |
| Fixing Mount Hole Size | 6 x 4mm (L*W) |
| Fixing Mount Center Hole Distance | 57 x 15mm (L*W) |
| Total Size (Approx.) | 68 x 22 x 88mm (L*W*H) |
| മൊത്തം ഭാരം | 65 ഗ്രാം |
| കണക്റ്റർ തരം | സോൾഡർ |
| കോൺടാക്റ്റ് മെറ്റീരിയൽ | വെള്ളി |
| ഓപ്പറേഷൻ മോഡ് | ഓട്ടോമാറ്റിക് |
| ഇനം മോഡൽ നമ്പർ | a12122100ux0565 |
6. പരിപാലനം
The uxcell H3Y-2 Delay Timer Time Relay is designed for reliable, long-term operation with minimal maintenance. However, periodic checks can help ensure optimal performance:
- വൃത്തിയാക്കൽ: Keep the relay and its socket free from dust and debris. Use a soft, dry cloth for cleaning. Do not use liquid cleaners.
- കണക്ഷനുകൾ: എല്ലാ വയറിംഗ് കണക്ഷനുകളും സുരക്ഷിതമായും തുരുമ്പെടുക്കാതെയും ഉറപ്പാക്കാൻ ഇടയ്ക്കിടെ പരിശോധിക്കുക.
- പരിസ്ഥിതി വ്യവസ്ഥകൾ: Ensure the operating environment remains within specified temperature and humidity ranges to prevent premature wear.
7. പ്രശ്നപരിഹാരം
If the uxcell H3Y-2 Delay Timer Time Relay does not function as expected, consider the following common issues and solutions:
- No Power (PW LED Off):
- Check the AC 220V power supply to the relay socket.
- Verify all power connections are secure and correctly wired.
- Ensure the relay is fully seated in its 8-pin socket.
- Relay Does Not Switch After Delay (UP LED Off):
- Confirm the time setting knob is correctly set to a non-zero delay time.
- Check the load connections and ensure the load itself is functional.
- Verify the contact rating (5A 250VAC) is not exceeded by the connected load.
- Incorrect Delay Time:
- Re-adjust the time setting knob to the desired value.
- Ensure the knob is not obstructed and rotates freely.
If issues persist after performing these checks, contact uxcell customer support or a qualified electrician.
8. വാറൻ്റിയും പിന്തുണയും
8.1 വാറൻ്റി വിവരങ്ങൾ
Specific warranty details for the uxcell H3Y-2 Delay Timer Time Relay are not provided in this manual. Please refer to the product packaging or the official uxcell webഏറ്റവും പുതിയ വാറന്റി നയത്തിനായുള്ള സൈറ്റ്.
8.2 ഉപഭോക്തൃ പിന്തുണ
For technical assistance, product inquiries, or further support, please visit the official uxcell website or contact their customer service department. You can often find contact information and FAQs on their brand store page: uxcell Official Store.


