1. ഉൽപ്പന്നം കഴിഞ്ഞുview
The COMTEC HDR-201G is a high-performance drive recorder designed and manufactured in Japan, offering continuous recording with advanced GPS and G-sensor capabilities. This device ensures reliable incident recording and provides accurate location and speed data, making it an essential tool for vehicle safety and documentation.
It is engineered to withstand demanding conditions, building on the legacy of previous COMTEC models. The HDR-201G integrates seamlessly into your vehicle, providing clear video evidence and peace of mind.
2 പ്രധാന സവിശേഷതകൾ
- GPS with GLONASS & Michibiki Support: Equipped with a GPS module compatible with GLONASS and Michibiki satellite systems for rapid and precise acquisition of speed and location data. Date and time information are automatically corrected via GPS, eliminating manual adjustments.
- G-Sensor (Impact Recording): Automatically detects impacts and records the event as separate shock recording data. This feature prevents critical incident footage from being overwritten by continuous recording.
- 2.5 ഇഞ്ച് LCD ഡിസ്പ്ലേ: Allows for immediate on-device playback of recorded footage. The display also shows live recording, simplifying camera angle adjustments during installation.
- Dashboard Mounting Support: The built-in G-sensor automatically detects the device's orientation (up/down) and inverts the LCD display accordingly, enabling flexible installation on either the front windshield (behind the rearview mirror) or the dashboard.
- Noise Countermeasures: Designed with noise reduction technology to minimize interference with other in-car electronics, such as digital terrestrial TV reception and car navigation GPS signals.
- Recording Failure Prevention: Performs a microSDHC card check upon startup to prevent recording failures due to card damage or errors.
- ജപ്പാനിൽ നിർമ്മിച്ചത്: The HDR-201G is designed, developed, and assembled in COMTEC's Japanese factories, ensuring high quality and reliability.
- അധിക പ്രവർത്തനങ്ങൾ: 11-level impact sensitivity adjustment (including OFF), audio recording, date and time stamping, backup function (saves recorded video even if power is cut), LED traffic signal compatibility, and calendar/clock display.
3. സജ്ജീകരണവും ഇൻസ്റ്റാളേഷനും
Before installation, ensure your vehicle's ignition is off. Choose a mounting location that does not obstruct your view അല്ലെങ്കിൽ എയർബാഗുകളിൽ ഇടപെടുക.
3.1 പാക്കേജ് ഉള്ളടക്കം
പാക്കേജിൽ എല്ലാ ഇനങ്ങളും ഉണ്ടെന്ന് ഉറപ്പാക്കുക:
- Main Unit (x1)
- മൗണ്ടിംഗ് ബ്രാക്കറ്റ് (x1)
- Double-sided Tape for Bracket Fixing (x1)
- Hex Wrench for Bracket Angle Adjustment (x1)
- Cigarette Lighter Plug Cord (x1)
- microSDHC Card (4GB) (x1)
- ചരട് Clamp (x3)
- Instruction Manual (with Warranty) (x1)

3.2 Mounting the Drive Recorder
The HDR-201G supports two main mounting types: behind the rearview mirror on the front windshield or on the dashboard. The device's G-sensor automatically adjusts the display orientation.
- മൗണ്ടിംഗ് ഉപരിതലം വൃത്തിയാക്കുക: Use the provided degreasing cleaner or an alcohol wipe to thoroughly clean the chosen mounting area on your windshield or dashboard. Ensure the surface is dry and free of dust.
- Attach Double-sided Tape: Apply the double-sided tape to the mounting bracket.
- ബ്രാക്കറ്റ് സുരക്ഷിതമാക്കുക: Firmly press the mounting bracket with the attached tape onto the cleaned surface. Hold for at least 30 seconds to ensure strong adhesion. Note: Once attached, repositioning the double-sided tape is difficult, so choose your location carefully.
- പ്രധാന യൂണിറ്റ് ഘടിപ്പിക്കുക: Slide the main unit onto the mounting bracket until it clicks into place.
- ക്യാമറ ആംഗിൾ ക്രമീകരിക്കുക: With the device powered on and displaying live footage, use the provided hex wrench to adjust the camera angle for optimal recording coverage. The LCD display will automatically invert if mounted upside down.


3.3 പവർ കണക്ഷൻ
Connect the provided cigarette lighter plug cord to your vehicle's cigarette lighter socket. Route the cable neatly using the included cord clamps to avoid interference with driving controls.

3.4 മൈക്രോ എസ്ഡിഎച്ച്സി കാർഡ് ചേർക്കൽ
Insert the provided 4GB microSDHC card into the designated slot on the device. Ensure it is inserted correctly until it clicks into place.

4. പ്രവർത്തന നിർദ്ദേശങ്ങൾ
4.1 Powering On/Off and Recording Modes
The device automatically starts continuous recording when the vehicle's ignition is turned on. It supports three recording modes:
- തുടർച്ചയായ റെക്കോർഡിംഗ്: Records video from the moment the power is turned ON until it is turned OFF. Older data is overwritten when the storage limit is reached.
- G-Sensor (Impact) Recording: When an impact is detected by the 3-axis acceleration sensor, the device automatically saves the footage as separate impact recording data, preventing it from being overwritten.
- മാനുവൽ റെക്കോർഡിംഗ്: Press the designated button to manually initiate a recording, saving specific events as needed.

4.2 Viewing Recorded Footage
നിങ്ങൾക്ക് കഴിയും view recorded videos directly on the device's LCD screen or on a PC/TV.
- ഉപകരണത്തിലെ പ്ലേബാക്ക്:
- Turn on the power to start recording.
- മെനുവിൽ പ്രവേശിക്കാൻ മെനു ബട്ടൺ അമർത്തുക.
- Navigate to the playback option and select the desired video to review.
- PC/TV Playback:
- Remove the microSDHC card from the device.
- Insert the microSDHC card into a computer's card reader.
- സമർപ്പിത ഉപയോഗിക്കുക viewer software (copied to the card during formatting) or a standard media player to view ദി files.
- Alternatively, connect the device to a TV using an optional AV cable to view footage ഒരു വലിയ സ്ക്രീനിൽ.

4.3 ജിപിഎസ് പ്രവർത്തനം
The integrated GPS module provides accurate speed and location data, which is recorded along with the video. It also automatically synchronizes the device's date and time, eliminating the need for manual adjustments.

5. പരിപാലനം
5.1 ഉപകരണം വൃത്തിയാക്കുന്നു
Wipe the device's exterior with a soft, dry cloth. For stubborn dirt, lightly dampen the cloth with water. Do not use abrasive cleaners or solvents, as they may damage the device.
5.2 microSDHC Card Management
Regularly format the microSDHC card (e.g., once a month) to maintain optimal recording performance and prevent data corruption. This can typically be done through the device's menu settings. Back up any important footage to a computer before formatting.
6. പ്രശ്നപരിഹാരം
If you encounter issues with your HDR-201G, refer to the following common problems and solutions:
- ഉപകരണം പവർ ഓൺ ചെയ്യുന്നില്ല:
- Check if the cigarette lighter plug cord is securely connected to both the device and the vehicle's power socket.
- വാഹനത്തിന്റെ ഇഗ്നിഷൻ ഓണാണെന്ന് ഉറപ്പാക്കുക.
- Verify that the vehicle's power socket is functioning correctly.
- No recording or recording errors:
- Ensure the microSDHC card is inserted correctly.
- Format the microSDHC card using the device's menu.
- If errors persist, try using a different, compatible microSDHC card.
- മോശം വീഡിയോ നിലവാരം:
- ക്യാമറ ലെൻസ് വൃത്തിയാക്കുക.
- Ensure the windshield area in front of the camera is clean and free of obstructions.
- Check the recording resolution settings in the device menu.
- GPS സിഗ്നൽ ലഭിച്ചില്ല:
- ഉപകരണത്തിന് വ്യക്തത ഉണ്ടെന്ന് ഉറപ്പാക്കുക view of the sky. Avoid mounting locations that are heavily shielded.
- Wait a few minutes for the device to acquire a signal, especially after initial setup or moving to a new location.
- മറ്റ് ഇലക്ട്രോണിക്സുകളുമായുള്ള ഇടപെടൽ:
- The device has noise countermeasures. If interference occurs, try repositioning the device or its power cable slightly away from other electronic devices or antennas.
For issues not covered here, please refer to the detailed troubleshooting section in the full instruction manual or contact customer support.
7 സ്പെസിഫിക്കേഷനുകൾ
| ഫീച്ചർ | വിവരണം |
|---|---|
| റെക്കോർഡിംഗ് രീതി | Continuous Recording / 3-axis Acceleration Sensor (G-Sensor) / Manual Recording via Switch |
| വൈദ്യുതി വിതരണം | 12V / 24V (via cigarette lighter plug cord) |
| മൗണ്ടിംഗ് സ്ഥാനം | Behind Rearview Mirror (Front Glass) / Dashboard |
| ക്യാമറ പിക്സലുകൾ | Approx. 1 Million Pixels CMOS Camera |
| ക്യാമറ ആംഗിൾ | Diagonal 170° (Horizontal 105° / Vertical 80°) |
| Recording Video Size | HD (1280 × 720) / SD (640 × 360) |
| എൽസിഡി സ്ക്രീൻ വലുപ്പം | 2.5 ഇഞ്ച് TFT |
| LCD റെസല്യൂഷൻ | 320 × 240 |
| റെക്കോർഡിംഗ് മീഡിയ | microSDHC Card (4GB included) |
| റെക്കോർഡിംഗ് സമയം | 30-360 minutes (with included 4GB microSDHC card) |
| ഫ്രെയിം റേറ്റ് | 30/15/10/5 fps |
| Video Confirmation Method | Device LCD / PC / TV |
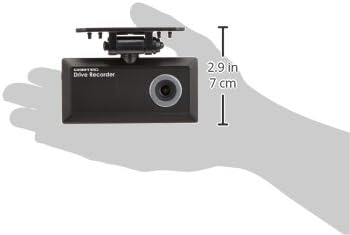
| Main Unit Size (W × H × D) | 102 mm × 50 mm × 20 mm |
| ഭാരം | 107 ഗ്രാം |
| മാതൃരാജ്യം | ജപ്പാൻ |
8. വാറൻ്റിയും പിന്തുണയും
The COMTEC HDR-201G comes with a manufacturer's warranty. Please refer to the warranty card included in your package for specific terms and conditions, including the warranty period and coverage details.
For technical support, product inquiries, or service requests, please contact COMTEC customer service. Contact information can typically be found in the instruction manual or on the official COMTEC webസൈറ്റ്.
9. ഉൽപ്പന്ന വീഡിയോകൾ
9.1 Small Drive Recorder by Newvision JP
ഈ വീഡിയോ ഒരു പൊതു വിശദീകരണം നൽകുന്നുview of a small drive recorder, showcasing its compact design and basic features. While not specific to the HDR-201G, it illustrates the form factor and typical usage of such devices.
9.2 Avylet A1 Product Display and Function Explanation
This video demonstrates the features and functions of the Avylet A1 dash cam. It covers aspects like recording quality, G-sensor operation, parking surveillance, and app connectivity, which are common to many modern drive recorders including the HDR-201G.