ആമുഖം
The Tekonsha 119250 ZCI Zero Contact Interface Universal ModuLite is designed to provide power for trailer stop, turn, tail, and running lights without requiring any cutting or splicing into the tow vehicle's electrical system. This module utilizes current sensors that snap over existing vehicle wires, detecting electrical current and activating the corresponding trailer lights. It is compatible with various vehicle types, including those with standard, PWM (Pulse Width Modulation), and multiplexed systems, and supports both 2-wire and 3-wire vehicle systems.
സുരക്ഷാ വിവരങ്ങൾ
- മുന്നറിയിപ്പ്: Do not cut or splice vehicle wiring. This product is designed for zero contact installation.
- ഷോർട്ട് സർക്യൂട്ടുകൾ തടയുന്നതിന് എല്ലാ കണക്ഷനുകളും സുരക്ഷിതമാണെന്നും ശരിയായി ഇൻസുലേറ്റ് ചെയ്തിട്ടുണ്ടെന്നും ഉറപ്പാക്കുക.
- Always disconnect the vehicle's battery before beginning installation to avoid electrical shock or damage to the vehicle's electrical system.
- Verify proper grounding of the ModuLite module to ensure reliable operation and prevent electrical issues.
- If the trailer lights remain on after the vehicle is turned off, immediately investigate the cause to prevent battery drain. This may indicate an incorrect installation or a fault.
- ഇൻസ്റ്റാളേഷൻ സമയത്ത് ഉചിതമായ ഉപകരണങ്ങളും വ്യക്തിഗത സംരക്ഷണ ഉപകരണങ്ങളും ഉപയോഗിക്കുക.
പാക്കേജ് ഉള്ളടക്കം
The Tekonsha 119250 ZCI ModuLite package typically includes the following components:
- Tekonsha ZCI ModuLite Power Module
- Current Sensors (typically 4-5 units)
- 4-Pin Trailer Wiring Connector
- റിംഗ് ടെർമിനലുള്ള ഗ്രൗണ്ട് വയർ
- പവർ വയർ
- ഇൻസ്റ്റലേഷൻ നിർദ്ദേശങ്ങൾ
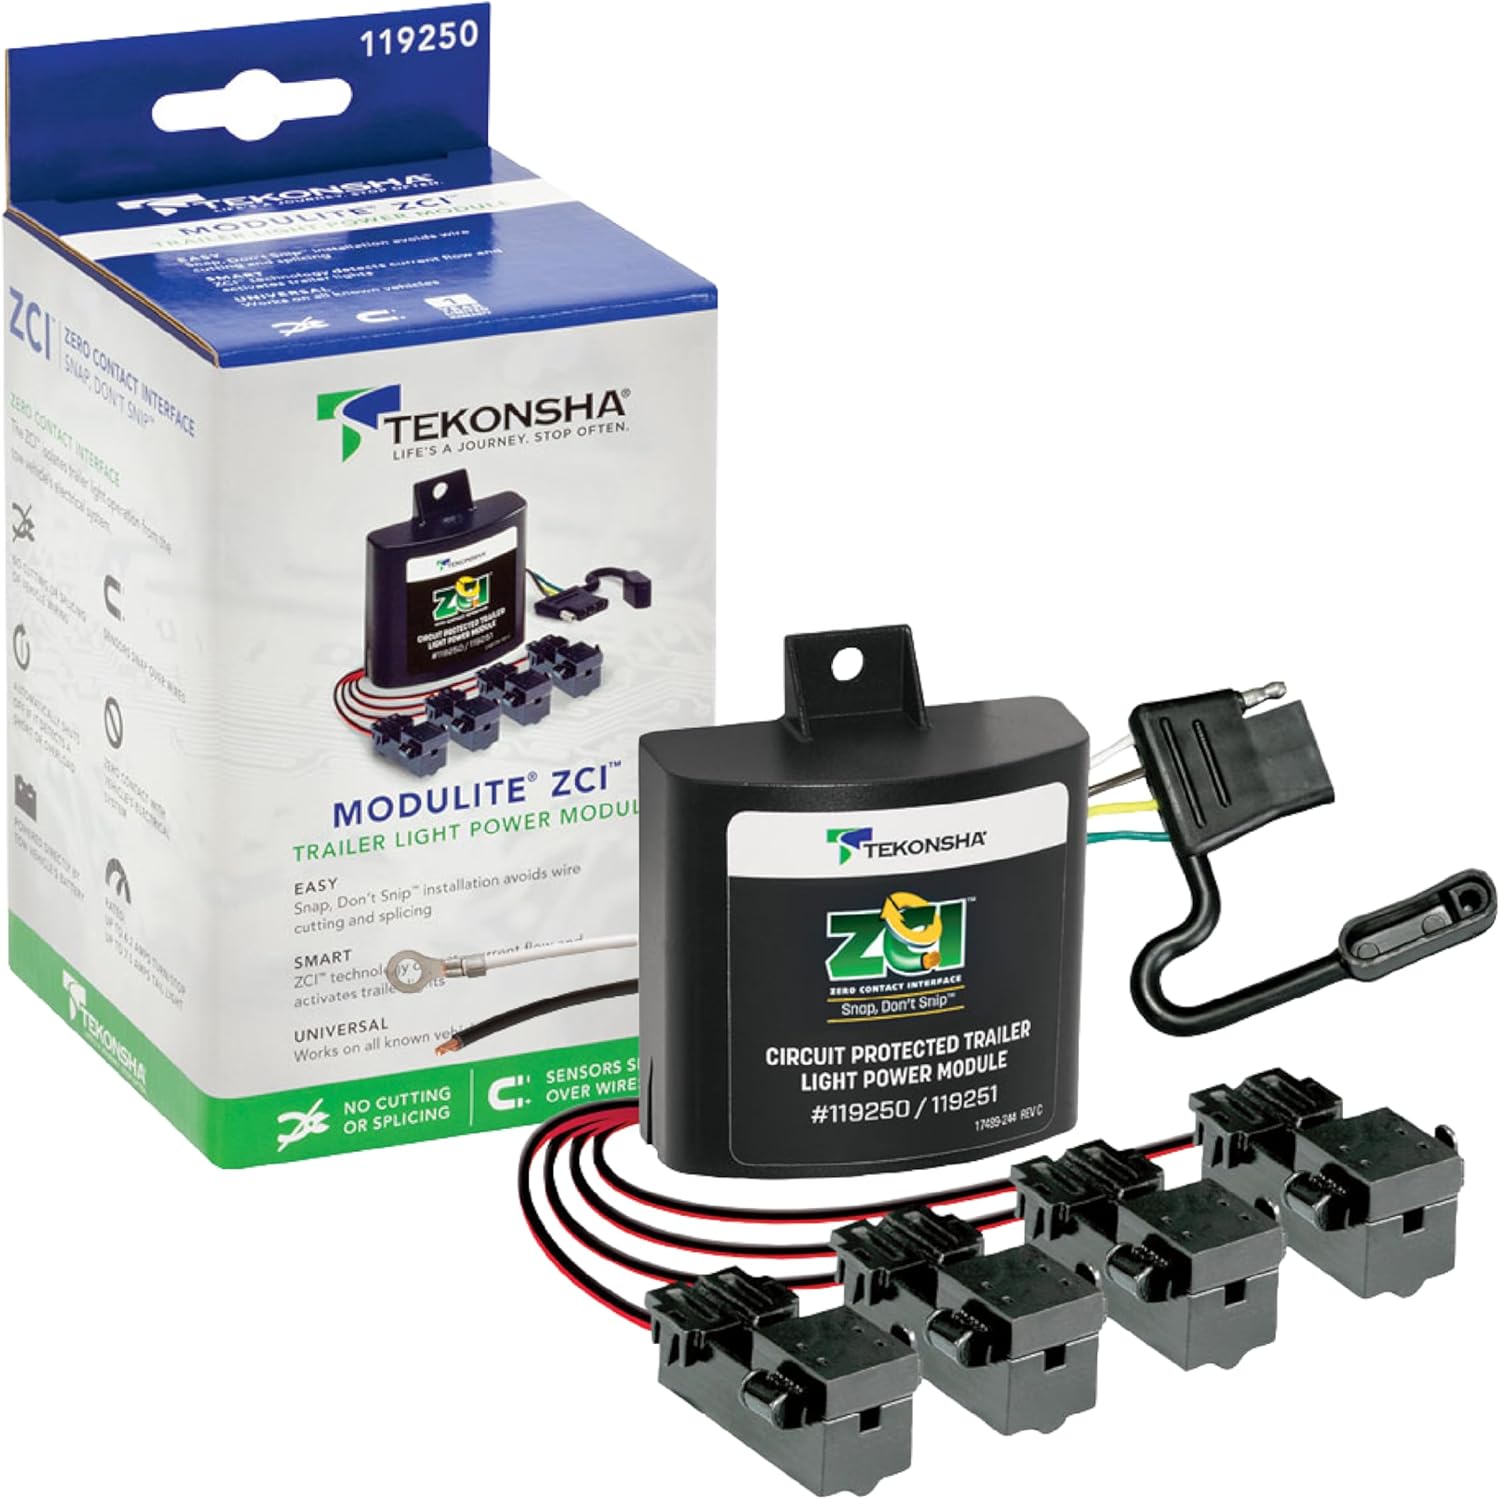
Image: The Tekonsha 119250 ZCI ModuLite box, showing the main module, several current sensors, and the 4-pin trailer connector.
സ്പെസിഫിക്കേഷനുകൾ
| ഫീച്ചർ | സ്പെസിഫിക്കേഷൻ |
|---|---|
| മോഡൽ നമ്പർ | 119250 |
| Turn/Stop Circuit Rating | 4.2 വരെ Amps |
| Taillight Circuit Rating | 7.5 വരെ Amps |
| അനുയോജ്യത | Standard, PWM, and Multiplexed Systems (2-wire or 3-wire) |
| ബൾബ് അനുയോജ്യത | LED and/or Incandescent bulbs (vehicle and trailer) |
| സംരക്ഷണം | Integrated, re-settable short circuit and overload protection |
| ഭാരം | ഏകദേശം 1.15 പൗണ്ട് |

Image: Diagram illustrating the approximate dimensions of the Tekonsha 119250 ZCI ModuLite packaging, showing a height of 8.9 inches, width of 4.8 inches, and depth of 4 inches.
ഇൻസ്റ്റലേഷൻ നിർദ്ദേശങ്ങൾ (സജ്ജീകരണം)
The ModuLite ZCI is designed for a non-invasive installation, avoiding any cutting or splicing of your vehicle's wiring. This makes it ideal for leased vehicles or those with sensitive electronics.
Required Tools and Additional Components (Not Included):
- Voltmeter or Test Light
- വയർ സ്ട്രിപ്പറുകൾ/ക്രിമ്പറുകൾ
- ഇലക്ട്രിക്കൽ ടേപ്പ് അല്ലെങ്കിൽ ഹീറ്റ് ഷ്രിങ്ക് ട്യൂബിംഗ്
- Fuse Holder (for power wire)
- Crimp Connectors (various types as needed)
- Battery Terminal Connector
- Additional 12-gauge wire (if needed for power/ground extension)
- Zip Ties or Mounting Hardware
ഘട്ടം ഘട്ടമായുള്ള ഇൻസ്റ്റാളേഷൻ:
- വാഹനം തയ്യാറാക്കുക: Ensure the vehicle is turned off and the battery is disconnected. Identify a suitable, dry location in the rear of the vehicle (e.g., trunk, cargo area, or under the vehicle) to mount the ModuLite module.
- Identify Vehicle Wires: Using a voltmeter or test light, identify the vehicle's tail light, stop light, left turn signal, and right turn signal wires. These wires will be used with the current sensors. For vehicles with combined stop/turn signals (2-wire system), the module will adapt this to a standard trailer 2-wire system. For vehicles with separate stop and turn signals (3-wire system), the module will also adapt.
- Connect Power and Ground:
- Route the ModuLite's power wire (typically black or red) directly to the vehicle's battery. Install an inline fuse holder (not included) with the specified fuse (usually 15A, one is included) as close to the battery as possible. Connect the power wire to the positive (+) battery terminal.
- Connect the ModuLite's ground wire (typically white) to a clean, unpainted metal surface on the vehicle chassis, ensuring a solid electrical connection. Use the provided ring terminal or a suitable crimp connector.
- Attach Current Sensors: For each identified vehicle light wire (tail, stop, left turn, right turn), snap the corresponding current sensor over the wire. Ensure the wire passes through the sensor in the correct direction as indicated by an arrow on the sensor. If the sensor does not work, reverse its direction or loop the wire through twice if the signal is weak.
- Connect 4-Pin Trailer Connector: Connect the 4-pin trailer wiring harness from the ModuLite module to the location where your trailer connector will be accessed. This typically involves routing it to the exterior of the vehicle near the hitch.
- Mount the Module: Securely mount the ModuLite module in the chosen dry location using zip ties or other appropriate mounting hardware. Ensure it is protected from moisture and physical damage.
- സിസ്റ്റം പരിശോധിക്കുക: Reconnect the vehicle battery. Connect a trailer or a trailer light tester to the 4-pin connector. Test all trailer light functions: tail lights, brake lights, left turn signal, and right turn signal.
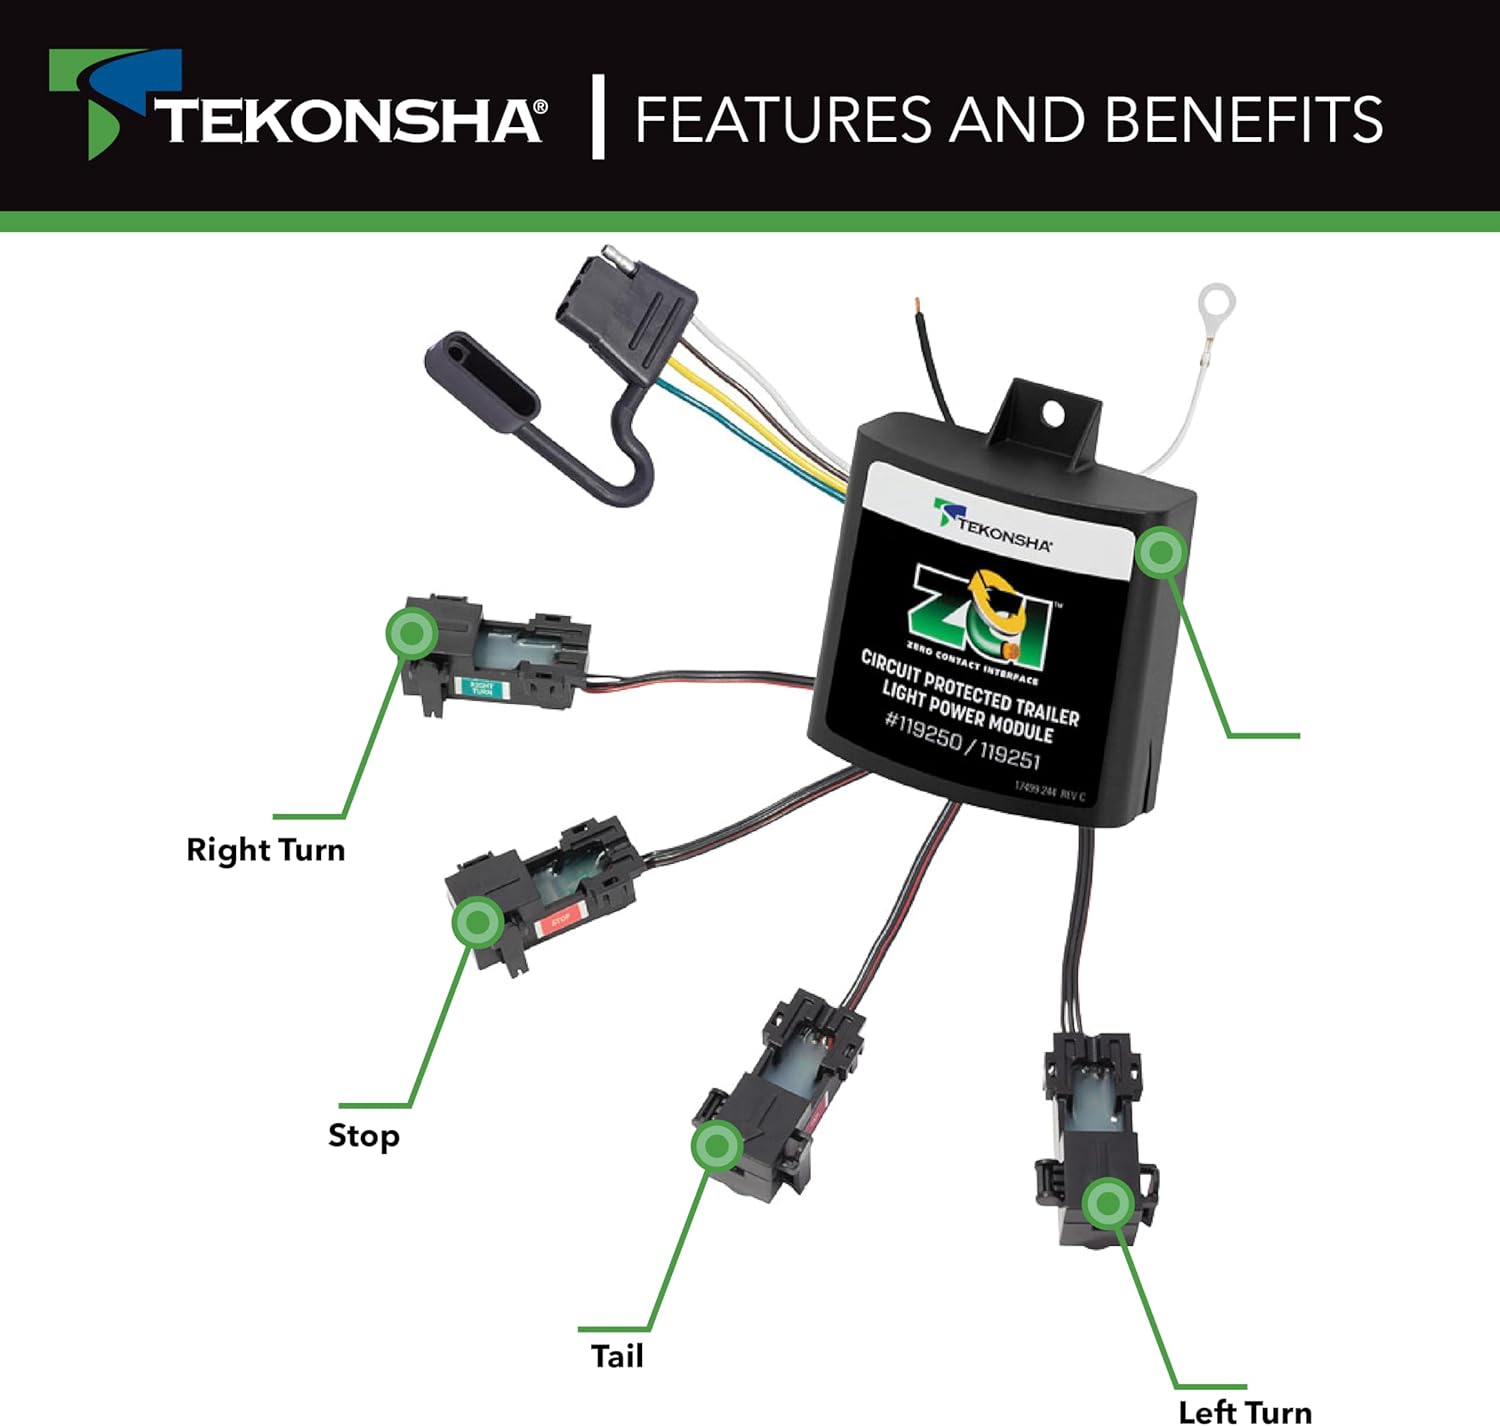
ചിത്രം: ഒരു ഓവർഹെഡ് view of the Tekonsha 119250 ZCI ModuLite, showing the main module connected to four current sensors, each labeled for Right Turn, Stop, Tail, and Left Turn signals. The 4-pin trailer connector is also visible.

ചിത്രം: ഒരു ക്ലോസ്-അപ്പ് view demonstrating the 'Smart Signal Sensing' feature, showing a vehicle wire passing through a current sensor, with an indicator light on the sensor. This illustrates the non-invasive method of detecting electrical signals.

ചിത്രം: വിശദമായ ഒരു ചിത്രം view of the Tekonsha 119250 ZCI ModuLite's included hardware, featuring the main module, multiple current sensors, and the 4-pin trailer connector. A separate red wire with a sensor is also shown, highlighting the components for installation.
ഓപ്പറേഷൻ
Once properly installed, the Tekonsha 119250 ZCI ModuLite operates automatically. When the vehicle's lights (tail, stop, turn signals) are activated, the current sensors detect the electrical flow in the vehicle's wiring. The ModuLite then draws power directly from the vehicle's battery (via the dedicated power wire) to illuminate the corresponding trailer lights. This ensures that the trailer lights receive full brightness and do not interfere with the vehicle's sensitive electrical systems or 'lamp out' sensors.
- The module is compatible with both LED and incandescent bulbs on both the tow vehicle and the trailer.
- It adapts 3-wire vehicle systems (separate turn and stop lights) to standard 2-wire trailer taillight wiring.

Image: A graphic highlighting additional features of the ModuLite ZCI, including circuit protection, ratings of up to 4.2 amps for turn/stop and 7.5 amps for tail lights, the 'no cutting or splicing' installation method, and its battery-powered operation.
ട്രബിൾഷൂട്ടിംഗ്
- No Trailer Lights or Incorrect Function:
- Check Power and Ground: Ensure the power wire is securely connected to the battery (with fuse) and the ground wire has a solid connection to the chassis.
- സെൻസർ പ്ലേസ്മെന്റ് പരിശോധിക്കുക: Confirm that each current sensor is correctly snapped over the intended vehicle wire and that the wire passes through in the direction indicated by any arrows on the sensor. Try reversing the sensor or looping the wire through twice if the signal is weak.
- ഫ്യൂസ് പരിശോധിക്കുക: Check the inline fuse on the power wire. Replace if blown.
- Trailer Connection: Ensure the 4-pin trailer connector is properly connected to the trailer or tester.
- Trailer Lights Remain On After Vehicle is Off (Battery Drain):
- This indicates the module is still receiving a signal or power when it shouldn't. Re-verify all sensor connections and ensure no vehicle wires are inadvertently providing a constant signal.
- Ensure the power wire is connected to a constant 12V source that is not switched by the ignition, as the module is designed to be battery-powered. The issue might stem from a vehicle's residual power or a faulty sensor connection.
- If the problem persists, consider installing a manual on/off switch on the power line to the ModuLite module to prevent battery drain when not in use.
- Power Wires Reversed (as reported by some users):
- If initial testing shows the trailer ground pin has voltage and light wires are grounded, it's possible the power and ground wires from the module are reversed. Carefully verify the polarity of your connections using a voltmeter before connecting to a trailer.
മെയിൻ്റനൻസ്
The Tekonsha 119250 ZCI ModuLite requires minimal maintenance. Periodically inspect the following:
- വയറിംഗും കണക്ഷനുകളും: Check all wires for signs of wear, fraying, or damage. Ensure all electrical connections, especially the power and ground connections, remain secure and free of corrosion.
- Module Mounting: Verify that the module is still securely mounted and protected from environmental elements.
- നിലവിലെ സെൻസറുകൾ: Ensure the current sensors remain properly clipped onto the vehicle wires and have not shifted.
- 4-പിൻ കണക്റ്റർ: Keep the 4-pin trailer connector clean and free of debris. Use a dielectric grease to protect the terminals from corrosion if exposed to the elements.
വാറൻ്റിയും പിന്തുണയും
The Tekonsha 119250 ZCI ModuLite is backed by Tekonsha, a trusted name in towing safety. For specific warranty details, claims, or technical assistance, please refer to the official Tekonsha webസൈറ്റിൽ ബന്ധപ്പെടുകയോ അവരുടെ ഉപഭോക്തൃ പിന്തുണയുമായി നേരിട്ട് ബന്ധപ്പെടുകയോ ചെയ്യുക. ഏതെങ്കിലും വാറന്റി ക്ലെയിമുകൾക്ക് വാങ്ങിയതിന്റെ തെളിവായി നിങ്ങളുടെ വാങ്ങൽ രസീത് സൂക്ഷിക്കുക.
For additional information and support, you may visit the official Tekonsha store or webസൈറ്റ്: Tekonsha Store


