1. പൊതു സുരക്ഷാ വിവരങ്ങൾ
ഈ പവർ ടൂളിനൊപ്പം നൽകിയിരിക്കുന്ന എല്ലാ സുരക്ഷാ മുന്നറിയിപ്പുകളും നിർദ്ദേശങ്ങളും ചിത്രീകരണങ്ങളും സ്പെസിഫിക്കേഷനുകളും എപ്പോഴും വായിച്ച് മനസ്സിലാക്കുക. താഴെ പട്ടികപ്പെടുത്തിയിരിക്കുന്ന എല്ലാ നിർദ്ദേശങ്ങളും പാലിക്കുന്നതിൽ പരാജയപ്പെടുന്നത് വൈദ്യുതാഘാതം, തീപിടുത്തം, കൂടാതെ/അല്ലെങ്കിൽ ഗുരുതരമായ പരിക്കിന് കാരണമാകാം.
വർക്ക് ഏരിയ സുരക്ഷ
- ജോലിസ്ഥലം വൃത്തിയായും നല്ല വെളിച്ചത്തിലും സൂക്ഷിക്കുക. അലങ്കോലമായതോ ഇരുണ്ടതോ ആയ പ്രദേശങ്ങൾ അപകടങ്ങൾ ക്ഷണിച്ചുവരുത്തുന്നു.
- തീപിടിക്കുന്ന ദ്രാവകങ്ങൾ, വാതകങ്ങൾ, പൊടി എന്നിവയുടെ സാന്നിധ്യം പോലെ സ്ഫോടനാത്മക അന്തരീക്ഷത്തിൽ പവർ ടൂളുകൾ പ്രവർത്തിപ്പിക്കരുത്. പവർ ടൂളുകൾ സ്പാർക്കുകൾ സൃഷ്ടിക്കുന്നു, അത് പൊടിയോ പുകയോ കത്തിച്ചേക്കാം.
- പവർ ടൂൾ പ്രവർത്തിപ്പിക്കുമ്പോൾ കുട്ടികളെയും കാഴ്ചക്കാരെയും അകറ്റി നിർത്തുക. ശ്രദ്ധാശൈഥില്യങ്ങൾ നിങ്ങളുടെ നിയന്ത്രണം നഷ്ടപ്പെടുത്തും.
ഇലക്ട്രിക്കൽ സുരക്ഷ
- പവർ ടൂൾ പ്ലഗുകൾ ഔട്ട്ലെറ്റുമായി പൊരുത്തപ്പെടണം. പ്ലഗ് ഒരു തരത്തിലും പരിഷ്കരിക്കരുത്.
- പൈപ്പുകൾ, റേഡിയറുകൾ, റേഞ്ചുകൾ, റഫ്രിജറേറ്ററുകൾ എന്നിവ പോലെയുള്ള എർത്ത് അല്ലെങ്കിൽ ഗ്രൗണ്ടഡ് പ്രതലങ്ങളുമായി ശരീര സമ്പർക്കം ഒഴിവാക്കുക. നിങ്ങളുടെ ശരീരം മണ്ണിലോ നിലത്തോ ആണെങ്കിൽ വൈദ്യുതാഘാതം ഉണ്ടാകാനുള്ള സാധ്യത കൂടുതലാണ്.
വ്യക്തിഗത സുരക്ഷ
- ജാഗ്രത പാലിക്കുക, നിങ്ങൾ എന്താണ് ചെയ്യുന്നതെന്ന് കാണുക, ഒരു പവർ ടൂൾ പ്രവർത്തിപ്പിക്കുമ്പോൾ സാമാന്യബുദ്ധി ഉപയോഗിക്കുക. നിങ്ങൾ ക്ഷീണിതനായിരിക്കുമ്പോഴോ മയക്കുമരുന്ന്, മദ്യം, മരുന്നിൻ്റെ സ്വാധീനത്തിലായിരിക്കുമ്പോഴോ ഒരു പവർ ടൂൾ ഉപയോഗിക്കരുത്.
- വ്യക്തിഗത സംരക്ഷണ ഉപകരണങ്ങൾ ഉപയോഗിക്കുക. എപ്പോഴും കണ്ണ് സംരക്ഷണം ധരിക്കുക. ഡസ്റ്റ് മാസ്ക്, സ്കിഡ് ചെയ്യാത്ത സുരക്ഷാ ഷൂസ്, ഹാർഡ് തൊപ്പി, അല്ലെങ്കിൽ ഉചിതമായ സാഹചര്യങ്ങളിൽ ഉപയോഗിക്കുന്ന കേൾവി സംരക്ഷണം എന്നിവ പോലുള്ള സംരക്ഷണ ഉപകരണങ്ങൾ വ്യക്തിഗത പരിക്കുകൾ കുറയ്ക്കും.
- അവിചാരിതമായി ആരംഭിക്കുന്നത് തടയുക. ബാറ്ററി പാക്കിലേക്ക് കണക്റ്റ് ചെയ്യുന്നതിനും ഉപകരണം എടുക്കുന്നതിനും കൊണ്ടുപോകുന്നതിനും മുമ്പ് സ്വിച്ച് ഓഫ് പൊസിഷനിൽ ആണെന്ന് ഉറപ്പാക്കുക.
- അതിരുകടക്കരുത്. എല്ലായ്പ്പോഴും ശരിയായ കാലും ബാലൻസും നിലനിർത്തുക. ഇത് അപ്രതീക്ഷിത സാഹചര്യങ്ങളിൽ പവർ ടൂളിൻ്റെ മികച്ച നിയന്ത്രണം സാധ്യമാക്കുന്നു.
പവർ ടൂൾ ഉപയോഗവും പരിചരണവും
- പവർ ടൂൾ നിർബന്ധിക്കരുത്. നിങ്ങളുടെ ആപ്ലിക്കേഷനായി ശരിയായ പവർ ടൂൾ ഉപയോഗിക്കുക.
- എന്തെങ്കിലും ക്രമീകരണങ്ങൾ വരുത്തുന്നതിനും ആക്സസറികൾ മാറ്റുന്നതിനും അല്ലെങ്കിൽ പവർ ടൂളുകൾ സംഭരിക്കുന്നതിനും മുമ്പ് പവർ ടൂളിൽ നിന്ന് ബാറ്ററി പാക്ക് വിച്ഛേദിക്കുക. അത്തരം പ്രതിരോധ സുരക്ഷാ നടപടികൾ ആകസ്മികമായി വൈദ്യുതി ഉപകരണം ആരംഭിക്കുന്നതിനുള്ള സാധ്യത കുറയ്ക്കുന്നു.
- നിഷ്ക്രിയ പവർ ടൂളുകൾ കുട്ടികൾക്ക് ലഭ്യമാകാതെ സൂക്ഷിക്കുക, പവർ ടൂൾ അല്ലെങ്കിൽ ഈ നിർദ്ദേശങ്ങളുമായി പരിചയമില്ലാത്ത വ്യക്തികളെ പവർ ടൂൾ പ്രവർത്തിപ്പിക്കാൻ അനുവദിക്കരുത്.
- പവർ ടൂളുകളും അനുബന്ധ ഉപകരണങ്ങളും പരിപാലിക്കുക. ചലിക്കുന്ന ഭാഗങ്ങളുടെ തെറ്റായ ക്രമീകരണം അല്ലെങ്കിൽ ബൈൻഡിംഗ്, ഭാഗങ്ങളുടെ പൊട്ടൽ, പവർ ടൂളിൻ്റെ പ്രവർത്തനത്തെ ബാധിച്ചേക്കാവുന്ന മറ്റേതെങ്കിലും അവസ്ഥ എന്നിവ പരിശോധിക്കുക. കേടുപാടുകൾ സംഭവിച്ചാൽ, ഉപയോഗിക്കുന്നതിന് മുമ്പ് പവർ ടൂൾ നന്നാക്കുക.
ബാറ്ററി ടൂൾ ഉപയോഗവും പരിചരണവും
- നിർമ്മാതാവ് വ്യക്തമാക്കിയ ചാർജർ ഉപയോഗിച്ച് മാത്രം റീചാർജ് ചെയ്യുക. ഒരു തരം ബാറ്ററി പായ്ക്കിന് അനുയോജ്യമായ ഒരു ചാർജർ മറ്റൊരു ബാറ്ററി പാക്കിനൊപ്പം ഉപയോഗിക്കുമ്പോൾ തീപിടിത്തം ഉണ്ടാക്കിയേക്കാം.
- പ്രത്യേകമായി നിയുക്ത ബാറ്ററി പായ്ക്കുകൾ ഉപയോഗിച്ച് മാത്രം പവർ ടൂളുകൾ ഉപയോഗിക്കുക. മറ്റേതെങ്കിലും ബാറ്ററി പായ്ക്കുകളുടെ ഉപയോഗം പരിക്കിനും തീപിടുത്തത്തിനും സാധ്യത സൃഷ്ടിച്ചേക്കാം.
- ബാറ്ററി പായ്ക്ക് ഉപയോഗത്തിലല്ലെങ്കിൽ, പേപ്പർ ക്ലിപ്പുകൾ, നാണയങ്ങൾ, കീകൾ, നഖങ്ങൾ, സ്ക്രൂകൾ അല്ലെങ്കിൽ മറ്റ് ചെറിയ ലോഹ വസ്തുക്കൾ എന്നിവ പോലെയുള്ള മറ്റ് ലോഹ വസ്തുക്കളിൽ നിന്ന് ഒരു ടെർമിനലിൽ നിന്ന് മറ്റൊന്നിലേക്ക് കണക്ഷൻ ഉണ്ടാക്കാൻ കഴിയും. ബാറ്ററി ടെർമിനലുകൾ ഒരുമിച്ച് ഷോർട്ട് ചെയ്യുന്നത് പൊള്ളലോ തീയോ ഉണ്ടാക്കിയേക്കാം.
2. സജ്ജീകരണവും അസംബ്ലിയും
2.1 അൺപാക്കിംഗ്
Carefully remove all components from the packaging. Verify that all items listed in the package contents are present and undamaged. The package includes: 1 Metabo PowerMaxx BS Basic cordless screwdriver, 2 Li-Power (10.8 V / 2.0 Ah) batteries, 1 LC 40 charger, 1 quick-release drill chuck, 1 belt hook, and 1 plastic case.
2.2 ബാറ്ററി ചാർജിംഗ്
The Metabo PowerMaxx BS Basic uses 10.8V Li-Ion batteries. Before first use, fully charge the battery pack. Use only the supplied Metabo LC 40 charger.
- Connect the LC 40 charger to a suitable power outlet.
- ബാറ്ററി പായ്ക്ക് ചാർജറിൽ ക്ലിക്ക് ചെയ്യുന്നത് വരെ സ്ലൈഡ് ചെയ്യുക.
- The charger's indicator light will show the charging status. Refer to the charger's manual for specific light patterns.
- പൂർണ്ണമായി ചാർജ് ചെയ്തുകഴിഞ്ഞാൽ, ചാർജറിൽ നിന്ന് ബാറ്ററി പായ്ക്ക് നീക്കം ചെയ്യുക.
Ultra-M technology ensures maximum battery performance and long service life.
2.3 Attaching and Detaching the Drill Chuck
The tool features a spindle with a hexagonal socket for direct bit insertion, allowing operation without the drill chuck for compact use. For drilling or larger bits, attach the quick-release drill chuck.
- To attach the chuck: Align the chuck with the spindle and screw it on clockwise until it is hand-tight.
- To detach the chuck: Hold the tool firmly and unscrew the chuck counter-clockwise.
2.4 Inserting Drill Bits or Screwdriver Bits

Image: Close-up of the tool's chuck and bit holder, showing the mechanism for inserting bits.
- Using the hexagonal socket (without chuck): Insert the screwdriver bit directly into the hexagonal socket on the spindle until it locks into place. Pull to ensure it is secure.
- Using the quick-release drill chuck: Open the chuck jaws by turning the front sleeve counter-clockwise. Insert the drill bit or screwdriver bit into the chuck. Turn the front sleeve clockwise to tighten the chuck jaws securely around the bit. Ensure the bit is centered and firmly gripped.

Image: The cordless screwdriver with a drill bit securely inserted into the quick-release chuck.
3. പ്രവർത്തന നിർദ്ദേശങ്ങൾ
3.1 പവർ ഓൺ/ഓഫ്
To start the tool, press the trigger switch. The tool speed is variable depending on how far the trigger is pressed. To stop the tool, release the trigger switch.
3.2 സ്പീഡ് സെലക്ഷൻ
The Metabo PowerMaxx BS Basic features two speed settings for different applications:
- ഗിയർ 1 (കുറഞ്ഞ വേഗത): Approximately 360 rpm. Ideal for high-torque applications such as driving large screws or drilling large diameter holes.
- ഗിയർ 2 (ഹൈ സ്പീഡ്): Approximately 1400 rpm. Suitable for faster drilling with smaller bits and general screwdriving.
Use the gear selector switch, typically located on top of the tool, to switch between speeds. Ensure the tool is stopped before changing gears.
3.3 ടോർക്ക് ക്രമീകരണം
The torque setting ring allows you to adjust the amount of torque applied, preventing overtightening of screws or damage to materials. The maximum torque for soft applications is 17 Nm, and for hard applications, it is 34 Nm.
- Rotate the torque setting ring, located behind the chuck, to the desired setting. Lower numbers indicate lower torque for smaller screws or softer materials. Higher numbers provide more torque.
- For drilling, set the ring to the drill symbol (usually the highest setting) to bypass the clutch and achieve maximum power.
3.4 Integrated Work Light
An integrated work light is located on the front of the tool, below the chuck. This light illuminates the work area when the trigger switch is pressed, providing optimal visibility in dimly lit spaces.
3.5 ഡ്രില്ലിംഗും സ്ക്രൂഡ്രൈവിംഗും

Image: A user operating the cordless screwdriver for a screwdriving task.
- സ്ക്രൂ ഡ്രൈവിംഗ്: Select the appropriate torque setting and gear. Apply firm, steady pressure to the tool, keeping it aligned with the screw. Start slowly and increase speed as needed.
- ഡ്രില്ലിംഗ്: Select the drill mode (highest torque setting) and the appropriate gear. Hold the tool firmly and apply steady pressure. For best results, start with a pilot hole for larger drills or hard materials.
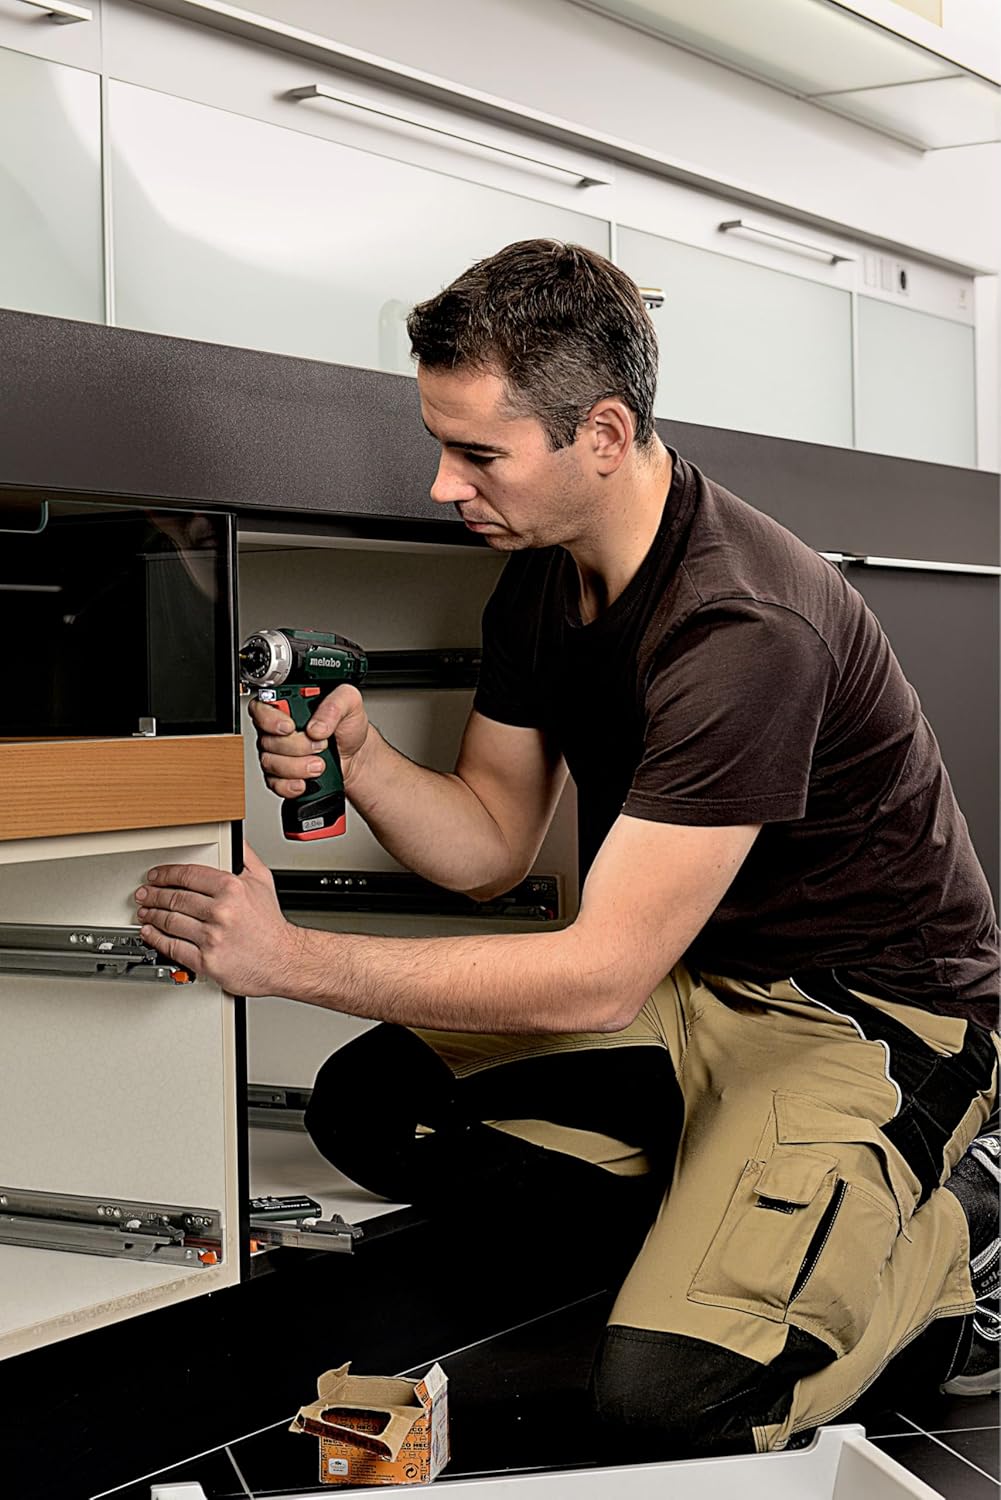
Image: The cordless screwdriver being used for assembly work inside a cabinet.
4. പരിപാലനം
4.1 വൃത്തിയാക്കൽ
- വൃത്തിയാക്കുന്നതിന് മുമ്പ് എപ്പോഴും ബാറ്ററി പാക്ക് നീക്കം ചെയ്യുക.
- Keep the ventilation openings of the tool clean to prevent overheating. Use a soft brush or compressed air to remove dust and debris.
- ടൂൾ ഹൗസിംഗ് ഒരു സോഫ്റ്റ്, ഡി ക്ലീനർ ഉപയോഗിച്ച് തുടയ്ക്കുക.amp തുണി. കഠിനമായ രാസവസ്തുക്കളോ ഉരച്ചിലുകളുള്ള ക്ലീനറുകളോ ഉപയോഗിക്കരുത്.
4.2 ബാറ്ററി പരിചരണവും സംഭരണവും
- ബാറ്ററി പായ്ക്കുകൾ തണുത്തതും വരണ്ടതുമായ സ്ഥലത്ത് സൂക്ഷിക്കുക, നേരിട്ടുള്ള സൂര്യപ്രകാശവും ഉയർന്ന താപനിലയും ഏൽക്കുന്നതിൽ നിന്ന് അകറ്റി നിർത്തുക.
- ദീർഘകാല സംഭരണത്തിനായി, ബാറ്ററി ഏകദേശം 50-70% ശേഷിയിലേക്ക് ചാർജ് ചെയ്യുക.
- Do not store battery packs with metal objects that could short the terminals.
4.3 പൊതു പരിശോധന
- Regularly inspect the tool for any signs of damage, such as cracked housing, damaged cables, or loose parts.
- If any damage is found, do not use the tool. Contact authorized service personnel for repair.
5. പ്രശ്നപരിഹാരം
| പ്രശ്നം | സാധ്യമായ കാരണം | പരിഹാരം |
|---|---|---|
| ഉപകരണം ആരംഭിക്കുന്നില്ല | ബാറ്ററി ചാർജ് ചെയ്തിട്ടില്ല അല്ലെങ്കിൽ തെറ്റായി ചേർത്തിട്ടില്ല. | ബാറ്ററി പൂർണ്ണമായും ചാർജ്ജ് ചെയ്തിട്ടുണ്ടെന്നും ശരിയായി ചേർത്തിട്ടുണ്ടെന്നും ഉറപ്പാക്കുക. |
| കുറഞ്ഞ പവർ അല്ലെങ്കിൽ പ്രകടനം | Battery charge is low. Incorrect gear or torque setting. | Recharge battery. Select appropriate gear and torque setting for the task. |
| ബാറ്ററി ചാർജ് ചെയ്യുന്നില്ല | Charger not connected to power. Damaged battery or charger. | Check power connection. Inspect battery and charger for damage. Contact support if issues persist. |
| ചക്ക് ബിറ്റ് സുരക്ഷിതമായി പിടിക്കുന്നില്ല | Chuck not tightened sufficiently. Damaged chuck. | Ensure chuck is tightened firmly. If damaged, replace chuck. |
6 സാങ്കേതിക സവിശേഷതകൾ
| ഫീച്ചർ | സ്പെസിഫിക്കേഷൻ |
|---|---|
| മോഡൽ നമ്പർ | 600080500 |
| ഉപകരണ തരം | Cordless Pistol Grip Drill/Screwdriver |
| ബാറ്ററി വോളിയംtage | 10.8 വി |
| ബാറ്ററി ശേഷി | 2.0 ആഹ് ലി-അയൺ |
| No-Load Speed (1st Gear) | 360 ആർപിഎം |
| No-Load Speed (2nd Gear) | 1400 ആർപിഎം |
| Max. Torque (Soft) | 17 എൻഎം |
| Max. Torque (Hard) | 34 എൻഎം |
| Max. Drilling Diameter (Wood) | 22 മി.മീ |
| Max. Drilling Diameter (Steel) | 10 മി.മീ |
| Chuck Jaw Width | 1 - 10 മി.മീ. |
| ഭാരം (ബാറ്ററി ഉപയോഗിച്ച്) | 0.8 കിലോഗ്രാം (800 ഗ്രാം) |
| Integrated Work Light | അതെ |
| കീലെസ് ചക്ക് | അതെ |
| സ്പിൻഡിൽ ത്രെഡ് | 1/2" |
7. വാറൻ്റിയും പിന്തുണയും
7.1 വാറൻ്റി വിവരങ്ങൾ
This Metabo PowerMaxx BS Basic cordless screwdriver comes with a 3-year warranty on the battery pack. Please retain your proof of purchase for warranty claims.
Spare parts for this product are available for a period of 1 year from the date of purchase.
7.2 ഉപഭോക്തൃ പിന്തുണ
For technical assistance, warranty claims, or to order spare parts, please contact your local Metabo service center or authorized dealer. Refer to the official Metabo webനിങ്ങളുടെ പ്രദേശത്തെ ബന്ധപ്പെടാനുള്ള വിവരങ്ങൾക്ക് സൈറ്റ് സന്ദർശിക്കുക.
When contacting support, please have your product model number (600080500) and serial number (if applicable) ready.


