1. ആമുഖം
This manual provides detailed instructions for the installation, configuration, and maintenance of your ASRock FM2A58M-VG3+ R2.0 Micro ATX Motherboard. Please read this manual thoroughly before attempting any installation or configuration to ensure proper operation and to prevent damage to your system components.
2. പാക്കേജ് ഉള്ളടക്കം
Upon opening the motherboard package, verify that all items are present and in good condition. The standard package typically includes:
- ASRock FM2A58M-VG3+ R2.0 Motherboard
- I/O Panel Shield
- SATA ഡാറ്റ കേബിളുകൾ
- ദ്രുത ഇൻസ്റ്റലേഷൻ ഗൈഡ്
- Support CD (containing drivers and utilities)
If any items are missing or damaged, contact your retailer for assistance.
3. മദർബോർഡ് ലേഔട്ട്
Familiarize yourself with the layout of the motherboard before installation. This section provides an overview of key components and connectors.
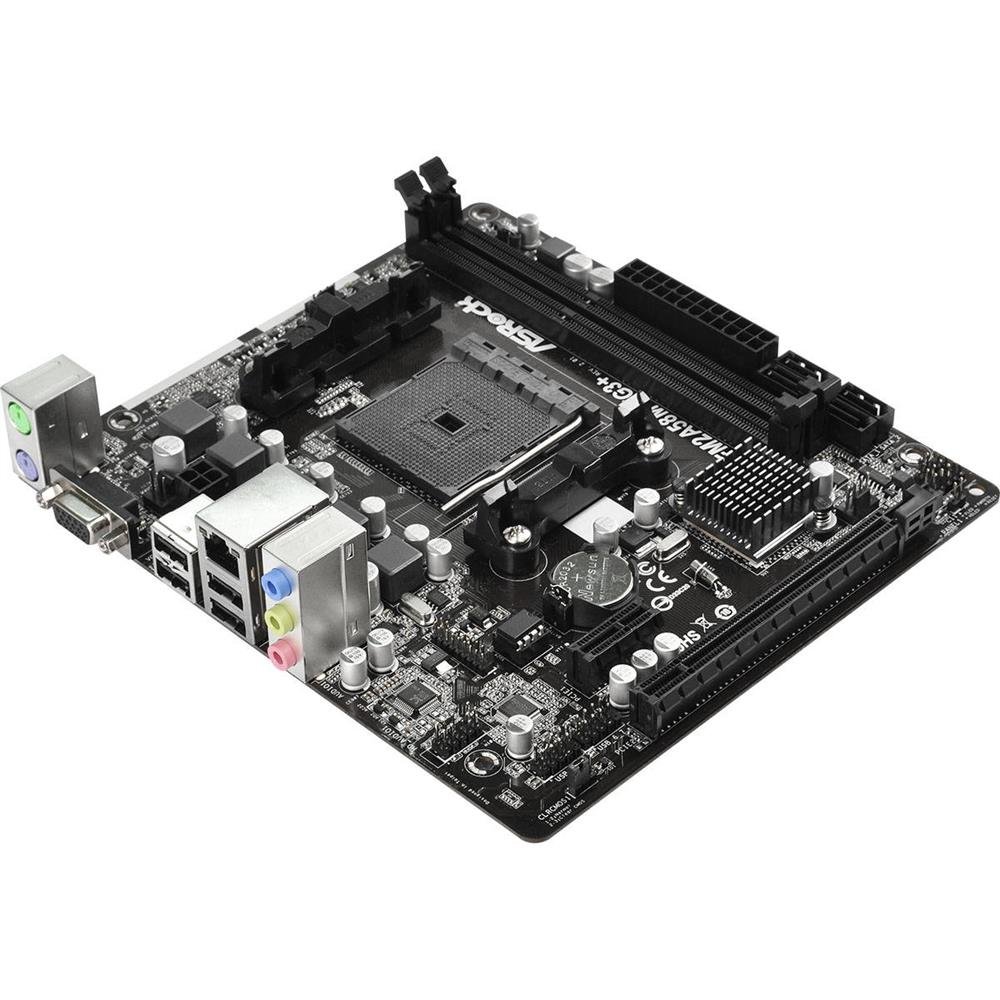
This image displays the ASRock FM2A58M-VG3+ R2.0 Micro ATX motherboard, highlighting its various components such as the CPU socket, DIMM slots, PCI-Express slots, and SATA ports.
Key areas include the CPU socket (FM2+), DDR3 DIMM slots, PCI-Express expansion slots, SATA ports, and various headers for front panel connectivity.
4. സജ്ജീകരണവും ഇൻസ്റ്റാളേഷനും
4.1. സിപിയു ഇൻസ്റ്റലേഷൻ
- സിപിയു സോക്കറ്റ് ലിവർ തുറക്കുക.
- Align the CPU (AMD FM2/FM2+) with the socket, ensuring the golden triangle on the CPU matches the triangle on the socket.
- നിർബന്ധിച്ച് അമർത്താതെ സിപിയു സോക്കറ്റിൽ സൌമ്യമായി വയ്ക്കുക.
- സിപിയു സുരക്ഷിതമാക്കാൻ സോക്കറ്റ് ലിവർ അടയ്ക്കുക.
- സിപിയു പ്രതലത്തിൽ തെർമൽ പേസ്റ്റ് പുരട്ടി നിർമ്മാതാവിന്റെ നിർദ്ദേശങ്ങൾക്കനുസരിച്ച് സിപിയു കൂളർ ഇൻസ്റ്റാൾ ചെയ്യുക.
4.2. റാം (മെമ്മറി) ഇൻസ്റ്റലേഷൻ
- DDR3 DIMM സ്ലോട്ടുകളുടെ രണ്ടറ്റത്തും ക്ലിപ്പുകൾ തുറക്കുക.
- മെമ്മറി മൊഡ്യൂൾ സ്ലോട്ടുമായി വിന്യസിക്കുക, മൊഡ്യൂളിലെ നോച്ച് സ്ലോട്ടിലെ കീയുമായി പൊരുത്തപ്പെടുന്നുണ്ടെന്ന് ഉറപ്പാക്കുക.
- ക്ലിപ്പുകൾ ശരിയായ സ്ഥാനത്ത് വരുന്നത് വരെ മെമ്മറി മൊഡ്യൂളിന്റെ രണ്ട് അറ്റങ്ങളിലും ദൃഢമായി അമർത്തുക.
4.3. മദർബോർഡ് മൗണ്ടിംഗ്
- നിങ്ങളുടെ കമ്പ്യൂട്ടർ കേസിന്റെ പിൻഭാഗത്ത് I/O ഷീൽഡ് ഇൻസ്റ്റാൾ ചെയ്യുക.
- കേസിനുള്ളിലെ സ്റ്റാൻഡ്ഓഫുകൾ ഉപയോഗിച്ച് മദർബോർഡ് വിന്യസിക്കുക.
- മദർബോർഡ് സ്ക്രൂകൾ ഉപയോഗിച്ച് ഉറപ്പിക്കുക, അത് ദൃഢമായി ഇട്ടിട്ടുണ്ടെന്നും എന്നാൽ അമിതമായി മുറുക്കിയിട്ടില്ലെന്നും ഉറപ്പാക്കുക.
4.4. പെരിഫറലുകൾ ബന്ധിപ്പിക്കുന്നു
- പവർ കണക്ടറുകൾ: നിങ്ങളുടെ പവർ സപ്ലൈയിൽ നിന്ന് 24-പിൻ ATX പവർ കണക്ടറും 4-പിൻ ATX 12V പവർ കണക്ടറും മദർബോർഡിലേക്ക് ബന്ധിപ്പിക്കുക.
- SATA ഉപകരണങ്ങൾ: Connect your storage drives (HDDs/SSDs) to the SATA2 ports using the provided SATA cables.
- ഫ്രണ്ട് പാനൽ ഹെഡറുകൾ: Connect the power button, reset button, HDD LED, power LED, and front panel USB/audio connectors to their respective headers on the motherboard. Refer to the motherboard diagram for exact locations.
- എക്സ്പാൻഷൻ കാർഡുകൾ: Install any PCI-Express graphics cards or other expansion cards into the appropriate slots and secure them.
5. നിങ്ങളുടെ സിസ്റ്റം പ്രവർത്തിപ്പിക്കൽ
5.1. ബയോസ്/യുഇഎഫ്ഐ കോൺഫിഗറേഷൻ
Upon first boot, or if you need to adjust system settings, you can enter the BIOS/UEFI setup utility. Typically, this is done by pressing the DEL or F2 key during the Power-On Self-Test (POST) phase. The UEFI interface allows you to configure boot order, system time, CPU/memory settings, and other hardware parameters.
5.2. ഡ്രൈവർ ഇൻസ്റ്റാളേഷൻ
After installing your operating system, install the necessary drivers for the motherboard's components. These can be found on the included support CD or downloaded from the official ASRock website. Install drivers for chipset, audio, LAN, and any integrated graphics (if using an APU).
5.3. ഓപ്പറേറ്റിംഗ് സിസ്റ്റം ഇൻസ്റ്റലേഷൻ
Insert your operating system installation media (USB drive or DVD) and follow the on-screen prompts to install your preferred operating system. Ensure the boot order in the UEFI is set to prioritize your installation media.
6. പരിപാലനം
6.1. വൃത്തിയാക്കൽ
അമിത ചൂടിലേക്കും ഘടകഭാഗങ്ങളുടെ തകരാറിലേക്കും നയിച്ചേക്കാവുന്ന പൊടിപടലങ്ങൾ തടയുന്നതിന് നിങ്ങളുടെ കമ്പ്യൂട്ടറിന്റെ ഉൾഭാഗം പതിവായി വൃത്തിയാക്കുക. ഫാനുകൾ, ഹീറ്റ്സിങ്കുകൾ, മറ്റ് ഘടകങ്ങൾ എന്നിവയിൽ നിന്ന് പൊടി നീക്കം ചെയ്യാൻ കംപ്രസ് ചെയ്ത വായു ഉപയോഗിക്കുക. വൃത്തിയാക്കുന്നതിന് മുമ്പ് സിസ്റ്റം ഓഫ് ചെയ്തിട്ടുണ്ടെന്നും അൺപ്ലഗ് ചെയ്തിട്ടുണ്ടെന്നും ഉറപ്പാക്കുക.
6.2. ബയോസ് അപ്ഡേറ്റുകൾ
ഇടയ്ക്കിടെ ASRock പരിശോധിക്കുക website for BIOS/UEFI updates. Updates can provide improved compatibility, stability, and new features. Follow the instructions provided by ASRock carefully when performing a BIOS update to avoid system instability or damage.
7. പ്രശ്നപരിഹാരം
നിങ്ങൾ നേരിട്ടേക്കാവുന്ന പൊതുവായ പ്രശ്നങ്ങളെ ഈ വിഭാഗം അഭിസംബോധന ചെയ്യുന്നു.
- ശക്തിയില്ല: Ensure all power cables (24-pin ATX, 4-pin ATX 12V) are securely connected to the motherboard and power supply. Verify the power supply switch is on.
- ഡിസ്പ്ലേ ഇല്ല: Check that the monitor is connected to the correct video output (either integrated graphics or discrete graphics card). Reseat the graphics card and memory modules.
- സിസ്റ്റം അസ്ഥിരത/ക്രാഷുകൾ: This can be caused by incompatible RAM, overheating, or outdated drivers. Verify RAM compatibility, check CPU/GPU temperatures, and update all drivers.
- POST Code Errors: If your motherboard has a POST code display or emits beep codes, consult the ASRock website or the full manual for the meaning of these codes to diagnose the issue.
- USB ഉപകരണ പ്രശ്നങ്ങൾ: Ensure USB devices are properly connected. If issues persist, try different USB ports or update USB drivers.
For more complex issues, refer to the comprehensive manual available on the ASRock support webസൈറ്റ് അല്ലെങ്കിൽ ASRock സാങ്കേതിക പിന്തുണയുമായി ബന്ധപ്പെടുക.
8 സ്പെസിഫിക്കേഷനുകൾ
Below are the technical specifications for the ASRock FM2A58M-VG3+ R2.0 Motherboard:
| ഫീച്ചർ | സ്പെസിഫിക്കേഷൻ |
|---|---|
| സിപിയു സോക്കറ്റ് | AMD Socket FM2+ |
| ചിപ്സെറ്റ് | AMD A58 FCH (Bolton-D2) |
| മെമ്മറി | 2x DDR3 DIMM Slots, Dual Channel, Non-ECC, Unbuffered, Max 32GB, Supports DDR3 2400+(OC)/ 2133/ 1866/ 1600/ 1333/ 1066 MHz |
| SATA പോർട്ടുകൾ | 4x SATA2 (3.0 Gb/s) Ports |
| വിപുലീകരണ സ്ലോട്ടുകൾ | 1x PCI-Express 3.0 x16, 1x PCI-Express 2.0 x1 |
| ഫോം ഫാക്ടർ | മൈക്രോ എടിഎക്സ് |
| USB പോർട്ടുകൾ | 4x USB 2.0 (Rear Panel) |
| അളവുകൾ (LxWxH) | 14 x 13 x 2 ഇഞ്ച് |
| ഭാരം | 1.32 പൗണ്ട് |
| ഓപ്പറേറ്റിംഗ് സിസ്റ്റം പിന്തുണ | വിൻഡോസ് |
9. വാറൻ്റിയും പിന്തുണയും
ASRock provides a limited warranty for its products. The duration and terms of the warranty may vary by region and retailer. Please retain your proof of purchase for warranty claims.
For technical support, driver downloads, BIOS updates, and additional documentation, please visit the official ASRock website. You can also contact ASRock customer service for direct assistance.
ASRock ഔദ്യോഗികം Webസൈറ്റ്: www.asrock.com