1. ആമുഖം
This manual provides essential information for the safe and efficient operation, installation, and maintenance of your Daitsu ADDH10 Digital Dehumidifier. Please read these instructions thoroughly before using the appliance and retain them for future reference.
The Daitsu ADDH10 is designed to reduce humidity levels in indoor environments, helping to prevent mold, mildew, and other moisture-related issues. It features a digital display and automatic functions for user convenience.
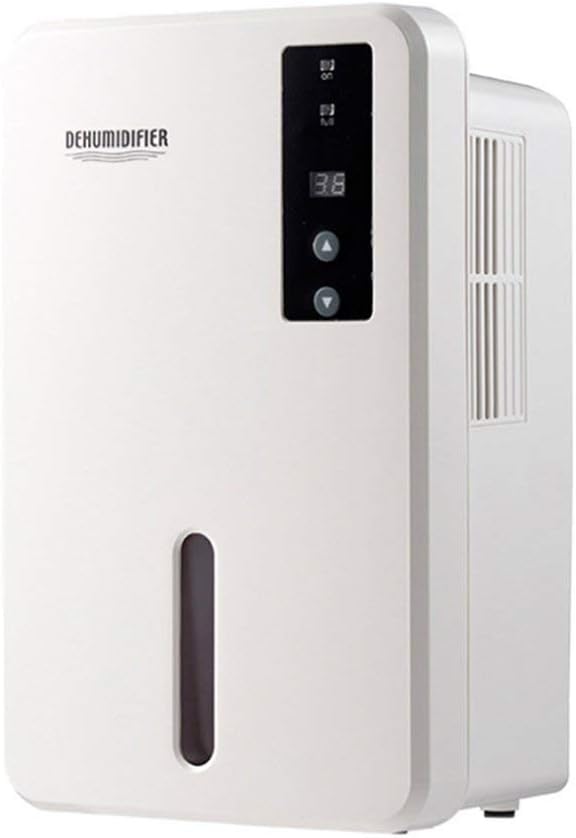
ചിത്രം 1.1: മുൻഭാഗം view of the Daitsu ADDH10 Digital Dehumidifier, showing the control panel and water tank window.
2 സുരക്ഷാ വിവരങ്ങൾ
തീ, വൈദ്യുതാഘാതം, പരിക്കുകൾ എന്നിവ കുറയ്ക്കുന്നതിന് വൈദ്യുത ഉപകരണങ്ങൾ ഉപയോഗിക്കുമ്പോൾ എല്ലായ്പ്പോഴും അടിസ്ഥാന സുരക്ഷാ മുൻകരുതലുകൾ പാലിക്കുക.
- Read all instructions before using the dehumidifier.
- വൈദ്യുതി വിതരണം വോള്യവുമായി പൊരുത്തപ്പെടുന്നുണ്ടെന്ന് ഉറപ്പാക്കുകtagഇ റേറ്റിംഗ് ലേബലിൽ വ്യക്തമാക്കിയിരിക്കുന്നു.
- കേടായ ചരടോ പ്ലഗോ ഉപയോഗിച്ച് ഡീഹ്യൂമിഡിഫയർ പ്രവർത്തിപ്പിക്കരുത്.
- ഉപകരണം താപ സ്രോതസ്സുകൾ, നേരിട്ടുള്ള സൂര്യപ്രകാശം, കത്തുന്ന വസ്തുക്കൾ എന്നിവയിൽ നിന്ന് അകറ്റി നിർത്തുക.
- Do not block the air inlet or outlet. Ensure adequate air circulation around the unit.
- ഡീഹ്യൂമിഡിഫയർ എപ്പോഴും സ്ഥിരതയുള്ളതും നിരപ്പായതുമായ ഒരു പ്രതലത്തിൽ സ്ഥാപിക്കുക.
- വൃത്തിയാക്കൽ, അറ്റകുറ്റപ്പണികൾ, അല്ലെങ്കിൽ ദീർഘനേരം ഉപയോഗത്തിലില്ലാത്തപ്പോൾ എന്നിവയ്ക്ക് മുമ്പ് യൂണിറ്റ് അൺപ്ലഗ് ചെയ്യുക.
- ഈ ഉപകരണം, അവരുടെ സുരക്ഷയ്ക്ക് ഉത്തരവാദിയായ ഒരു വ്യക്തി ഉപകരണത്തിൻ്റെ ഉപയോഗത്തെ സംബന്ധിച്ച മേൽനോട്ടമോ നിർദ്ദേശമോ നൽകിയിട്ടില്ലെങ്കിൽ, ശാരീരികമോ ഇന്ദ്രിയപരമോ മാനസികമോ ആയ കഴിവുകൾ കുറഞ്ഞതോ അനുഭവത്തിൻ്റെയും അറിവിൻ്റെയും അഭാവം ഉള്ള വ്യക്തികൾക്ക് (കുട്ടികൾ ഉൾപ്പെടെ) ഉപയോഗിക്കാൻ ഉദ്ദേശിച്ചുള്ളതല്ല.

Image 2.1: Illustration of the dehumidifier's double security protection, including automatic shut-off when the water tank is full and over-temperature protection (auto-stop if heat sink exceeds 80°C).
3. ഉൽപ്പന്ന ഘടകങ്ങളും സവിശേഷതകളും
നിങ്ങളുടെ ഡീഹ്യൂമിഡിഫയറിന്റെ പ്രധാന ഭാഗങ്ങളുമായി പരിചയപ്പെടുക:
- നിയന്ത്രണ പാനൽ: Digital display and buttons for operation.
- വായു പ്രവേശിക്കുന്നിടം: യൂണിറ്റിലേക്ക് ഈർപ്പമുള്ള വായു വലിച്ചെടുക്കുന്നിടത്ത്.
- എയർ ഔട്ട്ലെറ്റ്: വരണ്ട വായു പുറന്തള്ളപ്പെടുന്നിടത്ത്.
- വാട്ടർ ടാങ്ക്: Collects condensed water. Features a transparent window to monitor water level.
- Water Tank Handle/Lid: For easy removal and emptying.

Image 3.1: Diagram showing the key components: Air outlet, Control panel, Air inlet, and the 1.5L water tank capacity.
The dehumidifier has a 1.5-liter water tank capacity and features automatic shut-off when the tank is full, indicated by a float sensor. It also includes over-temperature protection.
4. സജ്ജീകരണവും ഇൻസ്റ്റാളേഷനും
4.1 അൺപാക്കിംഗ്
- ഡീഹ്യൂമിഡിഫയർ അതിന്റെ പാക്കേജിംഗിൽ നിന്ന് ശ്രദ്ധാപൂർവ്വം നീക്കം ചെയ്യുക.
- എല്ലാ പാക്കിംഗ് മെറ്റീരിയലുകളും, ടേപ്പുകളും, സംരക്ഷണ ഫിലിമുകളും നീക്കം ചെയ്യുക.
- Inspect the unit for any signs of damage. If damaged, do not operate and contact your retailer.
4.2 പ്ലേസ്മെൻ്റ്
- വാട്ടർ ടാങ്ക് നിറയുമ്പോൾ അതിന്റെ ഭാരം താങ്ങാൻ കഴിയുന്ന ഒരു ഉറച്ച, നിരപ്പായ പ്രതലത്തിൽ ഡീഹ്യൂമിഡിഫയർ സ്ഥാപിക്കുക.
- Ensure there is at least 20 cm (8 inches) of space around the air inlet and outlet for proper air circulation.
- വായുസഞ്ചാരത്തെ തടസ്സപ്പെടുത്തുന്ന മതിലുകൾ, ഫർണിച്ചറുകൾ അല്ലെങ്കിൽ കർട്ടനുകൾ എന്നിവയ്ക്ക് സമീപം യൂണിറ്റ് സ്ഥാപിക്കുന്നത് ഒഴിവാക്കുക.
- Do not place the unit in direct sunlight or near heat-generating appliances.
- For optimal performance, operate the dehumidifier in an enclosed area. Close all doors and windows in the room.
4.3 പവർ കണക്ഷൻ
- Ensure your hands are dry before plugging in the unit.
- ശരിയായി ഗ്രൗണ്ട് ചെയ്ത ഇലക്ട്രിക്കൽ outട്ട്ലെറ്റിലേക്ക് പവർ കോർഡ് പ്ലഗ് ചെയ്യുക.
5. പ്രവർത്തന നിർദ്ദേശങ്ങൾ
5.1 കൺട്രോൾ പാനൽ ഓവർview
The control panel features a digital display and control buttons:
- ഡിജിറ്റൽ ഡിസ്പ്ലേ: Shows current humidity level or settings.
- പവർ ബട്ടൺ: യൂണിറ്റ് ഓണാക്കുകയോ ഓഫാക്കുകയോ ചെയ്യുന്നു.
- അപ്പ്/ഡൗൺ ബട്ടണുകൾ: Adjust desired humidity level or other settings.

Image 5.1: Various angles of the dehumidifier, highlighting the digital control panel with up/down buttons and the transparent water tank.
5.2 അടിസ്ഥാന പ്രവർത്തനം
- ഓൺ ചെയ്യുക: Press the Power button to turn on the dehumidifier. The digital display will light up, showing the current room humidity.
- ആവശ്യമുള്ള ഈർപ്പം സജ്ജമാക്കുക: Use the Up and Down buttons to set your desired humidity level. The unit will operate until the room humidity reaches the set level, then cycle on and off to maintain it.
- ഓഫ് ചെയ്യുക: Press the Power button again to turn off the dehumidifier.
5.3 വാട്ടർ ടാങ്ക് ശൂന്യമാക്കൽ
When the water tank is full, the dehumidifier will automatically stop operating, and an indicator light (if available) may illuminate. The unit will not resume operation until the tank is emptied and reinserted correctly.
- യൂണിറ്റിന്റെ മുൻവശത്ത് നിന്ന് വാട്ടർ ടാങ്ക് സൌമ്യമായി പുറത്തെടുക്കുക.
- ടാങ്ക് ശ്രദ്ധാപൂർവ്വം ഒരു സിങ്കിലേക്കോ ഡ്രെയിനിലേക്കോ കൊണ്ടുപോകുക.
- Remove the tank lid (if applicable) and pour out the collected water.
- Replace the lid securely and slide the empty water tank back into the dehumidifier until it clicks into place.
- The unit will resume operation automatically if the power is on and the desired humidity level has not been reached.

Image 5.2: The transparent water tank, designed for easy removal and emptying.
6. പരിപാലനം
പതിവ് അറ്റകുറ്റപ്പണികൾ മികച്ച പ്രകടനം ഉറപ്പാക്കുകയും നിങ്ങളുടെ ഡീഹ്യുമിഡിഫയറിന്റെ ആയുസ്സ് വർദ്ധിപ്പിക്കുകയും ചെയ്യുന്നു. ഏതെങ്കിലും അറ്റകുറ്റപ്പണി നടത്തുന്നതിന് മുമ്പ് എല്ലായ്പ്പോഴും യൂണിറ്റ് അൺപ്ലഗ് ചെയ്യുക.
6.1 വാട്ടർ ടാങ്ക് വൃത്തിയാക്കൽ
- Clean the water tank regularly (e.g., every few weeks) to prevent mold and bacteria growth.
- സെക്ഷൻ 5.3 ൽ വിവരിച്ചിരിക്കുന്നതുപോലെ വാട്ടർ ടാങ്ക് നീക്കം ചെയ്യുക.
- Wash the tank with mild detergent and warm water. Rinse thoroughly.
- യൂണിറ്റിലേക്ക് വീണ്ടും ചേർക്കുന്നതിന് മുമ്പ് ടാങ്ക് പൂർണ്ണമായും ഉണക്കുക.
6.2 പുറംഭാഗം വൃത്തിയാക്കൽ
- ഡീഹ്യൂമിഡിഫയറിന്റെ പുറംഭാഗം മൃദുവായ, ഡി ഉപയോഗിച്ച് തുടയ്ക്കുകamp തുണി.
- അബ്രാസീവ് ക്ലീനറുകളോ, ലായകങ്ങളോ, കഠിനമായ രാസവസ്തുക്കളോ ഉപയോഗിക്കരുത്, കാരണം ഇവ ഉപരിതലത്തിന് കേടുവരുത്തും.
- ആന്തരിക ഘടകങ്ങളിലേക്ക് വെള്ളം കയറുന്നില്ലെന്ന് ഉറപ്പാക്കുക.
6.3 സംഭരണം
- If storing the dehumidifier for an extended period, ensure the water tank is empty and clean.
- യൂണിറ്റിന്റെ പുറംഭാഗം വൃത്തിയാക്കുക.
- നേരിട്ടുള്ള സൂര്യപ്രകാശത്തിൽ നിന്നും തീവ്രമായ താപനിലയിൽ നിന്നും അകന്ന്, തണുത്തതും വരണ്ടതുമായ സ്ഥലത്ത് യൂണിറ്റ് നേരായ സ്ഥാനത്ത് സൂക്ഷിക്കുക.
7. പ്രശ്നപരിഹാരം
ഉപഭോക്തൃ പിന്തുണയുമായി ബന്ധപ്പെടുന്നതിന് മുമ്പ്, പൊതുവായ പ്രശ്നങ്ങൾക്ക് ഇനിപ്പറയുന്ന ട്രബിൾഷൂട്ടിംഗ് ഗൈഡ് പരിശോധിക്കുക:
| പ്രശ്നം | സാധ്യമായ കാരണം | പരിഹാരം |
|---|---|---|
| ഡീഹ്യൂമിഡിഫയർ ഓണാക്കുന്നില്ല. | വൈദ്യുതി വിതരണം ഇല്ല. പവർ കോർഡ് സുരക്ഷിതമായി പ്ലഗ് ഇൻ ചെയ്തിട്ടില്ല. |
പവർ ഔട്ട്ലെറ്റ് പ്രവർത്തിക്കുന്നുണ്ടോയെന്ന് പരിശോധിക്കുക. പവർ കോർഡ് യൂണിറ്റിലേക്കും വാൾ ഔട്ട്ലെറ്റിലേക്കും ദൃഢമായി പ്ലഗ് ചെയ്തിട്ടുണ്ടെന്ന് ഉറപ്പാക്കുക. |
| യൂണിറ്റ് പ്രവർത്തിക്കുന്നുണ്ട്, പക്ഷേ വെള്ളം ശേഖരിക്കുന്നില്ല. | മുറിയിലെ ഈർപ്പം ഇതിനകം കുറവാണ്. താപനില വളരെ കുറവാണ്. വായുപ്രവാഹം തടഞ്ഞു. |
Check the current humidity level on the display. If it's below your set point, the unit will not collect water. വളരെ തണുത്ത അന്തരീക്ഷത്തിൽ ഡീഹ്യുമിഡിഫയറുകൾ ഫലപ്രദമല്ല. എയർ ഇൻലെറ്റും ഔട്ട്ലെറ്റും തടസ്സപ്പെടുന്നില്ലെന്ന് ഉറപ്പാക്കുക. |
| Unit stops operating and indicator light is on. | വാട്ടർ ടാങ്ക് നിറഞ്ഞു. വാട്ടർ ടാങ്ക് ശരിയായി ചേർത്തിട്ടില്ല. |
വാട്ടർ ടാങ്ക് ശൂന്യമാക്കുക. Reinsert the water tank correctly until it clicks into place. |
| പ്രവർത്തന സമയത്ത് അസാധാരണമായ ശബ്ദം. | യൂണിറ്റ് നിരപ്പായ പ്രതലത്തിലല്ല. ആന്തരിക ഘടക പ്രശ്നം. |
യൂണിറ്റ് സുസ്ഥിരവും നിരപ്പും ഉള്ള പ്രതലത്തിൽ സ്ഥാപിച്ചിട്ടുണ്ടെന്ന് ഉറപ്പാക്കുക. ശബ്ദം തുടരുകയാണെങ്കിൽ, ഉപയോഗം നിർത്തി ഉപഭോക്തൃ പിന്തുണയുമായി ബന്ധപ്പെടുക. |
8 സ്പെസിഫിക്കേഷനുകൾ
| ഫീച്ചർ | സ്പെസിഫിക്കേഷൻ |
|---|---|
| ബ്രാൻഡ് | ഡെയ്റ്റ്സു |
| മോഡൽ നമ്പർ | ADDH10 (Technical Model: bb_S0403263) |
| നിറം | വെള്ള |
| ഇനത്തിൻ്റെ ഭാരം | 10 കിലോഗ്രാം |
| ഉൽപ്പന്ന അളവുകൾ (ഏകദേശം) | 286mm (ഉയരം) x 180mm (വീതി) x 134mm (ആഴം) |
| വാട്ടർ ടാങ്ക് കപ്പാസിറ്റി | 1.5 ലിറ്റർ |
| ഓപ്പറേറ്റിംഗ് മോഡ് | ഓട്ടോമാറ്റിക് |
| ഉൾപ്പെടുത്തിയ ഘടകങ്ങൾ | ഡീഹ്യൂമിഡിഫയർ |

Image 8.1: Diagram illustrating the dimensions of the dehumidifier: 286mm height, 180mm width, and 134mm depth.
9. വാറൻ്റിയും പിന്തുണയും
For warranty information, please refer to the documentation included with your product packaging or visit the official Daitsu webസൈറ്റ്. വാറന്റി നിബന്ധനകളും വ്യവസ്ഥകളും പ്രദേശത്തിനും റീട്ടെയിലർക്കും അനുസരിച്ച് വ്യത്യാസപ്പെടാം.
If you encounter issues not covered in the troubleshooting section or require further assistance, please contact your retailer or the manufacturer's customer support. Have your model number (ADDH10) and purchase details ready when contacting support.


