1. ആമുഖം
This manual provides detailed instructions for the installation, operation, and maintenance of your Maxxima LED Dimmer Electrical Light Switch, Model MEW-DM600. This dimmer switch is designed for use with dimmable LED, CFL, and incandescent light bulbs, offering versatile lighting control in both single-pole and 3-way applications.
2 സുരക്ഷാ വിവരങ്ങൾ
മുന്നറിയിപ്പ്: To avoid fire, shock, or death, turn off power at the circuit breaker or fuse box and test that power is off before wiring. Installation should be performed by a qualified electrician or a person with a thorough understanding of electrical wiring.
- ഈ ഉപകരണം ദേശീയ ഇലക്ട്രിക് കോഡും പ്രാദേശിക നിയന്ത്രണങ്ങളും അനുസരിച്ച് ഇൻസ്റ്റാളുചെയ്യാൻ ഉദ്ദേശിച്ചുള്ളതാണ്.
- ചെമ്പ് അല്ലെങ്കിൽ ചെമ്പ് പൊതിഞ്ഞ വയർ ഉപയോഗിച്ച് മാത്രം ഉപയോഗിക്കുക.
- Do not use with non-dimmable light bulbs.
- Not for use with ceiling fans or motor-controlled devices.
- മൊത്തം വാട്ട് ഉറപ്പാക്കുകtage of connected bulbs does not exceed the dimmer's maximum capacity (150W for dimmable LED/CFL, 600W for incandescent).
- This product is UL listed for safety.
3. പാക്കേജ് ഉള്ളടക്കം
- Maxxima LED Dimmer Switch (2 units)
- Wall Plate (2 units)
- മൗണ്ടിംഗ് സ്ക്രൂകൾ
- വയർ പരിപ്പ്

Image 3.1: Two Maxxima LED Dimmer Switches with included wall plates.
4 സ്പെസിഫിക്കേഷനുകൾ
| ഫീച്ചർ | സ്പെസിഫിക്കേഷൻ |
|---|---|
| മോഡൽ നമ്പർ | MEW-DM600 |
| അനുയോജ്യത | Dimmable LED, CFL, Incandescent, Halogen |
| മാക്സ് വാട്ട്tage (LED/CFL) | 150W |
| മാക്സ് വാട്ട്tage (Incandescent) | 600W |
| വാല്യംtage | 120VAC, 60Hz |
| നിലവിലെ റേറ്റിംഗ് | 15 Amps |
| വയറിംഗ് തരം | Single Pole or 3-Way |
| നിയന്ത്രണ തരം | Slide Dimmer with Rocker On/Off |
| നിറം | വെള്ള |
| സർട്ടിഫിക്കേഷനുകൾ | UL ലിസ്റ്റുചെയ്തു |
| ഇനത്തിൻ്റെ ഭാരം | 4.5 ഔൺസ് |
5. ഇൻസ്റ്റലേഷൻ (സജ്ജീകരണം)
Before beginning installation, ensure power is turned off at the circuit breaker. Follow these steps carefully.
5.1 വയറിംഗ് ഓവർview
The Maxxima dimmer switch features multiple terminals for wiring. Identify the following wires in your electrical box:
- ഹോട്ട് (ലൈൻ) വയർ: സാധാരണയായി കറുപ്പ്, സർക്യൂട്ട് ബ്രേക്കറിൽ നിന്ന് വൈദ്യുതി കൊണ്ടുവരുന്നു.
- ലോഡ് വയർ: സാധാരണയായി കറുപ്പ്, ലൈറ്റ് ഫിക്ചറിലേക്ക് പോകുന്നു.
- ഗ്രൗണ്ട് വയർ: സുരക്ഷയ്ക്കായി വെറും ചെമ്പ് അല്ലെങ്കിൽ പച്ച.
- Traveler Wires (for 3-Way): Two wires (often red and black) that connect to another 3-way switch.

ചിത്രം 5.1: പിൻഭാഗം view of the dimmer switch showing wiring terminals. Note the red, black, and green wires for connection.
5.2 Single-Pole Installation
A single-pole installation controls a light fixture from one location.
- സർക്യൂട്ട് ബ്രേക്കറിൽ പവർ ഓഫ് ചെയ്യുക.
- വാൾ ബോക്സിൽ നിന്ന് നിലവിലുള്ള സ്വിച്ച് നീക്കം ചെയ്യുക.
- Connect the dimmer's green wire to the bare copper or green ground wire in the wall box.
- Connect one of the dimmer's black wires to the hot (line) wire from the circuit breaker.
- Connect the other black wire from the dimmer to the load wire going to the light fixture.
- വയർ നട്ടുകൾ ഉപയോഗിച്ച് എല്ലാ കണക്ഷനുകളും സുരക്ഷിതമാക്കുക.
- Carefully push the wires into the wall box and mount the dimmer switch using the provided screws.
- വാൾ പ്ലേറ്റ് അറ്റാച്ചുചെയ്യുക.
- സർക്യൂട്ട് ബ്രേക്കറിൽ വൈദ്യുതി പുനഃസ്ഥാപിക്കുക.
5.3 3-Way Installation
A 3-way installation controls a light fixture from two locations. This dimmer switch must be paired with a standard 3-way switch (not another dimmer).
- സർക്യൂട്ട് ബ്രേക്കറിൽ പവർ ഓഫ് ചെയ്യുക.
- Identify the common wire (usually black, connected to a darker screw) on your existing 3-way switch. This will be your hot (line) or load wire.
- Connect the dimmer's green wire to the bare copper or green ground wire in the wall box.
- Connect the dimmer's black wire (common) to the hot (line) wire from the circuit breaker.
- Connect the two red traveler wires from the dimmer to the two traveler wires in the wall box.
- At the second switch location, connect the common wire of the standard 3-way switch to the load wire going to the light fixture. Connect the two traveler wires to the remaining two traveler wires from the wall box.
- വയർ നട്ടുകൾ ഉപയോഗിച്ച് എല്ലാ കണക്ഷനുകളും സുരക്ഷിതമാക്കുക.
- Carefully push the wires into the wall box and mount the dimmer switch and the standard 3-way switch using the provided screws.
- Attach the wall plates.
- സർക്യൂട്ട് ബ്രേക്കറിൽ വൈദ്യുതി പുനഃസ്ഥാപിക്കുക.
6. ഓപ്പറേഷൻ
Once installed, operating your Maxxima dimmer switch is straightforward.
6.1 ഓൺ/ഓഫ് നിയന്ത്രണം
Press the bottom rocker switch to turn the lights ON or OFF.
6.2 Dimming Control
Slide the horizontal control lever up or down to adjust the light intensity. Sliding up increases brightness, and sliding down decreases brightness.
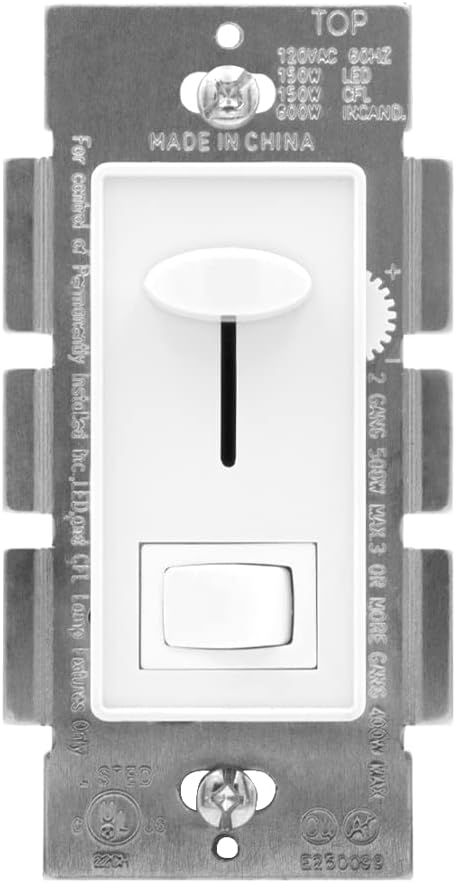
ചിത്രം 6.1: മുൻഭാഗം view of the dimmer switch, highlighting the slide control for dimming and the rocker switch for on/off functionality.
6.3 Sensitivity Adjustment (for LED/CFL)
For optimal performance with LED and CFL bulbs, a trim dial is located under the cover plate to adjust the dimmer's sensitivity and prevent flickering at low light levels.
- സർക്യൂട്ട് ബ്രേക്കറിൽ പവർ ഓഫ് ചെയ്യുക.
- Carefully remove the wall plate.
- Locate the small trim dial (often a wheel or screw) near the bottom of the dimmer module.
- ശക്തി പുനഃസ്ഥാപിക്കുക.
- Turn the lights on and slide the dimming lever to the lowest desired light level.
- Adjust the trim dial slowly until the lights are stable and do not flicker.
- Turn off power, reattach the wall plate, and restore power.

ചിത്രം 6.2: ക്ലോസ്-അപ്പ് view of the trim dial for sensitivity adjustment, accessible by removing the wall plate.
7. പരിപാലനം
Your Maxxima dimmer switch requires minimal maintenance.
- വൃത്തിയാക്കൽ: ഡിമ്മർ സ്വിച്ചും വാൾ പ്ലേറ്റും വൃത്തിയാക്കാൻ, മൃദുവായ, ഡി-ക്ലിപ്പർ ഉപയോഗിച്ച് തുടയ്ക്കുക.amp തുണി. അബ്രാസീവ് ക്ലീനറുകളോ ലായകങ്ങളോ ഉപയോഗിക്കരുത്. വൃത്തിയാക്കുന്നതിന് മുമ്പ് പവർ ഓഫ് ചെയ്തിട്ടുണ്ടെന്ന് ഉറപ്പാക്കുക.
- പരിശോധന: Periodically check the switch and wall plate for any signs of damage or loose connections. If any issues are found, turn off power and consult a qualified electrician.
8. പ്രശ്നപരിഹാരം
If you experience issues with your dimmer switch, refer to the following common problems and solutions:
| പ്രശ്നം | സാധ്യമായ കാരണം | പരിഹാരം |
|---|---|---|
| ലൈറ്റുകൾ ഓണാക്കുന്നില്ല. | No power, loose wiring, bulb burned out, non-dimmable bulb. | Check circuit breaker. Verify wiring connections. Replace bulb. Ensure dimmable bulbs are used. |
| ലൈറ്റുകൾ മിന്നിമറയുന്നു അല്ലെങ്കിൽ മുഴങ്ങുന്നു. | Incompatible bulbs, incorrect sensitivity setting, loose wiring. | Ensure dimmable LED/CFL bulbs are used. Adjust the sensitivity trim dial (Section 6.3). Check wiring connections. |
| Lights do not dim to desired level. | Incorrect sensitivity setting, bulb incompatibility. | Adjust the sensitivity trim dial (Section 6.3). Ensure bulbs are fully dimmable. |
| Dimmer switch is hot to the touch. | Overload, poor ventilation. | മൊത്തം വാട്ട് കുറയ്ക്കുകtage of connected bulbs. Ensure proper air circulation around the switch. If overheating persists, discontinue use and consult an electrician. |
9. വാറൻ്റിയും പിന്തുണയും
The Maxxima LED Dimmer Electrical Light Switch (Model MEW-DM600) comes with a 1 വർഷത്തെ വാറൻ്റി വാങ്ങിയ തീയതി മുതൽ.
This warranty covers defects in materials and workmanship under normal use. It does not cover damage resulting from improper installation, misuse, abuse, or unauthorized modifications.
For warranty claims, technical support, or further assistance, please contact Maxxima customer service. Please have your model number and proof of purchase available.
Maxxima Contact Information: Refer to the product packaging or the official Maxxima webഏറ്റവും പുതിയ കോൺടാക്റ്റ് വിശദാംശങ്ങൾക്കായി സൈറ്റ്.


