1. ആമുഖം
The Duronic DMUSB5X1 is a desk-mounted monitor arm designed to optimize your workspace. It features a gas spring mechanism for smooth, effortless adjustments, allowing you to position your monitor for optimal viewing comfort. This model also integrates a USB hub and audio ports for convenient connectivity directly at your desk.
This manual provides detailed instructions for the safe and efficient installation, operation, and maintenance of your Duronic DMUSB5X1 monitor arm.
2. സുരക്ഷാ നിർദ്ദേശങ്ങൾ
- അസംബ്ലിക്കും ഉപയോഗത്തിനും മുമ്പ് എല്ലാ നിർദ്ദേശങ്ങളും ശ്രദ്ധാപൂർവ്വം വായിക്കുക.
- Ensure your desk surface is strong enough to support the monitor arm and attached monitor(s).
- ഒരു കൈയ്ക്ക് പരമാവധി ഭാരം 8 കിലോഗ്രാം (17.6 പൗണ്ട്) കവിയരുത്.
- Ensure all screws and connections are securely tightened before use. Periodically check for tightness.
- കുട്ടികളെയും വളർത്തുമൃഗങ്ങളെയും അസംബ്ലി ഏരിയയിൽ നിന്ന് അകറ്റി നിർത്തുക.
- Use only the provided hardware. If any parts are missing or damaged, contact Duronic customer support.
- Adjust the gas spring tension carefully to match your monitor's weight. Improper tension can cause the monitor to drop or spring up unexpectedly.
3. പാക്കേജ് ഉള്ളടക്കം
അസംബ്ലി ആരംഭിക്കുന്നതിന് മുമ്പ് എല്ലാ ഘടകങ്ങളും നിലവിലുണ്ടെന്ന് ദയവായി പരിശോധിക്കുക:
- Monitor Arm Assembly (Gas Spring Arm, Pole)
- ഡെസ്ക് Clamp അടിസ്ഥാനം
- VESA മൗണ്ടിംഗ് പ്ലേറ്റ്
- USB and Audio Extension Cables
- മൗണ്ടിംഗ് ഹാർഡ്വെയർ (വിവിധ സ്ക്രൂകൾ, വാഷറുകൾ, സ്പെയ്സറുകൾ)
- Allen Keys for assembly and adjustment
4. സജ്ജീകരണവും ഇൻസ്റ്റാളേഷനും
Follow these steps to install your Duronic DMUSB5X1 monitor arm:
- ഡെസ്ക് Cl അറ്റാച്ച് ചെയ്യുകamp: മേശയുടെ സ്ഥാനം clamp base on your desk edge. Ensure the desk clamp is securely fastened to a stable surface. The clamp can accommodate desk thicknesses up to 68mm. Tighten the clamp ദൃഡമായി സ്ക്രൂ ചെയ്യുക.

Figure 4.1: Desk clamp ഇൻസ്റ്റലേഷൻ.
- Assemble Arm to Pole: Insert the monitor arm onto the pole of the desk clamp. Secure it with the provided screws and Allen key.
- മോണിറ്ററിലേക്ക് VESA പ്ലേറ്റ് അറ്റാച്ചുചെയ്യുക: Carefully place your monitor face down on a soft, clean surface. Attach the VESA mounting plate to the back of your monitor using the appropriate screws and spacers (if needed). The arm supports VESA 75x75mm and 100x100mm patterns.
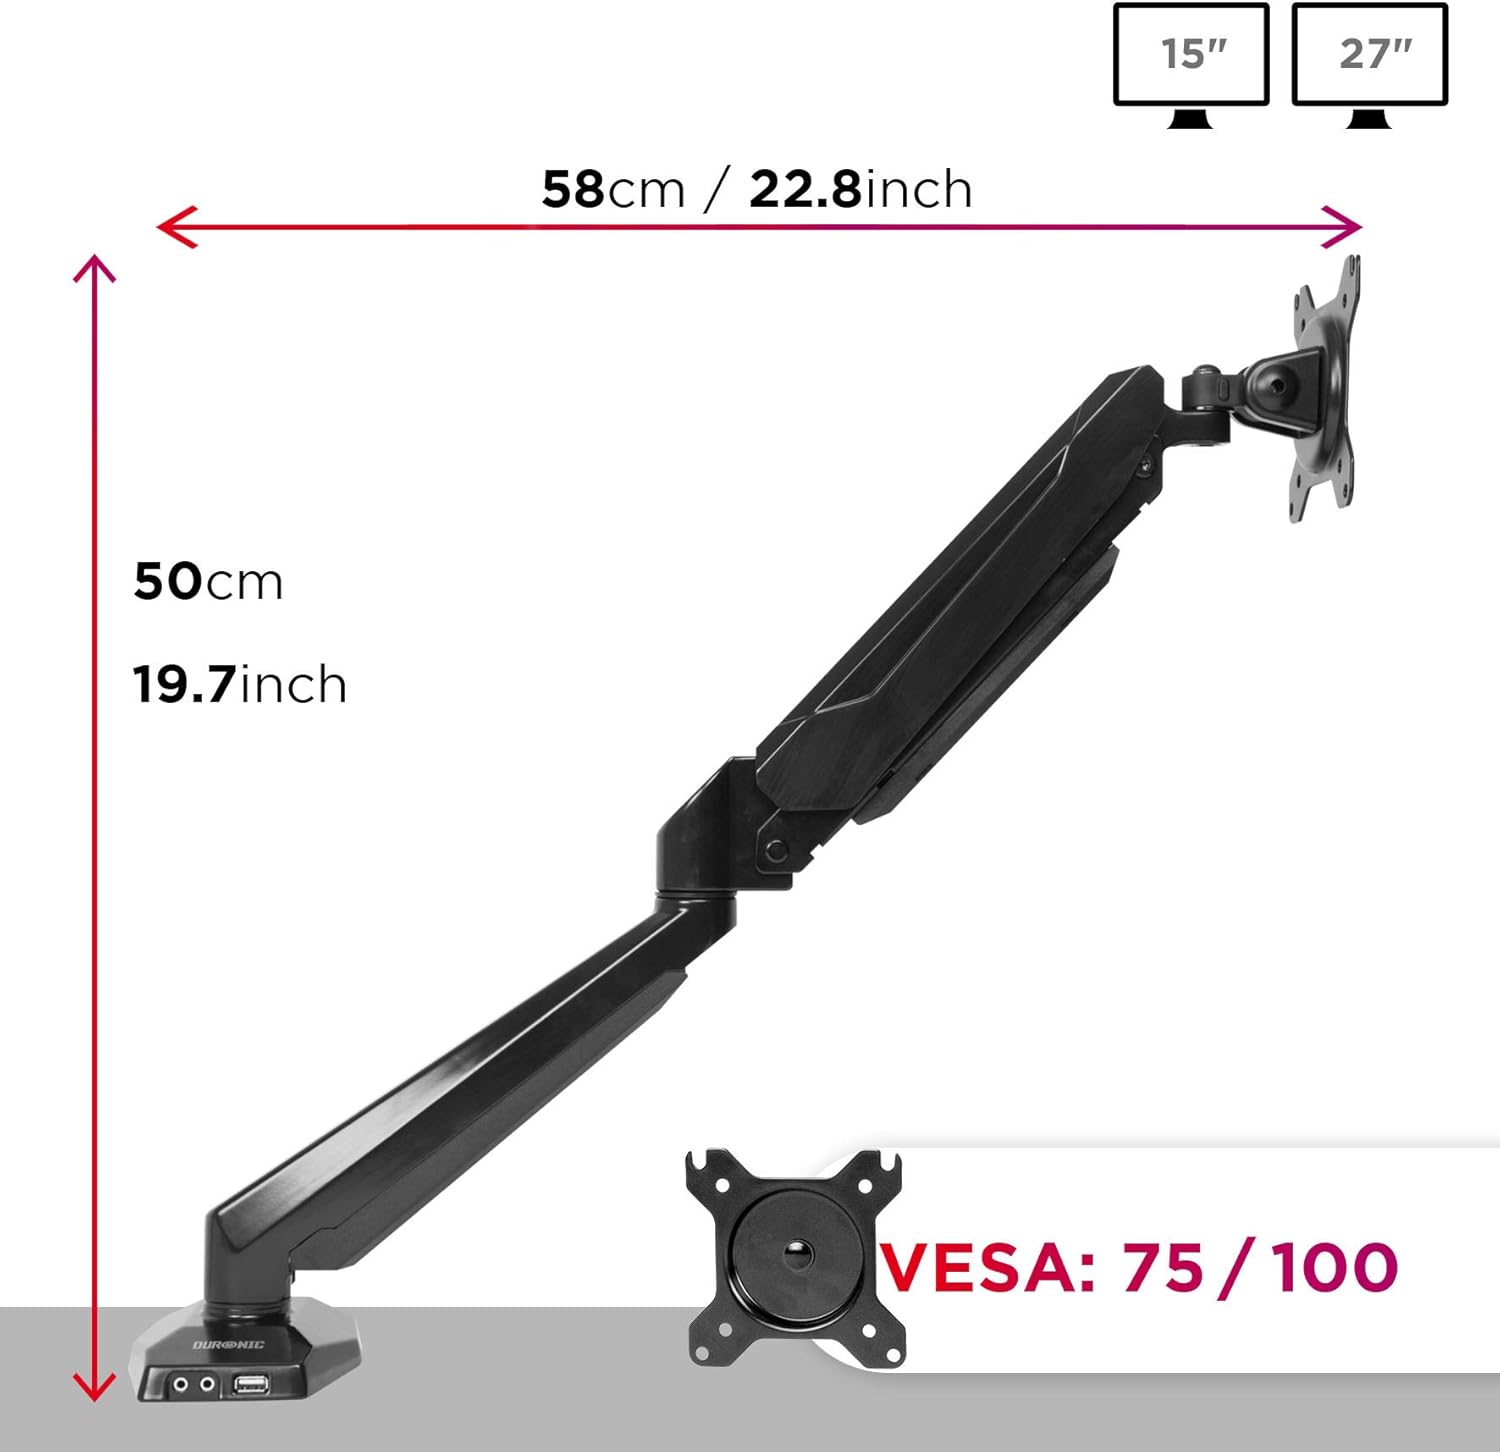
Figure 4.2: VESA plate and arm dimensions.
- മോണിറ്റർ കൈയിലേക്ക് മൌണ്ട് ചെയ്യുക: Slide the monitor (with VESA plate attached) onto the arm's VESA head. Secure it with the locking mechanism or screws as per the specific design.
- Connect USB and Audio Cables: Connect the integrated USB and audio extension cables from the monitor arm base to the corresponding ports on your computer. This enables the convenient USB and audio ports on the arm's base.

Figure 4.3: Integrated USB and audio ports.
- Adjust Gas Spring Tension: The gas spring comes pre-tensioned. You may need to adjust it to match your monitor's weight. Use the provided Allen key to turn the adjustment screw on the arm. Turn clockwise to increase tension for heavier monitors, and counter-clockwise to decrease tension for lighter monitors. Adjust until the monitor stays in position when moved.
5. പ്രവർത്തനവും ക്രമീകരണങ്ങളും
The Duronic DMUSB5X1 offers a wide range of adjustments for optimal viewing:
- ഉയരം ക്രമീകരിക്കൽ: The gas spring arm allows for smooth vertical movement. Gently push or pull the monitor to the desired height.
- ടിൽറ്റ്: The VESA head allows tilting the monitor -90° (downwards) to +85° (upwards) to reduce glare and improve viewകോണുകൾ.
- സ്വിവൽ: The arm can swivel 180° left or right at the pole and at the arm joints, allowing you to share your screen or adjust its position.
- റൊട്ടേഷൻ: The VESA plate allows for 360° rotation, enabling you to switch between landscape and portrait orientations.
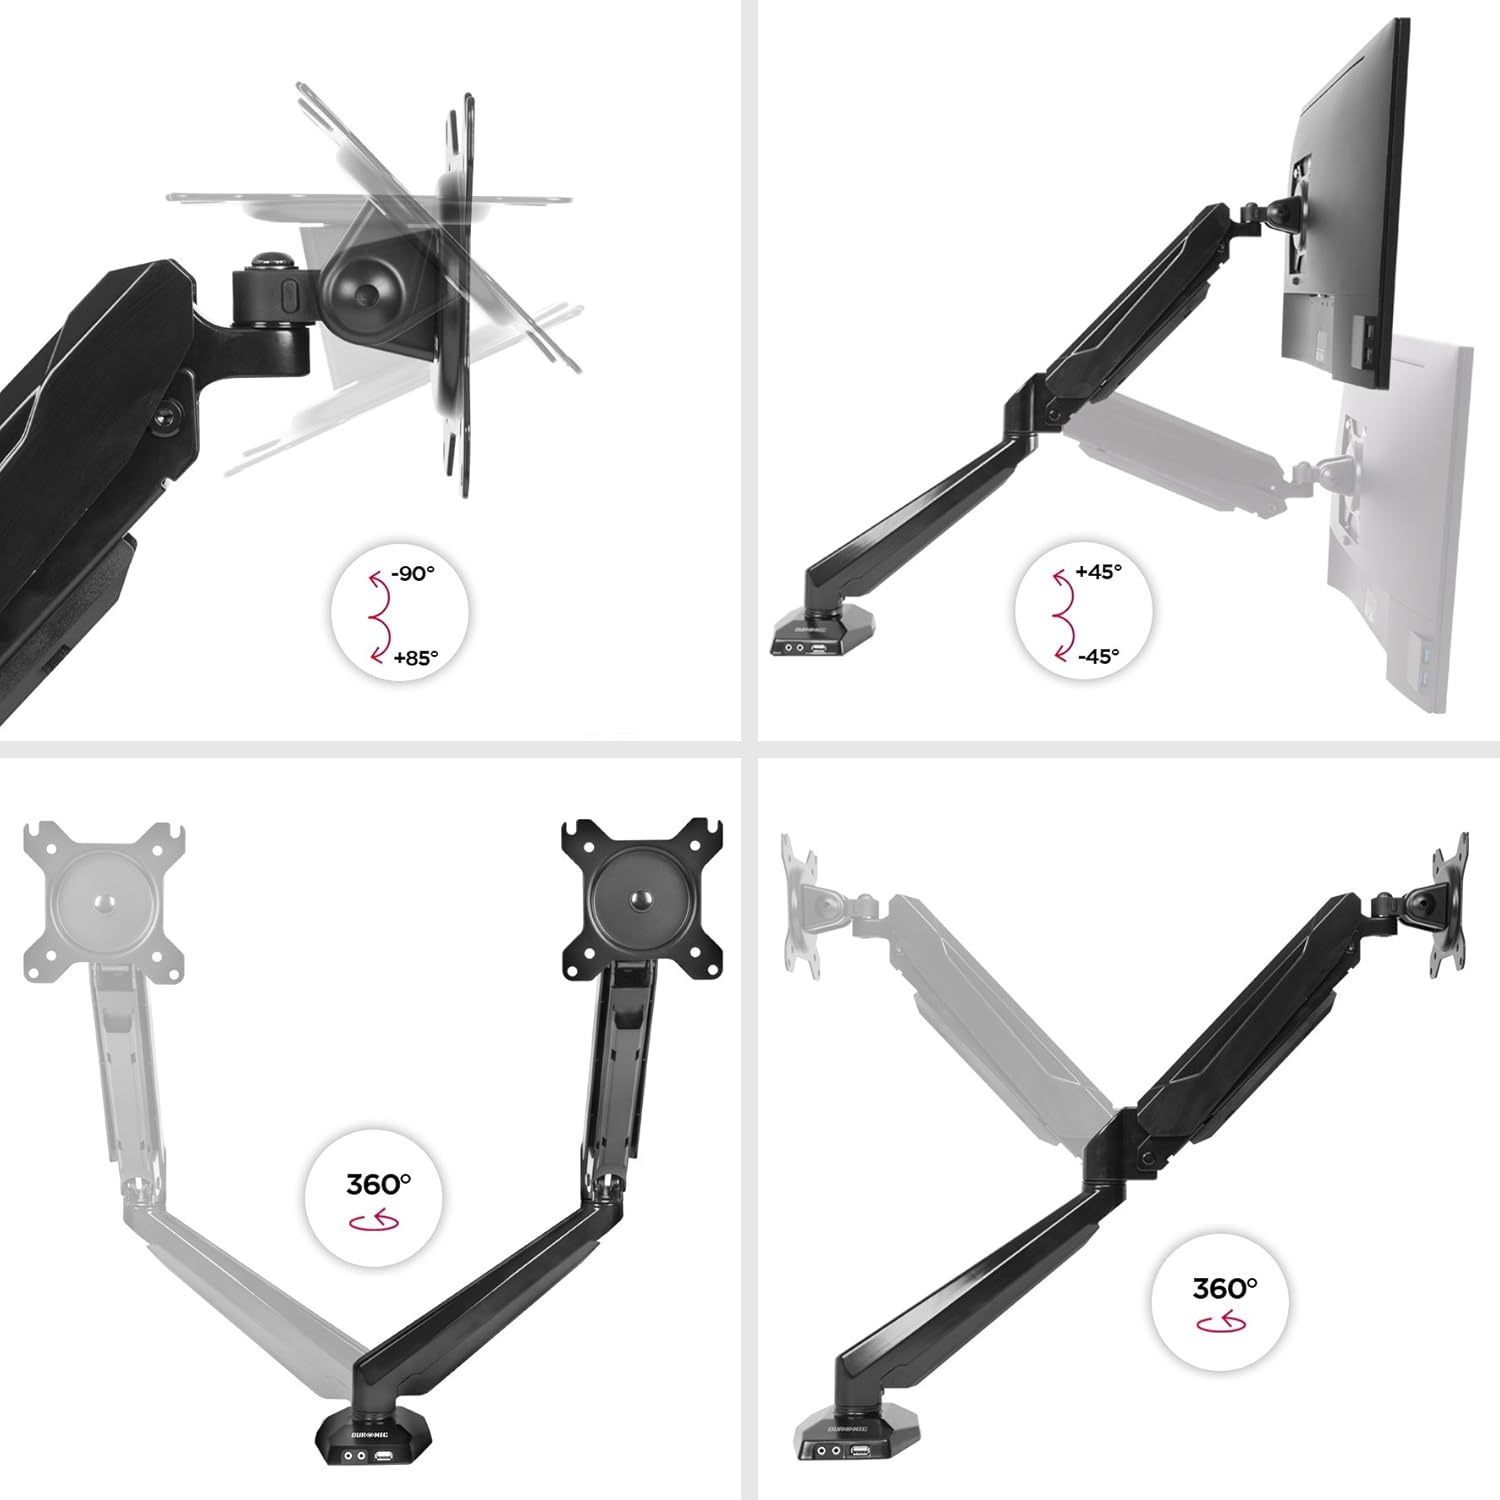
Figure 5.1: Monitor arm adjustment ranges.
- Integrated USB and Audio Ports: Use the two USB 2.0 ports for connecting peripherals like keyboards, mice, or USB drives. The headphone and microphone jacks provide convenient access for audio devices.
6. പരിപാലനം
- വൃത്തിയാക്കൽ: മോണിറ്റർ കൈ മൃദുവായ, d ക്ലീനർ ഉപയോഗിച്ച് തുടയ്ക്കുക.amp തുണി. ഫിനിഷിന് കേടുവരുത്തുന്ന ഉരച്ചിലുകളുള്ള ക്ലീനറുകളോ ലായകങ്ങളോ ഒഴിവാക്കുക.
- ആനുകാലിക പരിശോധനകൾ: എല്ലാ സ്ക്രൂകളും കണക്ഷനുകളും ഇറുകിയതും സുരക്ഷിതവുമാണെന്ന് ഉറപ്പാക്കാൻ പതിവായി പരിശോധിക്കുക. ആവശ്യമെങ്കിൽ വീണ്ടും മുറുക്കുക.
- ഗ്യാസ് സ്പ്രിംഗ് ക്രമീകരണം: If your monitor's weight changes, or if the arm no longer holds its position correctly, re-adjust the gas spring tension as described in the setup section.
7. പ്രശ്നപരിഹാരം
| പ്രശ്നം | സാധ്യമായ കാരണം | പരിഹാരം |
|---|---|---|
| Monitor does not stay in desired position (sags or springs up). | Incorrect gas spring tension. | Adjust the gas spring tension using the provided Allen key. Turn clockwise for heavier monitors, counter-clockwise for lighter monitors. |
| Monitor cannot be attached to the VESA plate. | Monitor VESA pattern is not compatible (not 75x75mm or 100x100mm). | Verify your monitor's VESA compatibility. An adapter may be required for non-standard patterns. |
| USB or audio ports on the arm base are not working. | Extension cables are not properly connected to the computer. | Ensure the USB and audio extension cables from the monitor arm base are securely plugged into the corresponding ports on your computer. |
| Arm feels loose or unstable. | ഡെസ്ക് clamp is not tightened sufficiently or desk surface is unstable. | ഡെസ്ക് cl വീണ്ടും മുറുക്കുകamp. Ensure the desk surface is stable and within the recommended thickness. |
8 സ്പെസിഫിക്കേഷനുകൾ
- മോഡൽ: DMUSB5X1
- ബ്രാൻഡ്: ഡ്യൂറോണിക്
- മെറ്റീരിയൽ: അലുമിനിയം
- Monitor Size Compatibility: 15-27 ഇഞ്ച് (38-68 സെ.മീ)
- ഭാരം ശേഷി: ഒരു കൈയ്ക്ക് 8 കിലോഗ്രാം (17.6 പൗണ്ട്) വരെ
- VESA അനുയോജ്യത: 75x75mm, 100x100mm
- ക്രമീകരണങ്ങൾ:
- ചരിവ്: -90 ° മുതൽ +85 ° വരെ
- സ്വിവൽ: 180°
- ഭ്രമണം: 360°
- ഡെസ്ക് Clamp കനം: 68 മില്ലിമീറ്റർ വരെ
- Integrated Ports: 2 x USB 2.0, 1 x Headphone Jack, 1 x Microphone Jack
9. വാറൻ്റിയും പിന്തുണയും
വാറൻ്റി വിവരങ്ങൾ: For detailed warranty terms and conditions, please refer to the manufacturer's official webസൈറ്റ് അല്ലെങ്കിൽ നിങ്ങളുടെ ഉൽപ്പന്ന പാക്കേജിംഗിൽ ഉൾപ്പെടുത്തിയിരിക്കുന്ന വാറന്റി കാർഡ്.
ഉപഭോക്തൃ പിന്തുണ: If you encounter any issues or have questions regarding your Duronic DMUSB5X1 monitor arm, please visit the official Duronic website for support resources, FAQs, and contact information for their customer service team.


