1. ആമുഖം
This user manual provides detailed instructions for the installation, setup, operation, and maintenance of the Fantini Cosmi CH180 Backlit Touch Chronothermostat. Please read this manual thoroughly before installation and use to ensure proper function and safety. This device is designed to control heating systems, offering programmable temperature management for enhanced comfort and energy efficiency.
2 സുരക്ഷാ വിവരങ്ങൾ
- ഇലക്ട്രിക്കൽ ഇൻസ്റ്റാളേഷൻ: Installation must be performed by a qualified electrician in accordance with local electrical codes and regulations. Ensure the main power supply is disconnected before commencing any wiring work.
- വാല്യംtage: The CH180-230V model operates on 230 Volts AC. Verify your power supply matches this requirement.
- പ്ലേസ്മെൻ്റ്: Install the chronothermostat away from direct sunlight, drafts, and heat sources (e.g., radiators, lamps) to ensure accurate temperature readings. Avoid placing it near doors or windows.
- വൃത്തിയാക്കൽ: വൃത്തിയാക്കാൻ മൃദുവായതും ഉണങ്ങിയതുമായ തുണി ഉപയോഗിക്കുക. അബ്രസീവ് ക്ലീനറുകളോ ലായകങ്ങളോ ഉപയോഗിക്കരുത്.
- വേർപെടുത്തുക: ഉപകരണം സ്വയം ഡിസ്അസംബ്ലിംഗ് ചെയ്യാനോ നന്നാക്കാനോ ശ്രമിക്കരുത്. എല്ലാ സേവനങ്ങളും യോഗ്യതയുള്ള ഉദ്യോഗസ്ഥരെ ഏൽപ്പിക്കുക.
3. ഉൽപ്പന്നം കഴിഞ്ഞുview
The Fantini Cosmi CH180 is a modern, backlit touch chronothermostat designed for intuitive control of your heating system. Its clear LCD display provides essential information at a glance, while the touch-sensitive buttons allow for easy programming and mode selection.
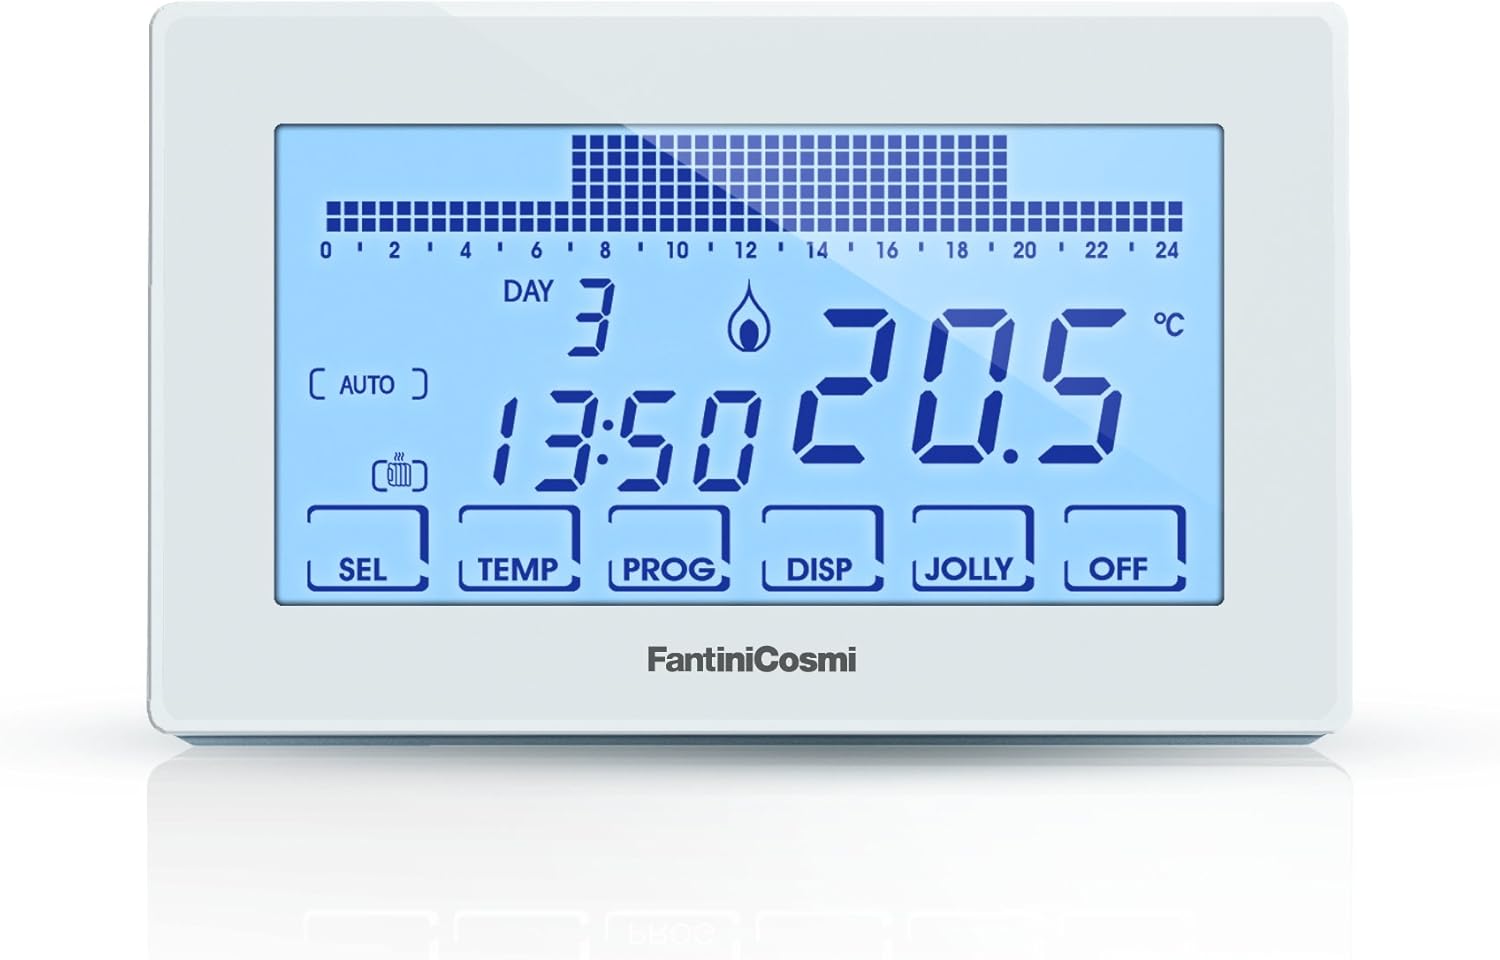
Figure 1: Fantini Cosmi CH180 Chronothermostat Display
This image displays the Fantini Cosmi CH180 Chronothermostat's backlit LCD screen. The screen shows the current day (DAY 3), time (13:50), and temperature (20.5 °C). Below the main display, touch-sensitive buttons are visible: SEL, TEMP, PROG, DISP, JOLLY, and OFF. The 'AUTO' indicator is active, and a flame icon suggests heating is engaged. A bar graph at the top indicates the programmed temperature profile 24 മണിക്കൂറിലധികം.
പ്രധാന ഘടകങ്ങൾ:
- LCD ഡിസ്പ്ലേ: Shows current time, day, temperature, operating mode, and programming schedule.
- ടച്ച് ബട്ടണുകൾ:
- വിൽക്കുക: തിരഞ്ഞെടുക്കുക/സ്ഥിരീകരിക്കുക
- ടെംപ്: താപനില ക്രമീകരണങ്ങൾ ക്രമീകരിക്കുക
- പ്രോഗ്രാം: Access programming menu for weekly schedules
- ഡിഎസ്പി: Change display information or backlight settings
- ജോളി: Activate "Jolly" (Holiday) mode
- ഓഫാണ്: Turn the heating system off
- ആന്തരിക ബാറ്ററി: Maintains programming settings during power outages (non-replaceable).
4. ഇൻസ്റ്റലേഷൻ
4.1 മ ing ണ്ടിംഗ് സ്ഥാനം
Choose an interior wall, approximately 1.5 meters (5 feet) from the floor, in a central area of the room that represents the average temperature. Avoid locations near windows, doors, air vents, or direct sunlight, as these can affect temperature accuracy.
4.2 വയറിംഗ്
WARNING: Disconnect power to the heating system at the main circuit breaker before proceeding with wiring to prevent electrical shock.
- Carefully remove the front cover of the chronothermostat to access the wiring terminals.
- Connect the 230V AC power supply wires to the designated terminals. Refer to the wiring diagram provided with the product packaging for specific terminal assignments.
- Connect the heating system control wires (e.g., boiler input) to the appropriate relay terminals on the chronothermostat. Ensure all connections are secure.
- Some installations may require a neutral jumper connection. Consult the detailed wiring diagram specific to your heating system and the chronothermostat.
- Once wiring is complete, reattach the front cover securely.
It is strongly recommended that a qualified electrician performs the wiring to ensure safety and compliance with all applicable standards.
5. പ്രാരംഭ സജ്ജീകരണം
After power is restored, the chronothermostat will typically prompt for initial setup.
- പവർ ഓൺ: Restore power to the heating system at the main circuit breaker. The display should illuminate.
- സമയവും തീയതിയും ക്രമീകരണം:
- അമർത്തുക SEL സജ്ജീകരണ മെനുവിൽ പ്രവേശിക്കുന്നതിനുള്ള ബട്ടൺ.
- ഉപയോഗിക്കുക TEMP buttons (up/down arrows, if present, or repeated presses of TEMP) to adjust the hour, then press SEL സ്ഥിരീകരിക്കാൻ.
- Repeat for minutes, day of the week, month, and year.
- അമർത്തുക SEL or wait for the device to exit the setting mode automatically.
- ബാക്ക്ലൈറ്റ് ക്രമീകരണങ്ങൾ:
- അമർത്തുക ഡി.എസ്.പി. to cycle through backlight options: OFF, ON (for a few seconds after touch), ALWAYS ON.
- If "ALWAYS ON" is selected, you may be able to adjust intensity using TEMP buttons. The device offers 5 intensity levels. Note that the lowest setting might still be bright in dark environments.
6 ഓപ്പറേറ്റിംഗ് മോഡുകൾ
The CH180 offers several operating modes to suit your needs:
- ഓട്ടോമാറ്റിക് മോഡ് (ഓട്ടോ): The chronothermostat follows the programmed weekly schedule. This is the default and most energy-efficient mode.
- Manual Mode (MAN): Allows you to set a constant temperature that overrides the programmed schedule until the next programmed event or until you switch back to AUTO mode.
- അമർത്തുക TEMP to adjust the desired temperature. The device will maintain this temperature.
- To return to AUTO mode, press PROG or SEL (depending on model variant) until AUTO is displayed.
- Jolly Mode (Holiday Mode): Designed for periods when you are away. You can set a specific temperature for a defined duration (e.g., several days).
- അമർത്തുക ജോളി.
- ഉപയോഗിക്കുക TEMP to set the desired temperature and the duration in days.
- ഉപയോഗിച്ച് സ്ഥിരീകരിക്കുക SEL. The device will revert to AUTO mode after the set duration.
- ഓഫ് മോഡ്: Turns off the heating system. The display will show "OFF" and the temperature will not be regulated.
- അമർത്തുക ഓഫ് to activate this mode.
- Press any other mode button (e.g., PROG for AUTO) to exit OFF mode.
7. Programming Weekly Schedule
The CH180 allows for detailed weekly programming with multiple temperature levels (T1, T2, T3) throughout the day.
- പ്രോഗ്രാമിംഗ് നൽകുക: അമർത്തുക PROG button. The display will show the current day and a flashing time segment.
- ദിവസം തിരഞ്ഞെടുക്കുക: ഉപയോഗിക്കുക SEL button to cycle through the days of the week (or a dedicated day button if available).
- Set Temperature Levels (T1, T2, T3):
- For each hour segment, use the TEMP buttons to select the desired temperature level (T1, T2, T3, or OFF).
- ടി 1: Comfort temperature (e.g., 20°C)
- ടി 2: Economy temperature (e.g., 18°C)
- ടി 3: Anti-freeze temperature (e.g., 5°C)
- ഓഫാണ്: Heating off for that hour.
- Advance Through Hours: After setting the temperature level for an hour, the display will automatically advance to the next hour, or you can use SEL മുന്നോട്ട് പോകാൻ.
- Copy Program: Some models allow copying a day's program to other days. Consult the specific on-screen prompts.
- പ്രോഗ്രാമിംഗിൽ നിന്ന് പുറത്തുകടക്കുക: അമർത്തുക PROG again or wait for the device to time out and return to the main display.
You can modify the default temperature values for T1, T2, and T3 in the advanced settings menu (often accessed by holding SEL or PROG കുറച്ച് നിമിഷങ്ങൾ).
8. പരിപാലനം
- വൃത്തിയാക്കൽ: Wipe the chronothermostat's surface with a soft, dry, or slightly damp cloth. Do not use chemical cleaners, as they may damage the display or casing.
- ആന്തരിക ബാറ്ററി: The CH180 features an internal battery that preserves settings during power outages. This battery is designed for the lifetime of the product and does not require replacement.
- പതിവ് പരിശോധനകൾ: Periodically ensure the chronothermostat is securely mounted and that no obstructions are blocking its temperature sensor.
9. പ്രശ്നപരിഹാരം
| പ്രശ്നം | സാധ്യമായ കാരണം | പരിഹാരം |
|---|---|---|
| പ്രദർശനം ശൂന്യമാണ് | No power supply; loose wiring. | Check circuit breaker. Ensure wiring connections are secure (consult an electrician if unsure). |
| Heating not turning on/off | Incorrect mode; incorrect temperature setting; wiring issue; heating system fault. | Verify operating mode (AUTO, MAN). Check programmed temperatures. Ensure desired temperature is above/below current room temperature. Consult an electrician for wiring check. Check heating system (boiler, furnace). |
| ടച്ച് ബട്ടണുകൾ പ്രതികരിക്കുന്നില്ല | Screen dirty; temporary software glitch. | Clean the screen with a soft, dry cloth. Briefly disconnect and reconnect power (at the circuit breaker) to reset the device. |
| കൃത്യമല്ലാത്ത താപനില വായന | Poor placement; sensor obstruction. | Ensure the chronothermostat is not in direct sunlight, near drafts, or heat sources. Remove any objects blocking the sensor. |
| Programming not saving | Programming steps not completed correctly. | Review Section 7 and ensure all steps are followed, including confirmation. |
If problems persist after attempting these solutions, please contact Fantini Cosmi customer support or a qualified technician.
10 സാങ്കേതിക സവിശേഷതകൾ
- ബ്രാൻഡ്: ഫാന്റിനി കോസ്മി
- മോഡൽ: CH180-230V
- നിറം: വെള്ള
- അളവുകൾ (L x W x H): 12.8 x 2.4 x 8.2 സെ.മീ (5.04 x 0.94 x 3.23 ഇഞ്ച്)
- ഭാരം: 180 ഗ്രാം (0.4 പൗണ്ട്)
- ഓപ്പറേറ്റിംഗ് വോളിയംtage: 230 വോൾട്ട് എസി
- ഊർജ്ജ സ്രോതസ്സ്: AC (Mains powered)
- കൺട്രോളർ തരം: Manual Control (with programmable features)
- കണക്റ്റിവിറ്റി പ്രോട്ടോക്കോൾ: BACnet MS/TP (for advanced system integration, if applicable)
- ബാക്ക്ലൈറ്റ്: Yes, adjustable intensity
- ആന്തരിക ബാറ്ററി: Non-replaceable, for program retention during power loss.
- അന്താരാഷ്ട്ര ആർട്ടിക്കിൾ കോഡ് (EAN): 08025863053606
11. വാറൻ്റിയും പിന്തുണയും
Fantini Cosmi products are manufactured to high-quality standards. For information regarding warranty terms and conditions, please refer to the documentation included with your purchase or visit the official Fantini Cosmi website. For technical support, troubleshooting assistance, or spare parts inquiries, please contact Fantini Cosmi customer service directly.
വാറന്റി ക്ലെയിമുകൾക്കുള്ള വാങ്ങിയതിന്റെ തെളിവായി നിങ്ങളുടെ വാങ്ങൽ രസീത് സൂക്ഷിക്കുക.


