1. ആമുഖം
DIGOO PPT1 റിമോട്ട് ഡോഗ് ട്രെയിനിംഗ് കോളർ തിരഞ്ഞെടുത്തതിന് നന്ദി. നിങ്ങളുടെ പരിശീലന സംവിധാനത്തിന്റെ സുരക്ഷിതവും ഫലപ്രദവുമായ ഉപയോഗത്തിനുള്ള വിശദമായ നിർദ്ദേശങ്ങൾ ഈ മാനുവൽ നൽകുന്നു. ശരിയായ പ്രവർത്തനം ഉറപ്പാക്കുന്നതിനും നിങ്ങളുടെ നായയ്ക്ക് പരിശീലന ഫലപ്രാപ്തി പരമാവധിയാക്കുന്നതിനും ഉപകരണം പ്രവർത്തിപ്പിക്കുന്നതിന് മുമ്പ് ദയവായി ഈ മാനുവൽ നന്നായി വായിക്കുക. ബീപ്പ്, വൈബ്രേഷൻ, സ്റ്റാറ്റിക് സ്റ്റിമുലേഷൻ മോഡുകൾ വഴി നായ്ക്കളെ പരിശീലിപ്പിക്കുന്നതിനും അഭികാമ്യമല്ലാത്ത പെരുമാറ്റങ്ങൾ തിരുത്തുന്നതിനും സഹായിക്കുന്നതിനാണ് ഈ സിസ്റ്റം രൂപകൽപ്പന ചെയ്തിരിക്കുന്നത്.

ചിത്രം: DIGOO PPT1 റിമോട്ട് ഡോഗ് ട്രെയിനിംഗ് കോളർ സിസ്റ്റം, ഹാൻഡ്ഹെൽഡ് റിമോട്ട് ട്രാൻസ്മിറ്ററും റിസീവർ കോളറും കാണിക്കുന്നു.
2. പാക്കേജ് ഉള്ളടക്കം
താഴെ ലിസ്റ്റ് ചെയ്തിരിക്കുന്ന എല്ലാ ഇനങ്ങളും നിങ്ങളുടെ പാക്കേജിൽ ഉൾപ്പെടുത്തിയിട്ടുണ്ടെന്ന് ഉറപ്പാക്കുക:
- 1 x DIGOO DG-PPT1 റിമോട്ട് ട്രാൻസ്മിറ്റർ
- 1 x DIGOO DG-PPT1 വാട്ടർപ്രൂഫ് റിസീവർ കോളർ
- 4 x DIGOO DG-PPT1 കോൺടാക്റ്റ് സ്ക്രൂകൾ (രണ്ട് വലുപ്പങ്ങൾ)
- 1 x DIGOO DG-PPT1 USB ചാർജ് കേബിൾ (Y-സ്പ്ലിറ്റർ)
- 1 x DIGOO DG-PPT1 ടെസ്റ്റ് ലൈറ്റ്
- 1 x ഉപയോക്തൃ മാനുവൽ (ഈ പ്രമാണം)
3. ഉൽപ്പന്നം കഴിഞ്ഞുview
3.1 റിമോട്ട് ട്രാൻസ്മിറ്റർ

ചിത്രം: LCD സ്ക്രീൻ, ആന്റിന, LED ലൈറ്റ്, ഇൻഡിക്കേറ്റർ, വൈബ്രേഷൻ/ഷോക്കിനുള്ള മുകളിലേക്ക്/താഴേക്ക് ബട്ടണുകൾ, വൈബ്രേഷൻ ബട്ടൺ, ഷോക്ക് ബട്ടൺ, LED ലൈറ്റ് ബട്ടൺ, ചാനൽ സ്വിച്ച് ബട്ടൺ, ലൈറ്റ്/ശബ്ദ ബട്ടൺ, ചാർജിംഗ് പോർട്ട് തുടങ്ങിയ ഘടകങ്ങളെ എടുത്തുകാണിക്കുന്ന റിമോട്ട് ട്രാൻസ്മിറ്ററിന്റെ വിശദമായ ഡയഗ്രം.
- ആൻ്റിന: സിഗ്നൽ പ്രക്ഷേപണത്തിനായി.
- LED ലൈറ്റ്: പ്രവർത്തനവും ബാറ്ററി നിലയും സൂചിപ്പിക്കുന്നു.
- സൂചകം: നിലവിലെ മോഡും ലെവലും കാണിക്കുന്നു.
- LCD സ്ക്രീൻ: പകലും രാത്രിയും ദൃശ്യപരതയ്ക്കായി നീല ബാക്ക്ലിറ്റ് ഡിസ്പ്ലേ, ചാനൽ, മോഡ്, ലെവൽ, ബാറ്ററി നില എന്നിവ കാണിക്കുന്നു.
- അപ്പ്/ഡൗൺ ബട്ടണുകൾ: വൈബ്രേഷൻ, സ്റ്റാറ്റിക് സ്റ്റിമുലേഷൻ ലെവലുകൾ ക്രമീകരിക്കുക (0-100).
- വൈബ്രേഷൻ ബട്ടൺ: വൈബ്രേഷൻ മോഡ് സജീവമാക്കുന്നു.
- ഷോക്ക് ബട്ടൺ: സ്റ്റാറ്റിക് സ്റ്റിമുലേഷൻ മോഡ് സജീവമാക്കുന്നു.
- LED ലൈറ്റ് ബട്ടൺ: റിസീവറിന്റെ LED ലൈറ്റ് സജീവമാക്കുന്നു.
- ചാനൽ സ്വിച്ച് ബട്ടൺ (1-2-3): നിയന്ത്രിക്കാൻ റിസീവർ കോളർ തിരഞ്ഞെടുക്കുന്നു (3 കോളറുകൾ വരെ).
- ലൈറ്റ്/സൗണ്ട് ബട്ടൺ: ബീപ്പ് സൗണ്ട് മോഡ് സജീവമാക്കുന്നു.
- ചാർജിംഗ് ഹോൾ: യുഎസ്ബി ചാർജിംഗ് പോർട്ട്.
3.2 റിസീവർ കോളർ
- ബന്ധപ്പെടാനുള്ള പോയിൻ്റുകൾ: സ്റ്റാറ്റിക് ഉത്തേജനം നൽകുക.
- പവർ ബട്ടൺ: റിസീവർ ഓൺ/ഓഫ് ചെയ്യുന്നു.
- ചാർജിംഗ് പോർട്ട്: യുഎസ്ബി ചാർജിംഗ് പോർട്ട്.
- ഇൻഡിക്കേറ്റർ ലൈറ്റ്: ശക്തിയും പ്രവർത്തന നിലയും കാണിക്കുന്നു.
- ക്രമീകരിക്കാവുന്ന സ്ട്രാപ്പ്: 11.8 ഇഞ്ച് (30cm) മുതൽ 23.6 ഇഞ്ച് (60cm) വരെയുള്ള കഴുത്തിന്റെ വലുപ്പങ്ങൾക്ക് അനുയോജ്യം.
- വാട്ടർപ്രൂഫ് ഡിസൈൻ: നീന്തൽ ഉൾപ്പെടെയുള്ള ഈർപ്പമുള്ള സാഹചര്യങ്ങളിൽ ഉപയോഗിക്കാൻ അനുവദിക്കുന്നു.
4. സജ്ജീകരണം
4.1 ഉപകരണങ്ങൾ ചാർജ് ചെയ്യുന്നു
റിമോട്ട് ട്രാൻസ്മിറ്ററും റിസീവർ കോളറും റീചാർജ് ചെയ്യാവുന്ന ലിഥിയം-അയൺ ബാറ്ററികളാണ് ഉപയോഗിക്കുന്നത്. രണ്ട് ഉപകരണങ്ങളും ഒരേസമയം ചാർജ് ചെയ്യാൻ നൽകിയിരിക്കുന്ന Y-സ്പ്ലിറ്റർ USB ചാർജിംഗ് കേബിൾ ഉപയോഗിക്കുക.
- Y-സ്പ്ലിറ്റർ USB കേബിൾ ഒരു സ്റ്റാൻഡേർഡ് USB പവർ അഡാപ്റ്ററുമായി (ഉൾപ്പെടുത്തിയിട്ടില്ല) അല്ലെങ്കിൽ ഒരു കമ്പ്യൂട്ടർ USB പോർട്ടുമായി ബന്ധിപ്പിക്കുക.
- റിമോട്ട് ട്രാൻസ്മിറ്ററിന്റെ ചാർജിംഗ് പോർട്ടിലേക്ക് ഒരു മൈക്രോ-യുഎസ്ബി അറ്റം പ്ലഗ് ചെയ്യുക.
- മറ്റേ മൈക്രോ-യുഎസ്ബി അറ്റം റിസീവർ കോളറിന്റെ ചാർജിംഗ് പോർട്ടിലേക്ക് പ്ലഗ് ചെയ്യുക.
- പൂർണ്ണമായും ചാർജ് ആകുന്നതുവരെ ഏകദേശം 3-4 മണിക്കൂർ ചാർജ് ചെയ്യുക. പൂർണ്ണ ചാർജ് സൂചിപ്പിക്കുന്നതിന് ഇൻഡിക്കേറ്റർ ലൈറ്റുകൾ മാറും (നിർദ്ദിഷ്ട സ്വഭാവത്തിന് ഉപകരണ സൂചകങ്ങൾ കാണുക).
കുറിപ്പ്: ഫ്രീക്വൻസി അനുസരിച്ച്, പൂർണ്ണമായി ചാർജ് ചെയ്യുന്നത് സാധാരണയായി 2 ആഴ്ച വരെ ഉപയോഗം ഉറപ്പാക്കും.
4.2 ഓൺ/ഓഫ് ചെയ്യുന്നു
- റിമോട്ട് ട്രാൻസ്മിറ്റർ: സജീവമാക്കാൻ ഏതെങ്കിലും ബട്ടൺ അമർത്തുക. പവർ ലാഭിക്കുന്നതിനായി 5 മിനിറ്റ് നിഷ്ക്രിയത്വത്തിന് ശേഷം ഇത് യാന്ത്രികമായി സ്റ്റാൻഡ്ബൈ മോഡിലേക്ക് പ്രവേശിക്കും.
- റിസീവർ കോളർ:
- ഓണാക്കാൻ: പ്രവർത്തിക്കുന്ന ഇൻഡിക്കേറ്റർ ലൈറ്റ് പ്രകാശിക്കുന്നത് വരെ റിസീവറിലെ പവർ ബട്ടൺ അമർത്തിപ്പിടിക്കുക.
- ഓഫാക്കാൻ: പ്രവർത്തിക്കുന്ന ഇൻഡിക്കേറ്റർ പ്രകാശിക്കുന്നില്ലെങ്കിൽ, പ്രവർത്തിക്കുന്ന ഇൻഡിക്കേറ്റർ രണ്ടുതവണ മിന്നുന്നത് വരെ പവർ ബട്ടൺ കുറച്ച് സെക്കൻഡ് അമർത്തിപ്പിടിക്കുക, തുടർന്ന് വിടുക.
4.3 റിമോട്ടും റിസീവറും ജോടിയാക്കൽ
റിമോട്ടും റിസീവറും സാധാരണയായി ഫാക്ടറിയിൽ നിന്ന് മുൻകൂട്ടി ജോടിയാക്കുന്നു. വീണ്ടും ജോടിയാക്കൽ ആവശ്യമുണ്ടെങ്കിൽ അല്ലെങ്കിൽ നിങ്ങൾ കൂടുതൽ കോളറുകൾ ചേർക്കുകയാണെങ്കിൽ:
- രണ്ട് ഉപകരണങ്ങളും പൂർണ്ണമായും ചാർജ്ജ് ചെയ്തിട്ടുണ്ടെന്നും ഓഫാണെന്നും ഉറപ്പാക്കുക.
- റിമോട്ട് ട്രാൻസ്മിറ്റർ ഓണാക്കുക. ചാനൽ സ്വിച്ച് ബട്ടൺ ഉപയോഗിച്ച് ആവശ്യമുള്ള ചാനൽ (1, 2, അല്ലെങ്കിൽ 3) തിരഞ്ഞെടുക്കുക.
- ഇൻഡിക്കേറ്റർ ലൈറ്റ് വേഗത്തിൽ മിന്നുന്നതുവരെ റിസീവർ കോളറിലെ പവർ ബട്ടൺ അമർത്തിപ്പിടിക്കുക.
- 10 സെക്കൻഡിനുള്ളിൽ, റിമോട്ട് ട്രാൻസ്മിറ്ററിലെ "ഷോക്ക്" അല്ലെങ്കിൽ "വൈബ്രേഷൻ" ബട്ടൺ അമർത്തുക.
- ജോടിയാക്കൽ വിജയകരമാണെങ്കിൽ, റിസീവറിന്റെ ഇൻഡിക്കേറ്റർ ലൈറ്റ് മിന്നുന്നത് നിർത്തി ഒരു നിമിഷം ഉറച്ചുനിൽക്കും, തുടർന്ന് പതുക്കെ മിന്നും.
- അധിക കോളറുകൾ ജോടിയാക്കാൻ, ഓരോ പുതിയ കോളറിനും റിമോട്ടിൽ വ്യത്യസ്ത ചാനൽ തിരഞ്ഞെടുത്ത് പ്രക്രിയ ആവർത്തിക്കുക.

ചിത്രം: ഒരു റിമോട്ട് ട്രാൻസ്മിറ്റർ മൂന്ന് വ്യത്യസ്ത റിസീവർ കോളറുകളുമായി എങ്ങനെ ജോടിയാക്കാമെന്നും നിയന്ത്രിക്കാമെന്നും കാണിക്കുന്ന ചിത്രീകരണം, ഓരോന്നും അതിന്റേതായ ചാനലിൽ.
4.4 കോളർ ഫിറ്റിംഗ്
ഫലപ്രദവും സുരക്ഷിതവുമായ പ്രവർത്തനത്തിന് റിസീവർ കോളറിന്റെ ശരിയായ ഫിറ്റ് നിർണായകമാണ്. കോൺടാക്റ്റ് പോയിന്റുകൾ നിങ്ങളുടെ നായയുടെ ചർമ്മവുമായി നേരിട്ട് സമ്പർക്കം പുലർത്തണം.

ചിത്രം: 10 മുതൽ 150 പൗണ്ട് വരെ ഭാരമുള്ള വിവിധ വലുപ്പത്തിലുള്ള നായ്ക്കൾക്ക് അനുയോജ്യമായ രീതിയിൽ അനുയോജ്യമാണെന്ന് ഉറപ്പാക്കാൻ കോളർ സ്ട്രാപ്പ് ക്രമീകരിക്കുന്നതിനും ഉചിതമായ കോൺടാക്റ്റ് സ്ക്രൂ നീളം (6mm അല്ലെങ്കിൽ 14mm) തിരഞ്ഞെടുക്കുന്നതിനുമുള്ള വിഷ്വൽ ഗൈഡ്.
- കോളർ ഓഫാണെന്ന് ഉറപ്പാക്കുക.
- നിങ്ങളുടെ നായയുടെ കോട്ടിന്റെ നീളം അനുസരിച്ച് കോൺടാക്റ്റ് സ്ക്രൂകളുടെ ഉചിതമായ നീളം (6mm അല്ലെങ്കിൽ 14mm) തിരഞ്ഞെടുക്കുക. കട്ടിയുള്ള കോട്ടുകൾക്കാണ് നീളമുള്ള സ്ക്രൂകൾ.
- തിരഞ്ഞെടുത്ത കോൺടാക്റ്റ് സ്ക്രൂകൾ റിസീവറിൽ സുരക്ഷിതമായി ഘടിപ്പിക്കുക.
- നിങ്ങളുടെ നായയുടെ കഴുത്തിൽ റിസീവർ കോളർ വയ്ക്കുക, കോൺടാക്റ്റ് പോയിന്റുകൾ കഴുത്തിന് താഴെയാണെന്ന് ഉറപ്പാക്കുക.
- സ്ട്രാപ്പ് വളരെ ഇറുകിയതായിരിക്കാതെ ക്രമീകരിക്കുക. സ്ട്രാപ്പിനും നിങ്ങളുടെ നായയുടെ കഴുത്തിനും ഇടയിൽ രണ്ട് വിരലുകൾ സുഖകരമായി വയ്ക്കാൻ നിങ്ങൾക്ക് കഴിയണം.
- ചർമ്മത്തിലെ പ്രകോപനം തടയാൻ ദിവസത്തിൽ 12 മണിക്കൂറിൽ കൂടുതൽ കോളർ ധരിക്കരുത്. നിങ്ങളുടെ നായയുടെ കഴുത്തിൽ എന്തെങ്കിലും പ്രകോപന ലക്ഷണങ്ങൾ ഉണ്ടോ എന്ന് പതിവായി പരിശോധിക്കുക.
5. പ്രവർത്തന നിർദ്ദേശങ്ങൾ
DIGOO PPT1 മൂന്ന് പരിശീലന മോഡുകൾ വാഗ്ദാനം ചെയ്യുന്നു: ബീപ്പ്, വൈബ്രേഷൻ, സ്റ്റാറ്റിക് സ്റ്റിമുലേഷൻ.
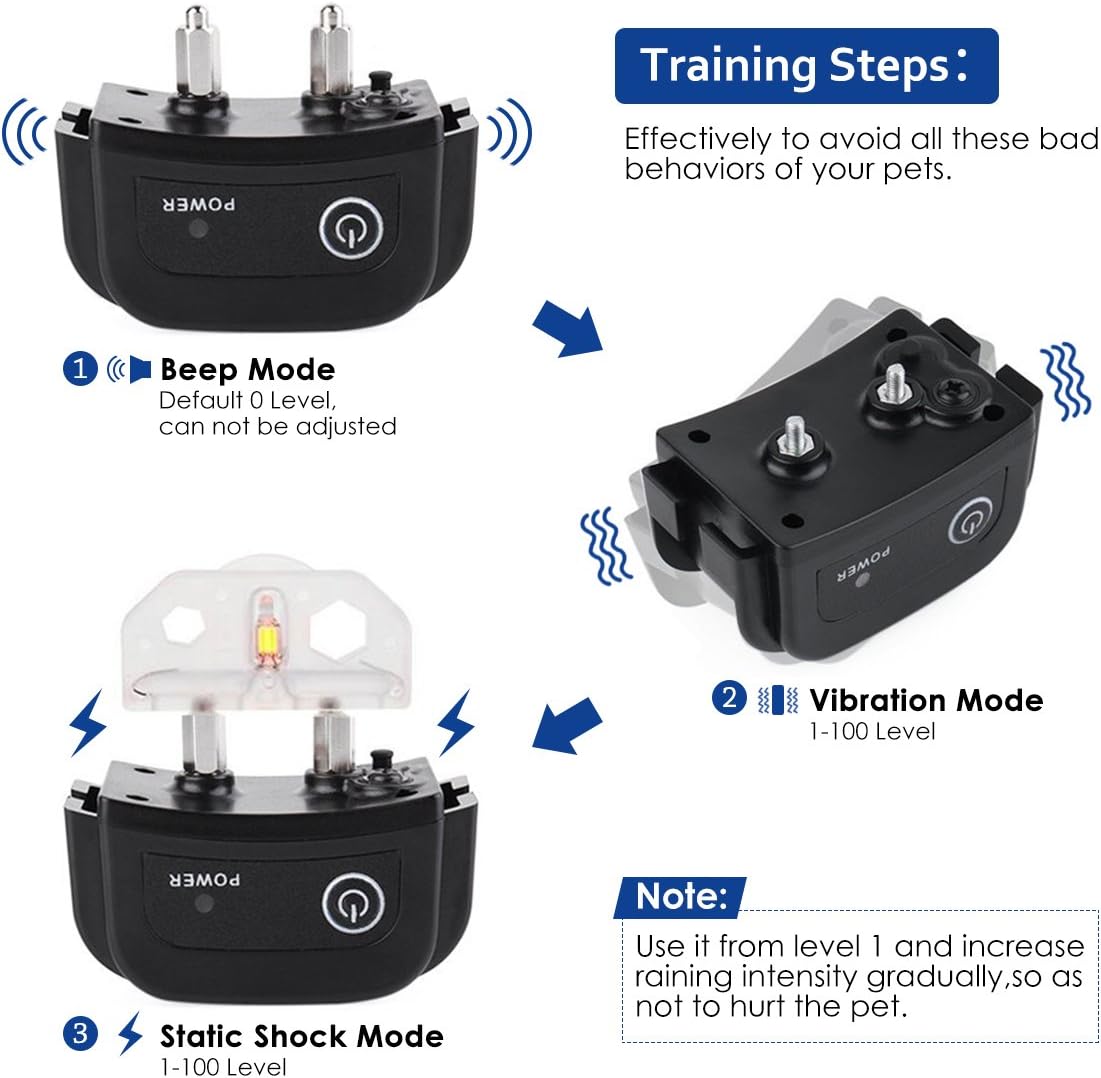
ചിത്രം: മൂന്ന് പരിശീലന രീതികളുടെ ദൃശ്യ പ്രാതിനിധ്യം: ബീപ്പ് (ഡിഫോൾട്ട് ലെവൽ 0, ക്രമീകരിക്കാൻ കഴിയില്ല), വൈബ്രേഷൻ (ലെവലുകൾ 1-100), സ്റ്റാറ്റിക് ഷോക്ക് (ലെവലുകൾ 1-100). ലെവൽ 1 ൽ നിന്ന് ആരംഭിച്ച് ക്രമേണ തീവ്രത വർദ്ധിപ്പിക്കാൻ ഒരു കുറിപ്പ് നിർദ്ദേശിക്കുന്നു.
5.1 ബീപ്പ് മോഡ്
- അമർത്തുക ലൈറ്റ്/സൗണ്ട് ബട്ടൺ റിമോട്ടിൽ.
- റിസീവർ കേൾക്കാവുന്ന ഒരു ബീപ്പ് ശബ്ദം പുറപ്പെടുവിക്കും.
- മുന്നറിയിപ്പുകൾ നൽകുന്നതിനോ നിങ്ങളുടെ നായയുടെ ശ്രദ്ധ ആകർഷിക്കുന്നതിനോ ഈ മോഡ് അനുയോജ്യമാണ്. ബീപ്പ് ലെവൽ സ്ഥിരമാണ്, ക്രമീകരിക്കാൻ കഴിയില്ല.
5.2 വൈബ്രേഷൻ മോഡ്
- അമർത്തുക വൈബ്രേഷൻ ബട്ടൺ റിമോട്ടിൽ.
- ഉപയോഗിക്കുക മുകളിലേക്കും താഴേക്കും ബട്ടണുകൾ 0 മുതൽ 100 വരെയുള്ള വൈബ്രേഷൻ ലെവൽ തിരഞ്ഞെടുക്കാൻ.
- തിരഞ്ഞെടുത്ത തീവ്രതയനുസരിച്ച് റിസീവർ വൈബ്രേറ്റ് ചെയ്യും.
- ഏറ്റവും കുറഞ്ഞ ഫലപ്രദമായ ലെവലിൽ നിന്ന് ആരംഭിച്ച് ആവശ്യമെങ്കിൽ ക്രമേണ വർദ്ധിപ്പിക്കുക.
5.3 സ്റ്റാറ്റിക് സ്റ്റിമുലേഷൻ മോഡ്
- അമർത്തുക ഷോക്ക് ബട്ടൺ റിമോട്ടിൽ.
- ഉപയോഗിക്കുക മുകളിലേക്കും താഴേക്കും ബട്ടണുകൾ 0 മുതൽ 100 വരെയുള്ള ഒരു സ്റ്റാറ്റിക് സ്റ്റിമുലേഷൻ ലെവൽ തിരഞ്ഞെടുക്കാൻ.
- തിരഞ്ഞെടുത്ത തീവ്രതയനുസരിച്ച് റിസീവർ ഒരു സ്റ്റാറ്റിക് പൾസ് നൽകും.
- എപ്പോഴും ഏറ്റവും കുറഞ്ഞ ഫലപ്രദമായ ലെവലിൽ (ലെവൽ 1) ആരംഭിച്ച് ക്രമേണ വർദ്ധിപ്പിക്കുക. സ്റ്റാറ്റിക് ഫംഗ്ഷൻ പരിശോധിക്കാൻ ഉൾപ്പെടുത്തിയിരിക്കുന്ന ടെസ്റ്റ് ലൈറ്റ് ഉപയോഗിക്കുക.
- ഗുരുതരമായ അനഭിലഷണീയമായ പെരുമാറ്റങ്ങൾ തിരുത്തുന്നതിന് ഈ രീതി ജാഗ്രതയോടെയും ആവശ്യമുള്ളപ്പോൾ മാത്രം ഉപയോഗിക്കണം.
5.4 റിമോട്ട് കൺട്രോൾ ശ്രേണി
തുറസ്സായ സ്ഥലങ്ങളിൽ 330 യാർഡ് (ഏകദേശം 300 മീറ്റർ) വരെ ഫലപ്രദമായ പരിധിയാണ് റിമോട്ട് കൺട്രോളിനുള്ളത്. പാരിസ്ഥിതിക ഘടകങ്ങളും തടസ്സങ്ങളും ഈ പരിധിയെ ബാധിച്ചേക്കാം.

ചിത്രം: റിമോട്ട് കൺട്രോളിന്റെ ഫലപ്രദമായ ശ്രേണിയുടെ ദൃശ്യ പ്രാതിനിധ്യം, 330 യാർഡ് അകലെയുള്ള ഒരു തുറന്ന വയലിൽ ഒരു നായയെ പരിശീലിപ്പിക്കുന്നതും, തടസ്സങ്ങളുള്ള പ്രദേശങ്ങളിൽ 165 യാർഡ് ചെറിയ ശ്രേണിയിൽ പരിശീലനം നൽകുന്നതും കാണിക്കുന്നു.
6. പരിശീലന നുറുങ്ങുകൾ
- സ്ഥിരതയാണ് പ്രധാനം: നിങ്ങൾ തിരുത്താൻ ആഗ്രഹിക്കുന്ന നിർദ്ദിഷ്ട പെരുമാറ്റങ്ങൾക്കായി കോളർ സ്ഥിരമായി ഉപയോഗിക്കുക.
- പോസിറ്റീവ് റൈൻഫോഴ്സ്മെൻ്റ്: നിങ്ങളുടെ നായ ആവശ്യമുള്ള പ്രവർത്തനം നടത്തുമ്പോൾ എല്ലായ്പ്പോഴും തിരുത്തലുകൾ പോസിറ്റീവ് റൈൻഫോഴ്സ്മെന്റുമായി ജോടിയാക്കുക.
- താഴ്ന്ന നിലയിൽ ആരംഭിക്കുക: ഏറ്റവും കുറഞ്ഞ ഫലപ്രദമായ ഉത്തേജന തലത്തിൽ നിന്ന് ആരംഭിക്കുക, നിങ്ങളുടെ നായ പ്രതികരിക്കുന്നില്ലെങ്കിൽ മാത്രം വർദ്ധിപ്പിക്കുക.
- ഹ്രസ്വ സെഷനുകൾ: നിങ്ങളുടെ നായയുടെ ഇടപെടൽ നിലനിർത്താൻ പരിശീലന സെഷനുകൾ ചെറുതും പോസിറ്റീവുമായി നിലനിർത്തുക.
- മേൽനോട്ടം: മേൽനോട്ടമില്ലാത്ത നായയുടെ മേൽ കോളർ ദീർഘനേരം വയ്ക്കരുത്.
- ശിക്ഷയ്ക്ക് വേണ്ടിയല്ല: ഈ ഉപകരണം ഒരു പരിശീലന സഹായിയാണ്, ശിക്ഷണ ഉപകരണമല്ല. ഉത്തരവാദിത്തത്തോടെയും മാനുഷികമായും ഇത് ഉപയോഗിക്കുക.
7. പരിപാലനം
7.1 വൃത്തിയാക്കൽ
- പരസ്യം ഉപയോഗിച്ച് റിമോട്ടും റിസീവറും തുടയ്ക്കുകamp തുണി. കഠിനമായ രാസവസ്തുക്കൾ ഉപയോഗിക്കരുത്.
- ശരിയായ പ്രവർത്തനം ഉറപ്പാക്കാനും ചർമ്മത്തിലെ പ്രകോപനം തടയാനും റിസീവറിലെ കോൺടാക്റ്റ് പോയിന്റുകൾ പതിവായി വൃത്തിയാക്കുക.
7.2 വാട്ടർപ്രൂഫിംഗ്
വാട്ടർപ്രൂഫ് ആയി രൂപകൽപ്പന ചെയ്തിരിക്കുന്ന ഈ റിസീവർ കോളർ, നിങ്ങളുടെ നായയ്ക്ക് നീന്താനോ മഴക്കാലത്ത് അത് ധരിക്കാനോ അനുവദിക്കുന്നു. റിമോട്ട് ട്രാൻസ്മിറ്റർ വാട്ടർപ്രൂഫ് അല്ല, അത് വരണ്ടതായി സൂക്ഷിക്കണം.

ചിത്രം: DIGOO PPT1 വാട്ടർപ്രൂഫ് റിസീവർ കോളർ ധരിച്ച് വെള്ളത്തിൽ തെറിക്കുന്ന ഒരു ഗോൾഡൻ റിട്രീവർ. നീന്തുമ്പോൾ പോലും വാട്ടർപ്രൂഫ് ശേഷി ഉറപ്പാക്കുന്ന പ്രത്യേക റബ്ബർ കവർ റിസീവറിൽ ക്ലോസ്-അപ്പ് ഇൻസെറ്റിൽ കാണിച്ചിരിക്കുന്നു.
7.3 ബാറ്ററി കെയർ
- ആദ്യ ഉപയോഗത്തിന് മുമ്പ് ഉപകരണങ്ങൾ പൂർണ്ണമായും ചാർജ് ചെയ്യുക.
- ബാറ്ററി ഇൻഡിക്കേറ്റർ കുറഞ്ഞ പവർ കാണിക്കുമ്പോൾ റീചാർജ് ചെയ്യുക.
- ദീർഘനേരം ഉപകരണങ്ങൾ സൂക്ഷിക്കുകയാണെങ്കിൽ, ബാറ്ററിയുടെ ആരോഗ്യം നിലനിർത്താൻ ഓരോ മാസവും ചാർജ് ചെയ്യുക.
8 സ്പെസിഫിക്കേഷനുകൾ
| ഫീച്ചർ | സ്പെസിഫിക്കേഷൻ |
|---|---|
| പ്രദർശിപ്പിക്കുക | ബ്ലൂ ബാക്ക്ലിറ്റ് എൽസിഡി |
| പ്രവർത്തന രീതികൾ | ബീപ്പ്, വൈബ്രേഷൻ, സ്റ്റാറ്റിക് സ്റ്റിമുലേഷൻ |
| വൈബ്രേഷൻ ലെവലുകൾ | 0-100 ലെവലുകൾ |
| സ്റ്റാറ്റിക് സ്റ്റിമുലേഷൻ ലെവലുകൾ | 0-100 ലെവലുകൾ |
| ഏറ്റവും കുറഞ്ഞ കോളർ വലുപ്പം | 11.8 ഇഞ്ച് (30 സെ.മീ) |
| പരമാവധി കോളർ വലുപ്പം | 23.6 ഇഞ്ച് (60 സെ.മീ) |
| ചാർജിംഗ് സമയം | 3-4 മണിക്കൂർ |
| ജോലി സമയം | 2 ആഴ്ച വരെ (സാധാരണ ഉപയോഗത്തിന്) |
| പവർ ഉറവിടം | യുഎസ്ബി ചാർജ് കേബിൾ |
| റിമോട്ട് കൺട്രോൾ റേഞ്ച് | 330 യാർഡ് വരെ (തുറന്ന സ്ഥലം) |
| റിസീവർ വാട്ടർപ്രൂഫ് റേറ്റിംഗ് | വാട്ടർപ്രൂഫ് (നീന്തലിന് അനുയോജ്യം) |
| അനുയോജ്യമായ നായ ഭാരം | 10 പൗണ്ട് - 150 പൗണ്ട് |
| ഉൽപ്പന്ന അളവുകൾ | 19 x 14 x 5.99 സെ.മീ |
| ഉൽപ്പന്ന ഭാരം | 260 ഗ്രാം |
| മോഡൽ നമ്പർ | ഡിഗോവോളിഫു147 |
9. പ്രശ്നപരിഹാരം
| പ്രശ്നം | സാധ്യമായ കാരണം | പരിഹാരം |
|---|---|---|
| കോളർ പ്രവർത്തിക്കുന്നില്ല / പ്രതികരണമില്ല | ബാറ്ററി കുറവാണ്; ഓണാക്കിയിട്ടില്ല; ജോടിയാക്കിയിട്ടില്ല; പരിധിക്ക് പുറത്താണ്. | രണ്ട് ഉപകരണങ്ങളും ചാർജ് ചെയ്യുക; രണ്ട് ഉപകരണങ്ങളും ഓണാക്കുക; റിമോട്ടും റിസീവറും വീണ്ടും ജോടിയാക്കുക; റിസീവറിന് അടുത്തേക്ക് നീക്കുക. |
| സ്റ്റാറ്റിക് ഉത്തേജനം അനുഭവപ്പെടുന്നില്ല. | കോളർ ശരിയായി ഘടിപ്പിച്ചിട്ടില്ല; കോൺടാക്റ്റ് പോയിന്റുകൾ വളരെ ചെറുതാണ്; ബാറ്ററി കുറവാണ്; ലെവൽ വളരെ കുറവാണ്. | കോളർ ഫിറ്റ് ക്രമീകരിക്കുക; നീളമുള്ള കോൺടാക്റ്റ് സ്ക്രൂകൾ ഉപയോഗിക്കുക; ചാർജ് റിസീവർ; ഉത്തേജന നില വർദ്ധിപ്പിക്കുക (ക്രമേണ). പ്രവർത്തനം പരിശോധിക്കാൻ ടെസ്റ്റ് ലൈറ്റ് ഉപയോഗിക്കുക. |
| റിമോട്ട് എൽസിഡി സ്ക്രീൻ മങ്ങിയതോ ശൂന്യമോ ആണ് | ബാറ്ററി കുറവാണ്; ഓട്ടോ-സ്റ്റാൻഡ്ബൈ മോഡ്. | റിമോട്ട് ചാർജ് ചെയ്യുക; അത് സജീവമാക്കാൻ ഏതെങ്കിലും ബട്ടൺ അമർത്തുക. |
| ചുരുക്കിയ വിദൂര പരിധി | പരിസ്ഥിതി ഇടപെടൽ; തടസ്സങ്ങൾ; കുറഞ്ഞ ബാറ്ററി. | തുറന്ന സ്ഥലത്തേക്ക് മാറുക; രണ്ട് ഉപകരണങ്ങളും ചാർജ് ചെയ്യുക. |
10. വാറൻ്റിയും പിന്തുണയും
ഡോഗ് ട്രെയിനിംഗ് കോളറിന് DIGOO ഒരു വർഷത്തെ ആശങ്ക രഹിത റിട്ടേൺ/റീഫണ്ട് പോളിസി വാഗ്ദാനം ചെയ്യുന്നു. എന്തെങ്കിലും പ്രശ്നങ്ങൾക്കോ ചോദ്യങ്ങൾക്കോ, ദയവായി ഇവിടെ ഉപഭോക്തൃ പിന്തുണയുമായി ബന്ധപ്പെടുക support@mydigoo.com. പ്രതികരണങ്ങൾ സാധാരണയായി 24 മണിക്കൂറിനുള്ളിൽ നൽകും.
കൂടുതൽ വിവരങ്ങൾക്ക്, ദയവായി നിർമ്മാതാവിന്റെ ഉദ്യോഗസ്ഥനെ സന്ദർശിക്കുക webസൈറ്റ്.


