1. ആമുഖം
This manual provides detailed instructions for the installation, operation, and maintenance of your Hunter 54-inch Contemporary Ceiling Fan. Please read all instructions carefully before beginning installation to ensure safe and proper operation. Retain this manual for future reference.

Figure 1.1: Hunter 54-inch Contemporary Ceiling Fan with remote control.

Figure 1.2: Key features of the Hunter 54-inch Contemporary Ceiling Fan.
2 സുരക്ഷാ വിവരങ്ങൾ
വൈദ്യുതാഘാതം, തീപിടുത്തം അല്ലെങ്കിൽ വ്യക്തിപരമായ പരിക്കുകൾ എന്നിവയുടെ അപകടസാധ്യത കുറയ്ക്കുന്നതിന്, എല്ലായ്പ്പോഴും ഈ അടിസ്ഥാന സുരക്ഷാ മുൻകരുതലുകൾ പാലിക്കുക:
- ഫാൻ ഇൻസ്റ്റാൾ ചെയ്യുന്നതിന് മുമ്പ് എല്ലാ നിർദ്ദേശങ്ങളും വായിക്കുക.
- എല്ലാ വയറിംഗും ദേശീയ, പ്രാദേശിക ഇലക്ട്രിക്കൽ കോഡുകൾക്ക് അനുസൃതമായിരിക്കണം. വയറിംഗിൽ നിങ്ങൾക്ക് പരിചയമില്ലെങ്കിൽ, യോഗ്യതയുള്ള ഒരു ഇലക്ട്രീഷ്യനെ സമീപിക്കുക.
- Before installation, disconnect power by turning off the circuit breakers to the fan's electrical box.
- Ensure the outlet box is securely attached to the building structure and can support the fan's weight (approximately 18.1 lbs).
- കേടായ ബ്ലേഡുകൾ ഉപയോഗിച്ച് ഫാൻ പ്രവർത്തിപ്പിക്കരുത്. ഏതെങ്കിലും ഒന്നിന് കേടുപാടുകൾ സംഭവിച്ചാൽ എല്ലാ ബ്ലേഡുകളും മാറ്റിസ്ഥാപിക്കുക.
- ഫാൻ ബ്ലേഡുകളുടെ പാതയിൽ വസ്തുക്കൾ സ്ഥാപിക്കുന്നത് ഒഴിവാക്കുക.
- ഈ ഫാൻ ഇൻഡോർ ഉപയോഗത്തിനായി മാത്രം രൂപകൽപ്പന ചെയ്തിട്ടുള്ളതാണ്.
3. പാക്കേജ് ഉള്ളടക്കം
താഴെ ലിസ്റ്റ് ചെയ്തിരിക്കുന്ന എല്ലാ ഘടകങ്ങളും നിങ്ങളുടെ പാക്കേജിൽ ഉൾപ്പെടുത്തിയിട്ടുണ്ടെന്ന് ഉറപ്പാക്കുക:
- 1 x Fan Motor Assembly
- 3 x Fan Blades (Reversible: Light Gray Oak / Greyed Walnut)
- 1 x ലൈറ്റ് കിറ്റ്
- 3 x LED Bulbs (E26 Medium Base)
- 1 x 4-inch Downrod
- 1 x 2-inch Downrod (for standard profile മൗണ്ടിംഗ്)
- 1 x Handheld Remote Control
- 2 x AAA ബാറ്ററികൾ (റിമോട്ട് കൺട്രോളിനായി)
- ഹാർഡ്വെയർ പായ്ക്ക് (സ്ക്രൂകൾ, വാഷറുകൾ, വയർ നട്ടുകൾ മുതലായവ)
4. സജ്ജീകരണവും ഇൻസ്റ്റാളേഷനും
പ്രൊഫഷണൽ ഇൻസ്റ്റാളേഷൻ ശുപാർശ ചെയ്യുന്നു. തുടരുന്നതിന് മുമ്പ് സർക്യൂട്ട് ബ്രേക്കറിൽ വൈദ്യുതി വിച്ഛേദിച്ചിട്ടുണ്ടെന്ന് ഉറപ്പാക്കുക.
4.1 ഫാൻ ഘടിപ്പിക്കൽ
- Securely attach the mounting bracket to the ceiling outlet box. The outlet box must be listed for fan support.
- Select the appropriate downrod (4-inch or 2-inch) for your ceiling height. Insert the downrod through the canopy and connect it to the fan motor assembly.
- ഫാൻ അസംബ്ലി ശ്രദ്ധാപൂർവ്വം ഉയർത്തി മൗണ്ടിംഗ് ബ്രാക്കറ്റിൽ തൂക്കിയിടുക.
4.2 വയറിംഗ് കണക്ഷനുകൾ
- Connect the fan's electrical wires to the household wiring according to local electrical codes. Typically, this involves connecting the black (hot) wire from the fan to the black (hot) wire from the ceiling, the white (neutral) wire from the fan to the white (neutral) wire from the ceiling, and the green (ground) wire from the fan to the bare copper (ground) wire from the ceiling.
- Ensure all wire connections are secure using the provided wire nuts.
- ഔട്ട്ലെറ്റ് ബോക്സിൽ എല്ലാ വയറുകളും വൃത്തിയായി തിരുകുക.
4.3 ബ്ലേഡുകളും ലൈറ്റ് കിറ്റും ഘടിപ്പിക്കൽ
- Attach the fan blades to the motor housing using the provided screws. Ensure the desired blade finish (Light Gray Oak or Greyed Walnut) is facing downwards.
- Install the light kit to the bottom of the fan motor assembly, following the specific instructions for your model.
- Screw the three E26 Medium Base LED bulbs into the light kit sockets.
- Attach the glass shade to the light kit.

Figure 4.1: Annotated view of fan components and features.

ചിത്രം 4.2: ഉദാample of the fan installed in a room.
5. പ്രവർത്തന നിർദ്ദേശങ്ങൾ
Your Hunter ceiling fan is operated using the included handheld remote control.
5.1 വിദൂര നിയന്ത്രണ പ്രവർത്തനങ്ങൾ

Figure 5.1: Handheld Remote Control.
- ഫാൻ ഓൺ/ഓഫ് & വേഗത നിയന്ത്രണം: Use the fan speed buttons (up/down arrows) to cycle through the three available fan speeds (low, medium, high) or turn the fan off.
- Light On/Off & Dimming: Press the light bulb button to turn the light on or off. To dim the light, press and hold the light bulb button. Release when the desired brightness is reached.
- Fan Direction (Reversible Motor): The remote control includes a button to reverse the fan's blade direction. This feature allows for seasonal use:
- താഴേക്കുള്ള വായുപ്രവാഹം (വേനൽക്കാലം): Creates a cooling effect.
- മുകളിലേക്കുള്ള വായുപ്രവാഹം (ശീതകാലം): സീലിംഗിന് സമീപം കുടുങ്ങിയ ചൂടുള്ള വായു പ്രചരിക്കുന്നു.
5.2 Reversible Blades
The fan features reversible blades with Light Gray Oak on one side and Greyed Walnut on the other. You can choose the finish that best complements your room's decor during installation.
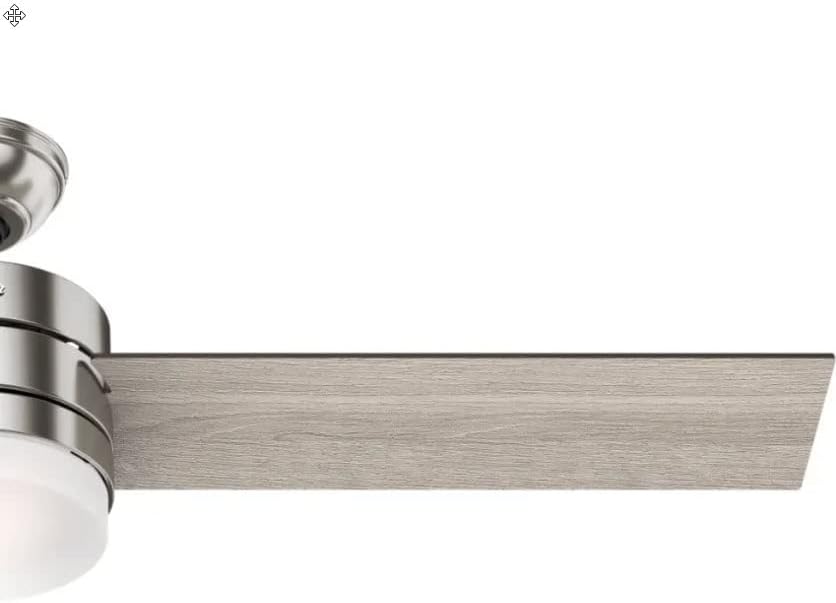
ചിത്രം 5.2: ഉദാample of the Light Gray Oak blade finish.
6. പരിപാലനം
പതിവ് അറ്റകുറ്റപ്പണികൾ നിങ്ങളുടെ സീലിംഗ് ഫാനിന്റെ മികച്ച പ്രകടനവും ദീർഘായുസ്സും ഉറപ്പാക്കുന്നു.
6.1 വൃത്തിയാക്കൽ
- Always turn off the power to the fan before cleaning.
- ഒരു സോഫ്റ്റ് ഉപയോഗിക്കുക, ഡിamp cloth to clean the fan blades and motor housing. Avoid abrasive cleaners that may scratch the finish.
- Clean the glass shade with a mild glass cleaner.
6.2 ബൾബ് മാറ്റിസ്ഥാപിക്കൽ
The fan uses E26 Medium Base LED bulbs. When replacing, ensure the power is off and allow bulbs to cool before handling.
- Unscrew the glass shade.
- Carefully unscrew the old LED bulb(s) and screw in new ones.
- Reattach the glass shade.
6.3 Blade Balancing
If the fan wobbles during operation, ensure all blade screws are tight. A balancing kit (often included with fans, though not explicitly listed here) can be used to correct persistent wobbling.
7. പ്രശ്നപരിഹാരം
പൊതുവായ പ്രശ്നങ്ങളും അവയുടെ പരിഹാരങ്ങളും അറിയാൻ താഴെയുള്ള പട്ടിക കാണുക.
| പ്രശ്നം | സാധ്യമായ കാരണം | പരിഹാരം |
|---|---|---|
| ഫാൻ ആരംഭിക്കുന്നില്ല | ഫാനിലേക്ക് വൈദ്യുതിയില്ല; അയഞ്ഞ വയർ കണക്ഷനുകൾ; റിമോട്ട് കൺട്രോൾ ബാറ്ററി കുറവാണ്. | സർക്യൂട്ട് ബ്രേക്കർ പരിശോധിക്കുക; എല്ലാ വയർ കണക്ഷനുകളും സുരക്ഷിതമാണെന്ന് ഉറപ്പാക്കുക; റിമോട്ട് കൺട്രോൾ ബാറ്ററികൾ മാറ്റിസ്ഥാപിക്കുക. |
| വെളിച്ചം പ്രവർത്തിക്കുന്നില്ല | Loose wire connections; Faulty bulb(s); Light switch off. | Check wiring to light kit; Replace bulb(s); Ensure light is turned on via remote. |
| ഫാൻ കുലുങ്ങുന്നു | അയഞ്ഞ ബ്ലേഡ് സ്ക്രൂകൾ; അസന്തുലിതമായ ബ്ലേഡുകൾ; അയഞ്ഞ മൗണ്ടിംഗ് ബ്രാക്കറ്റ്. | എല്ലാ ബ്ലേഡ് സ്ക്രൂകളും മുറുക്കുക; ഒരു ബ്ലേഡ് ബാലൻസിംഗ് കിറ്റ് ഉപയോഗിക്കുക; മൗണ്ടിംഗ് ബ്രാക്കറ്റ് സുരക്ഷിതമായി ഉറപ്പിച്ചിട്ടുണ്ടെന്ന് ഉറപ്പാക്കുക. |
| റിമോട്ട് കൺട്രോൾ പ്രതികരിക്കുന്നില്ല | Low or dead batteries; Remote not paired with fan. | Replace AAA batteries; Refer to remote pairing instructions (usually involves cycling power and pressing a button on the remote). |
8 സ്പെസിഫിക്കേഷനുകൾ
| ഫീച്ചർ | വിശദാംശങ്ങൾ |
|---|---|
| ബ്രാൻഡ് | വേട്ടക്കാരൻ |
| മോഡൽ നമ്പർ | CC5C91C61 |
| വലിപ്പം | 54 ഇഞ്ച് |
| പൂർത്തിയാക്കുക | ബ്രഷ് ചെയ്ത നിക്കൽ |
| ബ്ലേഡ് മെറ്റീരിയൽ | Wood (Reversible: Light Gray Oak / Greyed Walnut) |
| മോട്ടോർ തരം | AC Motor, Whisperwind |
| പ്രകാശ സ്രോതസ്സ് | Integrated Dimmable LED (3 bulbs) |
| ബൾബ് ബേസ് | E26 മീഡിയം |
| വർണ്ണ താപനില | 3000 കെൽവിൻ |
| ലൈറ്റ് ഔട്ട്പുട്ട് | 800 ല്യൂമെൻസ് |
| നിയന്ത്രണ രീതി | റിമോട്ട് കൺട്രോൾ |
| വാല്യംtage | 120 വോൾട്ട് |
| വാട്ട്tage | 44 watts (fan only) |
| ഇനത്തിൻ്റെ ഭാരം | 18.1 പൗണ്ട് |
| ഉൽപ്പന്ന അളവുകൾ | 54"L x 54"W x 14.5"H |
| ഇൻഡോർ/ഔട്ട്ഡോർ ഉപയോഗം | ഇൻഡോർ |
| കണക്കാക്കിയ വാർഷിക Energy ർജ്ജ ചെലവ് | $12 (based on 6.4 hours/day, 12 cents/kWh, excluding lights) |
| എയർ ഫ്ലോ | മിനിറ്റിന് 3,590 ക്യുബിക് അടി |
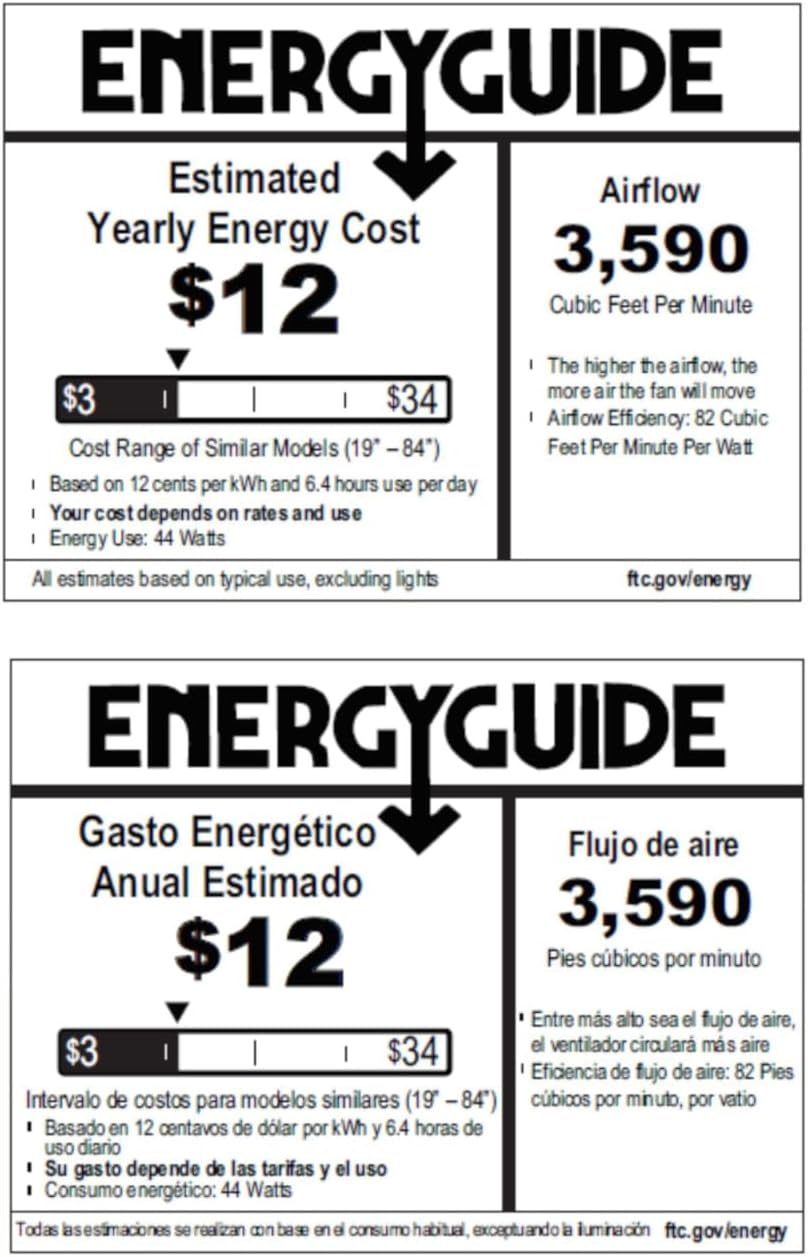
Figure 8.1: Energy Guide for the Hunter 54-inch Ceiling Fan.
9. വാറൻ്റിയും പിന്തുണയും
For warranty information or technical support, please refer to the official Hunter webസൈറ്റിൽ ബന്ധപ്പെടുകയോ അവരുടെ ഉപഭോക്തൃ സേവനവുമായി ബന്ധപ്പെടുകയോ ചെയ്യുക. ഏതെങ്കിലും വാറന്റി ക്ലെയിമുകൾക്ക് വാങ്ങിയതിന്റെ തെളിവായി നിങ്ങളുടെ വാങ്ങൽ രസീത് സൂക്ഷിക്കുക.


