1. ആമുഖം
This manual provides detailed instructions for the safe and efficient operation, setup, and maintenance of the ATLAS TC229 Rim-Clamp Tire Changer with Beadblaster. The TC229 is designed for changing tires on various vehicles, including passenger cars, light trucks, ATVs, and motorcycles (with optional adapters). It features a built-in Beadblaster system for assisting with stubborn tire inflation.
2 സുരക്ഷാ വിവരങ്ങൾ
WARNING: Read and understand all safety warnings and instructions before operating this equipment. Failure to follow these instructions may result in serious injury or death.
- സുരക്ഷാ ഗ്ലാസുകൾ, കയ്യുറകൾ, ശ്രവണ സംരക്ഷണം എന്നിവയുൾപ്പെടെ ഉചിതമായ വ്യക്തിഗത സംരക്ഷണ ഉപകരണങ്ങൾ (PPE) എപ്പോഴും ധരിക്കുക.
- Ensure the machine is properly grounded and connected to a suitable power supply.
- വൃത്തിയുള്ളതും നല്ല വെളിച്ചമുള്ളതുമായ ജോലിസ്ഥലം പരിപാലിക്കുക.
- ഏതെങ്കിലും ഭാഗങ്ങൾക്ക് കേടുപാടുകൾ സംഭവിച്ചാലോ നഷ്ടപ്പെട്ടാലോ മെഷീൻ പ്രവർത്തിപ്പിക്കരുത്.
- Keep hands, feet, and clothing clear of moving parts.
- Never exceed the maximum tire pressure ratings.
- Ensure adequate air supply pressure is maintained for proper operation of pneumatic components.
- പരിശീലനം ലഭിച്ച ഉദ്യോഗസ്ഥർ മാത്രമേ ഈ ഉപകരണം പ്രവർത്തിപ്പിക്കാവൂ.
3. ഉൽപ്പന്ന ഘടകങ്ങൾ
Familiarize yourself with the key components of the ATLAS TC229 Tire Changer:

ചിത്രം 3.1: ഫ്രണ്ട് view of the ATLAS TC229 Tire Changer with a car tire mounted. This image highlights the Swing Arm Adjustment Screw, Handheld Tire Inflater with Gauge, and overall dimensions (77" height, 39.5" width, 52" with bead breaker open).
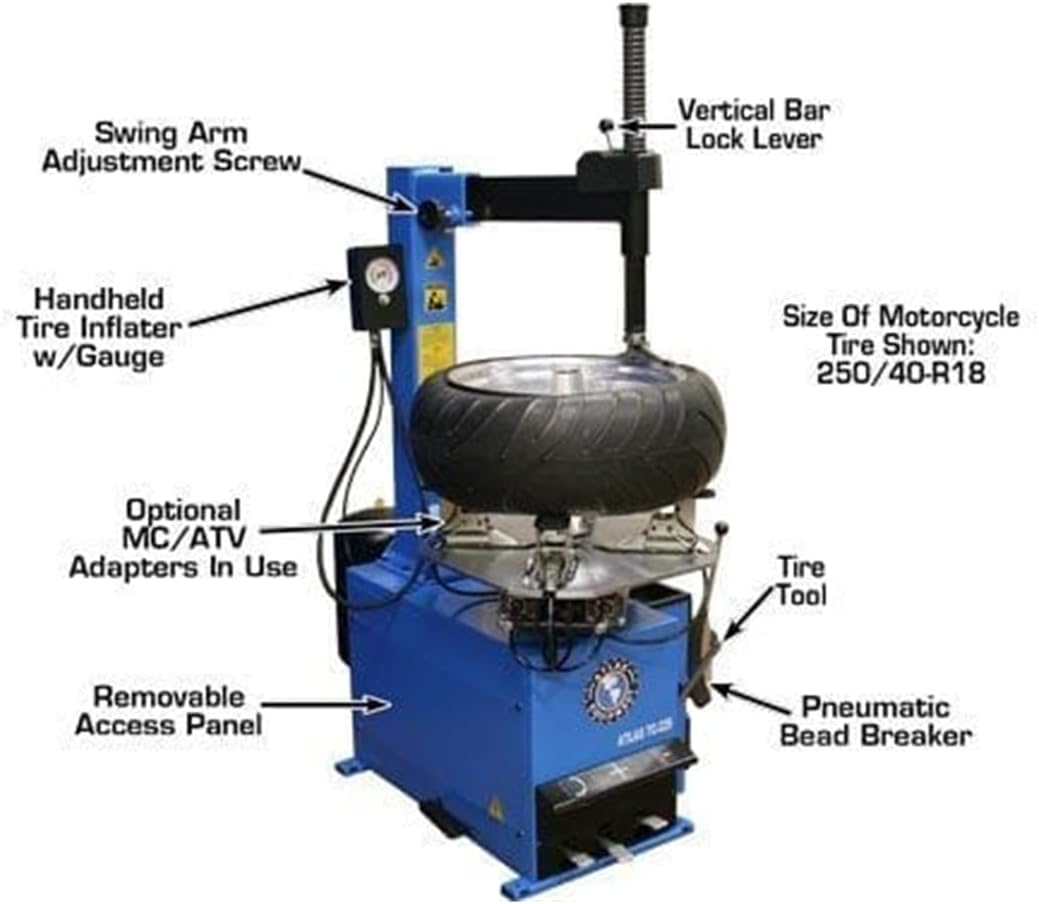
ചിത്രം 3.2: വശം view of the ATLAS TC229 Tire Changer with a motorcycle tire (250/40-R18) using optional MC/ATV adapters. Key components visible include the Vertical Bar Lock Lever, Swing Arm Adjustment Screw, Handheld Tire Inflater with Gauge, Removable Access Panel, Tire Tool, and Pneumatic Bead Breaker.
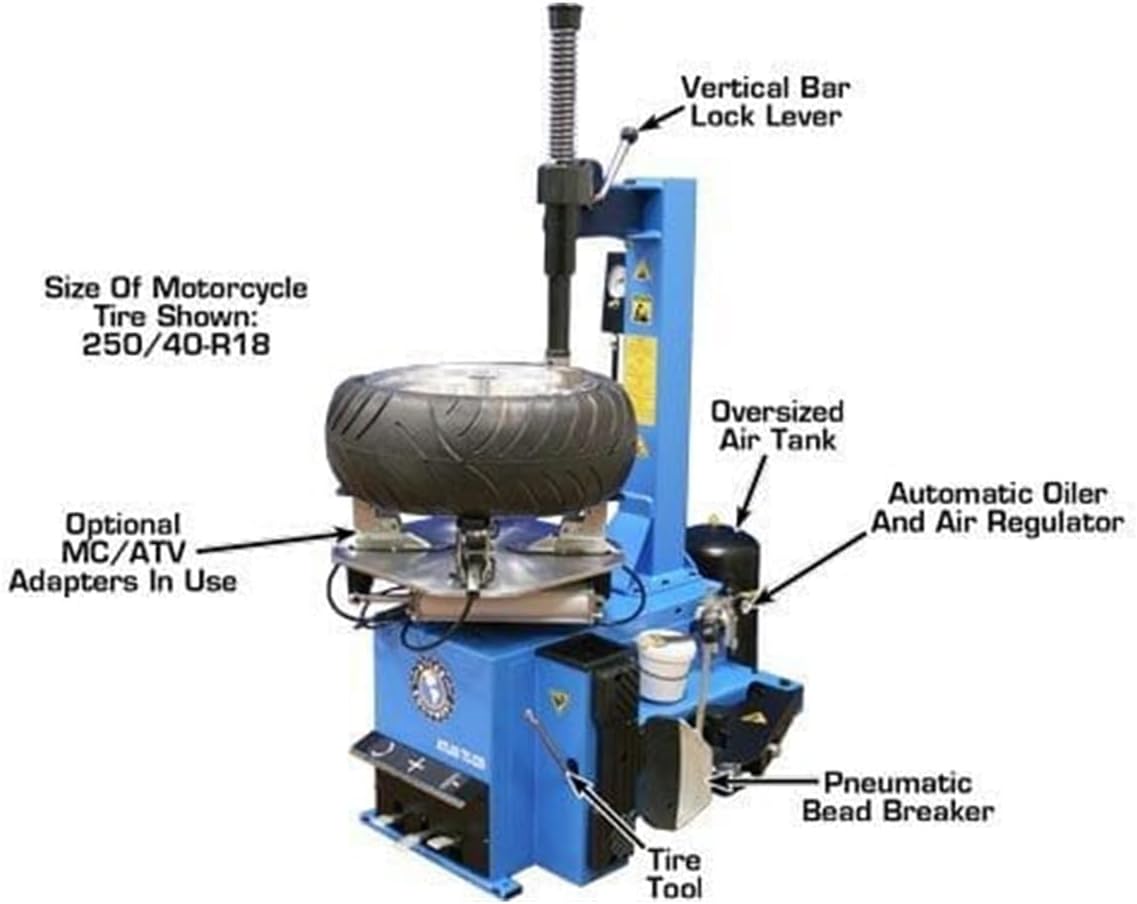
ചിത്രം 3.3: പിൻവശം view of the ATLAS TC229 Tire Changer, illustrating the Oversized Air Tank and the Automatic Oiler and Air Regulator. A motorcycle tire is shown with optional adapters.
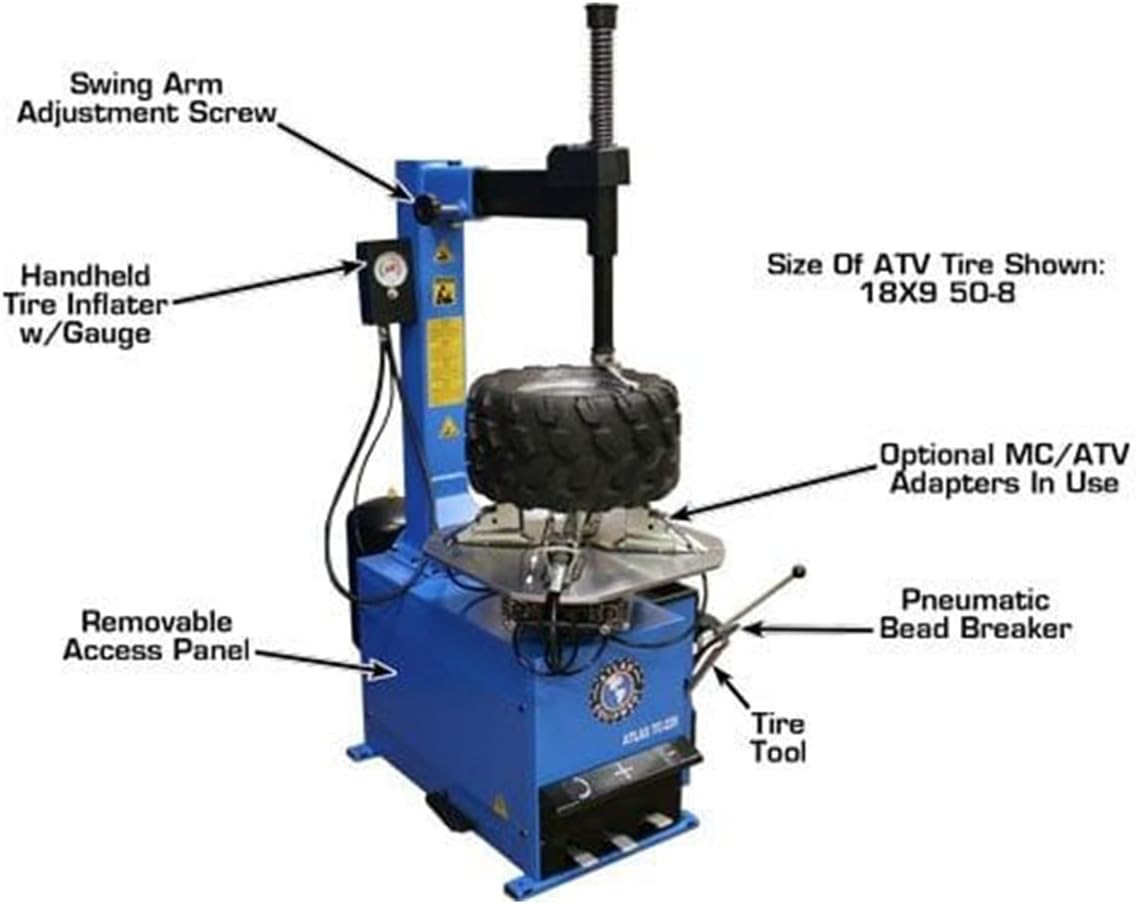
ചിത്രം 3.4: വശം view of the ATLAS TC229 Tire Changer with an ATV tire (18X9 50-8) using optional MC/ATV adapters. This view emphasizes the Removable Access Panel, Pneumatic Bead Breaker, and Tire Tool.

ചിത്രം 3.5: ക്ലോസ് അപ്പ് view demonstrating that the bottom of the mounting head should not contact the wheel during tire mounting or demounting. A motorcycle tire is shown with optional MC/ATV adapters.

ചിത്രം 3.6: Detail of the jaw assembly, illustrating multiple jaw mounting positions that allow for various clamping ranges to accommodate different wheel sizes.
Key Components List:
- Swing Arm Adjustment Screw: Used to position the mounting head relative to the tire.
- Handheld Tire Inflater w/ Gauge: For controlled inflation of tires.
- Vertical Bar Lock Lever: Secures the vertical post in position.
- Pneumatic Bead Breaker: Air-powered tool to separate the tire bead from the rim.
- Tire Tool: Manual lever for demounting and mounting tires.
- Removable Access Panel: Provides access to internal components for maintenance.
- Oversized Air Tank: Stores compressed air for the Beadblaster and pneumatic functions.
- Automatic Oiler and Air Regulator: Conditions the air supply for optimal machine performance and longevity.
- താടിയെല്ല് Clamps: Securely hold the wheel on the turntable.
- Optional MC/ATV Adapters: Used for smaller motorcycle and ATV wheels.
4. സജ്ജീകരണവും ഇൻസ്റ്റാളേഷനും
Proper setup is critical for safe and effective operation.
- അൺപാക്കിംഗും പരിശോധനയും: Carefully unpack the tire changer. Inspect all components for shipping damage. Report any damage immediately to the carrier and supplier.
- അസംബ്ലി: Assemble the main components according to the separate assembly instructions provided with the unit. Ensure all fasteners are tightened securely.
- മൗണ്ടിംഗ്: Securely bolt the tire changer to a concrete floor using appropriate anchor bolts. This prevents movement during operation.
- എയർ സപ്ലൈ കണക്ഷൻ: Connect the machine to a clean, dry compressed air supply capable of providing the required pressure (typically 110-175 PSI) and volume. Ensure the air line passes through the integrated filter/regulator/lubricator unit.
- ഇലക്ട്രിക്കൽ കണക്ഷൻ: Connect the machine to a dedicated electrical circuit with the correct voltagഇ കൂടാതെ amperage as specified on the machine's data plate. Ensure proper grounding.
- പ്രാരംഭ ലൂബ്രിക്കേഷൻ: Check the oil level in the automatic oiler and fill with appropriate pneumatic tool oil if necessary.
- പ്രവർത്തന പരിശോധന: Before first use, perform a full function test of all pneumatic and electrical components without a tire to ensure smooth operation.
5. പ്രവർത്തന നിർദ്ദേശങ്ങൾ
Follow these steps for changing a tire:
- ചക്രം തയ്യാറാക്കുക: Remove any weights, valve cores, and ensure the tire is completely deflated.
- Bead Breaking:
- Position the wheel on the bead breaker arm.
- Actuate the pneumatic bead breaker to separate the tire bead from the rim. Repeat for both sides of the tire.
- ചക്രം സ്ഥാപിക്കൽ:
- Place the wheel onto the turntable.
- Adjust the jaw clamps to securely hold the wheel from the inside or outside, depending on the rim type and desired clamping method. Ensure plastic jaw covers are used to protect alloy wheels.
- Positioning the Mounting Head:
- Swing the vertical arm into position.
- Lower the mounting head until it is just above the rim edge. Lock the vertical bar using the Vertical Bar Lock Lever.
- Adjust the Swing Arm Adjustment Screw to ensure the mounting head clears the rim by approximately 2-3mm, as shown in Figure 3.5.
- Demounting the Tire:
- Lubricate the tire beads and rim edges with tire lubricant.
- Insert the tire tool between the tire bead and the mounting head.
- Rotate the turntable clockwise while guiding the tire bead over the mounting head with the tire tool.
- Repeat for the second bead.
- Mounting the New Tire:
- Lubricate the new tire beads and rim edges.
- Place the bottom bead onto the rim, using the tire tool and turntable rotation.
- For the top bead, ensure the mounting head is correctly positioned. Use the tire tool and turntable rotation to guide the bead onto the rim.
- Tire Inflation (with Beadblaster):
- Connect the handheld tire inflator to the tire valve stem.
- For standard inflation, use the inflator to slowly inflate the tire to the recommended pressure.
- For stiff sidewall tires or when beads are difficult to seat, use the Beadblaster function. This delivers a rapid burst of air to help seat the beads. Exercise extreme caution and stand clear when using the Beadblaster.
- Once beads are seated, inflate to the manufacturer's recommended pressure.
- അവസാന ഘട്ടങ്ങൾ: Remove the wheel from the turntable. Install the valve core and check for leaks.
6. പരിപാലനം
Regular maintenance ensures the longevity and reliable operation of your ATLAS TC229.
- ദിവസേന:
- എയർ ലൈനുകളിലും ഫിറ്റിംഗുകളിലും ചോർച്ചയുണ്ടോ എന്ന് പരിശോധിക്കുക.
- Check the oil level in the automatic oiler and refill if low (use pneumatic tool oil).
- Clean the turntable and jaw clamps.
- പ്രതിവാരം:
- Drain moisture from the air filter bowl.
- Lubricate moving parts, such as the swing arm pivot points and bead breaker cylinder, with appropriate grease.
- Monthly/Quarterly:
- എല്ലാ വൈദ്യുത കണക്ഷനുകളിലും ഇറുകിയതാണോ അതോ തേയ്മാനത്തിന്റെ ലക്ഷണങ്ങളുണ്ടോ എന്നും പരിശോധിക്കുക.
- Check the condition of the drive belt (if applicable) and adjust tension if necessary.
- Inspect plastic jaw covers and mounting head inserts for wear and replace as needed.
7. പ്രശ്നപരിഹാരം
| പ്രശ്നം | സാധ്യമായ കാരണം | പരിഹാരം |
|---|---|---|
| മെഷീൻ പവർ ഓണാക്കുന്നില്ല | വൈദ്യുതി ഇല്ല; സർക്യൂട്ട് ബ്രേക്കർ തകരാറിലായി; സ്വിച്ച് തകരാറിലായി. | Check power connection; reset breaker; contact service. |
| Pneumatic functions (jaws, bead breaker) not working or weak | Low air pressure; air leak; clogged filter; low oil in lubricator. | Check air supply pressure; inspect for leaks; clean filter; refill oiler. |
| ടേൺടേബിൾ കറങ്ങുന്നില്ല | Motor issue; drive belt issue; electrical fault. | Check electrical connections; inspect drive belt; contact service. |
| Beads not seating during inflation | Insufficient lubrication; tire/rim mismatch; low air volume/pressure; Beadblaster not used effectively. | Apply more lubricant; verify tire/rim compatibility; ensure adequate air supply; use Beadblaster as directed. |
8 സ്പെസിഫിക്കേഷനുകൾ
| ഫീച്ചർ | വിശദാംശങ്ങൾ |
|---|---|
| മോഡൽ | ATTC229 |
| ഇനത്തിൻ്റെ ഭാരം | 550 പൗണ്ട് |
| ഉൽപ്പന്ന അളവുകൾ (L x W x H) | 42 x 38 x 30 ഇഞ്ച് |
| നിർമ്മാതാവിൻ്റെ ഭാഗം നമ്പർ | ATTC229-FPD |
| ഫീച്ചറുകൾ | Rim-Clamp, Beadblaster, Air Jaws, Powerful Breaker, Adjustable Jaws, Inflator Box, Tool Kit, Plastic Covers |
| വായു വിതരണ ആവശ്യകത | Typically 110-175 PSI (refer to machine label for exact requirement) |
9. വാറൻ്റിയും പിന്തുണയും
The ATLAS TC229 Tire Changer comes with a one-year parts-only warranty. This warranty covers manufacturing defects in materials and workmanship for a period of one year from the date of purchase. It does not cover wear items or damage due to misuse or improper maintenance.
Replacement parts and wear items are consistently kept in stock to ensure continuous support for your equipment.
For technical assistance, warranty claims, or to order replacement parts, please contact ATLAS Automotive Equipment customer service. You can find more information and contact details on the official ATLAS Store.


