1. സുരക്ഷാ നിർദ്ദേശങ്ങൾ
Before operating the Hobart HS7-1 slicer, read and understand all safety warnings and instructions. Failure to do so may result in serious injury or damage to the equipment.
- Always keep hands clear of the blade area. The blade is extremely sharp.
- Ensure the slicer is placed on a stable, level surface before operation.
- Unplug the slicer from the power outlet before cleaning, maintenance, or when not in use.
- Never operate the slicer without all guards and covers in place.
- Use the product pusher to feed food into the blade; never use bare hands.
- ചലിക്കുന്ന ഭാഗങ്ങളിൽ കുടുങ്ങിപ്പോകാൻ സാധ്യതയുള്ള അയഞ്ഞ വസ്ത്രങ്ങളോ ആഭരണങ്ങളോ ധരിക്കരുത്.
- Keep children and unauthorized personnel away from the slicer during operation.
2. സജ്ജീകരണം
2.1 അൺപാക്കിംഗും പരിശോധനയും
Carefully remove the slicer from its packaging. Inspect all components for any signs of damage during transit. Report any damage to your supplier immediately.
2.2 പ്ലേസ്മെൻ്റ്
Position the slicer on a sturdy, level countertop or table capable of supporting its weight. Ensure there is adequate space around the unit for ventilation and safe operation. The slicer should be near a grounded electrical outlet.
2.3 പ്രാരംഭ ക്ലീനിംഗ്
Before first use, thoroughly clean all food contact surfaces. Refer to the 'Maintenance and Cleaning' section for detailed instructions.

ചിത്രം 1: മുൻഭാഗം view of the Hobart HS7-1 Slicer.
3. പ്രവർത്തന നിർദ്ദേശങ്ങൾ
3.1 കൺട്രോൾ പാനൽ ഓവർview
The control panel features an ON/OFF button, a KNIFE button, and a STROKE LENGTH adjustment. Familiarize yourself with these controls before operation.

Figure 2: Detail of the control panel on the Hobart HS7-1 Slicer.
3.2 Adjusting Slice Thickness
The slice thickness is adjusted using the knob located on the side of the slicer. Rotate the knob to increase or decrease the desired slice thickness. The slicer can produce slices up to 1 inch thick.
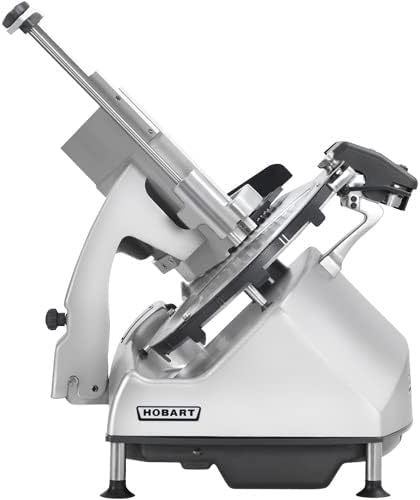
Figure 3: Thickness adjustment knob on the Hobart HS7-1 Slicer.
3.3 ഉൽപ്പന്നം ലോഡുചെയ്യുന്നു
Place the product to be sliced onto the product tray. Ensure the product is securely held against the product pusher and the gauge plate.
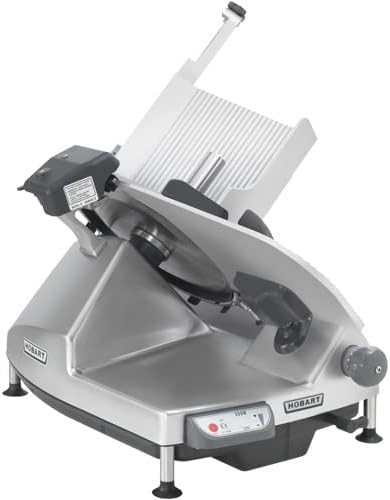
Figure 4: Product tray and carriage system of the Hobart HS7-1 Slicer.
3.4 Slicing Operation
- Ensure the slice thickness is set to your desired level.
- Press the ON button to start the slicer.
- Gently push the product carriage towards the rotating blade using the product pusher. Do not force the product.
- Collect sliced product from the receiving tray.
- When finished, press the OFF button.
4. പരിപാലനവും ശുചീകരണവും
Regular cleaning and maintenance are crucial for the longevity and safe operation of your Hobart HS7-1 slicer. Always unplug the unit before cleaning.
4.1 പ്രതിദിന ശുചീകരണം
- Remove the product tray and carriage system. The exclusive tilting, removable carriage system facilitates easy cleaning.
- Carefully wipe down the blade with a damp cloth and mild, food-safe detergent. Always wipe from the center of the blade outwards.
- Clean all food contact surfaces, including the gauge plate and blade guard, with warm soapy water.
- Rinse thoroughly with clean water and dry completely with a clean cloth.
- For optimal hygiene, hand wash only.

Figure 5: The removable carriage system allows for thorough cleaning.
4.2 ബ്ലേഡ് മൂർച്ച കൂട്ടൽ
The 13-inch CleanCut™ blade is designed for extended sharpness. Refer to the dedicated sharpening instructions in the full manual for proper procedure. Incorrect sharpening can damage the blade.
5. പ്രശ്നപരിഹാരം
This section addresses common issues you might encounter with your Hobart HS7-1 slicer. For problems not listed here, contact authorized service personnel.
- Slicer does not start: Check if the power cord is securely plugged into a grounded outlet. Ensure the ON button is pressed. Verify that all safety interlocks (e.g., blade guard, carriage) are correctly engaged.
- അസമമായ കഷ്ണങ്ങൾ: Ensure the product is firmly held against the gauge plate and product pusher. Check if the blade is clean and sharp. Adjust the slice thickness setting.
- മോട്ടോർ ശബ്ദങ്ങൾ ബുദ്ധിമുട്ടുന്നു: Reduce the pressure applied to the product. Ensure the product is not frozen or excessively hard. Check for any obstructions around the blade.
6 സ്പെസിഫിക്കേഷനുകൾ
| ഫീച്ചർ | സ്പെസിഫിക്കേഷൻ |
|---|---|
| ബ്രാൻഡ് | ഹോബാർട്ട് |
| മോഡൽ | HS7-1 |
| ഓപ്പറേഷൻ മോഡ് | ഓട്ടോമാറ്റിക് |
| ബ്ലേഡ് മെറ്റീരിയൽ | Stainless Steel (CleanCut™) |
| ബ്ലേഡ് വലിപ്പം | 13 ഇഞ്ച് |
| Maximum Slice Thickness | 1 ഇഞ്ച് |
| മെറ്റീരിയൽ | സ്റ്റെയിൻലെസ്സ് സ്റ്റീൽ |
| ഉൽപ്പന്ന പരിപാലന നിർദ്ദേശങ്ങൾ | കൈകൊണ്ട് മാത്രം കഴുകുക |
7. വാറൻ്റിയും പിന്തുണയും
The Hobart HS7-1 Automatic Heavy Duty Slicer is backed by Hobart's standard warranty. For specific warranty details, please refer to the warranty card included with your product or visit the official Hobart website. For technical support, service, or replacement parts, please contact your authorized Hobart dealer or customer service representative.
Always use genuine Hobart replacement parts to ensure optimal performance and maintain warranty validity.


