1. ആമുഖം
Thank you for choosing the La Crosse Technology WS6825 Weather Station. This device provides accurate indoor and outdoor temperature and humidity readings, along with a weather forecast, time, and date. This manual will guide you through the setup, operation, and maintenance of your new weather station to ensure optimal performance.
The WS6825 features a clear, colorful display and includes three wireless outdoor sensors for comprehensive environmental monitoring.
2. പാക്കേജ് ഉള്ളടക്കം
Please ensure all components are present before proceeding with the setup:
- 1 x Display Unit (Main Station)
- 3 x Temperature/Humidity Sensors (Wireless Outdoor Sensors)
- 1 x USB Cable (for optional power)
- 1 x ഇൻസ്ട്രക്ഷൻ മാനുവൽ (ഈ ഡോക്യുമെന്റ്)

Image 1: La Crosse Technology WS6825 Weather Station with main display unit and three wireless outdoor sensors.
3. ഉൽപ്പന്നം കഴിഞ്ഞുview
3.1 പ്രധാന ഡിസ്പ്ലേ യൂണിറ്റ്
The main display unit shows all collected data, including indoor and outdoor temperatures, humidity, time, date, and weather forecast. It features a color screen for easy readability and several control buttons.
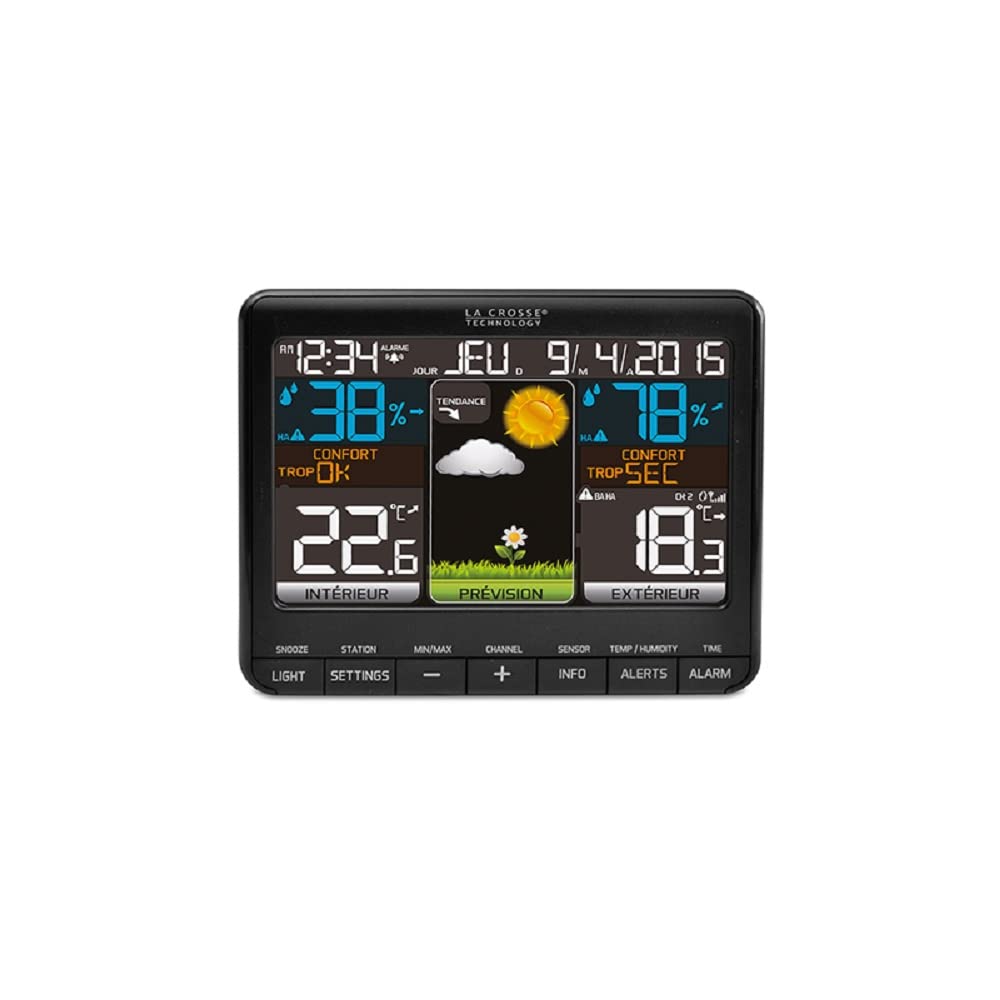
ചിത്രം 2: ക്ലോസ്-അപ്പ് view of the WS6825 main display unit, illustrating various data points.
3.2 Wireless Outdoor Sensors
The three wireless sensors transmit temperature and humidity data to the main unit via 433 MHz radio frequency. Each sensor can be placed in a different location to monitor various outdoor conditions.
3.3 നിയന്ത്രണ ബട്ടണുകൾ
The main unit features several buttons for configuration and data access:
- സ്നൂസ്/ലൈറ്റ്: Activates snooze for alarms or adjusts backlight.
- ക്രമീകരണങ്ങൾ: Enters setup mode for time, date, and other preferences.
- MIN/MAX: Displays minimum and maximum recorded values.
- +/-: Adjusts values during setup or navigates channels.
- ചാനൽ: Switches between data from different outdoor sensors.
- സെൻസർ: Manually searches for outdoor sensors.
- വിവരം: Displays additional information like heat index or dew point.
- അലേർട്ടുകൾ: താപനില/ഈർപ്പ അലേർട്ടുകൾ സജ്ജമാക്കുന്നു.
- അലാറം: Sets and activates time alarms.
4. സജ്ജീകരണം
4.1 പ്രധാന യൂണിറ്റിന് പവർ നൽകുന്നു
- Insert 3 AAA batteries (not included) into the main display unit, observing polarity.
- Alternatively, connect the provided USB cable to the main unit and a power adapter (not included) for continuous power.
- The display will light up and begin searching for sensors.
4.2 ഔട്ട്ഡോർ സെൻസറുകളിൽ ബാറ്ററികൾ ഇൻസ്റ്റാൾ ചെയ്യുന്നു
- Open the battery compartment on each of the three outdoor sensors.
- Insert 2 AA batteries (not included) into each sensor, observing polarity.
- ബാറ്ററി കമ്പാർട്ടുമെൻ്റുകൾ സുരക്ഷിതമായി അടയ്ക്കുക.
4.3 സെൻസർ ജോടിയാക്കൽ
The main unit should automatically detect and pair with the outdoor sensors once they are powered on. If pairing does not occur within a few minutes:
- Ensure the sensors are within range (up to 100 meters in open air).
- അമർത്തുക സെൻസർ button on the main unit to initiate a manual search.
- On each outdoor sensor, there is a small reset button (often labeled 'TX' or 'RESET'). Press this button to force a signal transmission.
4.4 Initial Settings (Time, Date, Units)
- അമർത്തിപ്പിടിക്കുക ക്രമീകരണങ്ങൾ button to enter setup mode.
- ഉപയോഗിക്കുക +/- buttons to adjust values (e.g., hour, minute, year, month, day).
- അമർത്തുക ക്രമീകരണങ്ങൾ ഓരോ ക്രമീകരണവും സ്ഥിരീകരിച്ച് അടുത്തതിലേക്ക് നീങ്ങാൻ വീണ്ടും.
- You can typically set 12/24-hour format, Celsius/Fahrenheit units, and language preference during this process.
- Exit setup mode by pressing ക്രമീകരണങ്ങൾ repeatedly until the normal display returns, or wait for it to time out.
4.5 സെൻസർ പ്ലേസ്മെന്റ്
For accurate outdoor readings, consider the following:
- Place sensors in a shaded area, away from direct sunlight, to prevent inaccurate temperature readings.
- Ensure sensors are protected from direct rain or snow.
- Mount sensors vertically to allow for proper drainage.
- Avoid placing sensors near large metal objects, electrical appliances, or sources of heat/cold that could interfere with readings or transmission.
- Keep sensors within the effective transmission range of the main unit.
5. കാലാവസ്ഥാ കേന്ദ്രം പ്രവർത്തിപ്പിക്കൽ
5.1 വിവരങ്ങൾ പ്രദർശിപ്പിക്കുക
The display is divided into several sections, showing:
- സമയവും തീയതിയും: നിലവിലെ സമയം, ആഴ്ചയിലെ ദിവസം, തീയതി.
- ഇൻഡോർ അവസ്ഥകൾ: ഇൻഡോർ താപനിലയും ഈർപ്പവും.
- പുറത്തെ അവസ്ഥകൾ: Outdoor temperature and humidity from the selected sensor.
- കാലാവസ്ഥാ പ്രവചനം: Icons representing predicted weather conditions (e.g., sunny, cloudy, rainy).
- കംഫർട്ട് ലെവൽ: An indicator of indoor comfort based on temperature and humidity.
- ട്രെൻഡ് സൂചകങ്ങൾ: Arrows showing if temperature or humidity is rising, falling, or stable.
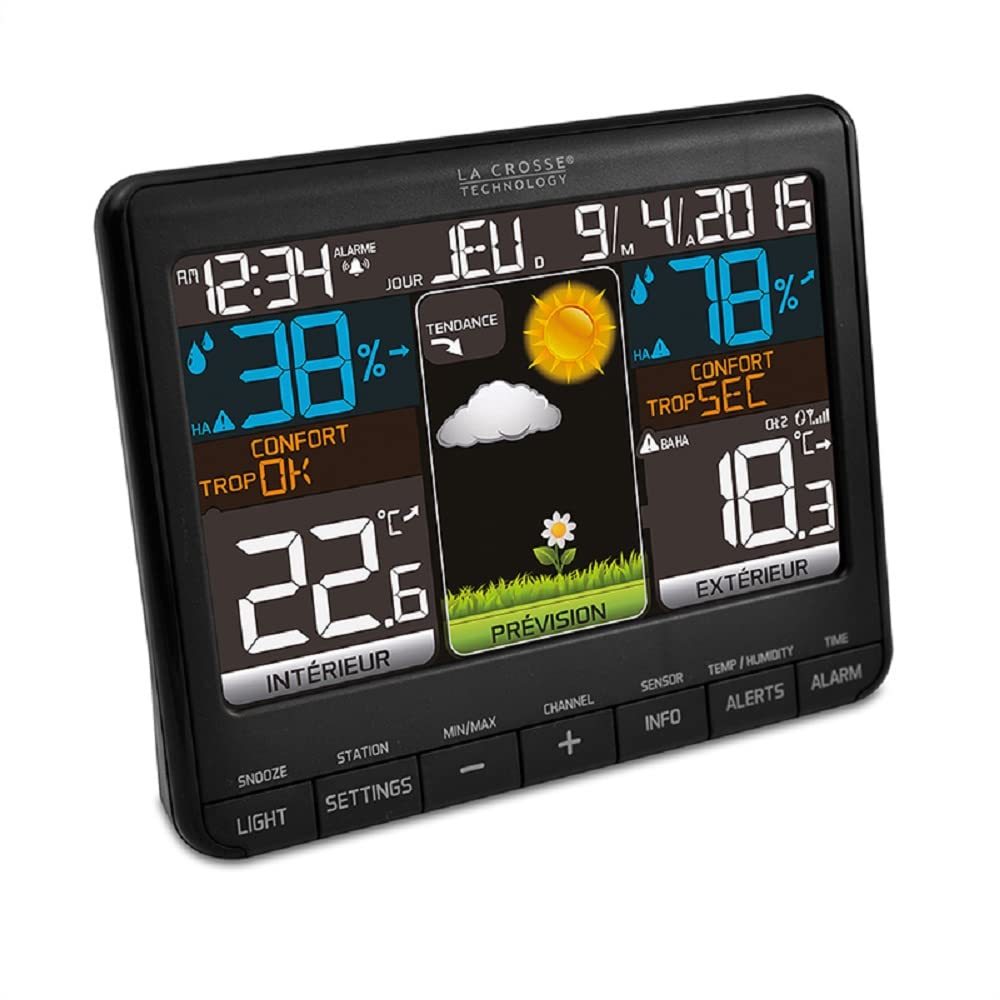
ചിത്രം 3: ആംഗിൾഡ് view of the WS6825 display, showing the clear segmentation of information.
5.2 Viewing Multiple Outdoor Sensors
അമർത്തുക ചാനൽ button to cycle through the readings from the three connected outdoor sensors (CH1, CH2, CH3). The display will indicate which channel's data is currently shown.
5.3 Minimum/Maximum Readings
അമർത്തുക MIN/MAX എന്നതിലേക്കുള്ള ബട്ടൺ view the highest and lowest recorded indoor and outdoor temperatures and humidity levels since the last reset. Press again to cycle through MIN, MAX, and current readings. To reset the MIN/MAX values, press and hold the MIN/MAX അതേസമയം ബട്ടൺ viewഅവരെ ing.
5.4 അലാറങ്ങൾ സജ്ജീകരിക്കൽ
- അമർത്തുക അലാറം എന്നതിലേക്കുള്ള ബട്ടൺ view അലാറം സമയം.
- അമർത്തിപ്പിടിക്കുക അലാറം അലാറം ക്രമീകരണ മോഡിൽ പ്രവേശിക്കാൻ ബട്ടൺ.
- ഉപയോഗിക്കുക +/- മണിക്കൂറും മിനിറ്റും ക്രമീകരിക്കാനുള്ള ബട്ടണുകൾ.
- അമർത്തുക അലാറം ഓരോ ക്രമീകരണവും സ്ഥിരീകരിക്കാൻ.
- അമർത്തുക അലാറം once more to activate or deactivate the alarm (an alarm icon will appear/disappear).
5.5 Temperature/Humidity Alerts
The station may support setting high/low alerts for temperature and humidity. Refer to the on-screen prompts or the അലേർട്ടുകൾ button functionality for detailed instructions on setting these thresholds.
6. പരിപാലനം
6.1 ബാറ്ററി മാറ്റിസ്ഥാപിക്കൽ
- Replace batteries in the main unit and sensors when the low battery indicator appears on the display.
- Always replace all batteries in a unit at the same time with new batteries of the same type.
- പ്രാദേശിക നിയന്ത്രണങ്ങൾ അനുസരിച്ച് പഴയ ബാറ്ററികൾ ഉത്തരവാദിത്തത്തോടെ നീക്കം ചെയ്യുക.
6.2 വൃത്തിയാക്കൽ
Wipe the display unit and sensors with a soft, damp തുണി. അബ്രാസീവ് ക്ലീനറുകളോ ലായകങ്ങളോ ഉപയോഗിക്കരുത്, കാരണം ഇവ പ്രതലങ്ങളെയോ ഇലക്ട്രോണിക് ഘടകങ്ങളെയോ നശിപ്പിച്ചേക്കാം.
6.3 പരിസ്ഥിതി പരിഗണനകൾ
Periodically check the placement of your outdoor sensors to ensure they remain protected from extreme weather and are still providing accurate readings. Clear any debris that may accumulate around the sensors.
7. പ്രശ്നപരിഹാരം
| പ്രശ്നം | സാധ്യമായ പരിഹാരം |
|---|---|
| പുറത്തെ താപനില/ഈർപ്പം അളക്കുന്നില്ല. |
|
| കൃത്യമല്ലാത്ത താപനില/ഈർപ്പനില വായനകൾ. |
|
| ഡിസ്പ്ലേ ശൂന്യമോ മങ്ങിയതോ ആണ്. |
|
| സമയം/തീയതി തെറ്റാണ്. |
|
8 സ്പെസിഫിക്കേഷനുകൾ
| ഫീച്ചർ | വിശദാംശങ്ങൾ |
|---|---|
| മോഡൽ നമ്പർ | WS6825BLA+2 |
| ബ്രാൻഡ് | ലാ ക്രോസ് ടെക്നോളജി |
| ഉൽപ്പന്ന അളവുകൾ | 15 x 4.2 x 12.3 സെ.മീ (മെയിൻ യൂണിറ്റ്) |
| ഭാരം | 0.3 g (Main Unit) |
| ഇൻഡോർ താപനില ശ്രേണി | 0°C മുതൽ 50°C വരെ (32°F മുതൽ 122°F വരെ) |
| Do ട്ട്ഡോർ താപനില ശ്രേണി | -40°C മുതൽ 60°C വരെ (-40°F മുതൽ 140°F വരെ) |
| ഇൻഡോർ ഹ്യുമിഡിറ്റി റേഞ്ച് | 1% മുതൽ 99% വരെ RH |
| ഔട്ട്ഡോർ ഹ്യുമിഡിറ്റി റേഞ്ച് | 1% മുതൽ 99% വരെ RH |
| കണക്റ്റിവിറ്റി ടെക്നോളജി | Radio Frequency (433 MHz) |
| പവർ സോഴ്സ് (മെയിൻ യൂണിറ്റ്) | Battery Powered (3x AAA, not included) or USB Cable |
| Power Source (Sensors) | Battery Powered (2x AA per sensor, not included) |
| മെറ്റീരിയൽ | കുൻസ്റ്റ്സ്റ്റോഫ് (പ്ലാസ്റ്റിക്) |
| പ്രത്യേക സവിശേഷതകൾ | Color Display, Time & Date, Alarm with Snooze, Calendar, Min/Max Records, Trend Indicators, Weather Forecast, Comfort Level, Heat Index, Dew Point |
9. വാറൻ്റിയും പിന്തുണയും
La Crosse Technology products are designed for reliability and performance. For specific warranty information, please refer to the warranty card included with your purchase or visit the official La Crosse Technology website. If you encounter any issues not covered in this manual, please contact La Crosse Technology customer support for assistance.
ഏതെങ്കിലും വാറന്റി ക്ലെയിമുകൾക്കായി നിങ്ങളുടെ വാങ്ങിയതിന്റെ തെളിവ് സൂക്ഷിക്കുക.


