ആമുഖം
This manual provides detailed instructions for the safe and effective use of the YATO YT-05342 Professional Glow Plug Drilling Tool Set. This 16-piece kit is designed for the precise removal of broken or seized glow plugs, including those with M8 and M10 threads, and for repairing damaged glow plug threads.
സുരക്ഷാ വിവരങ്ങൾ
Always prioritize safety when working with tools. Failure to follow safety guidelines can result in injury or damage to property.
- സുരക്ഷാ ഗ്ലാസുകളും കയ്യുറകളും ഉൾപ്പെടെയുള്ള ഉചിതമായ വ്യക്തിഗത സംരക്ഷണ ഉപകരണങ്ങൾ എപ്പോഴും ധരിക്കുക.
- Ensure the vehicle's engine is cool before attempting any work on glow plugs.
- ആകസ്മികമായ വൈദ്യുത ഡിസ്ചാർജ് തടയാൻ വാഹനത്തിന്റെ ബാറ്ററി വിച്ഛേദിക്കുക.
- Use the correct tool for each task. Do not force tools.
- ജോലിസ്ഥലം വൃത്തിയുള്ളതും നല്ല വെളിച്ചമുള്ളതുമായി സൂക്ഷിക്കുക.
- Store tools securely in their case after use to prevent damage and loss.
പാക്കേജ് ഉള്ളടക്കം
The YATO YT-05342 Professional Glow Plug Drilling Tool Set includes the following components:
- 2 x Step Drill Bits for drilling torn-off glow plugs: 7 x 5.5 mm and 9 x 5.5 mm
- Taps: M8 x 1.0, M10 x 1.0, and 6.3 mm (1/4 inch) - 28 UNF
- Tap Holder with Ratchet Function
- Other necessary components for glow plug disassembly and thread repair (16 pieces total).
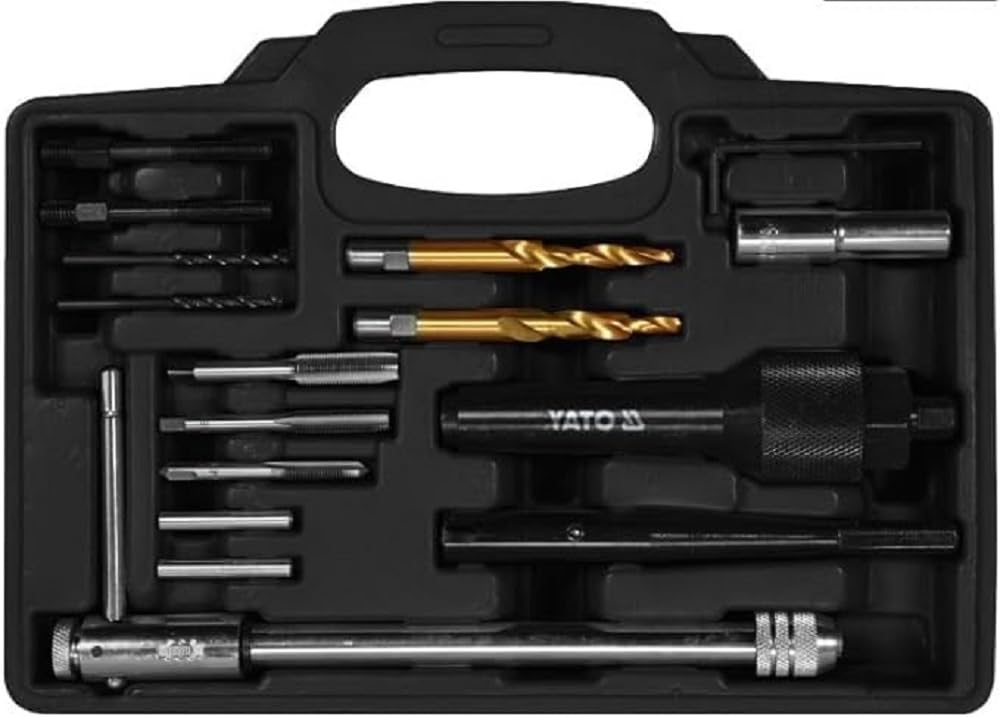
ചിത്രം: കഴിഞ്ഞുview of the YATO YT-05342 Professional Glow Plug Drilling Tool Set, highlighting its 16-piece count, CrV and HSS 4241 materials, 3/8" (10mm) drive, and a diagram illustrating the removal of a broken glow plug.
സജ്ജമാക്കുക
Before beginning the glow plug removal process, ensure the following:
- വാഹനം തയ്യാറാക്കൽ: Park the vehicle on a level surface and engage the parking brake. Allow the engine to cool completely.
- പ്രവേശനം: Identify the location of the broken glow plug. Remove any components obstructing access to the glow plug, such as intake manifolds or wiring harnesses.
- വൃത്തിയാക്കൽ: Thoroughly clean the area around the glow plug to prevent debris from entering the combustion chamber during removal. Use compressed air if available.
- ലൂബ്രിക്കേഷൻ: Apply a penetrating oil to the glow plug threads and allow it to soak for some time to help loosen any corrosion.
Operating Instructions: Removing Broken Glow Plugs
This procedure outlines the general steps for removing a broken glow plug. Specific situations may require variations.
- Assess the Break: Determine how the glow plug has broken. This kit is primarily for glow plugs where the electrode or tip has broken off inside the cylinder head, leaving the threaded body in place.
- Drilling the Center:
- Select the appropriate step drill bit (7 x 5.5 mm or 9 x 5.5 mm) based on the glow plug's diameter. The goal is to drill out the center of the broken glow plug's body.
- Carefully align the drill bit with the center of the broken glow plug. Use a low-speed drill and apply steady, even pressure.
- Drill only deep enough to create a pilot hole for the tap, avoiding damage to the cylinder head.
- Tapping New Threads:
- Choose the correct tap (M8 x 1.0, M10 x 1.0, or 6.3 mm (1/4 inch) - 28 UNF) that matches the internal diameter created by the drill bit.
- Attach the selected tap to the tap holder with the ratchet function.
- Carefully insert the tap into the drilled hole. Turn clockwise to cut new threads. Apply cutting oil to aid the process and prevent tap breakage.
- Turn the tap a quarter turn clockwise, then a half turn counter-clockwise to break chips and clear debris. Repeat until new threads are fully formed.
- വേർതിരിച്ചെടുക്കൽ:
- Once new threads are created, an extractor (not explicitly detailed in feature bullets but part of a complete kit) can be screwed into these new threads.
- Use the extractor to carefully pull out the remaining part of the broken glow plug.
- Thread Repair (if necessary): If the original glow plug threads in the cylinder head are damaged, use the thread repair components (e.g., re-threading taps, thread inserts) from the kit to restore the threads before installing a new glow plug.
- ക്ലീനപ്പ്: Thoroughly clean any metal shavings or debris from the cylinder head and combustion chamber before installing a new glow plug. Use a vacuum cleaner or compressed air (with caution and appropriate protection).
Image: Diagram illustrating the process of removing a broken glow plug, showing the drilling and extraction steps.
മെയിൻ്റനൻസ്
Proper maintenance ensures the longevity and performance of your tool set.
- വൃത്തിയാക്കൽ: After each use, clean all tools thoroughly to remove metal shavings, oil, and dirt. Use a clean cloth and a suitable degreaser if necessary.
- ലൂബ്രിക്കേഷൻ: Apply a light coat of rust-preventative oil to metal components, especially drill bits and taps, before storage.
- സംഭരണം: Store the tool set in its original protective case in a dry, clean environment to prevent corrosion and damage.
- പരിശോധന: Periodically inspect drill bits and taps for wear or damage. Replace worn components to maintain optimal performance and prevent damage to workpieces.
ട്രബിൾഷൂട്ടിംഗ്
If you encounter issues while using the tool set, consider the following:
- Drill bit not cutting: Ensure the drill bit is correctly seated and not dull. Apply appropriate pressure and use a low drill speed.
- Tap not forming threads: Verify the pilot hole diameter is correct for the tap. Ensure the tap is sharp and apply cutting oil. Turn the tap back and forth to clear chips.
- Glow plug fragment not extracting: Re-evaluate the depth of drilling and tapping. Ensure the extractor is fully engaged with the newly cut threads.
- Tool breakage: This often indicates excessive force, incorrect tool selection, or improper technique. Always use caution and follow instructions.
സ്പെസിഫിക്കേഷനുകൾ
| ആട്രിബ്യൂട്ട് | മൂല്യം |
| മോഡൽ നമ്പർ | YT-05342 |
| കഷണങ്ങളുടെ എണ്ണം | 16 |
| മെറ്റീരിയൽ | Plastic, Metal (CrV, HSS 4241) |
| ഇനത്തിൻ്റെ ഭാരം | 1 കിലോഗ്രാം |
| Step Drill Bit Sizes | 7 x 5.5 മിമി, 9 x 5.5 എംഎം |
| Tap Sizes | M8 x 1.0, M10 x 1.0, 6.3 mm (1/4 inch) - 28 UNF |
| ഡ്രൈവ് വലുപ്പം | 3/8" (10 മിമി) |
വാറൻ്റിയും പിന്തുണയും
This YATO product is manufactured to high-quality standards and is covered by the manufacturer's standard warranty against defects in materials and workmanship. For specific warranty terms, please refer to the documentation provided with your purchase or visit the official YATO webസൈറ്റ്.
For technical assistance, troubleshooting, or to inquire about replacement parts, please contact YATO customer support through their official channels. Provide your product model number (YT-05342) and details of your issue for efficient service.


