1. ആമുഖം
This manual provides detailed instructions for the safe installation, operation, and maintenance of your Utilitech 100-CFM Bathroom Ventilation Fan with 13-Watt LED Light. This ENERGY STAR compliant fan is designed to provide efficient ventilation and illumination for your bathroom. Please read this manual thoroughly before beginning installation or operation and retain it for future reference.
2 പ്രധാനപ്പെട്ട സുരക്ഷാ വിവരങ്ങൾ
മുന്നറിയിപ്പ്: തീ, വൈദ്യുത ആഘാതം അല്ലെങ്കിൽ ആളുകൾക്ക് പരിക്കേൽക്കാനുള്ള സാധ്യത കുറയ്ക്കുന്നതിന്, ഇനിപ്പറയുന്നവ നിരീക്ഷിക്കുക:
- ഇൻസ്റ്റാളേഷൻ ജോലികളും ഇലക്ട്രിക്കൽ വയറിംഗും ഫയർ-റേറ്റഡ് കൺസ്ട്രക്ഷൻ കോഡുകളും സ്റ്റാൻഡേർഡുകളും ഉൾപ്പെടെ, ബാധകമായ എല്ലാ കോഡുകൾക്കും മാനദണ്ഡങ്ങൾക്കും അനുസൃതമായി യോഗ്യതയുള്ള വ്യക്തി(കൾ) ചെയ്യണം.
- നിർമ്മാതാവ് ഉദ്ദേശിച്ച രീതിയിൽ മാത്രം ഈ യൂണിറ്റ് ഉപയോഗിക്കുക. നിങ്ങൾക്ക് ചോദ്യങ്ങളുണ്ടെങ്കിൽ, നിർമ്മാതാവിനെ ബന്ധപ്പെടുക.
- യൂണിറ്റ് സർവീസ് ചെയ്യുന്നതിനോ വൃത്തിയാക്കുന്നതിനോ മുമ്പ്, സേവന പാനലിൽ പവർ സ്വിച്ച് ഓഫ് ചെയ്യുകയും അബദ്ധത്തിൽ വൈദ്യുതി സ്വിച്ച് ഓൺ ആകുന്നത് തടയാൻ സർവീസ് വിച്ഛേദിക്കൽ മാർഗങ്ങൾ ലോക്ക് ചെയ്യുകയും ചെയ്യുക. സേവനം വിച്ഛേദിക്കുന്നതിനുള്ള മാർഗ്ഗങ്ങൾ ലോക്കുചെയ്യാൻ കഴിയാത്തപ്പോൾ, എ പോലുള്ള ഒരു പ്രധാന മുന്നറിയിപ്പ് ഉപകരണം സുരക്ഷിതമായി ഉറപ്പിക്കുക tag, സേവന പാനലിലേക്ക്.
- Do not use this fan with any solid-state speed control device unless specifically approved for use with this model.
- This unit is intended for general ventilating use only. Do not use to exhaust hazardous or explosive materials and vapors.
- Duct work must always be vented to the outdoors.
- To prevent motor bearing damage and noisy and/or unbalanced impellers, keep drywall spray, construction dust, etc., off power unit.
- ഇൻസ്റ്റാളേഷൻ സമയത്ത് എല്ലായ്പ്പോഴും സുരക്ഷാ ഗ്ലാസുകളും കയ്യുറകളും ധരിക്കുക.
- Ensure the fan housing is securely mounted to structural framing.
3. പാക്കേജ് ഉള്ളടക്കം
Carefully unpack your ventilation fan and check that all components are present and undamaged. If any parts are missing or damaged, do not attempt to install the product. Contact customer support.
- Ventilation Fan Housing Assembly
- Motor and Blower Wheel Assembly
- LED Light Grille Assembly
- ഇൻസ്റ്റലേഷൻ ഹാർഡ്വെയർ (സ്ക്രൂകൾ, വയർ നട്ടുകൾ)
- ഉപയോക്തൃ മാനുവൽ
4. ഇൻസ്റ്റലേഷൻ നിർദ്ദേശങ്ങൾ
This fan is designed for easy fit installation, often replacing common bath fan housing sizes without extensive drywall modification. However, careful attention to detail is required for proper mounting and wiring.
4.1 ടൂളുകൾ ആവശ്യമാണ്
- സ്ക്രൂഡ്രൈവർ (ഫിലിപ്സും ഫ്ലാറ്റ്ഹെഡും)
- ഡ്രിൽ
- വയർ സ്ട്രിപ്പറുകൾ
- പ്ലയർ
- അളക്കുന്ന ടേപ്പ്
- യൂട്ടിലിറ്റി കത്തി
- സുരക്ഷാ ഗ്ലാസുകളും കയ്യുറകളും
4.2 Mounting the Fan Housing
- പവർ ഓഫ് ചെയ്യുക: Before starting, ensure power is OFF at the circuit breaker or fuse box to avoid electrical shock.
- തുറക്കൽ തയ്യാറാക്കുക: If replacing an existing fan, remove the old unit. The new housing may be smaller, requiring additional wood blocking between joists for secure mounting.
- Position Housing: Place the fan housing between ceiling joists. The housing should be positioned so that its bottom edge is flush with the finished drywall surface, not the bottom of the joist. This is crucial for the LED light/cover to sit properly.
- സുരക്ഷിതമായ ഭവനം: The fan housing has pre-drilled mounting holes. Secure the housing to the joists using appropriate screws. It is recommended to add additional mounting screws on all sides for stability. Before drilling new holes, temporarily install the fan motor housing to identify locations where screws will not interfere with its installation.
- Connect Duct Work: Attach the appropriate size duct (typically 4-inch round) to the fan's duct connector. Secure with duct tape or clamps to ensure an airtight seal. Ensure the duct work vents directly to the outdoors.

ചിത്രം 1: അടിവശം view of the fan housing, showing the duct connector and internal components.
4.3 ഇലക്ട്രിക്കൽ വയറിംഗ്
ജാഗ്രത: All wiring must comply with local electrical codes. If you are unsure, consult a qualified electrician.
- ആക്സസ് വയറിംഗ് കമ്പാർട്ട്മെന്റ്: Open the wiring compartment cover on the fan housing. Note that the wiring compartment is compact.
- റൂട്ട് വയറുകൾ: Route the electrical supply wires (typically black, white, and ground) into the wiring compartment through an appropriate knockout hole. Use a strain relief clamp to prevent wire chaffing.
- കണക്ഷനുകൾ ഉണ്ടാക്കുക:
- ബന്ധിപ്പിക്കുക black (hot) wire from the power supply to the കറുപ്പ് fan wire.
- ബന്ധിപ്പിക്കുക white (neutral) wire from the power supply to the വെള്ള fan wire.
- ബന്ധിപ്പിക്കുക bare copper (ground) wire from the power supply to the പച്ച അല്ലെങ്കിൽ വെറും ചെമ്പ് fan ground wire.
- If connecting to separate switches for fan and light, ensure correct connections for each circuit. The fan may come with quick-connect fittings; if your wiring requires multiple incoming wires per connection, use appropriate wire nuts.
- സുരക്ഷിത വയറിംഗ്: Carefully tuck all wires into the wiring compartment and secure the cover. Ensure no wires are pinched.
4.4 Installing Motor and Grille
- Install Motor Assembly: Slide the motor and blower wheel assembly into the fan housing. Ensure it clicks securely into place or is fastened with provided screws.
- Connect LED Light: Plug the LED light connector from the grille assembly into the receptacle on the fan motor assembly.
- ഗ്രിൽ അറ്റാച്ചുചെയ്യുക: Squeeze the mounting springs on the grille assembly and insert them into the slots in the fan housing. Push the grille firmly against the ceiling until it is flush.
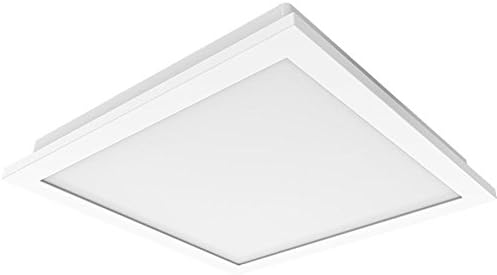
Figure 2: The LED light grille assembly, which covers the fan housing.
5. പ്രവർത്തന നിർദ്ദേശങ്ങൾ
Your Utilitech ventilation fan is designed for quiet and efficient operation, providing both air circulation and illumination.
- ഫാൻ പ്രവർത്തനം: Turn on the wall switch connected to the fan. The DC brushless motor may start slightly slower than traditional AC motors, but it will quickly reach its full 100 CFM capacity.
- LED ലൈറ്റ് ഓപ്പറേഷൻ: Turn on the wall switch connected to the LED light. The integrated 13-watt LED light provides bright illumination. This light is dimmable; if you wish to adjust its brightness, ensure it is connected to a compatible dimmer switch (sold separately).
- ഒപ്റ്റിമൽ പ്രകടനം: For best ventilation, operate the fan during and after showering or bathing to effectively remove moisture and odors from the bathroom.
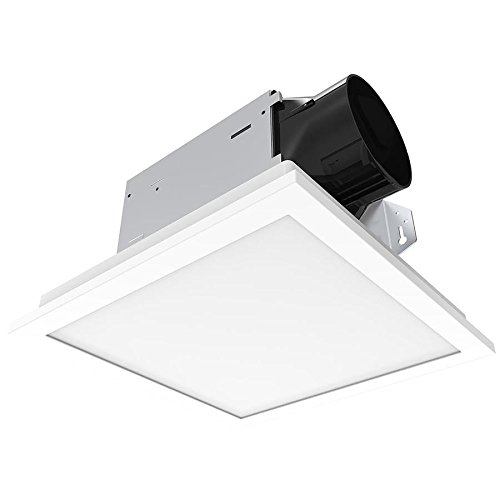
Figure 3: The Utilitech fan and LED light integrated into a bathroom ceiling.
6. പരിപാലനം
Regular maintenance ensures optimal performance and extends the life of your ventilation fan.
- വൈദ്യുതി വിച്ഛേദിക്കൽ: Always disconnect power at the service panel before performing any maintenance.
- ഗ്രിൽ ക്ലീനിംഗ്: Remove the LED light grille by gently pulling down on the sides to release the mounting springs. Wipe the grille with a soft, damp തുണി. ഉരച്ചിലുകൾ ഉള്ള ക്ലീനറുകൾ ഉപയോഗിക്കരുത്.
- Fan Housing and Blower Cleaning: With the grille removed, carefully vacuum or wipe away any dust or debris from the fan housing interior and the blower wheel. Avoid bending or damaging the blower blades.
- LED Light Module: The integrated LED light module is designed for long life (up to 30,000 hours) and is not user-replaceable. If the LED light fails or malfunctions, the entire unit may need to be replaced. Contact customer support for assistance.
- പുനഃസംയോജനം: Once clean, reattach the grille by squeezing the mounting springs and inserting them back into the housing slots. Restore power.
7. ട്രബിൾഷൂട്ടിംഗ് ഗൈഡ്
ഉപഭോക്തൃ പിന്തുണയുമായി ബന്ധപ്പെടുന്നതിന് മുമ്പ്, പൊതുവായ പ്രശ്നങ്ങൾക്ക് ഇനിപ്പറയുന്ന ട്രബിൾഷൂട്ടിംഗ് ഗൈഡ് പരിശോധിക്കുക.
| പ്രശ്നം | സാധ്യമായ കാരണം | പരിഹാരം |
|---|---|---|
| ഫാൻ പ്രവർത്തിക്കുന്നില്ല. | വൈദ്യുതി ഇല്ല; വയറിംഗ് അയഞ്ഞിരിക്കുന്നു; സ്വിച്ച് തകരാറിലായി. | സർക്യൂട്ട് ബ്രേക്കർ/ഫ്യൂസ് പരിശോധിക്കുക. എല്ലാ വയർ കണക്ഷനുകളും സുരക്ഷിതമാണെന്ന് ഉറപ്പാക്കുക. വാൾ സ്വിച്ച് പരിശോധിക്കുക. |
| LED light does not turn on or flickers. | No power supply; loose wiring; faulty LED module. | Check circuit breaker/fuse. Ensure light connector is fully plugged in. If module is faulty, the unit may require replacement. |
| Fan is noisy or vibrates excessively. | Loose mounting; debris in blower; damaged blower wheel. | Ensure fan housing is securely mounted. Disconnect power and clean blower wheel. Inspect for damage. |
| Poor air movement. | Blocked duct work; improper duct size; fan motor issue. | Check duct work for obstructions or kinks. Ensure duct size matches fan outlet. Clean blower wheel. |
8. ഉൽപ്പന്ന സവിശേഷതകൾ
| ഫീച്ചർ | വിശദാംശങ്ങൾ |
|---|---|
| ബ്രാൻഡ് | യൂട്ടിലിടെക് |
| മോഡൽ നമ്പർ | B07JZXNRRN |
| എയർ ഫ്ലോ കപ്പാസിറ്റി | മിനിറ്റിന് 100 ക്യുബിക് അടി (CFM) |
| Sone Rating | 1.5 സോണുകൾ |
| ലൈറ്റ് തരം | Integrated 13 Watt Dimmable LED |
| മോട്ടോർ തരം | ഡിസി ബ്രഷ്ലെസ്സ് |
| ഊർജ്ജ കാര്യക്ഷമത | ENERGY STAR Compliant |
| മെറ്റീരിയൽ | Galvanized Steel, Plastic |
| മുറിയുടെ തരം | കുളിമുറി |
| പവർ ഉറവിടം | കോർഡഡ് ഇലക്ട്രിക് |
| ഇനത്തിൻ്റെ ഭാരം | 8.87 പൗണ്ട് |
| പാക്കേജ് അളവുകൾ | 13.59 x 13.55 x 8.63 ഇഞ്ച് |
9. വാറണ്ടിയും ഉപഭോക്തൃ പിന്തുണയും
For warranty information or technical assistance, please contact Utilitech customer support. Keep your purchase receipt as proof of purchase.
കുറിപ്പ്: The integrated LED light module is not user-replaceable. If the LED light fails, the entire unit may need to be exchanged under warranty, if applicable.
Contact information for Utilitech can typically be found on their official webസൈറ്റ് അല്ലെങ്കിൽ ഉൽപ്പന്ന പാക്കേജിംഗിൽ.


