ആമുഖം
Thank you for choosing the LIVINGbasics 2-in-1 Single Serve Coffee Maker. This appliance is designed for convenient brewing of single cups of coffee using either K-Cup pods or your preferred ground coffee. Please read this manual thoroughly before operation to ensure safe and efficient use.
പ്രധാനപ്പെട്ട സുരക്ഷാ നിർദ്ദേശങ്ങൾ
മുന്നറിയിപ്പ്: തീ, വൈദ്യുതാഘാതം അല്ലെങ്കിൽ പരിക്കുകൾ എന്നിവ കുറയ്ക്കുന്നതിന്, എല്ലായ്പ്പോഴും അടിസ്ഥാന സുരക്ഷാ മുൻകരുതലുകൾ പാലിക്കുക.
- ഉപകരണം ഉപയോഗിക്കുന്നതിന് മുമ്പ് എല്ലാ നിർദ്ദേശങ്ങളും വായിക്കുക.
- ചൂടുള്ള പ്രതലങ്ങളിൽ തൊടരുത്. ഹാൻഡിലുകളോ നോബുകളോ ഉപയോഗിക്കുക.
- തീ, വൈദ്യുതാഘാതം, വ്യക്തികൾക്കുണ്ടാകുന്ന പരിക്കുകൾ എന്നിവയിൽ നിന്ന് സംരക്ഷണം നൽകാൻ, ചരട്, പ്ലഗുകൾ അല്ലെങ്കിൽ ഉപകരണം വെള്ളത്തിലോ മറ്റ് ദ്രാവകത്തിലോ മുക്കരുത്.
- കുട്ടികളോ സമീപത്തോ ഏതെങ്കിലും ഉപകരണം ഉപയോഗിക്കുമ്പോൾ സൂക്ഷ്മ മേൽനോട്ടം ആവശ്യമാണ്.
- ഉപയോഗത്തിലില്ലാത്തപ്പോഴും വൃത്തിയാക്കുന്നതിന് മുമ്പും ഔട്ട്ലെറ്റിൽ നിന്ന് അൺപ്ലഗ് ചെയ്യുക. ഭാഗങ്ങൾ ധരിക്കുന്നതിനോ എടുക്കുന്നതിനോ മുമ്പും ഉപകരണം വൃത്തിയാക്കുന്നതിന് മുമ്പും തണുപ്പിക്കാൻ അനുവദിക്കുക.
- കേടായ കോർഡ് അല്ലെങ്കിൽ പ്ലഗ് ഉപയോഗിച്ച് ഒരു ഉപകരണവും പ്രവർത്തിപ്പിക്കരുത്, അല്ലെങ്കിൽ ഉപകരണം തകരാറിലായതിന് ശേഷം അല്ലെങ്കിൽ ഏതെങ്കിലും വിധത്തിൽ കേടായി. പരിശോധനയ്ക്കോ അറ്റകുറ്റപ്പണികൾക്കോ ക്രമീകരണത്തിനോ വേണ്ടി അടുത്തുള്ള അംഗീകൃത സേവന സൗകര്യത്തിലേക്ക് ഉപകരണം തിരികെ നൽകുക.
- അപ്ലയൻസ് നിർമ്മാതാവ് ശുപാർശ ചെയ്യാത്ത ആക്സസറി അറ്റാച്ച്മെൻ്റുകളുടെ ഉപയോഗം തീയോ വൈദ്യുതാഘാതമോ വ്യക്തികൾക്ക് പരിക്കോ ഉണ്ടാക്കാം.
- വെളിയിൽ ഉപയോഗിക്കരുത്.
- മേശയുടെയോ കൗണ്ടറിൻ്റെയോ അരികിൽ ചരട് തൂങ്ങിക്കിടക്കാനോ ചൂടുള്ള പ്രതലങ്ങളിൽ തൊടാനോ അനുവദിക്കരുത്.
- ചൂടുള്ള വാതകത്തിലോ ഇലക്ട്രിക് ബർണറിലോ ചൂടാക്കിയ അടുപ്പിലോ വയ്ക്കരുത്.
- എല്ലായ്പ്പോഴും ആദ്യം അപ്ലയൻസിലേക്ക് പ്ലഗ് അറ്റാച്ചുചെയ്യുക, തുടർന്ന് വാൾ ഔട്ട്ലെറ്റിലേക്ക് കോർഡ് പ്ലഗ് ചെയ്യുക. വിച്ഛേദിക്കാൻ, ഏതെങ്കിലും നിയന്ത്രണം "ഓഫ്" ആക്കുക, തുടർന്ന് വാൾ ഔട്ട്ലെറ്റിൽ നിന്ന് പ്ലഗ് നീക്കം ചെയ്യുക.
- ഉദ്ദേശിച്ച ഉപയോഗത്തിനല്ലാതെ ഉപകരണം ഉപയോഗിക്കരുത്.
- ബ്രൂവിംഗ് സൈക്കിളുകളിൽ ലിഡ് നീക്കം ചെയ്താൽ പൊള്ളൽ സംഭവിക്കാം.
- Ensure the lid is fully closed and secured before brewing to prevent leaks or spills.
- Wait approximately 15 seconds after closing the lid with a K-Cup pod inserted before pressing the start button to ensure proper piercing and prevent leakage.
പാക്കേജ് ഉള്ളടക്കം
താഴെ പറയുന്ന ഇനങ്ങൾക്കായി ബോക്സ് ചെക്ക് ചെയ്യുക:
- LIVINGbasics 2-in-1 Single Serve Coffee Maker
- കെ-കപ്പ് പോഡ് ഹോൾഡർ
- വീണ്ടും ഉപയോഗിക്കാവുന്ന ഗ്രൗണ്ട് കോഫി ഫിൽട്ടർ
- കോഫി സ്കൂപ്പ്
- ഇൻസ്ട്രക്ഷൻ മാനുവൽ
ഉൽപ്പന്നം കഴിഞ്ഞുview

ചിത്രം 1: പൊട്ടിത്തെറിച്ചു view of the coffee maker components.
Familiarize yourself with the various parts of your coffee maker:
- Lid Tab: Used to open the top lid.
- Piercing Needle: Punctures K-Cup pods for brewing.
- ലിഡ്: Covers the brew chamber and water reservoir.
- Single-Serve Pack Holder: Holds K-Cup pods or the reusable filter.
- വാട്ടർ ടാങ്ക്: Removable reservoir for water.
- Funnel Handle & Funnel: Used with the reusable ground coffee filter.
- പ്രധാന ശരീരം: The primary housing of the coffee maker.
- Brew Basket Lid & Brew Basket: Components for the reusable ground coffee filter.
- ബട്ടൺ: പവർ / ആരംഭ ബട്ടൺ.
- Drip Tray Cover & Drip Tray: Collects drips and supports your cup.
- Water Gauge: Indicates water level in the tank.
- Front Body: The front panel of the appliance.

Figure 2: Appliance dimensions for placement reference.
സജ്ജീകരണവും ആദ്യ ഉപയോഗവും
1. പ്രാരംഭ ക്ലീനിംഗ്
- കോഫി മേക്കറിൽ നിന്ന് എല്ലാ പാക്കേജിംഗ് വസ്തുക്കളും ലേബലുകളും നീക്കം ചെയ്യുക.
- Wash the removable water tank, K-Cup pod holder, reusable ground coffee filter, and drip tray in warm, soapy water. Rinse thoroughly and dry.
- പരസ്യം ഉപയോഗിച്ച് കോഫി മേക്കറിന്റെ പുറംഭാഗം തുടയ്ക്കുകamp തുണി.
2. First Clean Cycle (Before First Brew)
- സ്ഥിരതയുള്ള പരന്ന പ്രതലത്തിൽ കോഫി മേക്കർ സ്ഥാപിക്കുക.
- Fill the water tank with fresh, cold water up to the MAX line.
- Ensure no K-Cup pod or ground coffee is in the brew chamber.
- ഡ്രിപ്പ് ട്രേയിൽ ഒരു വലിയ മഗ് (കുറഞ്ഞത് 10 ഔൺസ്) വയ്ക്കുക.
- Plug the power cord into a grounded electrical outlet. The power button will illuminate.
- Press the power button to start a brewing cycle with just water.
- Discard the hot water. The coffee maker is now ready for use.
പ്രവർത്തന നിർദ്ദേശങ്ങൾ
Brewing with K-Cup Pods
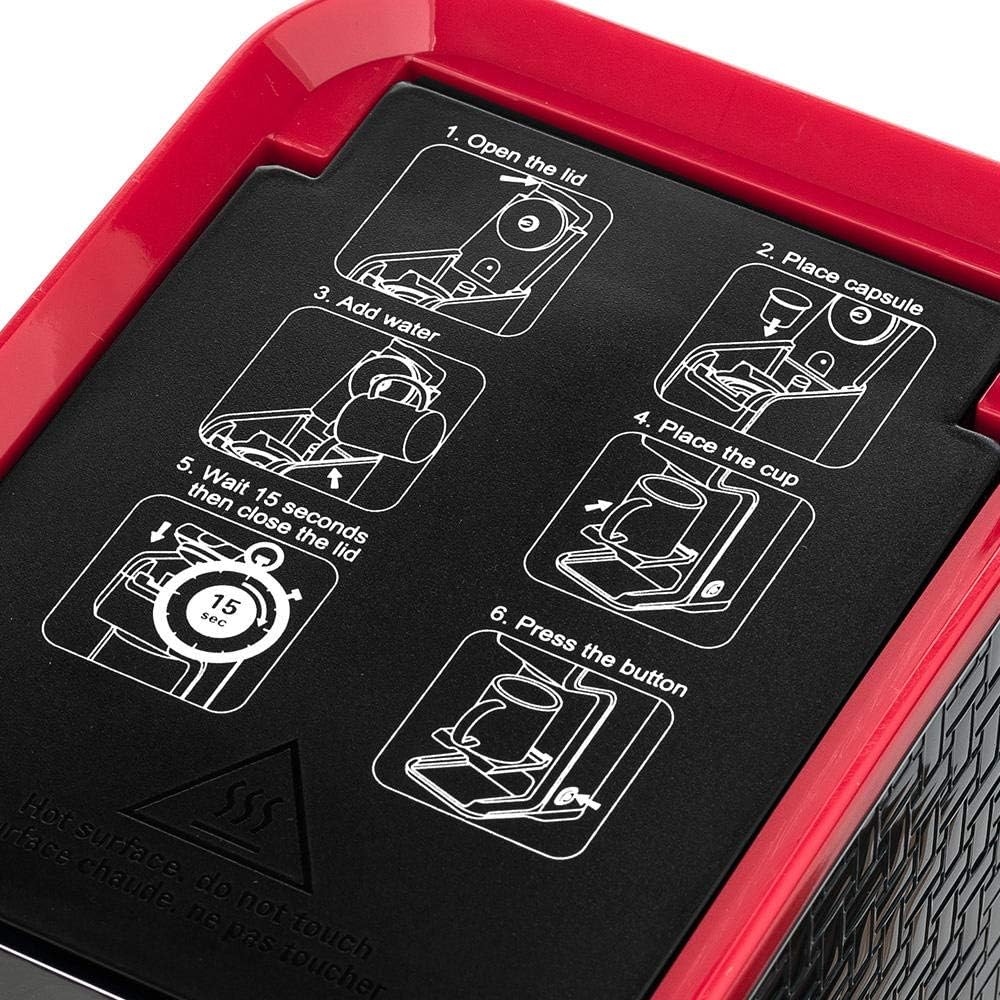
Figure 3: Quick start guide for K-Cup pod brewing.
- Lift the lid tab to open the top lid of the coffee maker.
- Insert a K-Cup pod into the K-Cup pod holder. Ensure it is seated correctly.
- Fill the water tank with fresh, cold water to your desired level (up to 10 oz for a standard brew).
- Place your coffee mug on the drip tray.
- Close the top lid firmly. Wait approximately 15 seconds for the pod to be properly pierced.
- Press the power button to begin brewing. The light will indicate brewing is in progress.
- Once brewing is complete, the light will turn off. Carefully remove your hot coffee.
ഗ്രൗണ്ട് കാപ്പി ഉപയോഗിച്ച് ബ്രൂവിംഗ്

Figure 4: The 2-in-1 feature allows for both K-Cup pods and ground coffee.
- Lift the lid tab to open the top lid.
- Open the reusable ground coffee filter. Using the provided coffee scoop, fill the filter with your desired amount of ground coffee (do not overfill).
- Close the reusable filter and place it into the single-serve pack holder in the brew chamber.
- Fill the water tank with fresh, cold water to your desired level (up to 10 oz for a standard brew).
- Place your coffee mug on the drip tray.
- മുകളിലെ മൂടി നന്നായി അടയ്ക്കുക.
- Press the power button to begin brewing. The light will indicate brewing is in progress.
- Once brewing is complete, the light will turn off. Carefully remove your hot coffee.
പരിപാലനവും ശുചീകരണവും
പ്രതിദിന ക്ലീനിംഗ്
- വൃത്തിയാക്കുന്നതിന് മുമ്പ് കോഫി മേക്കർ എപ്പോഴും അൺപ്ലഗ് ചെയ്യുക.
- Remove the K-Cup pod holder or reusable ground coffee filter, drip tray, and water tank. Wash these parts in warm, soapy water. Rinse thoroughly and dry.
- പരസ്യം ഉപയോഗിച്ച് കോഫി മേക്കറിന്റെ പുറംഭാഗം തുടയ്ക്കുകamp, മൃദുവായ തുണി. അബ്രാസീവ് ക്ലീനറുകളോ സ്കോറിംഗ് പാഡുകളോ ഉപയോഗിക്കരുത്.
- Do not immerse the coffee maker's main body in water or any other liquid.
ഡെസ്കലിംഗ്
Over time, mineral deposits (scale) can build up in your coffee maker, affecting its performance. Descale your appliance every 3-6 months, or more frequently if you have hard water.
- Fill the water tank with a mixture of one part white vinegar and two parts water.
- ഡ്രിപ്പ് ട്രേയിൽ ഒരു വലിയ മഗ് വയ്ക്കുക.
- Run a brewing cycle without a K-Cup pod or ground coffee.
- After the cycle, let the coffee maker sit for 30 minutes with the vinegar solution inside.
- Run several cycles with fresh, clean water to rinse out any remaining vinegar taste.
ട്രബിൾഷൂട്ടിംഗ്
| പ്രശ്നം | സാധ്യമായ കാരണം | പരിഹാരം |
|---|---|---|
| കോഫി മേക്കർ ഓണാക്കുന്നില്ല. | പ്ലഗ് ഇൻ ചെയ്തിട്ടില്ല; പവർ അല്ലെങ്കിൽtage. | Ensure the power cord is securely plugged into a working outlet. Check household circuit breaker. |
| Water is not dispensing or brewing is slow. | Water tank is empty; scale buildup; piercing needle clogged. | Fill water tank. Descale the coffee maker. Clean the piercing needle carefully with a paperclip. |
| Coffee is leaking from the top. | Lid not closed properly; K-Cup pod not seated correctly or overfilled (for ground coffee). | Ensure the lid is firmly closed. Reposition the K-Cup pod or reduce ground coffee amount. Wait 15 seconds after closing the lid before brewing. |
| കാപ്പിയുടെ രുചി ദുർബലമാണ് അല്ലെങ്കിൽ വളരെ ശക്തമാണ്. | Incorrect coffee-to-water ratio; wrong grind size. | Adjust the amount of ground coffee or K-Cup pod strength. Ensure proper grind size for ground coffee (medium-fine). |
സ്പെസിഫിക്കേഷനുകൾ
| ബ്രാൻഡ്: | ജീവിത അടിസ്ഥാനകാര്യങ്ങൾ |
| മോഡൽ: | LVBe-CM1801 |
| പവർ/വാട്ട്tage: | 750 വാട്ട്സ് |
| ശേഷി: | 3 Cups (approx. 10 oz per brew) |
| മെറ്റീരിയൽ: | സ്റ്റെയിൻലെസ്സ് സ്റ്റീൽ |
| ഉൽപ്പന്ന അളവുകൾ: | 13.97 x 20.32 x 33.53 സെ.മീ (5.5 x 8 x 13.2 ഇഞ്ച്) |
| ഇനത്തിൻ്റെ ഭാരം: | 1.55 കി.ഗ്രാം (3.42 പൗണ്ട്) |
| പ്രത്യേക സവിശേഷത: | നീക്കം ചെയ്യാവുന്ന വാട്ടർ ടാങ്ക് |
വാറൻ്റിയും പിന്തുണയും
For warranty information, technical support, or customer service inquiries, please refer to the contact information provided on the product packaging or visit the official LIVINGbasics webസൈറ്റ്.

