ആമുഖം
നിങ്ങളുടെ ഉപകരണത്തിന്റെ ഇൻസ്റ്റാളേഷൻ, പ്രവർത്തനം, പരിപാലനം എന്നിവയ്ക്കുള്ള വിശദമായ നിർദ്ദേശങ്ങൾ ഈ മാനുവൽ നൽകുന്നു. Ampire RVM051-5" TFT Monitor. Please read this manual thoroughly before use to ensure proper function and longevity of the device.
സുരക്ഷാ വിവരങ്ങൾ
പാലിക്കേണ്ട പ്രധാന സുരക്ഷാ മുൻകരുതലുകൾ:
- Do not expose the monitor to extreme temperatures or direct sunlight for prolonged periods.
- അമിതമായി ചൂടാക്കുന്നത് തടയാൻ ശരിയായ വായുസഞ്ചാരം ഉറപ്പാക്കുക.
- വൃത്തിയാക്കുന്നതിനോ അറ്റകുറ്റപ്പണികൾ നടത്തുന്നതിനോ മുമ്പ് വൈദ്യുതി വിച്ഛേദിക്കുക.
- This monitor is not suitable for 24-hour continuous surveillance use and may be damaged if used as such.
- നൽകിയിരിക്കുന്ന പവർ കേബിളും അനുബന്ധ ഉപകരണങ്ങളും മാത്രം ഉപയോഗിക്കുക.
പാക്കേജ് ഉള്ളടക്കം
പാക്കേജിൽ എല്ലാ ഇനങ്ങളും ഉണ്ടെന്ന് ഉറപ്പാക്കുക:
- 5" മോണിറ്റർ
- സക്ഷൻ കപ്പ് മ .ണ്ട്
- Adhesive Foot Mount
- കണക്ഷൻ കേബിൾ
സാങ്കേതിക സവിശേഷതകൾ
| ഫീച്ചർ | മൂല്യം |
|---|---|
| പ്രദർശിപ്പിക്കുക | 5" (12.7 cm) Digital HD TFT LCD (Color) |
| ബാക്ക്ലൈറ്റ് | എൽഇഡി |
| വീക്ഷണാനുപാതം | 16:9 |
| റെസലൂഷൻ | 800 x 480 പിക്സലുകൾ (HD) |
| വീഡിയോ ഇൻപുട്ടുകൾ | 2 x FBAS RCA (1 Vss, 75 ohms) |
| സിസ്റ്റം | Automatic NTSC/PAL switching |
| Automatic Power-on | 2 സെക്കൻഡ് |
| വൈദ്യുതി വിതരണം | 10-32 വി ഡിസി |
| പ്രവർത്തന താപനില | -20 °C മുതൽ 60 °C വരെ |
| സംഭരണ താപനില | -30 °C മുതൽ 80 °C വരെ |
| അളവുകൾ നിരീക്ഷിക്കുക | 126 x 83 x 33 മിമി |
| Pixel Error Standard | ISO 9241-307, Pixel Error Class II |
| മെനു ഭാഷ | ഇംഗ്ലീഷ്/ചൈനീസ് |
| സർട്ടിഫിക്കേഷനുകൾ | CE- E13 10R-02 2332, RoHS, WEEE |
സജ്ജീകരണവും ഇൻസ്റ്റാളേഷനും
മൗണ്ടിംഗ് ഓപ്ഷനുകൾ
ദി Ampire RVM051-5" monitor offers flexible mounting options to suit your vehicle's interior.
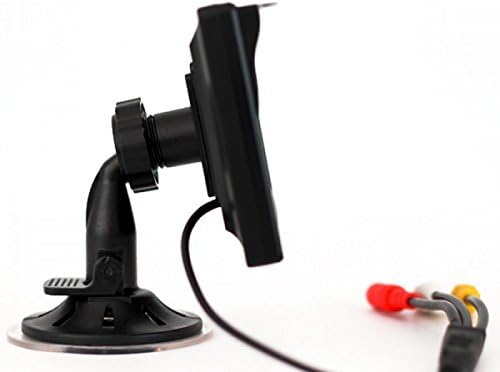
Using the Suction Cup Mount
- Clean the desired mounting surface (e.g., windshield, dashboard) thoroughly.
- Attach the suction cup mount to the back of the monitor.
- Press the suction cup firmly against the clean surface and engage the lever to secure it.
- മോണിറ്ററിന്റെ ആംഗിൾ ഒപ്റ്റിമലിനായി ക്രമീകരിക്കുക. viewing.
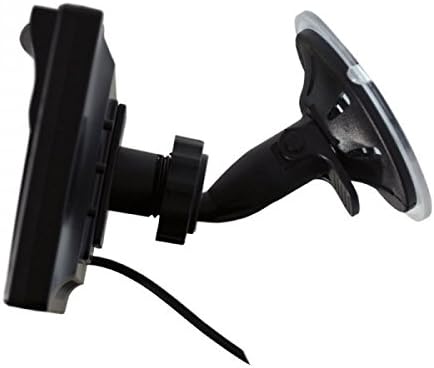
ചിത്രം: ദി Ampire RVM051-5" monitor with its suction cup mount, showing the adjustable arm and base.
Using the Adhesive Foot Mount
- ആവശ്യമുള്ള മൗണ്ടിംഗ് പ്രതലം നന്നായി വൃത്തിയാക്കുക.
- Attach the adhesive foot mount to the back of the monitor.
- Remove the protective film from the adhesive pad.
- Press the mount firmly onto the surface for at least 30 seconds. Allow adhesive to cure for several hours before use.
ചിത്രം: ദി Ampire RVM051-5" monitor with its adhesive foot mount, providing a stable base for dashboard installation.
മോണിറ്റർ ബന്ധിപ്പിക്കുന്നു
The monitor features two video inputs (RCA) and a power input.
- Connect the provided connection cable to the monitor's power input.
- Connect the power cable to a 10-32V DC power source in your vehicle. Ensure correct polarity.
- For a rearview camera, connect the camera's video output (RCA) to one of the monitor's video inputs (e.g., Video 1).
- For an additional video source (e.g., DVD player, DVB-T receiver), connect its video output (RCA) to the second video input (Video 2).
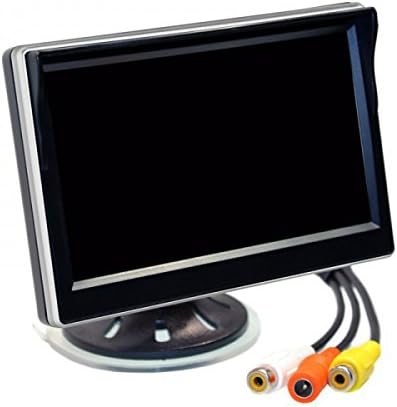
Image: The back of the Ampire RVM051-5" monitor, highlighting the two RCA video input jacks and the power input.
ഓപ്പറേഷൻ
പവർ ചെയ്യുന്നത് ഓൺ/ഓഫ്
The monitor will automatically power on within 2 seconds when a video signal is detected on the active input. It will power off when no signal is present or power is disconnected.
Switching Video Inputs
The monitor supports two video inputs. You can switch between them using the control buttons on the monitor. Refer to the on-screen display (OSD) for current input selection.
ഡിസ്പ്ലേ ക്രമീകരണങ്ങൾ ക്രമീകരിക്കുന്നു
Use the control buttons to navigate the on-screen menu. You can adjust settings such as brightness, contrast, color, and aspect ratio. The menu language can be set to English or Chinese.

ചിത്രം: ദി Ampire RVM051-5" monitor displaying a live feed, showcasing its clear image quality for vehicle applications.
മെയിൻ്റനൻസ്
മോണിറ്റർ വൃത്തിയാക്കൽ
മോണിറ്റർ സ്ക്രീൻ വൃത്തിയാക്കാൻ സി.asing:
- Turn off the monitor and disconnect it from the power source.
- മൃദുവായ, ലിൻ്റ് രഹിത തുണി ഉപയോഗിക്കുകampവെള്ളം അല്ലെങ്കിൽ നേരിയതും, ഉരച്ചിലുകളില്ലാത്തതുമായ സ്ക്രീൻ ക്ലീനർ ഉപയോഗിച്ച് തുടയ്ക്കുക.
- സ്ക്രീൻ സൌമ്യമായി തുടച്ച്, സി.asing. Do not spray liquid directly onto the monitor.
- Avoid using harsh chemicals, solvents, or abrasive materials, as they can damage the surface.
സംഭരണം
If storing the monitor for an extended period, ensure it is kept in a cool, dry place within the specified storage temperature range (-30 °C to 80 °C).
ട്രബിൾഷൂട്ടിംഗ്
| പ്രശ്നം | സാധ്യമായ കാരണം | പരിഹാരം |
|---|---|---|
| സ്ക്രീനിൽ ചിത്രമൊന്നുമില്ല. | No power; Incorrect video input selected; Loose video cable; No video signal from source. | Check power connection; Select correct input; Secure video cables; Verify video source is active. |
| ചിത്രം വികലമായിരിക്കുന്നു അല്ലെങ്കിൽ മിന്നിമറയുന്നു. | Poor video signal; Loose cable connection; Interference. | Check video cable for damage; Ensure connections are secure; Relocate monitor or cables away from interference sources. |
| Monitor does not turn on automatically. | No video signal detected; Power issue. | Ensure video source is active and connected; Check power supply. |
| Menu language is incorrect. | Language setting needs adjustment. | Access the OSD menu and change the language setting to English. |
വാറൻ്റിയും പിന്തുണയും
This product is covered by a standard manufacturer's warranty. Please refer to your purchase documentation for specific warranty terms and conditions.
For technical support or service inquiries, please contact your authorized Ampire dealer or visit the official Ampദേഷ്യം webസൈറ്റ്.
കുറിപ്പ്: The monitor is not designed for 24-hour surveillance use. Damage resulting from such use is not covered under warranty.


