1. പ്രധാന സുരക്ഷാ നിർദ്ദേശങ്ങൾ
Please read all instructions carefully before using this projector and retain them for future reference. Improper operation may result in electric shock, fire, or other hazards.
- ഊർജ്ജ സ്രോതസ്സ്: പ്രൊജക്ടറിനൊപ്പം നൽകിയിരിക്കുന്ന പവർ അഡാപ്റ്റർ മാത്രം ഉപയോഗിക്കുക. വോളിയം ഉറപ്പാക്കുകtagഇ പ്രാദേശിക വൈദ്യുതി വിതരണവുമായി പൊരുത്തപ്പെടുന്നു.
- വെൻ്റിലേഷൻ: Do not block any ventilation openings. Ensure adequate airflow around the projector to prevent overheating.
- പ്ലേസ്മെൻ്റ്: Place the projector on a stable, flat surface. Avoid placing it in direct sunlight, near heat sources, or in environments with high humidity or dust.
- ജലവും ഈർപ്പവും: Do not expose the projector to rain, moisture, or immerse it in water. If liquid enters the device, disconnect power immediately and contact support.
- വൃത്തിയാക്കൽ: Unplug the projector from the power outlet before cleaning. Use a soft, dry cloth. Do not use liquid or aerosol cleaners.
- സേവനം: Do not attempt to service this product yourself. Refer all servicing to qualified service personnel. Opening the casing നിങ്ങളെ അപകടകരമായ വോള്യത്തിലേക്ക് നയിച്ചേക്കാംtagഇ അല്ലെങ്കിൽ മറ്റ് അപകടങ്ങൾ.
- നേത്ര സംരക്ഷണം: l ചെയ്യുമ്പോൾ പ്രൊജക്ടർ ലെൻസിലേക്ക് നേരിട്ട് നോക്കരുത്amp തിളക്കമുള്ള വെളിച്ചം കണ്ണിന് കേടുപാടുകൾ വരുത്തുമെന്നതിനാൽ ഓണാണ്.
2. പാക്കേജ് ഉള്ളടക്കം
താഴെ ലിസ്റ്റ് ചെയ്തിരിക്കുന്ന എല്ലാ ഇനങ്ങളും നിങ്ങളുടെ പാക്കേജിൽ ഉൾപ്പെടുത്തിയിട്ടുണ്ടെന്ന് ഉറപ്പാക്കുക. ഏതെങ്കിലും ഇനങ്ങൾ നഷ്ടപ്പെട്ടിട്ടുണ്ടെങ്കിലോ കേടായിട്ടുണ്ടെങ്കിലോ, ദയവായി ഉപഭോക്തൃ പിന്തുണയുമായി ബന്ധപ്പെടുക.
- DBPOWER T22 Portable Video Projector
- റിമോട്ട് കൺട്രോൾ
- HDMI കേബിൾ
- എവി കേബിൾ
- പവർ കേബിൾ
- ഉപയോക്തൃ മാനുവൽ
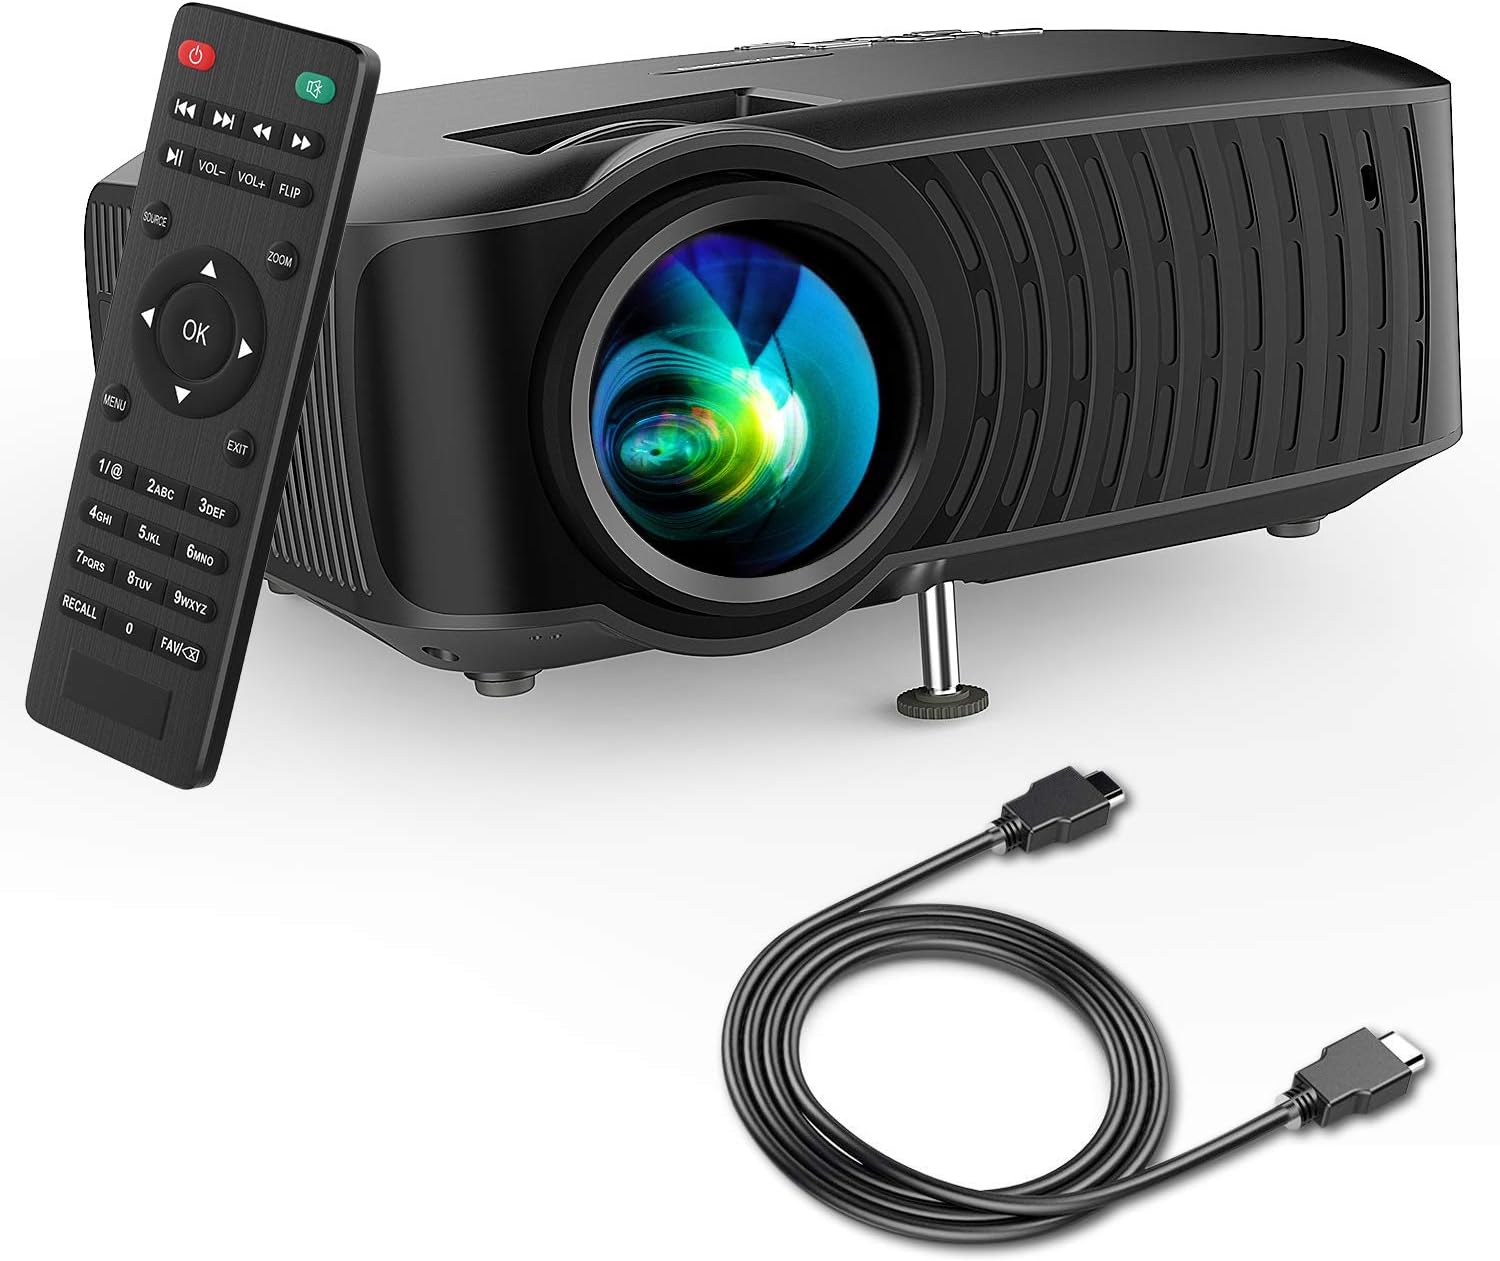
Image: The DBPOWER T22 Portable Video Projector, its remote control, and an HDMI cable, representing the typical package contents.
3. ഉൽപ്പന്നം കഴിഞ്ഞുview
Familiarize yourself with the various parts of your DBPOWER T22 projector.
3.1 മുൻവശവും വശവും View

ചിത്രം: ഒരു വശം view of the DBPOWER T22 projector with dimensions indicating its compact and portable design (21.8cm length, 17.2cm width, 9.16cm height).
- പ്രൊജക്ഷൻ ലെൻസ്: ചിത്രം സ്ക്രീനിലേക്ക് എമിറ്റ് ചെയ്യുന്നു.
- ഫോക്കസ് റിംഗ്: ചിത്രത്തിന്റെ വ്യക്തത ക്രമീകരിക്കുന്നു.
- കീസ്റ്റോൺ കറക്ഷൻ റിംഗ്: ട്രപസോയിഡൽ ഇമേജ് വികലത ശരിയാക്കുന്നു.
- വെന്റിലേഷൻ പോർട്ടുകൾ: താപ വിസർജ്ജനത്തിന്. തടയരുത്.
- ക്രമീകരിക്കാവുന്ന കാൽ: Raises or lowers the front of the projector.
3.2 പിൻ പാനലും കണക്റ്റിവിറ്റിയും
The rear panel provides various input and output ports for connecting external devices.
- എച്ച്ഡിഎംഐ പോർട്ട്: Connects to devices like laptops, Blu-ray players, game consoles, and TV sticks.
- USB പോർട്ട്: Connects to USB flash drives for media playback.
- എവി പോർട്ട്: ഉൾപ്പെടുത്തിയിരിക്കുന്ന AV കേബിൾ ഉപയോഗിച്ച് പഴയ ഉപകരണങ്ങളിലേക്ക് കണക്റ്റ് ചെയ്യുന്നു.
- SD കാർഡ് സ്ലോട്ട്: For playing media directly from an SD card.
- ഓഡിയോ ഔട്ട്പുട്ട് (3.5mm ജാക്ക്): ബാഹ്യ സ്പീക്കറുകളിലേക്കോ ഹെഡ്ഫോണുകളിലേക്കോ കണക്റ്റുചെയ്യുന്നു.
- പവർ ഇൻപുട്ട്: പവർ അഡാപ്റ്ററുമായി ബന്ധിപ്പിക്കുന്നു.
3.3 വിദൂര നിയന്ത്രണം
The remote control allows convenient operation of the projector from a distance.
- പവർ ബട്ടൺ: പ്രൊജക്ടർ ഓൺ/ഓഫ് ചെയ്യുന്നു.
- ഉറവിട ബട്ടൺ: Selects input source (HDMI, AV, USB, SD).
- നാവിഗേഷൻ ബട്ടണുകൾ (മുകളിലേക്ക്/താഴേക്ക്/ഇടത്/വലത്): മെനുകൾ നാവിഗേറ്റ് ചെയ്യുന്നു.
- ശരി ബട്ടൺ: തിരഞ്ഞെടുക്കലുകൾ സ്ഥിരീകരിക്കുന്നു.
- മെനു ബട്ടൺ: Accesses projector settings.
- പുറത്തുകടക്കുക ബട്ടൺ: നിലവിലെ മെനുവിൽ നിന്നോ ഫംഗ്ഷനിൽ നിന്നോ പുറത്തുകടക്കുന്നു.
- വോളിയം +/-: സ്പീക്കർ വോളിയം ക്രമീകരിക്കുന്നു.
- Flip Button: Rotates the projected image.
- സൂം ബട്ടൺ: Adjusts image zoom (digital zoom).
4. സജ്ജീകരണം
4.1 പവർ ഓൺ/ഓഫ്
- Connect the power cable to the projector's power input, then plug the other end into a power outlet.
- Press the power button on the projector or the remote control to turn it on. The indicator light will change.
- ഓഫാക്കാൻ, വീണ്ടും പവർ ബട്ടൺ അമർത്തുക.
4.2 Adjusting Image Focus and Keystone
Achieve a clear and rectangular image by adjusting the focus and keystone correction.

Image: Diagram showing the manual keystone correction and focus rings on the side of the projector, with examples of de-focused and focused images, and trapezoidal correction.
- ഫോക്കസ്: തിരിക്കുക ഫോക്കസ് റിംഗ് until the projected image appears sharp and clear.
- കീസ്റ്റോൺ തിരുത്തൽ: If the image appears trapezoidal (wider at the top or bottom), rotate the Keystone Correction Ring to make the image rectangular. The projector supports ±15° manual keystone correction.
4.3 ബാഹ്യ ഉപകരണങ്ങൾ ബന്ധിപ്പിക്കുന്നു
The DBPOWER T22 supports multiple input sources.
- എച്ച്ഡിഎംഐ: Connect an HDMI cable from your device (e.g., laptop, game console, Amazon Fire TV Stick) to the projector's HDMI port.
- USB: USB പോർട്ടിൽ ഒരു USB ഫ്ലാഷ് ഡ്രൈവ് ചേർക്കുക.
- ഓഫ്: Use the provided AV cable to connect to devices with AV output.
- SD കാർഡ്: Insert an SD card into the SD card slot.
- സ്മാർട്ട്ഫോണുകൾ: For iOS devices, an external Lightning to HDMI adapter is required. For Android devices, an external Micro USB/Type-C to HDMI adapter is required. (Adapters not included).
5. പ്രൊജക്ടർ പ്രവർത്തിപ്പിക്കൽ
5.1 ഇൻപുട്ട് ഉറവിടം തിരഞ്ഞെടുക്കൽ
After connecting your device, you need to select the correct input source.
- അമർത്തുക ഉറവിടം button on the remote control or the projector.
- Use the navigation buttons to select the desired input source (e.g., HDMI, USB, AV, SD).
- അമർത്തുക OK സ്ഥിരീകരിക്കാൻ.
5.2 മീഡിയ പ്ലേബാക്ക് (USB/SD)
When a USB drive or SD card is inserted, the projector will display a media browser.
- ഫോൾഡറുകളിലൂടെ നാവിഗേറ്റ് ചെയ്യുക കൂടാതെ files using the remote control's navigation buttons.
- എ തിരഞ്ഞെടുക്കുക file (e.g., video, photo, music, text) and press OK കളിക്കാൻ.
5.3 ഓഡിയോ putട്ട്പുട്ട്
The projector features an improved built-in speaker system. For enhanced audio, you can connect external speakers.

Image: An illustration of the DBPOWER T22 projector highlighting its stereo speakers, indicating that external speakers are not always necessary for an enjoyable audio experience.
- ബിൽറ്റ്-ഇൻ സ്പീക്കർ: The projector's internal speaker provides audio. Adjust volume using the വോൾ +/- റിമോട്ടിലെ ബട്ടണുകൾ.
- External Speakers/Headphones: Connect a 3.5mm audio cable from your external audio device to the projector's Audio Out port.
5.4 Projector Settings (Menu)
അമർത്തുക മെനു button on the remote to access settings such as Picture Mode, Aspect Ratio, Sound Mode, and other system preferences.
6. പരിപാലനം
6.1 ലെൻസ് വൃത്തിയാക്കൽ
Use a professional lens cleaning cloth or lens paper to clean the projector lens. Avoid touching the lens directly with your hands.

ചിത്രം: പൊട്ടിത്തെറിച്ച ഒരു view of the projector lens assembly, highlighting the tempered glass lens and the importance of a dust cover to protect it from scratches and dust.
6.2 പ്രൊജക്ടർ ബോഡി വൃത്തിയാക്കൽ
Wipe the projector body with a soft, dry cloth. Do not use abrasive cleaners or solvents.
6.3 Heat Dispersion System
The projector features an advanced cooling system to ensure stable operation and extend lamp life. Ensure ventilation ports are clear.

ചിത്രം: ഒരു ആന്തരികം view of the DBPOWER T22 projector, illustrating the advanced heat dispersion system with air flowing through cooling fins to maintain optimal operating temperature.
6.4 എൽamp ജീവിതം
എൽഇഡി എൽamp in your DBPOWER T22 projector has an extended lifespan of over 50,000 hours, significantly reducing the need for lamp മാറ്റിസ്ഥാപിക്കൽ.
7. പ്രശ്നപരിഹാരം
നിങ്ങൾക്ക് പ്രശ്നങ്ങൾ നേരിടുകയാണെങ്കിൽ, ഇനിപ്പറയുന്ന പൊതുവായ പ്രശ്നങ്ങളും പരിഹാരങ്ങളും പരിശോധിക്കുക.
| പ്രശ്നം | സാധ്യമായ കാരണം | പരിഹാരം |
|---|---|---|
| No image or "No Signal" message | തെറ്റായ ഇൻപുട്ട് ഉറവിടം തിരഞ്ഞെടുത്തു; കേബിൾ കണക്ഷൻ അയഞ്ഞിരിക്കുന്നു; ഉപകരണം ഓണാക്കിയിട്ടില്ല. |
|
| മങ്ങിയ ചിത്രം | ഫോക്കസ് ക്രമീകരിച്ചിട്ടില്ല; പ്രൊജക്ടർ സ്ക്രീനിൽ നിന്ന് വളരെ അടുത്താണ്/അകലെയാണ്. |
|
| Trapezoidal image | പ്രൊജക്ടർ സ്ക്രീനിന് ലംബമല്ല. |
|
| ശബ്ദമോ കുറഞ്ഞ വോളിയമോ ഇല്ല | Volume too low; mute enabled; external audio device issues. |
|
| റിമോട്ട് കൺട്രോൾ പ്രവർത്തിക്കുന്നില്ല | Dead batteries; obstruction; remote not pointed at IR receiver. |
|
8 സ്പെസിഫിക്കേഷനുകൾ
Detailed technical specifications for the DBPOWER T22 Portable Video Projector.
| ഫീച്ചർ | വിശദാംശങ്ങൾ |
|---|---|
| ബ്രാൻഡ് | DBPOWER |
| മോഡൽ നമ്പർ | T22 |
| തെളിച്ചം | 120 ANSI Lumens (80% brighter than most market projectors) |
| കോൺട്രാസ്റ്റ് റേഷ്യോ | 2000:1 |
| പിന്തുണയുള്ള റെസല്യൂഷൻ | 1080P (പൂർണ്ണ HD) |
| നേറ്റീവ് ഡിസ്പ്ലേ റെസല്യൂഷൻ | 800 x 480 |
| ഡിസ്പ്ലേ തരം | എൽസിഡി |
| Lamp ജീവിതം | 50,000 മണിക്കൂർ |
| പ്രൊജക്ഷൻ വലിപ്പം | 32-176 ഇഞ്ച് |
| പ്രൊജക്ഷൻ ദൂരം | 1-5.2 മീറ്റർ |
| കീസ്റ്റോൺ തിരുത്തൽ | Manual ±15° |
| കണക്റ്റിവിറ്റി ടെക്നോളജി | HDMI, USB, AV, SD Card |
| ബിൽറ്റ്-ഇൻ സ്പീക്കർ | Yes (Improved system) |
| ഉൽപ്പന്ന അളവുകൾ | 21.59 x 17.02 x 9.14 സെ.മീ |
| ഇനത്തിൻ്റെ ഭാരം | 1.9 കി.ഗ്രാം |
| വാട്ട്tage | 24 വാട്ട്സ് |
9. വാറൻ്റിയും പിന്തുണയും
DBPOWER products are designed and manufactured to the highest quality standards. For warranty information, technical support, or customer service inquiries, please refer to the contact information provided with your purchase or visit the official DBPOWER webസൈറ്റ്.
ഉദ്യോഗസ്ഥൻ Webസൈറ്റ്: www.dbpower.co (ദയവായി ശ്രദ്ധിക്കുക: URL may vary by region. Refer to product packaging for specific regional support details.)


