1. ആമുഖം
Thank you for choosing the KW-Trio Adjustable 6-Hole Desktop Punch. This manual provides essential information for the proper setup, operation, and maintenance of your new punch. Please read this manual thoroughly before use to ensure optimal performance and longevity of the product.
This desktop punch is designed for creating precise 6-hole patterns, suitable for various planner and organizer formats, including A4, A5, A6, and B7. Its adjustable hole spacing feature offers flexibility for different binding requirements.
2. ഉൽപ്പന്നം കഴിഞ്ഞുview
The KW-Trio Adjustable 6-Hole Desktop Punch is a durable and portable tool crafted from high-quality metal. It features a thoughtful design for ease of use and efficient waste management.
പ്രധാന സവിശേഷതകൾ:
- Adjustable Hole Distance: Customize spacing to fit various 6-hole planner and organizer formats.
- നീണ്ടുനിൽക്കുന്ന നിർമ്മാണം: Made of high-quality metal for extended use.
- പോർട്ടബിൾ ഡിസൈൻ: Compact dimensions (approx. 7.8" x 1.54" x 2.64") for easy transport.
- Integrated Chip Holder: Designed for easy disposal of paper fragments.
- 6-Sheet Capacity: Efficiently punches up to 6 sheets of paper at a time.
- Standard Hole Diameter: 5.5mm hole size.

This image shows the overall design of the pink 6-hole desktop punch, highlighting its sleek appearance and compact form factor.
3. സജ്ജീകരണം
- അൺപാക്ക് ചെയ്യുന്നു: Carefully remove the punch from its packaging. Inspect the unit for any signs of damage during transit.
- പ്ലേസ്മെൻ്റ്: Place the punch on a stable, flat surface. Ensure there is enough clear space around the punch for comfortable operation and paper handling.
- പ്രാഥമിക പരിശോധന: Verify that all movable parts, such as the punch heads and the chip holder, operate smoothly.
4. പ്രവർത്തന നിർദ്ദേശങ്ങൾ
4.1. Basic Punching Operation
- Prepare Paper: Gather the sheets of paper you wish to punch. Ensure the paper is flat and free of creases or folds. Do not exceed the maximum capacity of 6 sheets per punch.
- Insert Paper: Slide the paper into the punch opening until it reaches the back stop. Align the paper evenly to ensure consistent hole placement.
- പഞ്ച്: Press down firmly and evenly on the top handle of the punch until the holes are fully cut through the paper.
- പേപ്പർ നീക്കം ചെയ്യുക: Release the handle and carefully remove the punched paper.

This image illustrates how to properly insert paper and press down on the punch to create holes.
4.2. Adjusting Hole Distance
The punch features an adjustable mechanism to accommodate various 6-hole binding standards. The punch creates two groups of three holes, with 19mm spacing within each group. The central distance between these two groups can be adjusted.
- Locate Adjustment Sliders: On the underside or side of the punch, you will find sliders or indicators for adjusting the central distance.
- Select Desired Spacing: The available central distance options are typically 19mm, 38mm, 51mm, and 70mm. Move the adjustment mechanism to the desired setting. Refer to the markings on the punch for precise alignment.
- Verify Setting: Before punching important documents, it is recommended to test the selected spacing on a scrap piece of paper to ensure it matches your requirements.
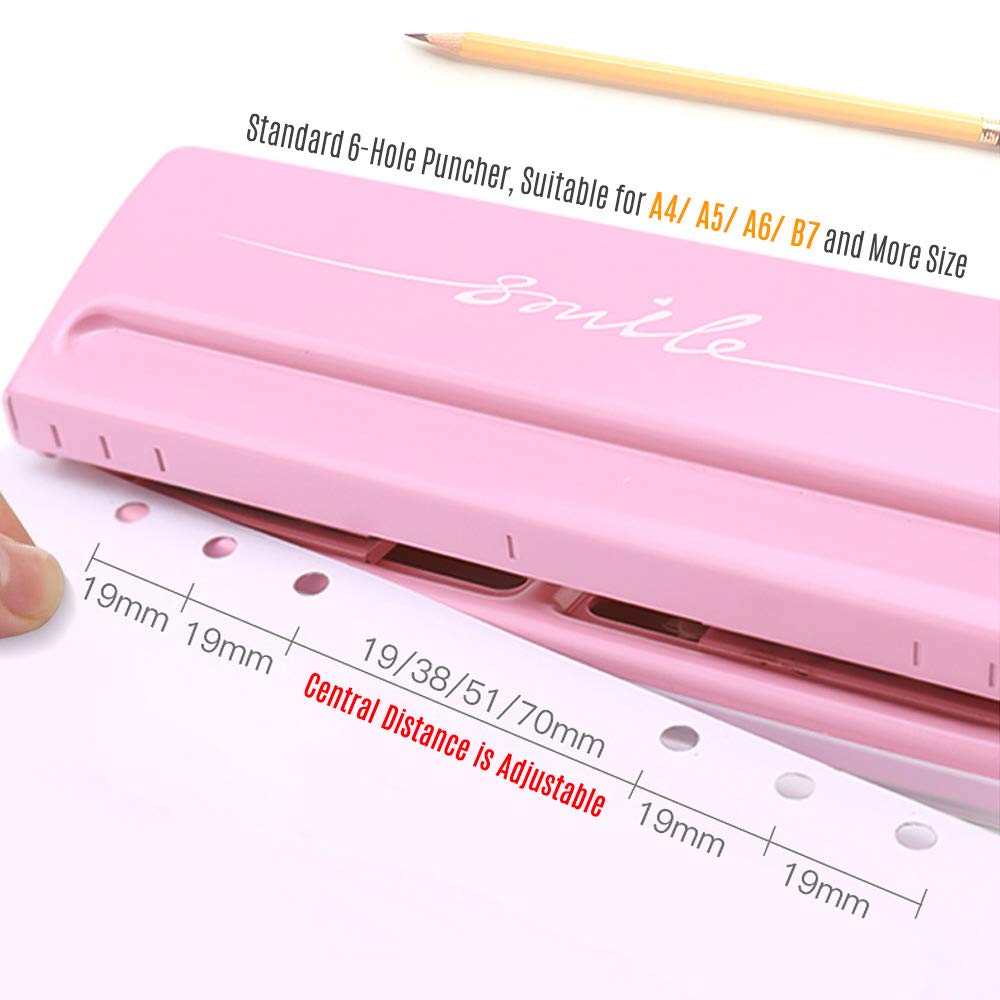
This image displays the punch with a paper guide indicating the various adjustable central distances (19mm, 38mm, 51mm, 70mm) between the two sets of three holes.
4.3. Emptying the Chip Holder
The punch is equipped with a transparent chip holder at the bottom to collect paper confetti. Regularly empty this holder to prevent jams and maintain cleanliness.
- Locate Chip Holder: The chip holder is typically a clear plastic tray located at the base of the punch.
- Remove/Open Holder: Gently slide out or unclip the chip holder from the punch.
- ശൂന്യമായ ഉള്ളടക്കം: Dispose of the paper confetti into a waste bin.
- Reattach Holder: Securely reattach the chip holder to the punch, ensuring it clicks into place if applicable.

This image shows how to open or remove the chip holder from the bottom of the punch for easy disposal of paper waste.
5. പരിപാലനം
- വൃത്തിയാക്കൽ: Regularly wipe the exterior of the punch with a soft, dry cloth to remove dust and debris. Avoid using abrasive cleaners or solvents.
- Empty Chip Holder: As mentioned in Section 4.3, frequently empty the chip holder to prevent accumulation and potential jamming.
- Lubrication (If Needed): If the punching mechanism feels stiff over time, a small amount of silicone-based lubricant can be applied to the moving parts, avoiding contact with the cutting edges.
- സംഭരണം: Store the punch in a dry environment, away from extreme temperatures and humidity, when not in use.
6. പ്രശ്നപരിഹാരം
| പ്രശ്നം | സാധ്യമായ കാരണം | പരിഹാരം |
|---|---|---|
| Incomplete or Ragged Holes | Exceeding sheet capacity; dull blades; paper not inserted flat. | Reduce the number of sheets. Ensure paper is flat and fully inserted. If blades are dull, consider replacement if parts are available, or product replacement. |
| Punching Mechanism Stiff | ലൂബ്രിക്കേഷന്റെ അഭാവം; മെക്കാനിസത്തിലെ അവശിഷ്ടങ്ങൾ. | Apply a small amount of silicone lubricant. Check for and remove any trapped paper fragments. |
| പേപ്പർ ജാമുകൾ | Too many sheets; improper paper insertion; full chip holder. | Do not exceed 6-sheet capacity. Ensure paper is inserted straight. Empty the chip holder. Carefully remove jammed paper. |
7 സ്പെസിഫിക്കേഷനുകൾ
| ആട്രിബ്യൂട്ട് | വിശദാംശങ്ങൾ |
|---|---|
| ഉൽപ്പന്ന അളവുകൾ (L x W x H) | 7.8" x 1.54" x 2.64" (19.8സെ.മീ x 3.9സെ.മീ x 6.7സെ.മീ) |
| ഇനത്തിൻ്റെ ഭാരം | 0.54 കിലോഗ്രാം (1.19 പൗണ്ട്) |
| മെറ്റീരിയൽ | മെറ്റൽ, പ്ലാസ്റ്റിക് |
| നിറം | പിങ്ക് |
| Hole Capacity | 6 Sheets (max) |
| ദ്വാര വ്യാസം | 5.5 മി.മീ |
| Adjustable Central Distances | 19 എംഎം, 38 എംഎം, 51 എംഎം, 70 എംഎം |
| മോഡൽ നമ്പർ | DZR4364766644982RO |
8. വാറൻ്റിയും പിന്തുണയും
വാറന്റി വിവരങ്ങൾക്കോ സാങ്കേതിക പിന്തുണയ്ക്കോ, നിങ്ങളുടെ വാങ്ങലിനൊപ്പം ഉൾപ്പെടുത്തിയിരിക്കുന്ന ഡോക്യുമെന്റേഷൻ പരിശോധിക്കുകയോ നിർമ്മാതാവിനെ നേരിട്ട് ബന്ധപ്പെടുകയോ ചെയ്യുക. ഏതെങ്കിലും വാറന്റി ക്ലെയിമുകൾക്കായി നിങ്ങളുടെ വാങ്ങലിന്റെ തെളിവ് സൂക്ഷിക്കുക.
Manufacturer: KW-Trio


