1. പ്രധാന സുരക്ഷാ നിർദ്ദേശങ്ങൾ
Please read all instructions carefully before using the Caso Coffee Compact Electronic coffee machine. Keep this manual for future reference.
- ഇലക്ട്രിക്കൽ സുരക്ഷ: വോളിയം ഉറപ്പാക്കുകtagഉപകരണത്തിൽ സൂചിപ്പിച്ചിരിക്കുന്ന e നിങ്ങളുടെ ലോക്കൽ മെയിൻസ് വോള്യവുമായി പൊരുത്തപ്പെടുന്നുtage before connecting. Do not immerse the appliance, cord, or plug in water or other liquids.
- ചൂടുള്ള പ്രതലങ്ങൾ: The coffee machine's heating plate and carafe will become hot during and after operation. Always use the handle when touching the carafe. Allow the appliance to cool completely before cleaning.
- കുട്ടികളും വളർത്തുമൃഗങ്ങളും: Keep the appliance out of reach of children and pets. This appliance is not intended for use by persons with reduced physical, sensory or mental capabilities, or lack of experience and knowledge, unless they have been given supervision or instruction.
- ശരിയായ ഉപയോഗം: Use the appliance only for its intended purpose of brewing coffee. Do not operate the appliance with a damaged cord or plug, or after the appliance malfunctions or has been damaged in any manner.
- വെൻ്റിലേഷൻ: Ensure adequate ventilation around the appliance during operation. Do not place it on or near hot gas or electric burners, or in a heated oven.
2. ഉൽപ്പന്നം കഴിഞ്ഞുview
Familiarize yourself with the components of your Caso Coffee Compact Electronic coffee machine.

ചിത്രം 2.1: ഫ്രണ്ട് view of the Caso Coffee Compact Electronic coffee machine, showcasing its compact design and stainless steel finish.

ചിത്രം 2.2: കോണാകൃതിയിലുള്ളത് view of the coffee machine, highlighting its sleek profile and integrated components.

ചിത്രം 2.3: Close-up of the control panel with LCD display, showing the various buttons for operation.

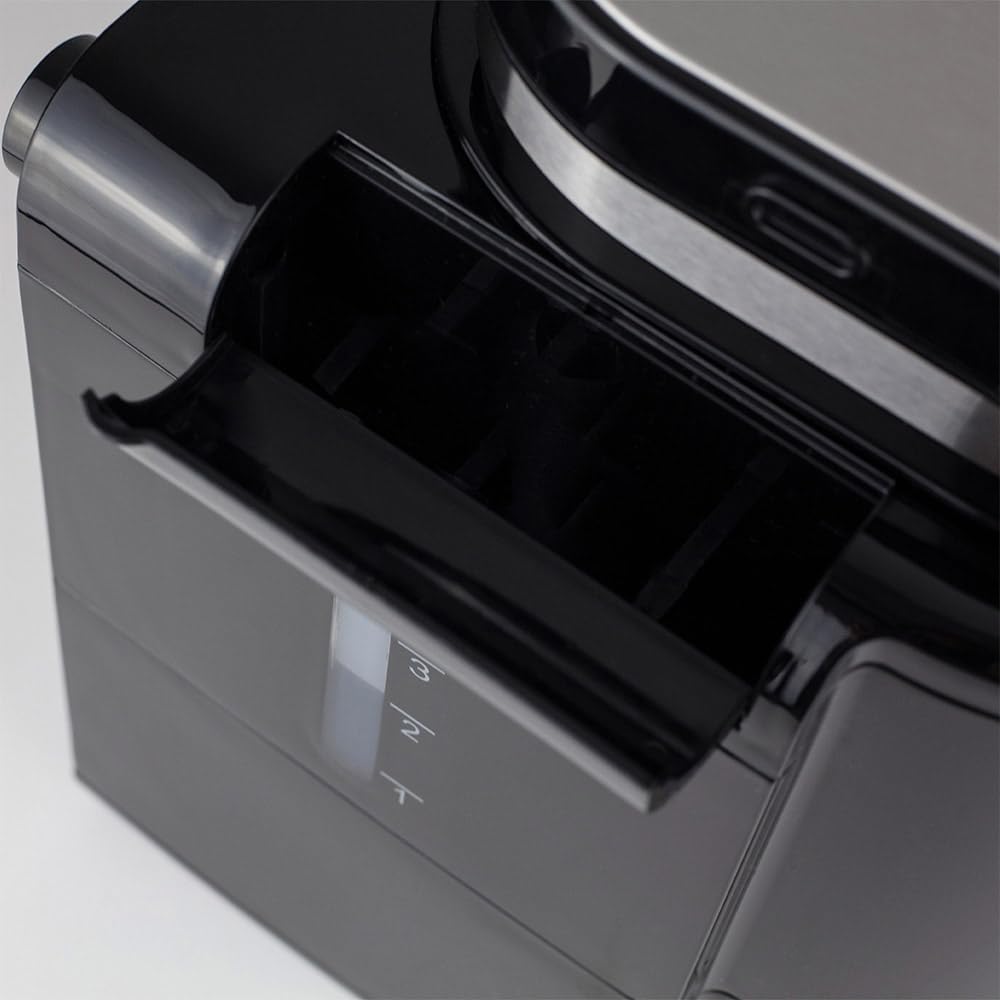
ചിത്രം 2.4: ആന്തരികം view of the coffee machine's grinding mechanism and integrated filter basket.
ഘടകങ്ങൾ:
- ഇന്റഗ്രേറ്റഡ് ഗ്രൈൻഡർ: പുതിയ കാപ്പിക്കുരുക്കൾക്ക്.
- വാട്ടർ ടാങ്ക്: With clear level indicator.
- ഗ്ലാസ് കരാഫ്: With handle and capacity markings.
- നിയന്ത്രണ പാനൽ: With LCD display and intuitive buttons.
- നീക്കം ചെയ്യാവുന്ന ഫിൽട്ടർ ബാസ്കറ്റ്: എളുപ്പമുള്ള വൃത്തിയാക്കലിനായി.
നിയന്ത്രണ പാനൽ പ്രവർത്തനങ്ങൾ:
- പവർ ബട്ടൺ: To turn the machine on/off.
- Grind Level Button (%): Adjusts the fineness of the coffee grind (two adjustable levels).
- Quantity Buttons (+/-): Selects the number of cups (up to 4).
- Timer Button (Clock icon): Sets the current time and programs delayed brewing.
- ആരംഭ ബട്ടൺ: മദ്യനിർമ്മാണ പ്രക്രിയ ആരംഭിക്കുന്നു.
3. സജ്ജീകരണം
- അൺപാക്ക് ചെയ്യുന്നു: Carefully remove all packaging materials and check for any damage. Retain packaging for future transport if needed.
- പ്രാരംഭ ക്ലീനിംഗ്: Before first use, clean all removable parts (carafe, filter basket, grinder components) with warm soapy water. Wipe the exterior of the machine with a damp cloth. Run one or two cycles with only water to rinse the internal system.
- പ്ലേസ്മെൻ്റ്: Place the coffee machine on a stable, flat, heat-resistant surface, away from direct sunlight and heat sources. Ensure there is sufficient space around the unit for ventilation.
- വെള്ളം നിറയ്ക്കൽ: Open the water tank lid and fill the water tank with fresh, cold water up to the desired level, corresponding to the number of cups you wish to brew. Do not exceed the maximum fill line.
ചിത്രം 3.1: വശം view illustrating the water tank with its clear level indicator.
- Adding Coffee:
- For Coffee Beans: Open the grinder lid and pour the desired amount of fresh coffee beans into the grinder chamber.

ചിത്രം 3.2: Adding fresh coffee beans into the integrated grinder.
- ഗ്രൗണ്ട് കോഫിക്ക്: If using pre-ground coffee, ensure the grinder is empty and clean. Place the ground coffee directly into the filter basket.
- For Coffee Beans: Open the grinder lid and pour the desired amount of fresh coffee beans into the grinder chamber.
4. പ്രവർത്തന നിർദ്ദേശങ്ങൾ
4.1. Brewing Coffee from Beans:
- Ensure the water tank is filled and coffee beans are in the grinder.
- ഒഴിഞ്ഞ ഗ്ലാസ് കാരഫ് ഹീറ്റിംഗ് പ്ലേറ്റിൽ വയ്ക്കുക.
- Press the Power button to turn on the machine. The LCD display will illuminate.
- ഉപയോഗിക്കുക +/- buttons to select the desired number of cups (1-4).
- അമർത്തുക % button to cycle through the two available grind levels (fine or coarse), depending on your preference for coffee strength and aroma.
- അമർത്തുക ആരംഭിക്കുക button to begin the grinding and brewing process. The machine will automatically grind the beans and then brew the coffee.
4.2. Brewing with Pre-Ground Coffee:
- വാട്ടർ ടാങ്ക് നിറഞ്ഞിട്ടുണ്ടെന്ന് ഉറപ്പാക്കുക.
- Add the desired amount of pre-ground coffee directly into the filter basket.
- ഒഴിഞ്ഞ ഗ്ലാസ് കാരഫ് ഹീറ്റിംഗ് പ്ലേറ്റിൽ വയ്ക്കുക.
- മെഷീൻ ഓണാക്കാൻ പവർ ബട്ടൺ അമർത്തുക.
- ഉപയോഗിക്കുക +/- buttons to select the desired number of cups.
- അമർത്തുക ആരംഭിക്കുക button. The machine will bypass the grinding process and proceed directly to brewing.
4.3. Using the Timer Function:
The integrated timer allows you to program the machine to start brewing at a specific time.
- നിലവിലെ സമയം ക്രമീകരിക്കുക:
- With the machine on, press and hold the ടൈമർ സമയ ഡിസ്പ്ലേ മിന്നുന്നത് വരെ ബട്ടൺ അമർത്തുക.
- ഉപയോഗിക്കുക +/- buttons to set the current hour, then press ടൈമർ സ്ഥിരീകരിക്കാൻ വീണ്ടും.
- ഉപയോഗിക്കുക +/- buttons to set the current minute, then press ടൈമർ സമയ ക്രമീകരണ മോഡ് സ്ഥിരീകരിച്ച് പുറത്തുകടക്കാൻ.
- Programming Delayed Start:
- Prepare the machine with water and coffee (beans or ground) as described in sections 4.1 or 4.2.
- അമർത്തുക ടൈമർ button once. The display will show "PROG" or a similar indicator.
- ഉപയോഗിക്കുക +/- buttons to set the desired brewing start time.
- അമർത്തുക ടൈമർ button again to confirm the programmed time. The machine will now be in standby mode, waiting for the set time to begin brewing.
4.4. ചൂട് നിലനിർത്തുക പ്രവർത്തനം:
After brewing, the machine automatically activates a keep warm function for 30 minutes, maintaining the coffee's temperature. After 30 minutes, the machine will automatically shut off for safety and energy saving.
5. പരിപാലനവും ശുചീകരണവും
പതിവായി വൃത്തിയാക്കുന്നത് മികച്ച പ്രകടനം ഉറപ്പാക്കുകയും നിങ്ങളുടെ കോഫി മെഷീനിന്റെ ആയുസ്സ് വർദ്ധിപ്പിക്കുകയും ചെയ്യുന്നു.
- വൃത്തിയാക്കുന്നതിന് മുമ്പ്: Always unplug the coffee machine from the power outlet and allow it to cool completely before cleaning any parts.
- കരാഫെയും ഫിൽട്ടർ ബാസ്കറ്റും:
- Remove the glass carafe and filter basket after each use.
- ഉപയോഗിച്ച കാപ്പിപ്പൊടി ഉപേക്ഷിക്കുക.
- Wash the carafe and filter basket with warm, soapy water. Rinse thoroughly and dry. These parts may also be dishwasher safe (check product specifications for confirmation).
- ഗ്രൈൻഡർ ക്ലീനിംഗ്: The integrated grinder is fully removable for easy cleaning.
- Carefully remove the grinder assembly from the top of the machine.
- Brush away any residual coffee grounds. The grinding mechanism can be rinsed under running water, but ensure it is completely dry before reassembling.
- Refer to Figure 2.4 for a visual reference of the grinder area.
- ബാഹ്യ ശുചീകരണം: Wipe the exterior surfaces of the coffee machine with a soft, damp തുണി. അബ്രാസീവ് ക്ലീനറുകളോ സ്കോറിംഗ് പാഡുകളോ ഉപയോഗിക്കരുത്, കാരണം അവ ഫിനിഷിന് കേടുവരുത്തും.
- നിരസിക്കൽ: Mineral deposits from water can build up over time, affecting performance. Descale your machine regularly (e.g., every 2-3 months, or more often in hard water areas).
- Use a commercial descaling solution suitable for coffee machines, or a mixture of white vinegar and water (1:2 ratio).
- വാട്ടർ ടാങ്കിലേക്ക് ഡെസ്കലിംഗ് ലായനി ഒഴിക്കുക.
- Run a brewing cycle without coffee.
- After the cycle, run 2-3 cycles with fresh water to rinse out any descaling residue.
6. പ്രശ്നപരിഹാരം
If you encounter issues with your coffee machine, refer to the following table before contacting support.
| പ്രശ്നം | സാധ്യമായ കാരണം | പരിഹാരം |
|---|---|---|
| മെഷീൻ ഓണാക്കുന്നില്ല. | പ്ലഗ് ഇൻ ചെയ്തിട്ടില്ല; പവർ ഔട്ട്ലെറ്റ് പ്രശ്നം. | പവർ കോർഡ് കണക്ഷൻ പരിശോധിക്കുക; മറ്റൊരു ഔട്ട്ലെറ്റ് പരീക്ഷിക്കുക. |
| കാപ്പി ഉണ്ടാക്കുന്നില്ല. | No water in tank; carafe not correctly placed; filter basket clogged. | Fill water tank; ensure carafe is correctly seated; clean filter basket. |
| Grinder is not working. | No beans; grinder clogged; grinder assembly not properly installed. | Add beans; clean grinder thoroughly; ensure grinder is securely in place. |
| കാപ്പിയുടെ രുചി ദുർബലമാണ് അല്ലെങ്കിൽ വളരെ ശക്തമാണ്. | Incorrect coffee-to-water ratio; wrong grind level. | Adjust coffee quantity or water level; experiment with grind settings. |
| യന്ത്രം ചോരുന്നു. | Water tank or carafe not properly seated; overfilled water tank. | Ensure all components are correctly positioned; do not overfill water tank. |
7 സ്പെസിഫിക്കേഷനുകൾ
Technical details for the Caso Coffee Compact Electronic coffee machine.
| ഫീച്ചർ | വിശദാംശങ്ങൾ |
|---|---|
| ബ്രാൻഡ് | CASO ഡിസൈൻ |
| മോഡൽ നമ്പർ | 1848 |
| നിറം | സ്റ്റെയിൻലെസ്സ് സ്റ്റീൽ, കറുപ്പ് |
| അളവുകൾ (L x W x H) | 26 x 17.5 x 27.5 സെ.മീ |
| ഭാരം | 2.2 കി.ഗ്രാം |
| ശേഷി | 960 ml (up to 4 cups) |
| ശക്തി | 600 W |
| വാല്യംtage | 230 വോൾട്ട് |
| മെറ്റീരിയൽ | സ്റ്റെയിൻലെസ്സ് സ്റ്റീൽ |
| പ്രത്യേക സവിശേഷതകൾ | Integrated Grinder, LCD Display with Timer, Automatic Shut-off (30 min), Keep Warm Function (30 min), Two Adjustable Grind Levels, Processes Ground Coffee, Removable Grinder for Easy Cleaning. |

ചിത്രം 7.1: Product dimensions: 26 cm (width) x 17.5 cm (depth) x 27.5 cm (height).
8. വാറൻ്റിയും പിന്തുണയും
Your Caso Coffee Compact Electronic coffee machine comes with a manufacturer's warranty. For detailed warranty information, please refer to the warranty card included with your product or visit the official CASO Design webസൈറ്റ്.
If you require technical support, have questions about operation, or need to arrange for service, please contact CASO Design customer service. Contact details can typically be found on the manufacturer's webസൈറ്റ് അല്ലെങ്കിൽ ഉൽപ്പന്ന പാക്കേജിംഗിൽ.
പിന്തുണയുമായി ബന്ധപ്പെടുമ്പോൾ നിങ്ങളുടെ മോഡൽ നമ്പറും (1848) വാങ്ങൽ തീയതിയും തയ്യാറായി വയ്ക്കുക.


