1. ഉൽപ്പന്നം കഴിഞ്ഞുview
The FEELWORLD F6 Plus V2 is a 6-inch field monitor designed for DSLR cameras, featuring a 3D LUT touch screen with a 1920x1080 IPS display. It supports 4K HDMI input and output, and includes a tilt arm for flexible mounting. This manual provides instructions for setup, operation, and maintenance of your F6 Plus V2 monitor.

Image 1.1: FEELWORLD F6 Plus V2 6-inch field monitor.
2. പാക്കേജ് ഉള്ളടക്കം
താഴെ ലിസ്റ്റ് ചെയ്തിരിക്കുന്ന എല്ലാ ഇനങ്ങളും നിങ്ങളുടെ പാക്കേജിൽ ഉൾപ്പെടുത്തിയിട്ടുണ്ടെന്ന് ഉറപ്പാക്കുക:
- FEELWORLD F6 Plus V2 Monitor
- മൈക്രോ HDMI കേബിൾ
- സൺ ഷേഡ്
- ടിൽറ്റ് ആം
- ഓപ്പറേഷൻ മാനുവൽ

Image 2.1: Included accessories with the FEELWORLD F6 Plus V2 monitor.
3. സജ്ജീകരണ ഗൈഡ്
3.1 ഫിസിക്കൽ ഓവർview
Familiarize yourself with the ports and controls of the F6 Plus V2 monitor.
- മുകൾ വശം: Power/Touch button, 3/4-inch screw mount, Menu rocker wheel.
- ഇടത് വശം: HDMI In, HDMI Out (4K pass-through up to 24Hz), DC Out 8V.
- Bottom Side: SD Card slot (for 3D LUT upload and firmware upgrade), DC In 12V, 1/4-inch screw mount, Headphone monitor jack.
- പിൻ വശം: Standard F970 battery slot.

ചിത്രം 3.1: മുകളിൽ view of the monitor with power/touch button and menu wheel.

ചിത്രം 3.2: വശം view of the monitor displaying various input/output ports.
3.2 മോണിറ്റർ പവർ ചെയ്യുന്നു
The F6 Plus V2 can be powered via the F970 battery slot on the back or through the DC In 12V port. Ensure the battery is charged or the power adapter is connected before use.
3.3 മോണിറ്റർ മൌണ്ട് ചെയ്യൽ
The monitor can be mounted using the included tilt arm via the hot shoe mount or 1/4"-20 thread. This allows for flexible positioning, such as on top of your camera or on a gimbal.
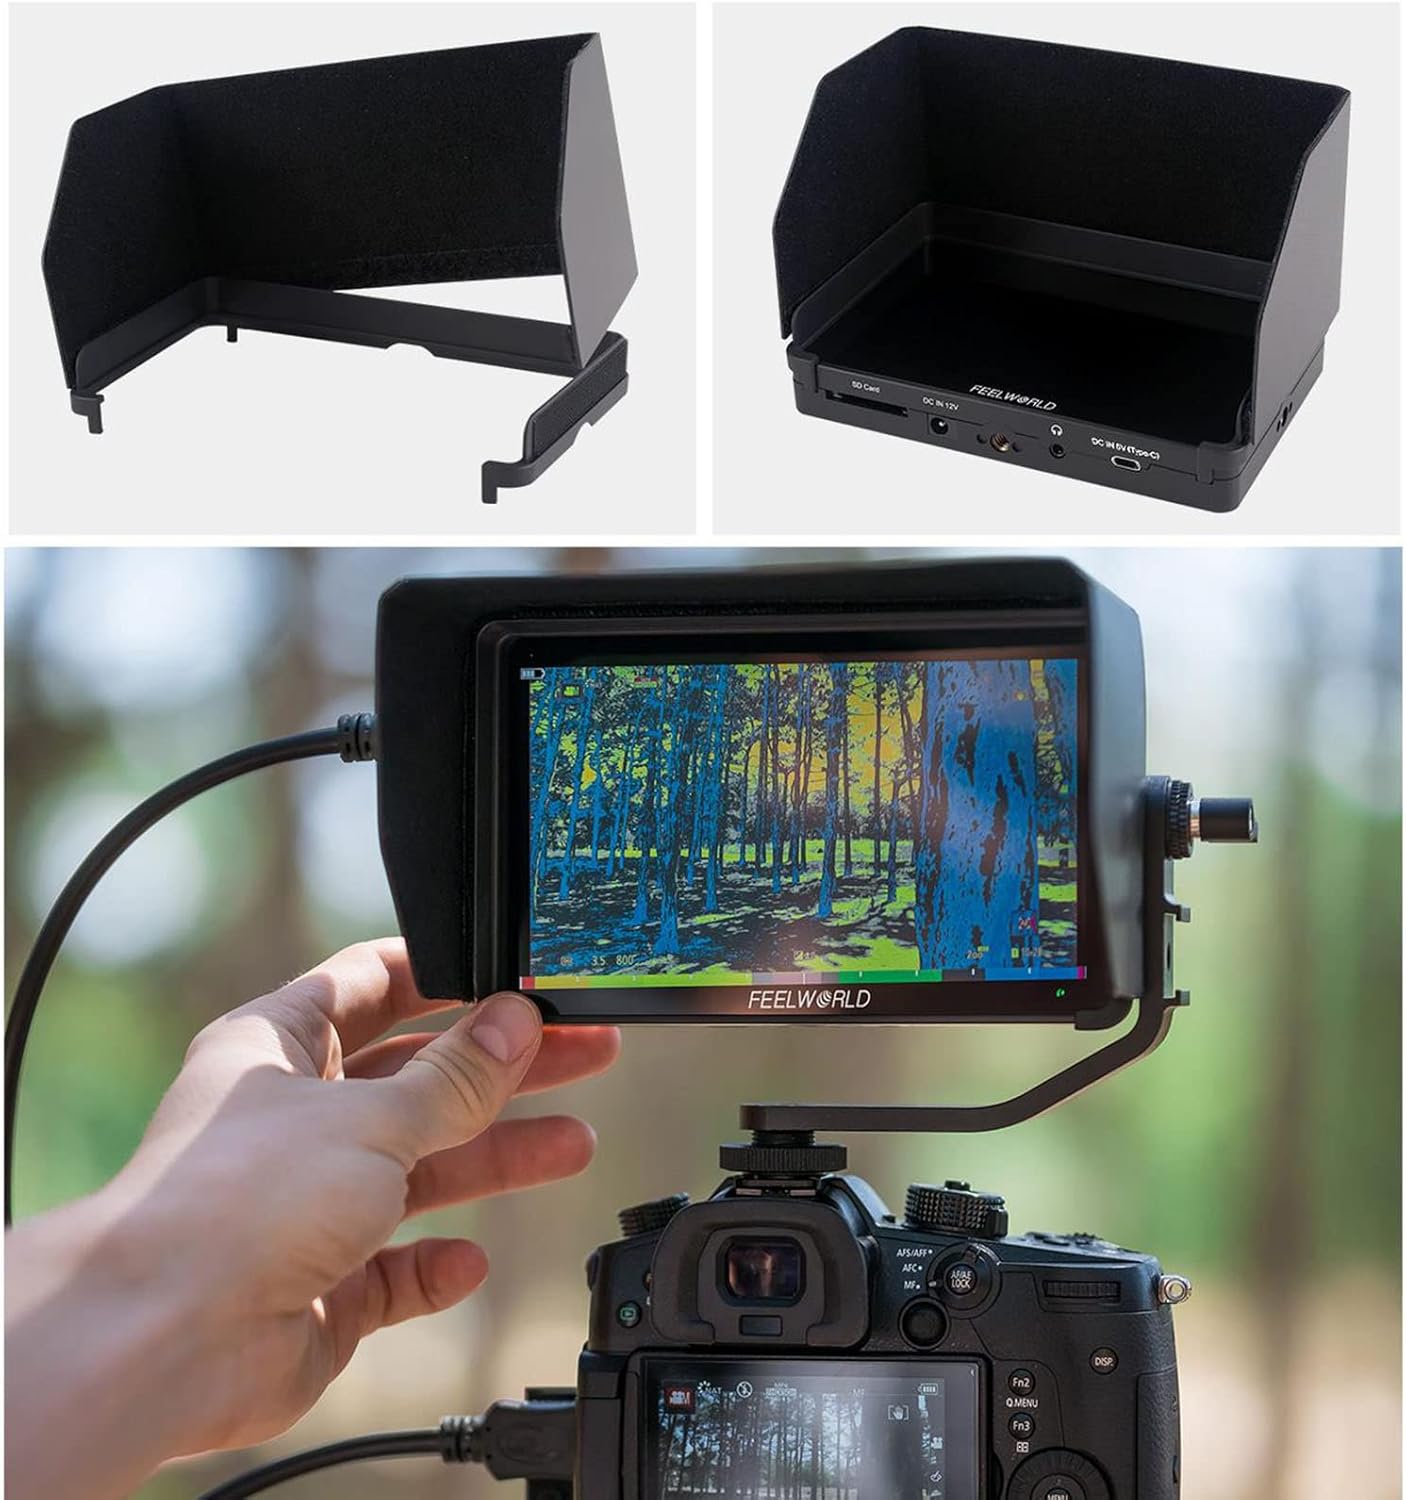
Image 3.3: Monitor mounted on a camera with the tilt arm and sunshade.
4. പ്രവർത്തന നിർദ്ദേശങ്ങൾ
4.1 അടിസ്ഥാന പ്രവർത്തനം
Press the Power/Touch button to turn the monitor on or off. The touch screen allows for intuitive control of all parameters.
4.2 മെനു നാവിഗേഷൻ
Tap twice on the screen to enter the menu system. The menu rocker wheel can also be used to navigate and select options. The menu is organized into several categories:
- ചിത്ര ക്രമീകരണങ്ങൾ: Adjust display parameters.
- Feature Settings: Access monitoring tools.
- സിസ്റ്റം ക്രമീകരണങ്ങൾ: Configure general monitor options.
4.3 Monitoring Tools and Features
The F6 Plus V2 includes a variety of professional monitoring tools to assist with your video production:
- തരംഗരൂപ നിരീക്ഷണം: Choose from RGB Parade, Y Parade, vectorscope, histogram, and audio phase/level displays for broadcast-accurate signal monitoring.
- ഫോക്കസ് അസിസ്റ്റ് (പീക്കിംഗ്): Highlights in-focus areas to aid in sharp focusing.
- തെറ്റായ നിറം: Displays exposure levels using color overlays.
- ഹിസ്റ്റോഗ്രാം: ടോണൽ വിതരണത്തിന്റെ ഗ്രാഫിക്കൽ പ്രാതിനിധ്യം.
- ഓഡിയോ മീറ്റർ: Monitors audio input levels.
- മോണോക്രോം: Displays the image in black and white.
- സുരക്ഷാ മാർക്കർ: Provides frame guides for various aspect ratios (e.g., 4:3, 16:9, 2.35:1).
- സെന്റർ മാർക്കർ: Displays a crosshair in the center of the screen.
- അനാമോർഫിക് മോഡ്: അനാമോർഫിക് ഫൂ ഡീ-സ്ക്വീസസ് ചെയ്യുന്നുtage (1.33x, 2.0x).
- ഇമേജ് ഫ്ലിപ്പ്: ചിത്രം തിരശ്ചീനമായോ ലംബമായോ ഫ്ലിപ്പുചെയ്യുന്നു.
- സൂം: Magnifies a portion of the screen for detailed inspection.
- ഫ്രീസ്: Holds the current frame on the screen.
- പിക്സൽ-ടു-പിക്സൽ: സ്കെയിലിംഗ് ഇല്ലാതെ ചിത്രം അതിന്റെ നേറ്റീവ് റെസല്യൂഷനിൽ പ്രദർശിപ്പിക്കുന്നു.
- Screenshot & Video Overlay: Capture screenshots and compare them with real-time video using semi-transparent overlay. (Requires SD card)

Image 4.1: Waveform monitoring and other analysis tools on the F6 Plus V2.
Image 4.2: Screenshot and video overlay function for composition comparison.
4.4 3D LUT Color Calibration
The monitor supports 3D LUT (Look Up Table) import via SD card, allowing you to preview your desired color grades in real-time. It comes with pre-loaded LUTs for various log profiles like S-Log2/3, V-Log, and Log-C.
- To import custom LUTs, save your .cube LUT files onto an SD card.
- Insert the SD card into the monitor's SD card slot.
- Navigate to the LUT Import section in the menu and select "Initialize" to load the LUTs.
- Once imported, you can select your desired LUT from the list for live preview.

Image 4.3: Real-time 3D LUT preview for color calibration.
4.5 ഡിസ്പ്ലേ ക്രമീകരണങ്ങൾ
You can adjust various display parameters to suit your viewing preferences and shooting environment:
- Color Temperature (e.g., 6500K)
- ബാക്ക്ലൈറ്റ്
- തെളിച്ചം
- കോൺട്രാസ്റ്റ്
- സാച്ചുറേഷൻ
- നിറം
- മൂർച്ച
5. പരിപാലനം
To ensure the longevity and optimal performance of your FEELWORLD F6 Plus V2 monitor, follow these maintenance guidelines:
- വൃത്തിയാക്കൽ: മോണിറ്റർ സ്ക്രീനും ബോഡിയും വൃത്തിയാക്കാൻ മൃദുവായതും ഉണങ്ങിയതുമായ തുണി ഉപയോഗിക്കുക. കഠിനമായ പാടുകൾക്ക്, അല്പം ഡി.amp cloth with a mild, non-abrasive cleaner can be used, ensuring no liquid enters the ports.
- സംഭരണം: Store the monitor in a cool, dry place away from direct sunlight and extreme temperatures. Use the provided sunshade or a protective case when not in use to prevent scratches and dust accumulation.
- ബാറ്ററി കെയർ: If using rechargeable batteries, follow the manufacturer's instructions for charging and storage. Remove batteries if the monitor will not be used for an extended period.
- ഫേംവെയർ അപ്ഡേറ്റുകൾ: FEELWORLD ഉദ്യോഗസ്ഥനെ ഇടയ്ക്കിടെ പരിശോധിക്കുക website for firmware updates to ensure your monitor has the latest features and bug fixes. Follow the provided instructions for safe updating via the SD card slot.
6. പ്രശ്നപരിഹാരം
If you encounter issues with your FEELWORLD F6 Plus V2 monitor, refer to the following common troubleshooting steps:
- ശക്തിയില്ല: Ensure the battery is fully charged or the power adapter is securely connected. Check the power button operation.
- സിഗ്നലില്ല: Verify that the HDMI cable is correctly connected to both the camera and the monitor. Check the camera's HDMI output settings. Ensure the correct input source is selected on the monitor.
- ഇമേജ് വികലമാക്കൽ/തെറ്റായ നിറങ്ങൾ: Check the HDMI cable for damage. Reset display settings to default in the monitor menu. Ensure no incorrect LUTs are applied.
- ടച്ച് സ്ക്രീൻ പ്രതികരിക്കുന്നില്ല: Try restarting the monitor. Ensure the touch function is enabled via the Power/Touch button.
- ഫേംവെയർ അപ്ഡേറ്റ് പരാജയം: Ensure the SD card is properly formatted and the firmware file is correctly placed. Follow the update instructions precisely.
For persistent issues, contact FEELWORLD customer support or refer to the official webകൂടുതൽ സഹായത്തിനുള്ള സൈറ്റ്.
7 സ്പെസിഫിക്കേഷനുകൾ
| ഫീച്ചർ | സ്പെസിഫിക്കേഷൻ |
|---|---|
| മോഡൽ നമ്പർ | F6 PLUS V2 |
| സ്ക്രീൻ വലിപ്പം | 6 ഇഞ്ച് |
| റെസലൂഷൻ | എഫ്എച്ച്ഡി 1080പി (1920x1080) |
| ഡിസ്പ്ലേ തരം | ഐപിഎസ് ടച്ച് സ്ക്രീൻ |
| വീക്ഷണാനുപാതം | 16:9 |
| കോൺട്രാസ്റ്റ് റേഷ്യോ | 1000:1 |
| തെളിച്ചം | 500 നിറ്റ് |
| HDMI ഇൻപുട്ട്/ഔട്ട്പുട്ട് | 4K HDMI ഇൻപുട്ട് & ലൂപ്പ് ഔട്ട്പുട്ട് |
| LUT പിന്തുണ | 3D LUT Cube Import (up to 50) via SD Card |
| പവർ ഇൻപുട്ട് | DC In 12V, 5V Type-C, F970/LP-E6 Battery Plate |
| പവർ ഔട്ട്പുട്ട് | DC Out 8V |
| ഇനത്തിൻ്റെ ഭാരം | 2.2 പൗണ്ട് |
| പാക്കേജ് അളവുകൾ | 7.5 x 5.1 x 3.4 ഇഞ്ച് |
8. ഔദ്യോഗിക ഉൽപ്പന്ന വീഡിയോ
Video 8.1: FEELWORLD F6 Plus 4K DSLR Camera Field Monitor Overview by INSTACINE. This video demonstrates the monitor's features, physical layout, and menu options, including touch screen functionality and LUT loading. Note: This video is for the FEELWORLD F6 Plus model, and some features or specifications may vary slightly for the F6 Plus V2.
9. വാറൻ്റിയും പിന്തുണയും
For warranty information, technical support, or service inquiries, please refer to the official FEELWORLD webസൈറ്റിൽ ബന്ധപ്പെടുകയോ അവരുടെ ഉപഭോക്തൃ സേവനവുമായി നേരിട്ട് ബന്ധപ്പെടുകയോ ചെയ്യുക. വാറന്റി ക്ലെയിമുകൾക്കുള്ള വാങ്ങലിന്റെ തെളിവായി നിങ്ങളുടെ വാങ്ങൽ രസീത് സൂക്ഷിക്കുക.


