ആമുഖം
വാങ്ങിയതിന് നന്ദി.asing the Trexonic Retro Record Player. This versatile audio system combines vintage aesthetics with modern functionality, allowing you to enjoy your favorite music from various sources including vinyl records, CDs, Bluetooth devices, and AM/FM radio. This manual provides detailed instructions for setup, operation, maintenance, and troubleshooting to ensure optimal performance and longevity of your device.
പ്രധാനപ്പെട്ട സുരക്ഷാ മുൻകരുതലുകൾ
Please read these instructions carefully before using the unit. Keep this manual for future reference.
- ഊർജ്ജ സ്രോതസ്സ്: വൈദ്യുതി വിതരണം വോള്യവുമായി പൊരുത്തപ്പെടുന്നുണ്ടെന്ന് ഉറപ്പാക്കുകtagഇ യൂണിറ്റിൽ വ്യക്തമാക്കിയിട്ടുണ്ട്.
- വെൻ്റിലേഷൻ: വെന്റിലേഷൻ തുറസ്സുകൾ തടയരുത്. ശരിയായ വായുസഞ്ചാരത്തിനായി യൂണിറ്റിന് ചുറ്റും മതിയായ ഇടം നൽകുക.
- ജലവും ഈർപ്പവും: Do not expose the unit to rain, moisture, or dripping water. Do not place objects filled with liquids on the unit.
- ചൂട്: റേഡിയേറ്ററുകൾ, ഹീറ്റ് രജിസ്റ്ററുകൾ, സ്റ്റൗകൾ അല്ലെങ്കിൽ താപം ഉൽപ്പാദിപ്പിക്കുന്ന മറ്റ് ഉപകരണങ്ങൾ പോലുള്ള താപ സ്രോതസ്സുകളിൽ നിന്ന് യൂണിറ്റ് അകറ്റി നിർത്തുക.
- വൃത്തിയാക്കൽ: വൃത്തിയാക്കുന്നതിന് മുമ്പ് വാൾ ഔട്ട്ലെറ്റിൽ നിന്ന് യൂണിറ്റ് പ്ലഗ് ഊരിയിടുക. മൃദുവായതും ഉണങ്ങിയതുമായ തുണി ഉപയോഗിക്കുക. ലിക്വിഡ് ക്ലീനറുകളോ എയറോസോൾ ക്ലീനറുകളോ ഉപയോഗിക്കരുത്.
- സേവനം: ഈ ഉൽപ്പന്നം സ്വയം സേവിക്കാൻ ശ്രമിക്കരുത്. യോഗ്യതയുള്ള സേവന ഉദ്യോഗസ്ഥർക്ക് എല്ലാ സേവനങ്ങളും റഫർ ചെയ്യുക.
പാക്കേജ് ഉള്ളടക്കം
എല്ലാ ഇനങ്ങളും പാക്കേജിൽ ഉൾപ്പെടുത്തിയിട്ടുണ്ടെന്ന് ഉറപ്പാക്കുക:
- Trexonic Retro Record Player (TRX-16TRQ)
- പവർ അഡാപ്റ്റർ
- ഉപയോക്തൃ മാനുവൽ (ഈ പ്രമാണം)
ഉൽപ്പന്നം കഴിഞ്ഞുview
Familiarize yourself with the various components and controls of your Trexonic Retro Record Player.

ചിത്രം: ഫ്രണ്ട് view of the Trexonic Retro Record Player (Model TRX-16TRQ) highlighting key features. From left to right, the image points out the Headphone jack, USB input, SD input, CD Player, Aux-In, 3-Speed Turntable, FM/AM Radio, Bluetooth, and Alarm Clock with timer. The main display shows "READING".

ചിത്രം: A detailed close-up of the control panel of the Trexonic Retro Record Player. The display shows "USB READING". Buttons visible include MODE/CLK, Play/Pause/Scan, REC/DEL, CD/USB/SD, PHONO, TUNER, AUX/BT, TIMER/SLEEP, and volume/tuning knobs.
ഫ്രണ്ട് പാനൽ നിയന്ത്രണങ്ങൾ:
- MODE/CLK Knob: Controls power, volume, and clock settings.
- Play/Pause/Scan Button: Controls playback for CD/USB/SD, and scanning for radio.
- REC/DEL Button: Initiates recording to USB/SD or deletes files.
- CD/USB/SD Button: Selects CD, USB, or SD card input mode.
- PHONO Button: Selects turntable input mode.
- ട്യൂണർ ബട്ടൺ: Selects AM/FM radio mode.
- AUX/BT Button: Selects Auxiliary input or Bluetooth mode.
- TIMER/SLEEP Button: Sets alarm and sleep timer functions.
- ട്യൂണിംഗ് നോബ്: റേഡിയോ ഫ്രീക്വൻസി ക്രമീകരിക്കുന്നു.
- ഹെഡ്ഫോൺ ജാക്ക്: സ്വകാര്യ ശ്രവണത്തിനായി.
- USB പോർട്ട്: യുഎസ്ബി ഡ്രൈവ് പ്ലേബാക്കിനും റെക്കോർഡിംഗിനും.
- SD കാർഡ് സ്ലോട്ട്: For SD card playback and recording.
- ഓക്സ്-ഇൻ ജാക്ക്: ബാഹ്യ ഓഡിയോ ഉപകരണങ്ങൾ ബന്ധിപ്പിക്കുന്നതിന്.
- സിഡി ട്രേ: ഓഡിയോ സിഡികൾ ചേർക്കുന്നതിന്.
പിൻ പാനൽ കണക്ഷനുകൾ:
- എസി പവർ ഇൻപുട്ട്: പവർ അഡാപ്റ്റർ ഇവിടെ ബന്ധിപ്പിക്കുക.
- ആർസിഎ ലൈൻ-ഔട്ട്: ബാഹ്യ സ്പീക്കറുകളിലേക്ക് കണക്റ്റുചെയ്യുക അല്ലെങ്കിൽ amplifier (cables not included).
സജ്ജമാക്കുക
അൺപാക്കിംഗും പ്ലേസ്മെൻ്റും:
- യൂണിറ്റ് അതിന്റെ പാക്കേജിംഗിൽ നിന്ന് ശ്രദ്ധാപൂർവ്വം നീക്കം ചെയ്യുക.
- Place the unit on a flat, stable surface away from direct sunlight, heat sources, and excessive dust or moisture.
- യൂണിറ്റിന് ചുറ്റും മതിയായ വായുസഞ്ചാരം ഉറപ്പാക്കുക.
പവർ കണക്ഷൻ:
- Connect the provided AC power adapter to the AC Power Input jack on the rear of the unit.
- Plug the other end of the power adapter into a standard wall outlet.
- യൂണിറ്റ് സ്റ്റാൻഡ്ബൈ മോഡിൽ പ്രവേശിക്കും.
പ്രാരംഭ പവർ ഓൺ:
To turn on the unit from standby mode, press the മോഡ്/CLK knob or use the remote control (if included).
പ്രവർത്തന നിർദ്ദേശങ്ങൾ
Playing Vinyl Records:
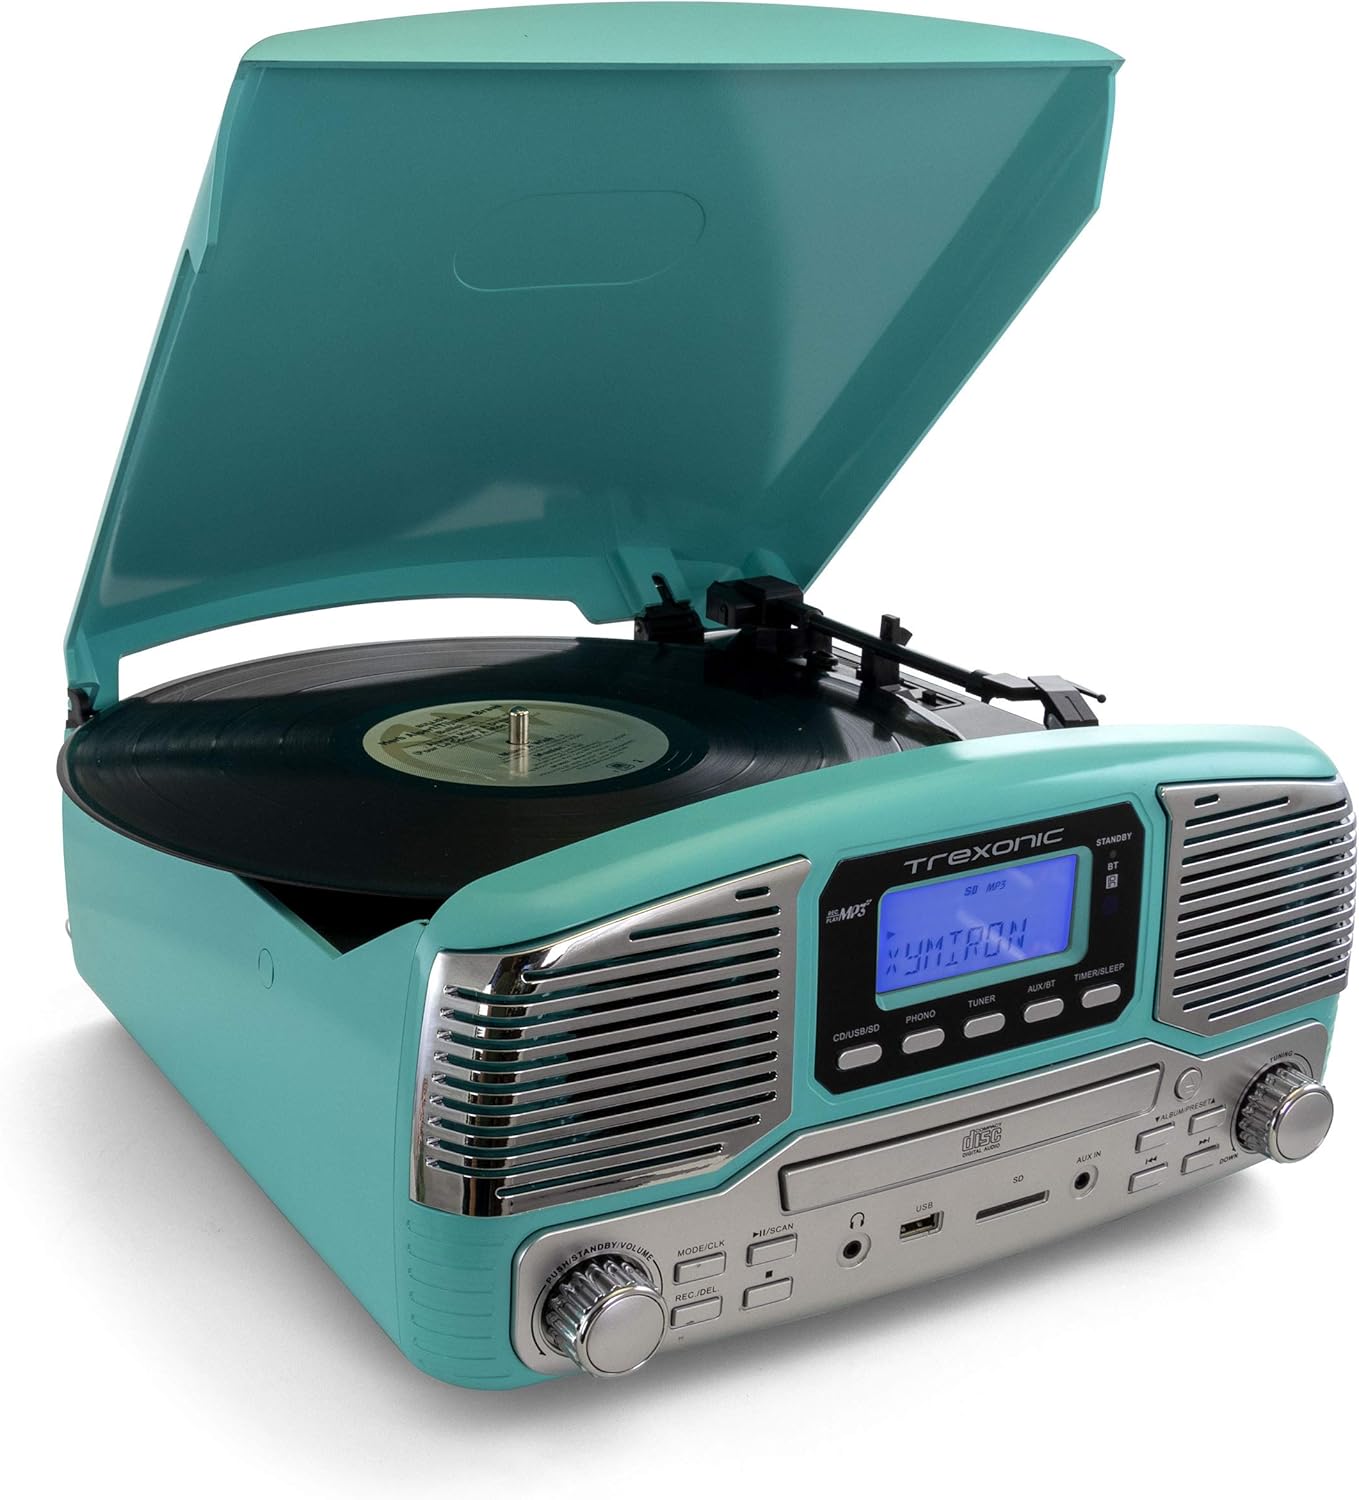
ചിത്രം: The Trexonic Retro Record Player in turquoise, with its lid open, showing a black vinyl record spinning on the turntable. The tone arm with its stylus is positioned on the record.
- പൊടി കവർ തുറക്കുക.
- ടർടേബിൾ പ്ലാറ്ററിൽ ഒരു വിനൈൽ റെക്കോർഡ് സ്ഥാപിക്കുക.
- Select the appropriate speed (33 1/3, 45, or 78 RPM) using the speed selector switch located on the turntable deck. For 45 RPM records, place the included 45 RPM adapter on the center spindle.
- അമർത്തുക ഫോൺ button to select the turntable mode.
- Gently lift the tone arm using the cue lever and position the stylus over the desired track of the record.
- ക്യൂ ലിവർ ഉപയോഗിച്ച് ടോൺ ആം പതുക്കെ റെക്കോർഡിലേക്ക് താഴ്ത്തുക. പ്ലേബാക്ക് ആരംഭിക്കും.
- ഉപയോഗിച്ച് വോളിയം ക്രമീകരിക്കുക മോഡ്/CLK മുട്ട്.
- At the end of the record, the turntable may stop automatically depending on the auto-stop setting. Lift the tone arm and return it to the arm rest.

ചിത്രം: ഒരു ക്ലോസപ്പ് view of the turntable platter and the tone arm with its red stylus cartridge. A black vinyl record is visible on the platter, and the tone arm is positioned over it, ready for playback.
Note on Auto-Stop: Some records may have a slightly different end groove position, which might cause the auto-stop feature to activate prematurely or not at all. If this occurs, you may need to manually stop playback or adjust the tone arm.
സിഡികൾ പ്ലേ ചെയ്യുന്നു:

ചിത്രം: The Trexonic Retro Record Player with its CD tray extended, showing a silver compact disc being inserted into the player. The display reads "OPEN".
- അമർത്തുക CD/USB/SD സിഡി മോഡ് തിരഞ്ഞെടുക്കാനുള്ള ബട്ടൺ.
- Press the Eject button (usually indicated by a triangle with a line below it) to open the CD tray.
- ലേബൽ വശം മുകളിലേക്ക് അഭിമുഖീകരിക്കുന്ന തരത്തിൽ ഒരു സിഡി ട്രേയിൽ വയ്ക്കുക.
- Press the Eject button again to close the tray. The unit will read the disc.
- അമർത്തുക പ്ലേ/താൽക്കാലികമായി നിർത്തുക പ്ലേബാക്ക് ആരംഭിക്കുന്നതിനുള്ള ബട്ടൺ.
- Use the Skip Forward/Backward buttons to navigate between tracks.
ബ്ലൂടൂത്ത് ഉപയോഗിക്കുന്നത്:
- അമർത്തുക AUX/BT button to select Bluetooth mode. The display will show "BT" and flash, indicating it's ready to pair.
- നിങ്ങളുടെ ബ്ലൂടൂത്ത് പ്രാപ്തമാക്കിയ ഉപകരണത്തിൽ (സ്മാർട്ട്ഫോൺ, ടാബ്ലെറ്റ് മുതലായവ), ബ്ലൂടൂത്ത് ഓണാക്കി ലഭ്യമായ ഉപകരണങ്ങൾക്കായി തിരയുക.
- Select "Trexonic" or "TRX-16TRQ" from the list of devices.
- Once paired, the display will stop flashing and show "BT". You can now stream audio from your device to the record player.
- Control playback (play/pause, skip) from your connected device.
Listening to AM/FM Radio:
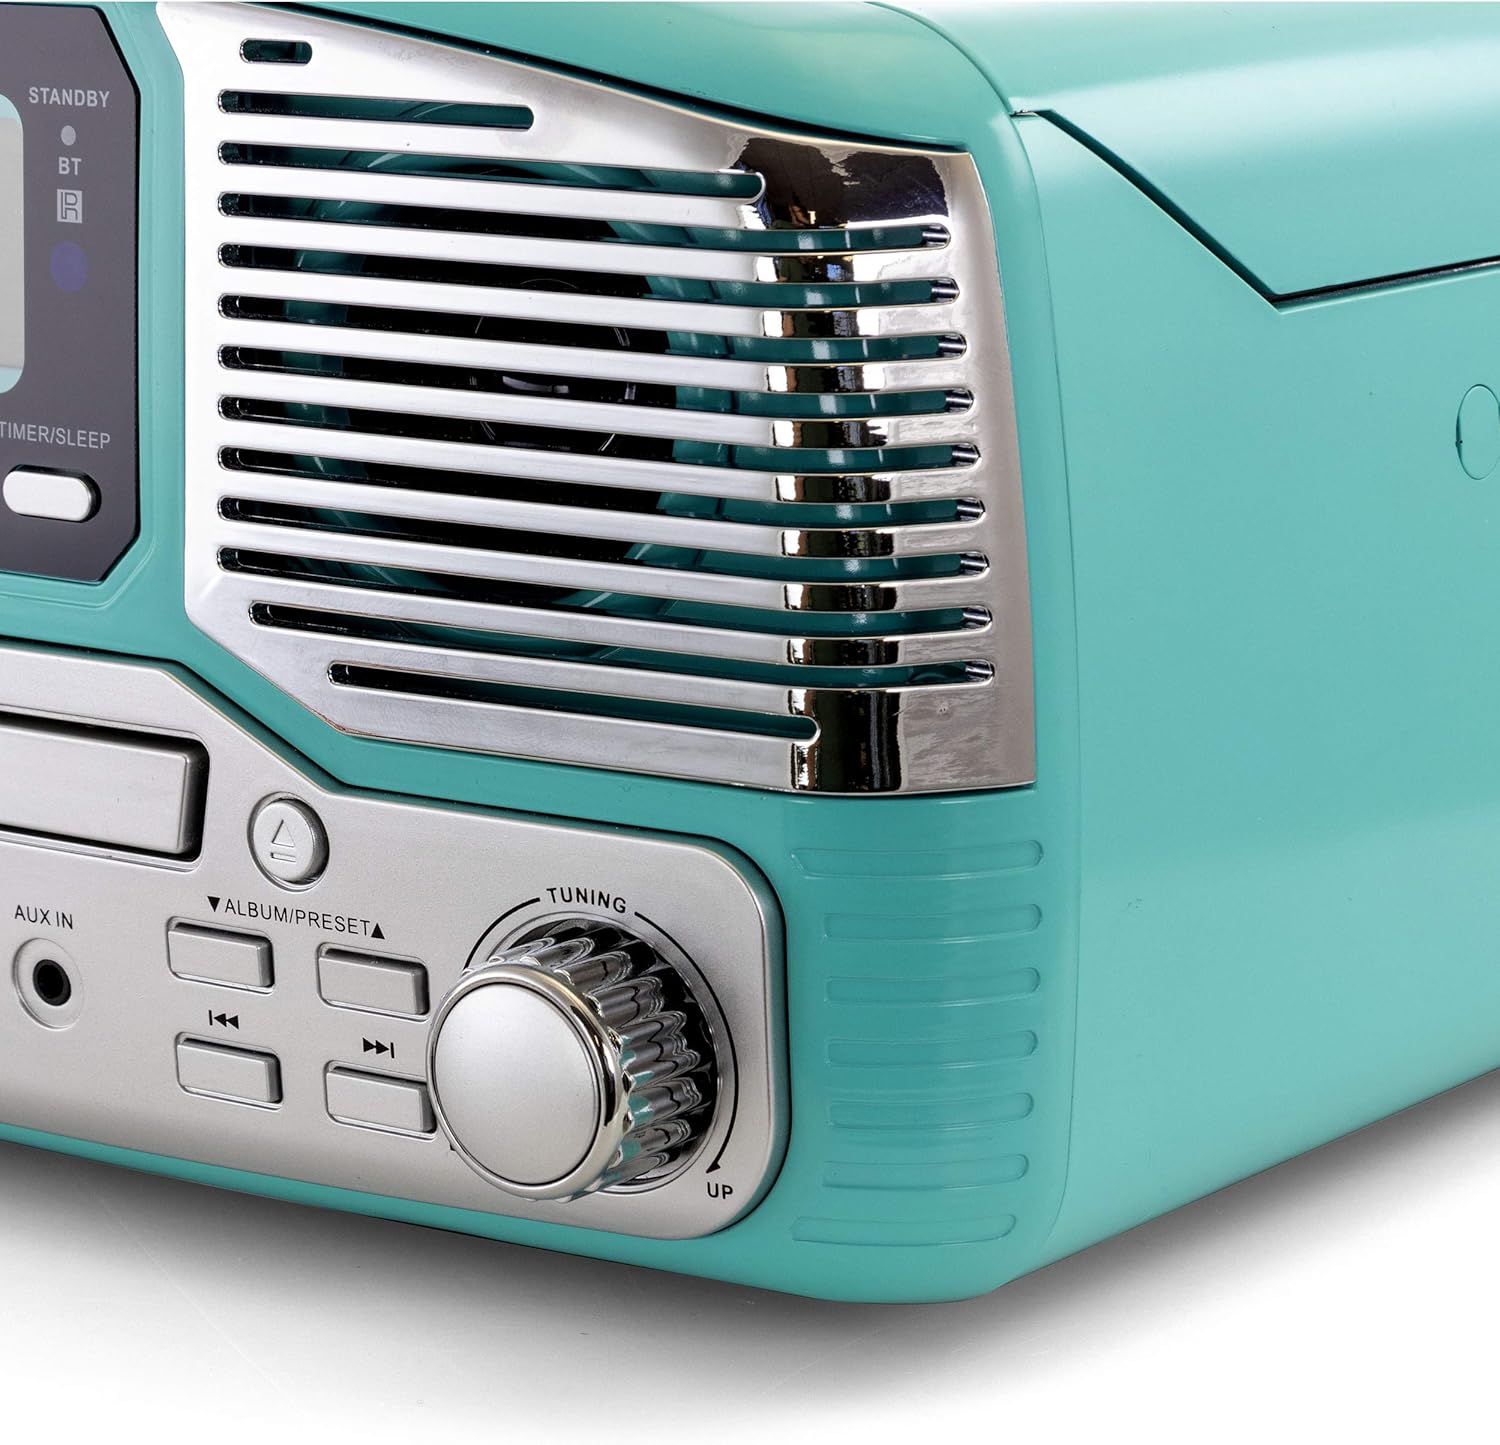
ചിത്രം: ഒരു ക്ലോസ്-അപ്പ് വശം view of the Trexonic Retro Record Player, focusing on the right speaker grille and the large, chrome-finished tuning knob. The knob is labeled "TUNING" with "UP" and "DOWN" indicators.
- അമർത്തുക ട്യൂണർ റേഡിയോ മോഡ് തിരഞ്ഞെടുക്കാൻ ബട്ടൺ.
- തിരിക്കുക ട്യൂബ് നോബ് to manually tune to your desired AM or FM station.
- യാന്ത്രിക സ്കാനിംഗിനായി, അമർത്തിപ്പിടിക്കുക പ്ലേ/താൽക്കാലികമായി നിർത്തുക/സ്കാൻ ചെയ്യുക button. The unit will scan and stop at the next strong station.
Using USB/SD Input:
- USB പോർട്ടിലേക്ക് ഒരു USB ഫ്ലാഷ് ഡ്രൈവ് അല്ലെങ്കിൽ SD കാർഡ് സ്ലോട്ടിലേക്ക് ഒരു SD കാർഡ് ഇടുക.
- അമർത്തുക CD/USB/SD button repeatedly until "USB" or "SD" appears on the display.
- The unit will automatically start playing compatible audio file(ഉദാ. MP3).
- പ്ലേബാക്ക് നിയന്ത്രിക്കാൻ പ്ലേ/പോസ്, സ്കിപ്പ് ബട്ടണുകൾ ഉപയോഗിക്കുക.
Recording to USB/SD (Vinyl to MP3):
- Ensure a USB drive or SD card is inserted.
- Select the source you wish to record (e.g., PHONO for vinyl).
- Start playback of the source material.
- അമർത്തുക REC/DEL ബട്ടൺ. റെക്കോർഡിംഗ് പുരോഗമിക്കുകയാണെന്ന് ഡിസ്പ്ലേ സൂചിപ്പിക്കും.
- അമർത്തുക REC/DEL റെക്കോർഡിംഗ് നിർത്താൻ വീണ്ടും ബട്ടൺ അമർത്തുക. റെക്കോർഡ് ചെയ്തത് file USB ഡ്രൈവിലേക്കോ SD കാർഡിലേക്കോ സംരക്ഷിക്കപ്പെടും.
Using Aux-In:
- ഒരു ബാഹ്യ ഓഡിയോ ഉപകരണം (ഉദാ. MP3 പ്ലെയർ, സ്മാർട്ട്ഫോൺ) ഇതിലേക്ക് ബന്ധിപ്പിക്കുക ഓക്സ് ഇൻ jack using a 3.5mm audio cable (not included).
- അമർത്തുക AUX/BT AUX മോഡ് തിരഞ്ഞെടുക്കാൻ ബട്ടൺ.
- Play audio from your external device. The sound will be output through the record player's speakers.
ഹെഡ്ഫോൺ ശ്രവിക്കൽ:
സ്റ്റാൻഡേർഡ് 3.5mm ഹെഡ്ഫോണുകൾ പ്ലഗ് ചെയ്യുക ഹെഡ്ഫോൺ ജാക്ക് on the front panel for private listening. The built-in speakers will be muted automatically.
മെയിൻ്റനൻസ്
യൂണിറ്റ് വൃത്തിയാക്കൽ:
- വൃത്തിയാക്കുന്നതിന് മുമ്പ് എല്ലായ്പ്പോഴും പവർ ഔട്ട്ലെറ്റിൽ നിന്ന് യൂണിറ്റ് അൺപ്ലഗ് ചെയ്യുക.
- പുറംഭാഗങ്ങൾ തുടയ്ക്കാൻ മൃദുവായതും ഉണങ്ങിയതുമായ തുണി ഉപയോഗിക്കുക.
- അബ്രാസീവ് ക്ലീനറുകൾ, മെഴുക് അല്ലെങ്കിൽ ലായകങ്ങൾ എന്നിവ ഉപയോഗിക്കരുത്, കാരണം അവ ഫിനിഷിന് കേടുവരുത്തും.
Turntable Maintenance:
- സ്റ്റൈലസ് കെയർ: The stylus (needle) is delicate. Handle it with care. Clean the stylus periodically with a soft brush, brushing from back to front.
- പൊടി കവർ: പൊടിയിൽ നിന്നും അവശിഷ്ടങ്ങളിൽ നിന്നും ടർടേബിളിനെ സംരക്ഷിക്കാൻ ഉപയോഗത്തിലില്ലാത്തപ്പോൾ പൊടി കവർ അടച്ചു വയ്ക്കുക.
- റെക്കോർഡ് കെയർ: Keep your records clean to prevent dust buildup on the stylus and improve sound quality.
CD Player Maintenance:
- Handle CDs by their edges to avoid fingerprints and scratches.
- സിഡികൾ മൃദുവായ, ലിന്റ് രഹിത തുണി ഉപയോഗിച്ച് വൃത്തിയാക്കുക, മധ്യഭാഗത്ത് നിന്ന് പുറത്തേക്ക് തുടയ്ക്കുക.
- Do not use abrasive cleaners or solvents on CDs.
ട്രബിൾഷൂട്ടിംഗ്
If you experience problems with your unit, please refer to the following table for possible solutions.
| പ്രശ്നം | സാധ്യമായ കാരണം | പരിഹാരം |
|---|---|---|
| ശക്തിയില്ല | പവർ കോർഡ് സുരക്ഷിതമായി ബന്ധിപ്പിച്ചിട്ടില്ല. | പവർ കോർഡ് യൂണിറ്റിലേക്കും വാൾ ഔട്ട്ലെറ്റിലേക്കും ദൃഢമായി പ്ലഗ് ചെയ്തിട്ടുണ്ടോയെന്ന് പരിശോധിക്കുക. |
| ശബ്ദമില്ല | Volume is too low or muted. Incorrect source selected. Headphones connected. | Increase volume. Select the correct input source (PHONO, CD, BT, etc.). Disconnect headphones. |
| Turntable not spinning or stopping prematurely | Speed setting incorrect. Auto-stop feature. | Ensure correct speed (33/45/78 RPM) is selected. Note that auto-stop may vary with some records. |
| സിഡി പ്ലേ ചെയ്യുന്നില്ല | CD inserted incorrectly. CD is dirty or scratched. | Ensure CD is inserted label-side up. Clean or try a different CD. |
| ബ്ലൂടൂത്ത് ജോടിയാക്കൽ പ്രശ്നങ്ങൾ | Device too far. Bluetooth not enabled on source. | Move device closer to the unit. Ensure Bluetooth is enabled on your device and the unit is in BT mode. |
| മോശം റേഡിയോ സ്വീകരണം | Antenna not extended or positioned correctly. Interference. | Adjust the position of the FM wire antenna. For AM, rotate the unit for better reception. Move away from other electronic devices. |
ഈ പരിഹാരങ്ങൾ പരീക്ഷിച്ചതിന് ശേഷവും പ്രശ്നം നിലനിൽക്കുകയാണെങ്കിൽ, ദയവായി ഉപഭോക്തൃ പിന്തുണയുമായി ബന്ധപ്പെടുക.
സ്പെസിഫിക്കേഷനുകൾ
| ഫീച്ചർ | വിശദാംശങ്ങൾ |
|---|---|
| മോഡൽ നമ്പർ | TRX-16TRQ |
| പവർ ഉറവിടം | AC 100-240V ~ 50 / 60Hz |
| ടേൺ ചെയ്യാവുന്ന വേഗത | 33 1/3, 45, 78 ആർപിഎം |
| കണക്റ്റിവിറ്റി | Bluetooth, USB, SD, Aux-In, RCA Line-Out |
| മീഡിയ പ്ലേബാക്ക് | Vinyl Records, CDs, MP3 (via USB/SD/Bluetooth) |
| റേഡിയോ ട്യൂണർ | AM/FM |
| അളവുകൾ (ഏകദേശം) | 14.5 x 14.5 x 8.75 ഇഞ്ച് (L x W x H) |
| ഭാരം (ഏകദേശം) | 7.24 പൗണ്ട് |
| നിറം | ടർക്കോയ്സ് |
വാറൻ്റിയും പിന്തുണയും
പരിമിത വാറൻ്റി:
Trexonic warrants this product against defects in material or workmanship for a period of one (1) year from the original date of purchase. This warranty does not cover damage caused by accident, misuse, abuse, improper installation or operation, or unauthorized repairs. Proof of purchase is required for warranty service.
ഉപഭോക്തൃ പിന്തുണ:
For technical assistance, troubleshooting, or warranty inquiries, please contact Trexonic Customer Service. Refer to the product packaging or the official Trexonic webഏറ്റവും പുതിയ ബന്ധപ്പെടാനുള്ള വിവരങ്ങൾക്കായി സൈറ്റ്.
ഓൺലൈൻ ഉറവിടങ്ങൾ: Visit the official Trexonic webപതിവുചോദ്യങ്ങൾ, ഉൽപ്പന്ന രജിസ്ട്രേഷൻ, അധിക പിന്തുണാ ഉറവിടങ്ങൾ എന്നിവയ്ക്കുള്ള സൈറ്റ്.


