1. ആമുഖം
Thank you for choosing the XElectron Techno Plus M2 Grand FHD Miracast Projector. This manual provides essential information for the safe and efficient operation of your device. Please read it thoroughly before use and retain it for future reference.
This projector features a native 1080P resolution with 4K support, Android 13 operating system, auto-focus, auto-keystone correction, dual-band WiFi 6, and Bluetooth 5.0 connectivity, offering a versatile and immersive viewഅനുഭവം.
2 സുരക്ഷാ വിവരങ്ങൾ
- l ചെയ്യുമ്പോൾ പ്രൊജക്ടർ ലെൻസിലേക്ക് നേരിട്ട് നോക്കരുത്amp ഓണാണ്.
- അമിതമായി ചൂടാകുന്നത് തടയാൻ പ്രൊജക്ടറിന് ചുറ്റും ശരിയായ വായുസഞ്ചാരം ഉറപ്പാക്കുക.
- ഉപകരണത്തിനൊപ്പം നൽകിയിട്ടുള്ള പവർ അഡാപ്റ്റർ മാത്രം ഉപയോഗിക്കുക.
- പ്രൊജക്ടർ വെള്ളത്തിൽ നിന്നോ മറ്റ് ദ്രാവകങ്ങളിൽ നിന്നോ അകറ്റി നിർത്തുക.
- അസ്ഥിരമായ പ്രതലങ്ങളിൽ പ്രൊജക്ടർ സ്ഥാപിക്കുന്നത് ഒഴിവാക്കുക.
- Do not attempt to disassemble or repair the projector yourself. Contact customer support for assistance.
3. പാക്കേജ് ഉള്ളടക്കം
നിങ്ങളുടെ പാക്കേജിൽ എല്ലാ ഇനങ്ങളും ഉണ്ടെന്ന് ഉറപ്പാക്കുക:
- പ്രൊജക്ടർ
- പവർ കോർഡ്
- റിമോട്ട് കൺട്രോൾ
- ഉപയോക്തൃ മാനുവൽ (ഈ പ്രമാണം)
- വാറൻ്റി കാർഡ്
4. ഉൽപ്പന്നം കഴിഞ്ഞുview
Familiarize yourself with the projector's components and features.

ചിത്രം 4.1: മുൻഭാഗം view of the XElectron Techno Plus M2 Projector, showcasing അതിന്റെ ഒതുക്കമുള്ള രൂപകൽപ്പനയും ലെൻസും.
ചിത്രം 4.2: പിൻഭാഗം view of the projector, illustrating the various input and output ports for connectivity.

ചിത്രം 4.3: ഓവർview of the projector highlighting features such as Android 13, 1080P Native resolution, 210° rotation, automatic keystone, 50,000 hours lamp life, built-in speaker, 4D+4P correction, and various connectivity options (HDMI, USB, AUX).
5. സജ്ജീകരണം
5.1 പ്രാരംഭ പ്ലേസ്മെന്റ്
Place the projector on a stable, flat surface. The rotatable design allows for flexible positioning, including ceiling projection. Ensure there is adequate space for ventilation around the device.
5.2 പവർ കണക്ഷൻ
- പ്രൊജക്ടറിന്റെ പവർ ഇൻപുട്ടിലേക്ക് പവർ കോർഡ് ബന്ധിപ്പിക്കുക.
- പവർ കോഡിന്റെ മറ്റേ അറ്റം അനുയോജ്യമായ ഒരു ഇലക്ട്രിക്കൽ ഔട്ട്ലെറ്റിലേക്ക് പ്ലഗ് ചെയ്യുക.
- ഉപകരണം ഓണാക്കാൻ പ്രൊജക്ടറിലോ റിമോട്ട് കൺട്രോളിലോ ഉള്ള പവർ ബട്ടൺ അമർത്തുക.
5.3 പ്രൊജക്ഷൻ ക്രമീകരിക്കൽ
The projector features auto-focus and auto-keystone correction for a clear and rectangular image. Minor adjustments can be made manually if needed.

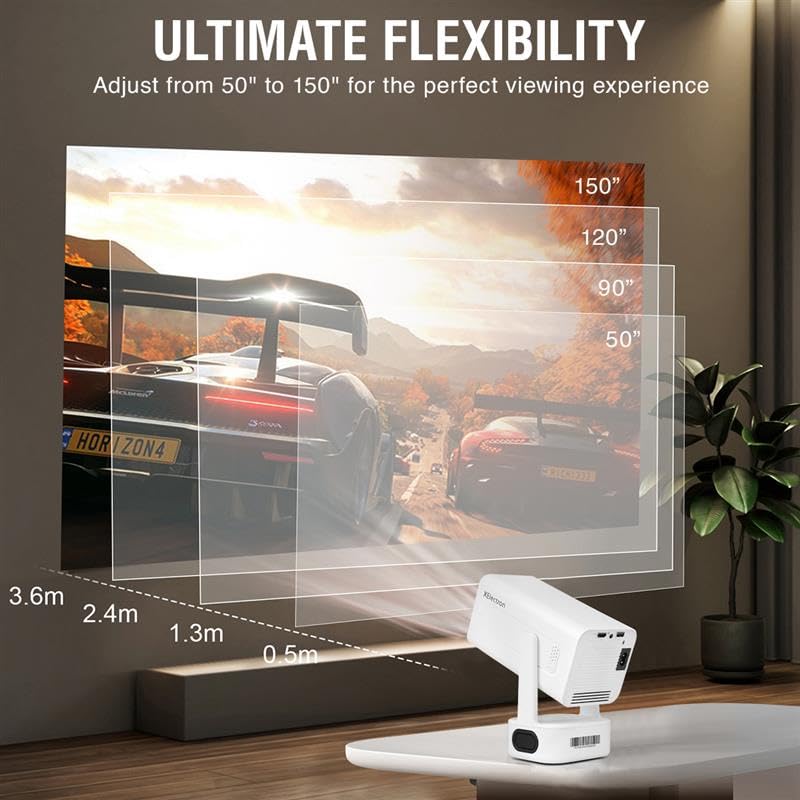
Figure 5.1: The projector offers ultimate flexibility, allowing adjustment of projection size from 50 to 150 inches for an optimal viewഅനുഭവം.

Figure 5.2: The projector automatically corrects image distortion (keystone) and focuses for a sharp, straight, and seamless picture from various angles.
6. പ്രവർത്തന നിർദ്ദേശങ്ങൾ
6.1 ആൻഡ്രോയിഡ് 13 ഓപ്പറേറ്റിംഗ് സിസ്റ്റം
The projector runs on Android 13, providing access to various streaming applications and content directly. Navigate the interface using the remote control.
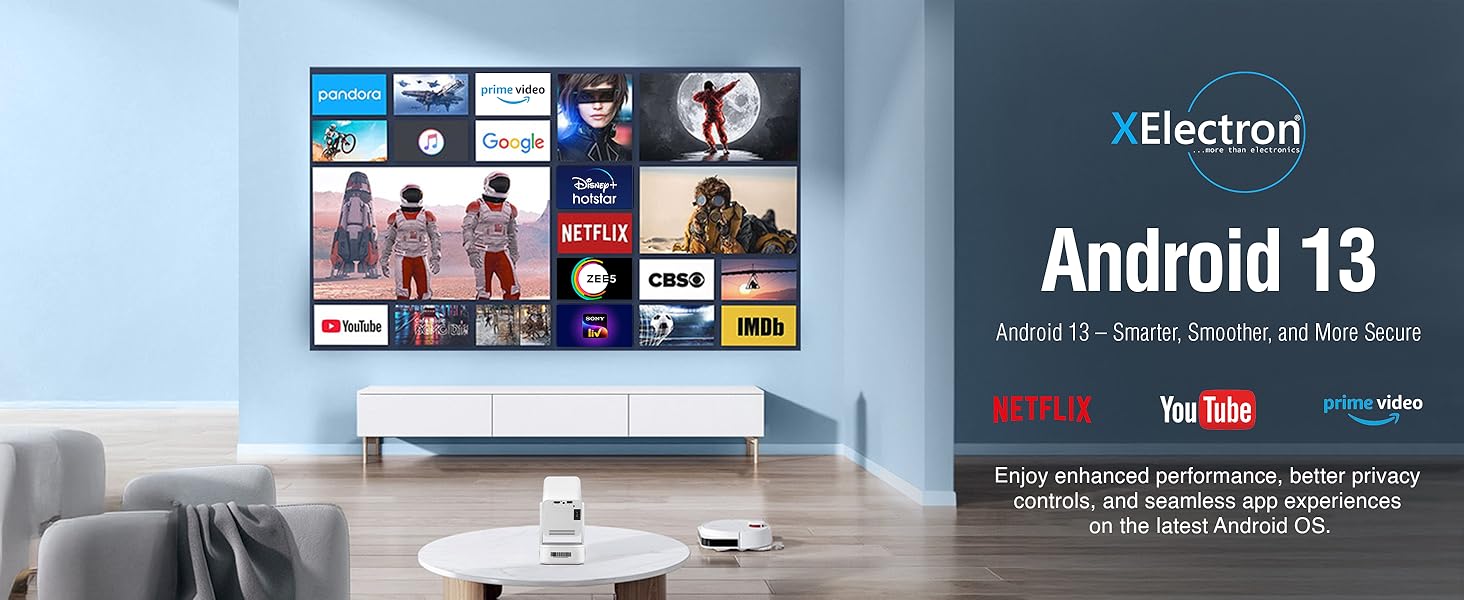
Figure 6.1: The Android 13 interface offers a smart, smooth, and secure experience with pre-installed apps like Netflix, YouTube, and Prime Video.
6.2 Network Connectivity (WiFi 6)
ഒരു വയർലെസ് നെറ്റ്വർക്കിലേക്ക് കണക്റ്റുചെയ്യാൻ:
- പോകുക ക്രമീകരണങ്ങൾ on the projector's home screen.
- തിരഞ്ഞെടുക്കുക നെറ്റ്വർക്കും ഇൻ്റർനെറ്റും.
- ഓൺ ചെയ്യുക വൈഫൈ ലിസ്റ്റിൽ നിന്ന് നിങ്ങൾക്ക് ആവശ്യമുള്ള നെറ്റ്വർക്ക് തിരഞ്ഞെടുക്കുക.
- ആവശ്യപ്പെടുകയാണെങ്കിൽ പാസ്വേഡ് നൽകി കണക്റ്റുചെയ്യുക.
The dual-band 2.4/5G WiFi 6 ensures reduced latency and enhanced responsiveness for streaming and online applications.
6.3 Bluetooth 5.0 Audio
The projector supports two-way Bluetooth 5.0, allowing connection to external speakers, headphones, or soundbars for enhanced audio. It can also function as a standalone Bluetooth speaker.

Figure 6.2: Two-way Bluetooth 5.0 allows seamless connection to various audio devices, enhancing the sound experience.
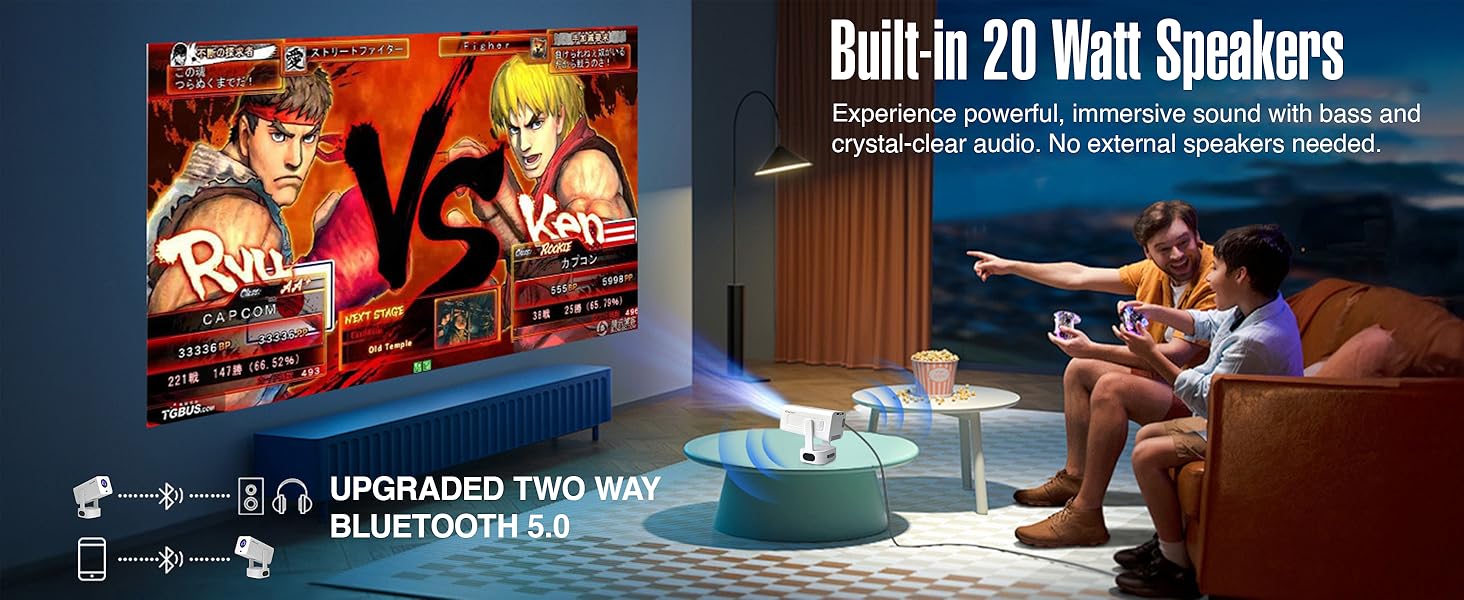
Figure 6.3: The projector features built-in 20-watt speakers for powerful, immersive sound, and supports upgraded two-way Bluetooth 5.0 for external audio.
6.4 Screen Mirroring (Miracast)
The projector supports Miracast for wireless screen mirroring from compatible devices. Refer to your device's instructions for initiating screen mirroring and select the projector from the available devices.
6.5 ബാഹ്യ ഉപകരണങ്ങൾ ബന്ധിപ്പിക്കുന്നു
Use the HDMI and USB ports to connect external devices such as laptops, gaming consoles, USB drives, or other media players.
- എച്ച്ഡിഎംഐ: Connect an HDMI cable from your device to the projector's HDMI port. Select the HDMI input source from the projector's menu.
- USB: Insert a USB drive into the USB port. The projector's media player will typically detect the drive, allowing you to browse and play media files.
6.6 ചിത്ര നിലവാരം
The projector delivers native 1080P resolution with 4K support, 3X brightness, and a 5000:1 contrast ratio for vivid and detailed projections.
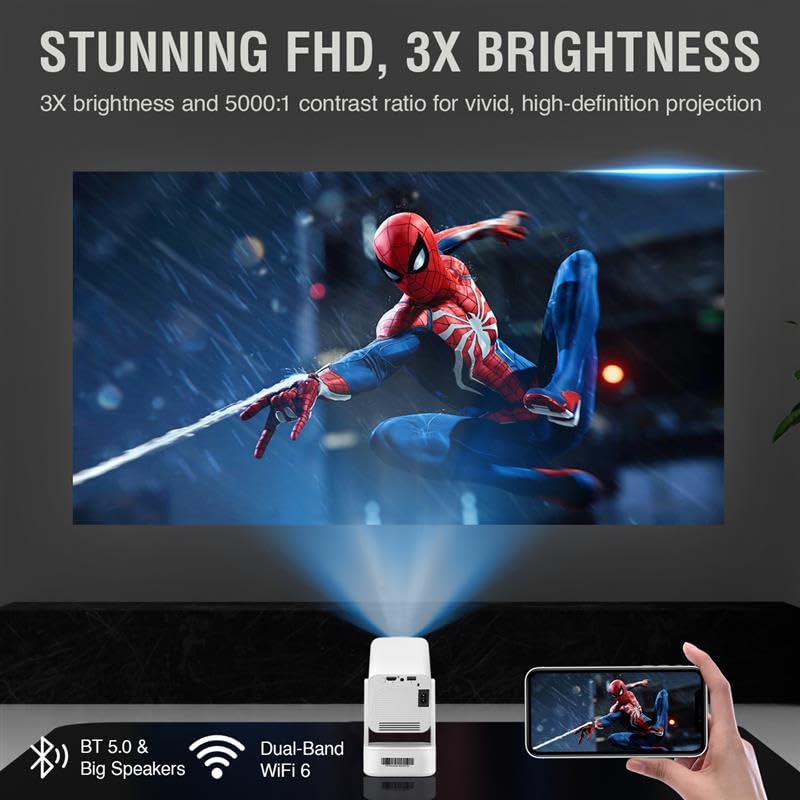
Figure 6.4: The projector provides stunning Full HD visuals with 3X brightness and a 5000:1 contrast ratio for a high-definition projection.

Figure 6.5: Experience excellent Full HD Native 1080P resolution, enhanced with 4K support, for sharper details, vibrant colors, and an ultimate cinematic viewഅനുഭവം.
7. പരിപാലനം
7.1 പ്രൊജക്ടർ വൃത്തിയാക്കൽ
The XElectron Techno Plus M2 features advanced dust-resistant technology to minimize dust accumulation and extend lamp life. However, regular cleaning is recommended.

Figure 7.1: The advanced dust-resistant technology helps prevent black spots and extends the projector's lifespan by 60% compared to non-dust-resistant models.
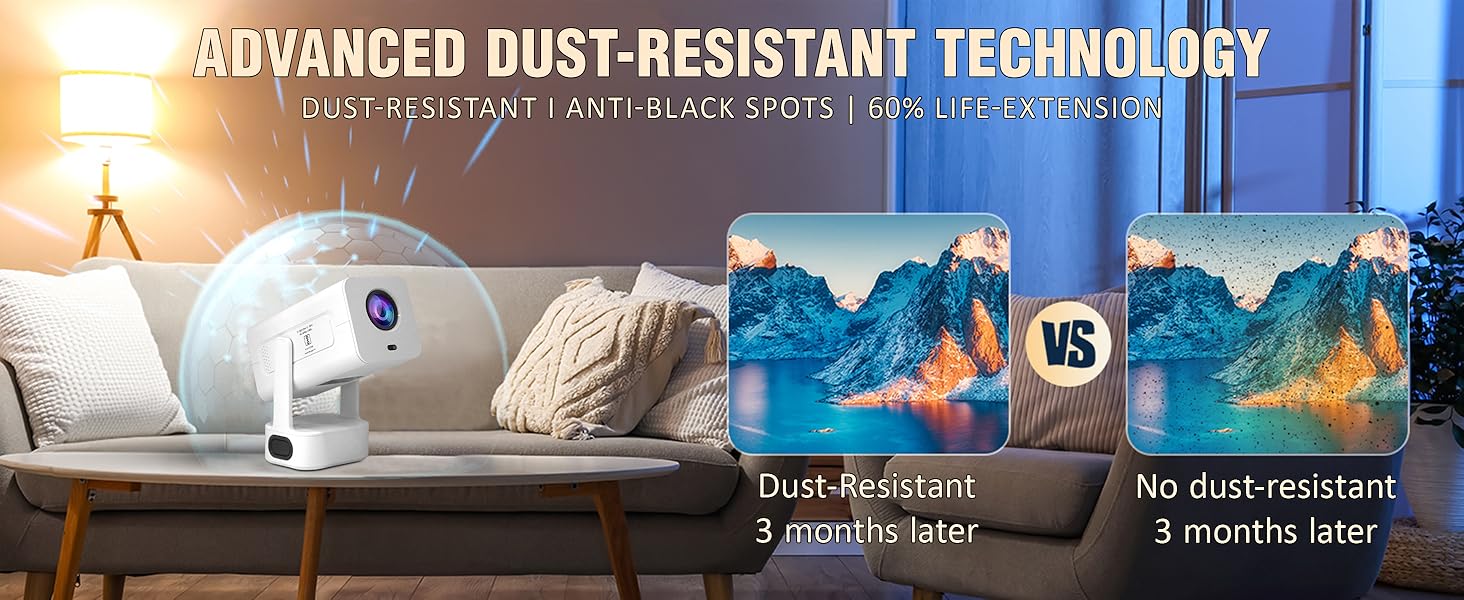
Figure 7.2: The advanced dust-resistant technology ensures a clearer image and longer product life by preventing dust accumulation on internal components.
- ലെൻസ്: ഒപ്റ്റിക്കൽ ലെൻസുകൾക്കായി പ്രത്യേകം രൂപകൽപ്പന ചെയ്ത മൃദുവായ, ലിന്റ് രഹിത തുണി ഉപയോഗിക്കുക. അബ്രാസീവ് ക്ലീനറുകൾ ഉപയോഗിക്കരുത്.
- Casing: മൃദുവായതും ഉണങ്ങിയതുമായ തുണി ഉപയോഗിച്ച് പുറംഭാഗം തുടയ്ക്കുക. കഠിനമായ അടയാളങ്ങൾക്ക്, അല്പം ഡി.amp ഉണങ്ങിയ തുണി ഉപയോഗിച്ച ശേഷം തുടയ്ക്കാം.
- വെന്റിലേഷൻ പോർട്ടുകൾ: Periodically check and gently clean the ventilation ports to ensure unobstructed airflow.
7.2 എൽamp ജീവിതം
എൽഇഡി എൽamp has a lifespan of up to 50,000 hours, providing long-term usage without frequent lamp മാറ്റിസ്ഥാപിക്കൽ.
8. പ്രശ്നപരിഹാരം
നിങ്ങളുടെ പ്രൊജക്ടറിൽ പ്രശ്നങ്ങൾ നേരിടുകയാണെങ്കിൽ, ഇനിപ്പറയുന്ന പൊതുവായ പ്രശ്നങ്ങളും പരിഹാരങ്ങളും പരിശോധിക്കുക:
| പ്രശ്നം | സാധ്യമായ കാരണം | പരിഹാരം |
|---|---|---|
| സ്ക്രീനിൽ ചിത്രമൊന്നുമില്ല | പവർ കണക്ട് ചെയ്തിട്ടില്ല, ഇൻപുട്ട് സോഴ്സ് തെറ്റാണ്, ലെൻസ് ക്യാപ്പ് ഓണാണ്. | Check power connection, select correct input source (HDMI/USB), remove lens cap. |
| Image blurry or distorted | Focus or keystone not adjusted. | Allow auto-focus/auto-keystone to complete. Manually adjust if needed via settings. |
| ശബ്ദമില്ല | Volume too low, external audio device not connected/paired, incorrect audio output selected. | Increase volume. Check Bluetooth connection for external speakers. Ensure internal speakers are selected or external device is properly connected. |
| Projector unresponsive/freezes | Software issue, unsupported media file. | Restart the projector. If playing media from USB, ensure file format is supported. Wait for a few moments if it's processing an unsupported file. |
| റിമോട്ട് കൺട്രോൾ പ്രവർത്തിക്കുന്നില്ല | Batteries low/dead, obstruction, remote not paired. | Replace batteries. Ensure no obstruction between remote and projector. Re-pair if necessary. |
9 സ്പെസിഫിക്കേഷനുകൾ
Detailed technical specifications for the XElectron Techno Plus M2 Projector:
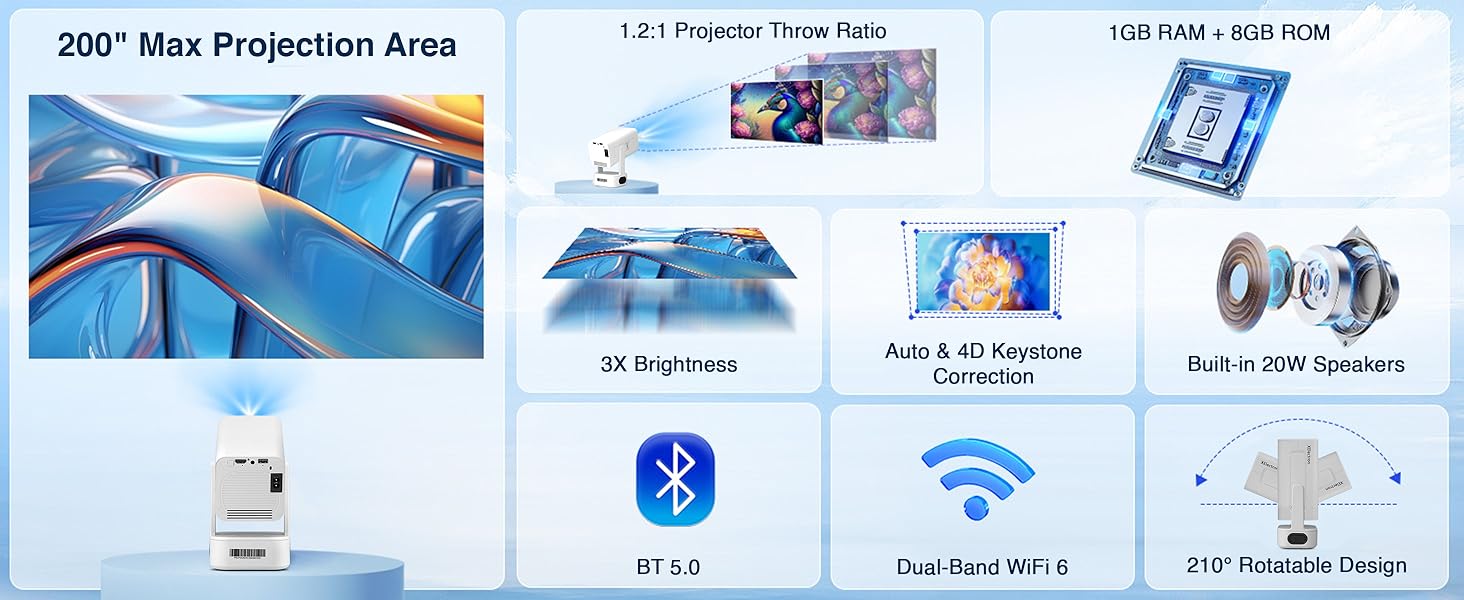
Figure 9.1: Key specifications of the XElectron Techno Plus M2 Projector, including 200" max projection, 1GB RAM + 8GB ROM, 3X brightness, auto & 4D keystone, 20W speakers, BT 5.0, WiFi 6, and 210° rotatable design.
| ഫീച്ചർ | സ്പെസിഫിക്കേഷൻ |
|---|---|
| ബ്രാൻഡ് | എക്സ് ഇലക്ട്രോൺ |
| മോഡൽ | M2 (Techno Plus Series) |
| നേറ്റീവ് റെസല്യൂഷൻ | 1920 x 1080 (പൂർണ്ണ HD) |
| പിന്തുണയുള്ള റെസല്യൂഷൻ | 3840 x 2160 (4K) വരെ |
| കോൺട്രാസ്റ്റ് റേഷ്യോ | 5000:1 |
| ഓപ്പറേറ്റിംഗ് സിസ്റ്റം | ആൻഡ്രോയിഡ് 13 |
| കണക്റ്റിവിറ്റി | Bluetooth 5.0 (Two-way), Miracast, Wi-Fi 6 (Dual-Band 2.4/5G), HDMI, USB, 3.5mm Jack |
| പ്രത്യേക സവിശേഷതകൾ | Auto Focus, Auto Keystone Correction (4D), Built-In Speaker, Dust-Proof, 210° Rotatable Design |
| Lamp ജീവിതം | 50,000 മണിക്കൂർ വരെ |
| ബിൽറ്റ്-ഇൻ സ്പീക്കർ | Yes (20 Watts) |
| അളവുകൾ (LxWxH) | 22 x 19.4 x 11.6 സെ.മീ |
| ഇനത്തിൻ്റെ ഭാരം | 720 ഗ്രാം |
| പവർ ഉറവിടം | AC |
| വാട്ട്tage | 60 വാട്ട്സ് |
10. വാറൻ്റിയും പിന്തുണയും
10.1 വാറൻ്റി വിവരങ്ങൾ
The XElectron Techno Plus M2 Projector comes with a 1 വർഷത്തെ നിർമ്മാതാവിൻ്റെ വാറൻ്റി. Please retain your purchase receipt and warranty card for any claims.
10.2 ഉപഭോക്തൃ പിന്തുണ
For technical assistance, warranty claims, or any other inquiries, please contact XElectron customer support:
- ഫോൺ: 0120-4134583, 8527312304
- പ്രവർത്തന സമയം: Monday to Saturday, 10:30 AM to 6:00 PM


